操作步骤:
1)下载spring framework开发包,给eclipse安装spring开发插件,如何安装开发插件&下载开发包请参考我的博文:《Spring(一):eclipse上安装spring开发插件&下载Spring开发包》
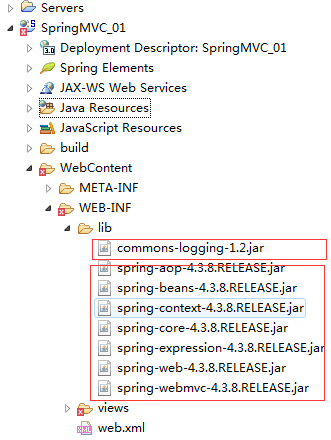
2)使用eclipse创建Dynamic web project,并把spring mvc开发必须包引入,引入commons-logging日志包;
3)修改web.xml配置文件,配置dispatcherServlet;在src下创建一个springmvc.xml配置文件,配置文件内指定扫描包,及配置视图解析器。
/WEB-INF/web.xml配置后:
 1 <?xml version="1.0" encoding="UTF-8"?>
 2 <web-app xmlns:xsi="http://www.w3.org/2001/XMLSchema-instance"
 3     xmlns="http://java.sun.com/xml/ns/javaee"
 4     xsi:schemaLocation="http://java.sun.com/xml/ns/javaee http://java.sun.com/xml/ns/javaee/web-app_3_0.xsd"
 5     id="WebApp_ID" version="3.0">
 6     <display-name>SpringMVC_01</display-name>
 7     <welcome-file-list>
 8         <welcome-file>index.html</welcome-file>
 9         <welcome-file>index.htm</welcome-file>
10         <welcome-file>index.jsp</welcome-file>
11         <welcome-file>default.html</welcome-file>
12         <welcome-file>default.htm</welcome-file>
13         <welcome-file>default.jsp</welcome-file>
14     </welcome-file-list>
15
16     <!-- 因为我这里安装了spring ide 插件,因此可以 alt + / 找到dispatcherServlet -->
17     <!-- The front controller of this Spring Web application, responsible for
18         handling all application requests -->
19     <servlet>
20         <servlet-name>springDispatcherServlet</servlet-name>
21         <servlet-class>org.springframework.web.servlet.DispatcherServlet</servlet-class>
22         <init-param>
23             <param-name>contextConfigLocation</param-name>
24             <param-value>classpath:springmvc.xml</param-value>
25         </init-param>
26         <load-on-startup>1</load-on-startup>
27     </servlet>
28
29     <!-- Map all requests to the DispatcherServlet for handling -->
30     <servlet-mapping>
31         <servlet-name>springDispatcherServlet</servlet-name>
32         <url-pattern>/</url-pattern>
33     </servlet-mapping>
34
35 </web-app>
配置src/springmvc.xml
 1 <?xml version="1.0" encoding="UTF-8"?>
 2 <beans xmlns="http://www.springframework.org/schema/beans"
 3     xmlns:xsi="http://www.w3.org/2001/XMLSchema-instance" xmlns:aop="http://www.springframework.org/schema/aop"
 4     xmlns:context="http://www.springframework.org/schema/context"
 5     xmlns:mvc="http://www.springframework.org/schema/mvc"
 6     xsi:schemaLocation="http://www.springframework.org/schema/beans http://www.springframework.org/schema/beans/spring-beans.xsd
 7         http://www.springframework.org/schema/aop http://www.springframework.org/schema/aop/spring-aop-4.3.xsd
 8         http://www.springframework.org/schema/context http://www.springframework.org/schema/context/spring-context-4.3.xsd
 9         http://www.springframework.org/schema/mvc http://www.springframework.org/schema/mvc/spring-mvc-4.3.xsd">
10     <!-- 配置自定义扫描的包 -->
11     <context:component-scan base-package="com.dx.springlearn"></context:component-scan>
12
13     <!-- 配置视图解析器:如何把handler方法返回值解析为实际的物理视图(路径) -->
14     <bean
15         class="org.springframework.web.servlet.view.InternalResourceViewResolver">
16         <property name="prefix" value="/WEB-INF/views/"></property>
17         <property name="suffix" value=".jsp"></property>
18     </bean>
19 </beans>
4)创建一个springmvc的handlers包,并在包下创建HelloWord.java,并把类注解为Controller;抒写一个hello方法,把该方法注解为一个Action。
 1 package com.dx.springlearn.handlers;
 2
 3 import org.springframework.stereotype.Controller;
 4 import org.springframework.web.bind.annotation.RequestMapping;
 5
 6 @Controller
 7 public class HelloWord {
 8     /**
 9      * 1.使用@RequestMapping注解来映射请求的url
10      * 2.返回值会通过视图解析器解析为实际的物理视图,对于InternalResourceViewResolver视图解析器,
11      *     会做如下解析:通过prefix+returnVal+suffix 拼接出来的实际的物理视图,然后做转化操作。
12      *  prefix:/WEB-INF/views/
13      *  reuturnVal:success
14      *  suffix:.jsp
15      * */
16     // 接收请求的路径http://localhost:8080/hello
17     // 响应返回的视图物理位置:/WEB-INF/views/success.jsp
18     @RequestMapping("/hello")
19     public String hello(){
20         System.out.println("hello word...");
21         return "success";
22     }
23 }
在WebContent目录下创建index.jsp,并添加链接:
<a href="hello">hello action</a>
在WEB-INF/下创建views文件夹,在views文件夹中添加success.jsp页面,页面内添加内容"Success Page ..."
到这里为止,项目完整结构如下:

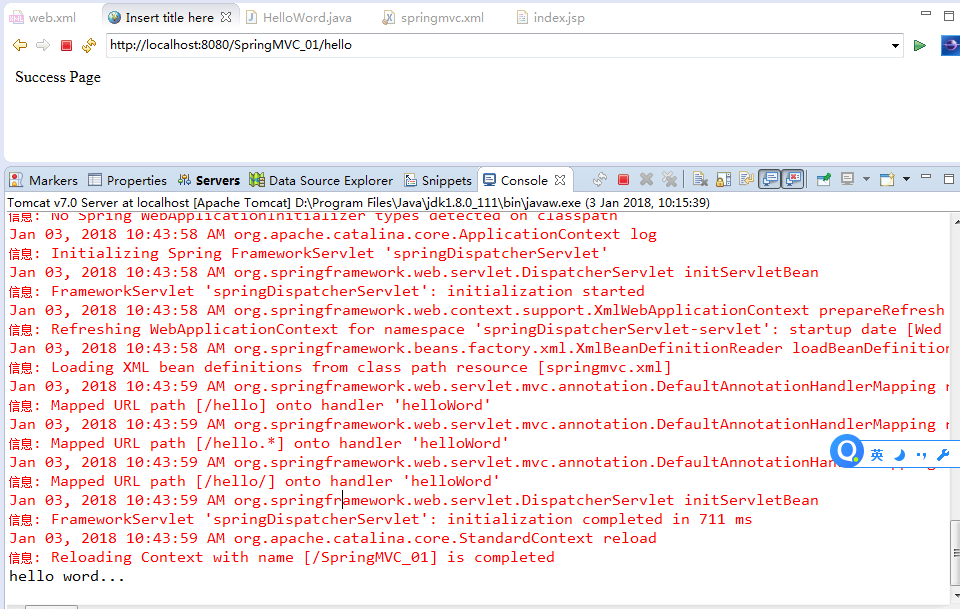
5)运行测试项目是否正常运行。

点击“hello action”链接后:
另外一种配置dispatcherServlet的方式(也是默认配置方式):
1)修改web.xml配置信息:
 1 <?xml version="1.0" encoding="UTF-8"?>
 2 <web-app xmlns:xsi="http://www.w3.org/2001/XMLSchema-instance"
 3     xmlns="http://java.sun.com/xml/ns/javaee"
 4     xsi:schemaLocation="http://java.sun.com/xml/ns/javaee http://java.sun.com/xml/ns/javaee/web-app_3_0.xsd"
 5     id="WebApp_ID" version="3.0">
 6     <display-name>SpringMVC_01</display-name>
 7     <welcome-file-list>
 8         <welcome-file>index.html</welcome-file>
 9         <welcome-file>index.htm</welcome-file>
10         <welcome-file>index.jsp</welcome-file>
11         <welcome-file>default.html</welcome-file>
12         <welcome-file>default.htm</welcome-file>
13         <welcome-file>default.jsp</welcome-file>
14     </welcome-file-list>
15
16     <!-- 因为我这里安装了spring ide 插件,因此可以 alt + / 找到dispatcherServlet -->
17     <!-- The front controller of this Spring Web application, responsible for
18         handling all application requests -->
19     <servlet>
20         <servlet-name>springDispatcherServlet</servlet-name>
21         <servlet-class>org.springframework.web.servlet.DispatcherServlet</servlet-class>
22         <!--
23          <init-param>
24             <param-name>contextConfigLocation</param-name>
25             <param-value>classpath:springmvc.xml</param-value>
26         </init-param>
27         -->
28         <load-on-startup>1</load-on-startup>
29     </servlet>
30
31     <!-- Map all requests to the DispatcherServlet for handling -->
32     <servlet-mapping>
33         <servlet-name>springDispatcherServlet</servlet-name>
34         <url-pattern>/</url-pattern>
35     </servlet-mapping>
36
37 </web-app>
2)把springmvc.xml转移位置到WEB-INF/<servlet-name>-servlet.xml,其中<servlet-name>就是web.xml配置的servlet-name名称。
把springmvc.xml转移到WEB-INF下,并重命名为:springDispatcherServlet-servlet.xml,内容做修改。
修改后项目结构如下:
