在上一篇如何使用ASP.NET Core、EF Core、ABP(ASP.NET Boilerplate)创建分层的Web应用程序(第一部分)我们介绍了第一部分,这一篇是接着上一篇的内容写的。
创建Person实体
添加一个Person实体,用于分配任务:
 [Table("AppPersons")]
   public class Person:AuditedEntity<Guid>
    {
        public const int MaxNameLength = 32;
        [Required]
        [MaxLength(MaxNameLength)]
        public string Name { get; set; }
        public Person()
        {

        }
        public Person(string name)
        {
            Name = name;
        }
    }
这次我设置主键Id的类型为Guid,为了进行演示,Person类继承了AuditedEntity(它具有CreationTime、CreaterUserId、LastModificationTime和LastModifierUserId属性)。
关联Person与Task
向Task实体添加了AssignedPerson属性
  [Table("AppTasks")]
    public class Task : Entity, IHasCreationTime
    {
        public const int MaxTitleLength = 256;
        public const int MaxDescriptionLength = 64 * 1024; //64KB

        [ForeignKey(nameof(AssignedPersonId))]
        public Person AssignedPerson { get; set; }
        public Guid? AssignedPersonId { get; set; }

        [Required]
        [MaxLength(MaxTitleLength)]
        public string Title { get; set; }

        [MaxLength(MaxDescriptionLength)]
        public string Description { get; set; }

        public DateTime CreationTime { get; set; }

        public TaskState State { get; set; }

        public Task()
        {
            CreationTime = Clock.Now;
            State = TaskState.Open;
        }

        public Task(string title, string description = null,Guid? assignedPersonId=null)
            : this()
        {
            Title = title;
            Description = description;
            AssignedPersonId = assignedPersonId;
        }
    }
AssignedPerson是可选的。因此,任务可以分配给一个人,也可以不分配。
添加Person到DbContext
public DbSet<Person> People { get; set; }
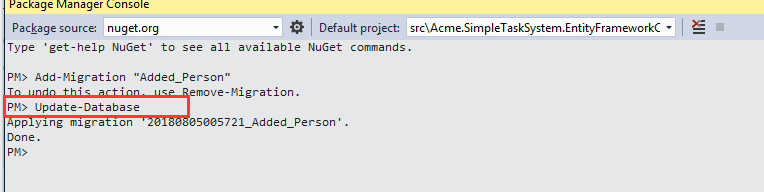
为Person实体添加新的迁移
在包管理器控制台执行以下命令

它在项目中创建了一个新的迁移类
using System;
using Microsoft.EntityFrameworkCore.Migrations;

namespace Acme.SimpleTaskSystem.Migrations
{
    public partial class Added_Person : Migration
    {
        protected override void Up(MigrationBuilder migrationBuilder)
        {
            migrationBuilder.AddColumn<Guid>(
                name: "AssignedPersonId",
                table: "AppTasks",
                nullable: true);

            migrationBuilder.CreateTable(
                name: "AppPersons",
                columns: table => new
                {
                    Id = table.Column<Guid>(nullable: false),
                    CreationTime = table.Column<DateTime>(nullable: false),
                    CreatorUserId = table.Column<long>(nullable: true),
                    LastModificationTime = table.Column<DateTime>(nullable: true),
                    LastModifierUserId = table.Column<long>(nullable: true),
                    Name = table.Column<string>(maxLength: 32, nullable: false)
                },
                constraints: table =>
                {
                    table.PrimaryKey("PK_AppPersons", x => x.Id);
                });

            migrationBuilder.CreateIndex(
                name: "IX_AppTasks_AssignedPersonId",
                table: "AppTasks",
                column: "AssignedPersonId");

            migrationBuilder.AddForeignKey(
                name: "FK_AppTasks_AppPersons_AssignedPersonId",
                table: "AppTasks",
                column: "AssignedPersonId",
                principalTable: "AppPersons",
                principalColumn: "Id",
                onDelete: ReferentialAction.SetNull);
        }

        protected override void Down(MigrationBuilder migrationBuilder)
        {
            migrationBuilder.DropForeignKey(
                name: "FK_AppTasks_AppPersons_AssignedPersonId",
                table: "AppTasks");

            migrationBuilder.DropTable(
                name: "AppPersons");

            migrationBuilder.DropIndex(
                name: "IX_AppTasks_AssignedPersonId",
                table: "AppTasks");

            migrationBuilder.DropColumn(
                name: "AssignedPersonId",
                table: "AppTasks");
        }
    }
}
我仅仅将ReferentialAction.Restrict 改变为ReferentialAction.SetNull.这样的话,当我们删除一个人,那么分配给那个人的任务就会被设置成未分配。这个 在本次教程中并不重要,但是可以说明如果有需要的情况下,我们是可以修改迁移类中的代码的。事实上,我们应该每次都检查一下迁移代码之后再将其应用到数据库。
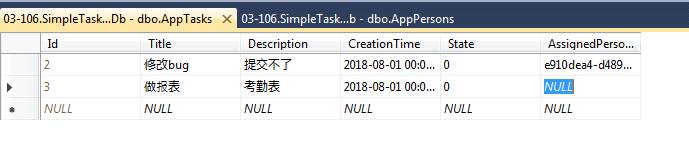
打开数据库可以看到新加的表和列,这里可以加一些测试数据:
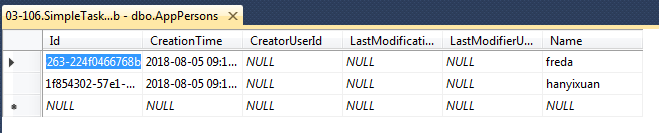
我们将第一个任务分配给第一个人:
在任务列表中返回分配的人员
将TaskAppService更改为返回分配的人员信息。首先,向TaskListDto添加两个属性:
public Guid? AssignedPersonId { get; set; }
public string AssignedPersonName { get; set; }
将Task.AssignedPerson属性添加到查询方法中,只添加Include行:
 public async Task<ListResultDto<TaskListDto>> GetAll(GetAllTasksInput input)
        {
            var tasks = await _taskRepository
                .GetAll()
                .Include(t => t.AssignedPerson)
                .WhereIf(input.State.HasValue, t => t.State == input.State.Value)
                .OrderByDescending(t => t.CreationTime)
                .ToListAsync();

            return new ListResultDto<TaskListDto>(
                ObjectMapper.Map<List<TaskListDto>>(tasks)
            );
        }
这样,GetAll方法将返回分配给任务的人员信息。由于我们使用了AutoMapper,新的属性也将自动复制到DTO。
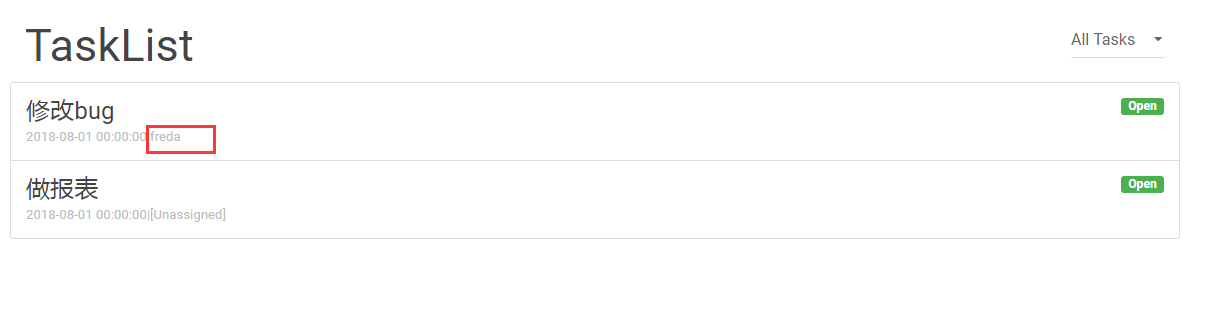
在任务列表页面显示被分配的人员姓名
我们在TasksIndex下可以修改index.cshtml来显示AssignedPersonName:
@foreach (var task in Model.Tasks)
            {
                <li class="list-group-item">
                    <span class="pull-right label @Model.GetTaskLabel(task)">@L($"TaskState_{task.State}")</span>
                    <h4 class="list-group-item-heading">@task.Title</h4>
                    <div class="list-group-item-text">
                        @task.CreationTime.ToString("yyyy-MM-dd HH:mm:ss")|@(task.AssignedPersonName?? L("Unassigned"))
                    </div>
                </li>
            }
运行程序,可以看到被分配的任务会显示人员姓名;
创建任务
前面的内容都是显示任务列表,接下来我们要做一个创建任务的页面。首先在ITaskAppService 接口中增加Create方法;
System.Threading.Tasks.Task Create(CreateTaskInput input);
在TaskAppService 类中实现它:
public async System.Threading.Tasks.Task Create(CreateTaskInput input)
        {
            var task = ObjectMapper.Map<Task>(input);
            await _taskRepository.InsertAsync(task);
        }
创建CreateTaskInput Dto如下所示:
 [AutoMapTo(typeof(Task))]
    public class CreateTaskInput
    {
        [Required]
        [MaxLength(Task.MaxTitleLength)]
        public string Title { get; set; }

        [MaxLength(Task.MaxDescriptionLength)]
        public string Description { get; set; }

        public Guid? AssignedPersonId { get; set; }
    }
配置将其映射到任务实体(使用AutoMapTo属性)并添加数据注释以应用验证,这里的长度和Task实体中的长度一致。
----省略单元测试的内容-----
创建任务页面
首先在TaskController 中添加Create action
   public class TasksController : SimpleTaskSystemControllerBase
    {
        private readonly ITaskAppService _taskAppService;
        private readonly ILookupAppService _lookupAppService;
        public TasksController(ITaskAppService taskAppService, ILookupAppService lookupAppService)
        {
            _taskAppService = taskAppService;
            _lookupAppService = lookupAppService;
        }
        public async Task<ActionResult> Index(GetAllTasksInput input)
        {
            var output = await _taskAppService.GetAll(input);
            var model = new IndexViewModel(output.Items)
            {
                SelectedTaskState = input.State
        };
            return View(model);
        }
        public async Task<ActionResult> Create()
        {
            var peopleSelectListItems = (await _lookupAppService.GetPeopleComboboxItems()).Items
                .Select(p => p.ToSelectListItem())
                .ToList();

            peopleSelectListItems.Insert(0, new SelectListItem { Value = string.Empty, Text = L("Unassigned"), Selected = true });

            return View(new CreateTaskViewModel(peopleSelectListItems));
        }
    }
我注入了ILookupAppService 以获得人员列表,虽然这里可以直接使用IRepository<Person, Guid>,但是这样可以更好的分层和重用,ILookupAppService.GetPeopleComboboxItems 定义在应用层:
public interface ILookupAppService:IApplicationService
    {
        Task<ListResultDto<ComboboxItemDto>> GetPeopleComboboxItems();
    }
public class LookupAppService:SimpleTaskSystemAppServiceBase,ILookupAppService
    {
        private readonly IRepository<Person, Guid> _personRepository;

        public LookupAppService(IRepository<Person, Guid> personRepository)
        {
            _personRepository = personRepository;
        }

        public async Task<ListResultDto<ComboboxItemDto>> GetPeopleComboboxItems()
        {
            var people = await _personRepository.GetAllListAsync();
            return new ListResultDto<ComboboxItemDto>(
                people.Select(p => new ComboboxItemDto(p.Id.ToString("D"), p.Name)).ToList()
            );
        }
    }
ComboboxItemDto是一个简单的类(在ABP中定义),用于传输combobox项数据。TaskController.Create用这个方法将返回的List转换成SelectListItem列表(在AspNet .Core中定义),并通过CreateTaskViewModel传递到视图:
 public class CreateTaskViewModel
    {
        public List<SelectListItem> People { get; set; }

        public CreateTaskViewModel(List<SelectListItem> people)
        {
            People = people;
        }
    }
创建视图代码如下:
@model Acme.SimpleTaskSystem.Web.CreateTaskViewModel

@section scripts
{
    <environment names="Development">
        <script src="~/js/views/tasks/create.js"></script>
    </environment>

    <environment names="Staging,Production">
        <script src="~/js/views/tasks/create.min.js"></script>
    </environment>
}

<h2>
    @L("NewTask")
</h2>

<form id="TaskCreationForm">

    <div class="form-group">
        <label for="Title">@L("Title")</label>
        <input type="text" name="Title" class="form-control" placeholder="@L("Title")" required maxlength="@Acme.SimpleTaskSystem.Task.MaxTitleLength">
    </div>

    <div class="form-group">
        <label for="Description">@L("Description")</label>
        <input type="text" name="Description" class="form-control" placeholder="@L("Description")" maxlength="@Acme.SimpleTaskSystem.Task.MaxDescriptionLength">
    </div>

    <div class="form-group">
        @Html.Label(L("AssignedPerson"))
        @Html.DropDownList(
            "AssignedPersonId",
            Model.People,
            new
            {
                @class = "form-control",
                id = "AssignedPersonCombobox"
            })
    </div>

    <button type="submit" class="btn btn-default">@L("Save")</button>

</form>
创建 create.js如下:
(function ($) {
    $(function () {

        var _$form = $('#TaskCreationForm');

        _$form.find('input:first').focus();

        _$form.validate();

        _$form.find('button[type=submit]')
            .click(function (e) {
                e.preventDefault();

                if (!_$form.valid()) {
                    return;
                }

                var input = _$form.serializeFormToObject();
                abp.services.app.task.create(input)
                    .done(function () {
                        location.href = '/Tasks';
                    });
            });
    });
})(jQuery);
create.js做了如下事情:
- 为表单准备验证(使用jquery验证插件),并在Save按钮的单击时验证它
- 使用serializeFormToObject jquery插件(在jquery扩展中定义)。将表单数据转换为JSON对象,(Layout.cshtml中引入了 jquery-extensions.js)。
- 用 abp.services.task.create方法去调用TaskAppService.Create方法。这是ABP中的一个重要的特性,我们可以在JavaScript中调用应用程序服务方法,就像调用JavaScript方法一样
最后在任务列表中增加“Add Task”按钮以作为增加任务的入口:
<a class="btn btn-primary btn-sm" asp-action="Create">@L("AddNew")</a>
运行程序到创建任务页面,可以看到页面如下所示:
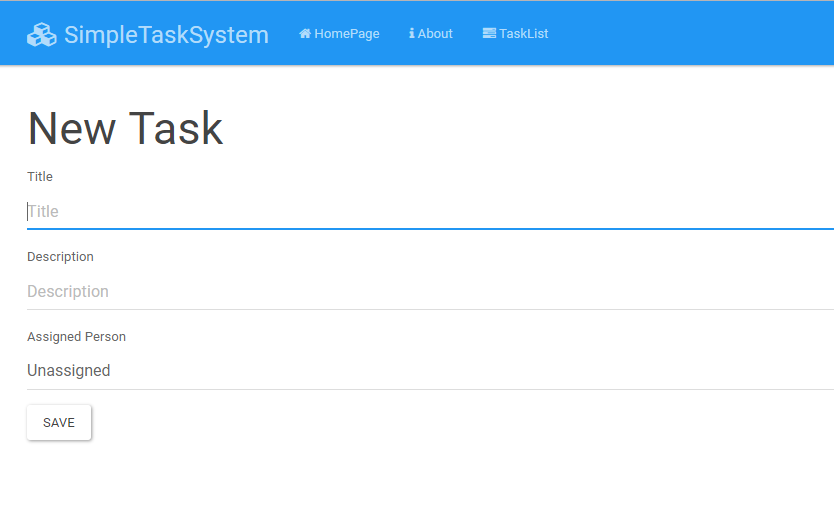
到这我们就可以填写信息点击Save按钮保存即可哦。
注:如果不需要Home或者About的直接去掉就可以,ABP框架很灵活,就根据自己的需求修改就ok了。