CCS选择器的作用是找出某类元素。以便使我们使用style元素或者外部样式表对这类元素设置样式。
1.使用CSS基本选择器
有些选择器使用起来非常简单,我们把这部分选择器称为基本选择器(basic selector)。开发人员可使用这类选择器在文档中进行比较宽泛的选择,也可以将其看作结合多种选择器进行特殊选择的基础。
1.1 选择所有元素
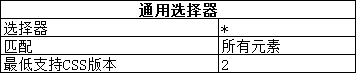
通用选择器匹配文档中的所有元素。它是最基本的选择器,不过使用很少,因为匹配过于广泛。
下面代码是一个使用通用选择器的样式示例:
<!DOCTYPE html>
<html lang="en">
<head>
    <meta charset="UTF-8">
    <title>CSS</title>
    <style type="text/css">
        *{border:thin black solid;padding:4px;}
    </style>
</head>
<body>
<a href="http://yexiaochao.github.io">Visit the website</a>
<p>I like <span>apples</span> and oranges.</p>
<a href="http://w3c.org">Visit the W3C website</a>
</body>
</html>
代码中定义的样式将选中的元素以细黑框包起,该选择器的显示效果如下:
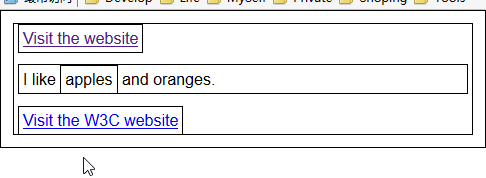
上图开起来有点奇怪,因为通用选择器会匹配文档中的所有元素,包括html 和body 元素。通用选择器非常给力,但容易过头儿,因此使用之前请三思。
1.2 根据元素类型选择元素
指定元素类型作为选择器可以选取一个文档中该元素的所有实例(例如,如果想选中所有的a元素就可以使用a作为选择器)。

<!DOCTYPE html>
<html lang="en">
<head>
    <meta charset="UTF-8">
    <title>CSS</title>
    <style type="text/css">
        a {border:thin black solid;padding:4px;}
    </style>
</head>
<body>
<a href="http://yexiaochao.github.io">Visit the website</a>
<p>I like <span>apples</span> and oranges.</p>
<a href="http://w3c.org">Visit the W3C website</a>
</body>
</html>
PS:只需将元素类型用逗号分开即可将某个样式应用到多个元素类型。
1.3 根据类选择元素
类选择器采用全局属性 class 匹配指定类的元素。
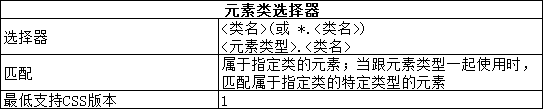
<!DOCTYPE html>
<html lang="en">
<head>
    <meta charset="UTF-8">
    <title>CSS</title>
    <style type="text/css">
        .class2 {border:thin black solid;padding:4px;}
    </style>
</head>
<body>
<a class="class1 class2" href="http://yexiaochao.github.io">Visit the website</a>
<p>I like <span class="class2">apples</span> and oranges.</p>
<a href="http://w3c.org">Visit the W3C website</a>
</body>
</html>
此例使用了选择器 .class2 。使用该选择器的效果是选中指定 class2 的所有类型的元素。
这个选择器有两种表示形式:一种是使用通用选择器,另一种是不使用。 *.class2 和 .class2 是等价的。第一种形式看起来更容易理解,但实际使用中第二个更常见。这种模式在CSS选择器中很常见。
如果逐个添加合适的选择器,你会发现所有选择器无非都是有效的过滤器:缩小前面的选择器的范围,匹配更少元素。这些选择器相互组合能够产生具体程度更高的匹配。
上面代码中指定 class2 的元素有两个: a 元素和 span 元素。效果图如下:
此处选择器的具体程度还可以更高,将与指定类匹配的元素限定为一种类型。要实现这个效果,将通用选择器替换为元素类型就可以了,如下面代码所示:
<!DOCTYPE html>
<html lang="en">
<head>
    <meta charset="UTF-8">
    <title>CSS</title>
    <style type="text/css">
        span.class2 {border:thin black solid;padding:4px;}
    </style>
</head>
<body>
<a class="class1 class2" href="http://yexiaochao.github.io">Visit the website</a>
<p>I like <span class="class2">apples</span> and oranges.</p>
<a href="http://w3c.org">Visit the W3C website</a>
</body>
</html>
在这个例子中进一步缩小了选择器的范围,使它只匹配指定 class2的 span元素。效果图如下:

PS:如果想选择属于多个类的元素,可指定类名(不同类名之间用据点隔开)。例如, span.class1.class2 会选择同时指定 class1 和 class2 的元素。
1.4 根据ID选择元素
使用ID选择器可根据全局属性 id的值选择元素。

HTML文档中元素id属性的值必须唯一。这意味着只要使用ID选择器,查找的必定是单个元素。下面是一个示例:
<!DOCTYPE html>
<html lang="en">
<head>
    <meta charset="UTF-8">
    <title>CSS</title>
    <style type="text/css">
        #w3canchor {border:thin black solid;padding:4px;}
    </style>
</head>
<body>
<a id="yexiaochaoanchor" class="class1 class2" href="http://yexiaochao.github.io">Visit the website</a>
<p>I like <span class="class2">apples</span> and oranges.</p>
<a id="w3canchor" href="http://w3c.org">Visit the W3C website</a>
</body>
</html>
这个例子用选中了id为w3canchor的元素,效果图如下所示:

从这个示例来看,如果想为单个元素应用样式,使用元素的style属性可以达到同样的效果。确实,不过只有跟其他选择器组合使用,后一个选择器才能真正排上用场。
1.5 根据属性选择器选择元素
使用属性选择器能基于属性的不同方面匹配属性。

此处使用通用选择器可以匹配具有符合指定条件属性的所有元素(或指定类型的所有元素),不过,更常见的用法是不用通用选择器,而将选中条件放到[和]字符之间。下面代码展示了一个常用的属性选择器。
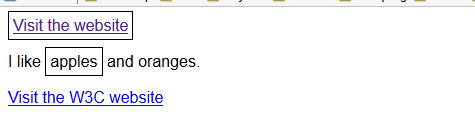
<!DOCTYPE html>
<html lang="en">
<head>
    <meta charset="UTF-8">
    <title>CSS</title>
    <style type="text/css">
        [href] {border:thin black solid;padding:4px;}
    </style>
</head>
<body>
<a id="yexiaochaoanchor" class="class1 class2" href="http://yexiaochao.github.io">Visit the website</a>
<p>I like <span class="class2">apples</span> and oranges.</p>
<a id="w3canchor" href="http://w3c.org">Visit the W3C website</a>
</body>
</html>
此例使用了最简单的属性选择器,它匹配的是所有具有 href 属性的元素,而不管属性的具体填的是什么。在示例HTML文档中,该选择器的选择效果是选中两个a 元素。

可以为待匹配的属性限定更多复杂的条件,下面列出了属性选择器支持的条件:

这里你补充说明一下最后两个条件。处理支持多个值且不同的值用空格分割的属性会用到~=条件,如全局属性 class。 来个例子如下:
<!DOCTYPE html>
<html lang="en">
<head>
    <meta charset="UTF-8">
    <title>CSS</title>
    <style type="text/css">
        [class~="class2"] {border:thin black solid;padding:4px;}
    </style>
</head>
<body>
<a id="yexiaochaoanchor" class="class1 class2" href="http://yexiaochao.github.io">Visit the website</a>
<p>I like <span class="class2">apples</span> and oranges.</p>
<a id="w3canchor" href="http://w3c.org">Visit the W3C website</a>
</body>
</html>
代码中使用了 class 全局属性,因为这是目前唯一一个可以接受多个值得属性。不过,要匹配class值无需使用属性选择器,类选择器会自动处理多个类成员。
上面这个选择器使用的条件是:匹配定义class属性,且class的值包括class2的元素。这个选择器的效果如下图所示:

若是一个属性值中包括多条用连字符分割的信息,这时就要用到|=条件, lang全局属性就是一个很好的例子。 lang属性可以跟包括区域子标记的言语说明符一起使用,例如,en-us 代表美国英语,en-gb 代表英国英语。下面代码展示了如何选中所有标记为en的元素,而无需枚举不同的区域(实际上还挺多)。
<!DOCTYPE html>
<html lang="en">
<head>
    <meta charset="UTF-8">
    <title>CSS</title>
    <style type="text/css">
       [lang|="en"] {border:thin black solid;padding:4px;}
    </style>
</head>
<body>
<a lang="en-us" id="yexiaochaoanchor" class="class1 class2" href="http://yexiaochao.github.io">Visit the website</a>
<p>I like <span lang="en-gb" class="class2">apples</span> and oranges.</p>
<a lang="en" id="w3canchor" href="http://w3c.org">Visit the W3C website</a>
</body>
</html>
该选择器的效果如下图所示。注意选择器除了匹配带有子标记的元素,也匹配了第二个a元素,这个a元素并没有区域子标记(也就是lang元素的值是en,而不是en-us或en-gb)。

2. 符合选择器
组合使用不同的选择器可以匹配更特定的元素。有的符合选择器能将目标样式应用到更多元素,有的符合选择器则会锁定更少的元素,总之会选择非常具体。
2.1 并集选择器
创建由逗号分隔的多个选择器可以将样式应用到单个选择器匹配的所有元素。

<!DOCTYPE html>
<html lang="en">
<head>
    <meta charset="UTF-8">
    <title>CSS</title>
    <style type="text/css">
       a,[lang|="en"] {border:thin black solid;padding:4px;}
    </style>
</head>
<body>
<a id="yexiaochaoanchor" class="class1 class2" href="http://yexiaochao.github.io">Visit the website</a>
<p>I like <span lang="en-uk" class="class2">apples</span> and oranges.</p>
<a id="w3canchor" href="http://w3c.org">Visit the W3C website</a>
</body>
</html>
在代码清单中,指定了一个类型选择器(a)和一个属性选择器([lang|="en"]),两者之间用逗号隔开(a,[lang|="en"])。浏览器会以此求每个选择器的值,然后将样式应用到匹配元素。你可以选择任意混搭不同类型的选择器,不要求它们匹配的元素有什么共性。效果图如下:

可以根据自己的需要组合任意多个选择器,只需将不同的选择器之间用逗号分开即可。
2.2 后代选择器
后代选择器用于选择包含在其他元素中的元素。

先应用第一个选择器,再从匹配元素的后代中找出匹配第二个选择器的元素。后代选择器会匹配任意包含在匹配第一个选择器的元素中的元素,而不仅是直接子元素。简单例子如下:
<!DOCTYPE html>
<html lang="en">
<head>
    <meta charset="UTF-8">
    <title>CSS</title>
    <style type="text/css">
       p span {border:thin black solid;padding:4px;}
    </style>
</head>
<body>
<a id="yexiaochaoanchor" class="class1 class2" href="http://yexiaochao.github.io">Visit the website</a>
<p>I like <span lang="en-uk" class="class2">apples</span> and oranges.</p>
<a id="w3canchor" href="http://w3c.org">Visit the W3C website</a>
</body>
</html>

代码中的选择器匹配 p 元素的后代 span 元素。对于这个示例中的HTML文档,直接用 span 元素选择器能得到同样的效果,不过这里的方法更灵活,看一下下面代码:
<!DOCTYPE html>
<html lang="en">
<head>
    <meta charset="UTF-8">
    <title>CSS</title>
    <style type="text/css">
       #mytable td{border:thin black solid;padding:4px;}
    </style>
</head>
<body>
<table id="mytable">
    <tr><th>Name</th><th>City</th></tr>
    <tr><td>Adam Freeman</td><td>London</td></tr>
    <tr><td>Joe Smith</td><td>New York</td></tr>
    <tr><td>Anne Jones</td><td>Paris</td></tr>
</table>
<p>I like <span lang="en-uk">apples</span> and oranges.</p>

<table id="othertable">
    <tr><th>Name</th><th>City</th></tr>
    <tr><td>Peter Peterson</td><td>Boston</td></tr>
    <tr><td>Chuck Fellows</td><td>Paris</td></tr>
    <tr><td>Jane Firth</td><td>Paris</td></tr>
</table>
</body>
</html>
在代码中,定义了两个简单的表格,每个表格定义了一个id属性。使用ID选择器选中id值为mytable的表格,然后选中表格包含的td元素。效果图如下:

这个例子中选择的不是直接后代,跳过了tr元素,直接匹配td元素。
2.3 选择子元素
子代选择器跟后代选择器很像,不过只选择匹配元素中的直接后代。

<!DOCTYPE html>
<html lang="en">
<head>
    <meta charset="UTF-8">
    <title>CSS</title>
    <style type="text/css">
      body > * > span, tr > th {border:thin black solid;padding:4px;}
    </style>
</head>
<body>
<table id="mytable">
    <tr><th>Name</th><th>City</th></tr>
    <tr><td>Adam Freeman</td><td>London</td></tr>
    <tr><td>Joe Smith</td><td>New York</td></tr>
    <tr><td>Anne Jones</td><td>Paris</td></tr>
</table>
<p>I like <span lang="en-uk">apples</span> and oranges.</p>

<table id="othertable">
    <tr><th>Name</th><th>City</th></tr>
    <tr><td>Peter Peterson</td><td>Boston</td></tr>
    <tr><td>Chuck Fellows</td><td>Paris</td></tr>
    <tr><td>Jane Firth</td><td>Paris</td></tr>
</table>
</body>
</html>
在这个选择器中,创建了一个子选择器的并集选择器。首先找到属于body元素任意子元素的子元素的span,然后找到tr元素的子元素th,从下图中可以看到有哪些元素匹配这个选择器:

2.4 选择兄弟元素
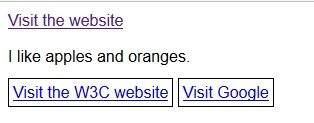
使用相邻兄弟选择器可以选择紧跟在某元素之后的元素。

<!DOCTYPE html>
<html lang="en">
<head>
    <meta charset="UTF-8">
    <title>CSS</title>
    <style type="text/css">
       p + a {border:thin black solid;padding:4px;}
    </style>
</head>
<body>
<a class="class1 class2" href="http://yexiaochao.github.io">Visit the website</a>
<p>I like <span lang="en-uk" class="class2">apples</span> and oranges.</p>
<a href="http://w3c.org">Visit the W3C website</a>
<a href="http://googel.com">Visit Google</a>
</body>
</html>
代码中的选择器会匹配紧跟在p元素之后的a元素。从下图可以看到,文档中只有一个a元素符合要求,即指向W3C网站的超链接。

使用普通兄弟选择器选择范围会稍微宽松一些,它匹配的元素在指定元素之后,但不一定相邻。

<!DOCTYPE html>
<html lang="en">
<head>
    <meta charset="UTF-8">
    <title>CSS</title>
    <style type="text/css">
       p ~ a {border:thin black solid;padding:4px;}
    </style>
</head>
<body>
<a class="class1 class2" href="http://yexiaochao.github.io">Visit the website</a>
<p>I like <span lang="en-uk" class="class2">apples</span> and oranges.</p>
<a href="http://w3c.org">Visit the W3C website</a>
<a href="http://googel.com">Visit Google</a>
</body>
</html>
3. 使用伪元素选择器
CSS中还定义了伪选择器(pseudo-selector),它们提供了更复杂的功能,但并非直接对应HTML文档定义的元素。伪选择器分两种:伪元素和伪类。 顾名思义,伪元素实际上并不存在,它们是CSS提供的额外“福利”,为了方便你选择文档内容。
3.1 使用::first-line 选择器
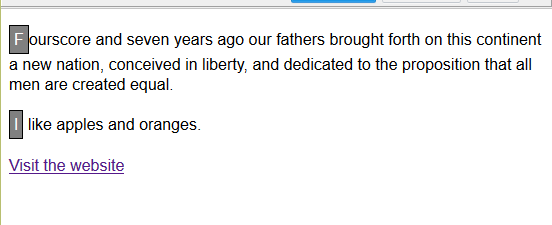
::first-line 选择器匹配文本块的首行。

<!DOCTYPE html>
<html lang="en">
<head>
    <meta charset="UTF-8">
    <title>CSS</title>
    <style type="text/css">
       ::first-line {background-color: gray; color:white;}
    </style>
</head>
<body>
<p>Fourscore and seven years ago our fathers brought forth
    on this continent a new nation, conceived in liberty, and
    dedicated to the proposition that all men are created equal.</p>

<p>I like <span>apples</span> and oranges.</p>

<a href="http://yexiaochao.github.io">Visit the website</a>
</body>
</html>
这个示例中只是用了这一个选择器,不过伪元素选择器也可以作为修饰符跟其他选择器一块儿使用。假如,假设我想选中p元素的首行,就可以指定p::first-line 作为选择器。
PS:伪元素选择器的前缀是两个冒号字符(::),但浏览器认为选择器只有一个冒号(也就是说将:first-line 看作 :first-line)。这样它的格式就跟伪类选择器的格式一致了,这是为了向后兼容。
上面的代码效果中,如果浏览器窗口调整大小,浏览器会重新评估那些内容属于文档的首行。这就意味着首行样式总是可以成功应用的。
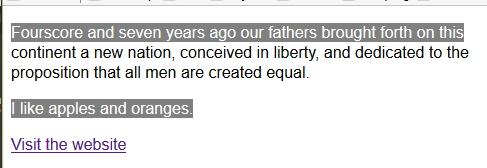

3.2 使用 ::first-letter 选择器

<!DOCTYPE html>
<html lang="en">
<head>
    <meta charset="UTF-8">
    <title>CSS</title>
    <style type="text/css">
       ::first-letter {background-color: gray; color:white;border: thin black solid; padding: 4px;}
    </style>
</head>
<body>
<p>Fourscore and seven years ago our fathers brought forth
    on this continent a new nation, conceived in liberty, and
    dedicated to the proposition that all men are created equal.</p>

<p>I like <span>apples</span> and oranges.</p>

<a href="http://yexiaochao.github.io">Visit the website</a>
</body>
</html>
3.3 使用:before 和 :after 选择器
这两个选择器跟之前的选择器不太一样,因为它们会生成内容,并将其插入文档。

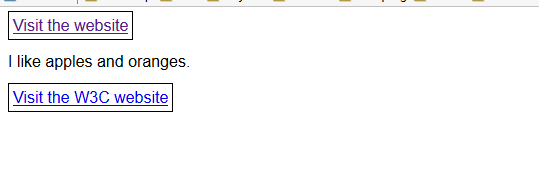
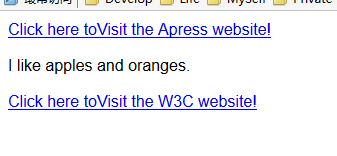
<!DOCTYPE html>
<html lang="en">
<head>
    <meta charset="UTF-8">
    <title>CSS</title>
    <style type="text/css">
       a:before {content:"Click here to"}
       a:after{content:"!"}
    </style>
</head>
<body>
<a href="http;//apress.com">Visit the Apress website</a>
<p>I like <span>apples</span> and oranges.</p>
<a href="http://w3c.org">Visit the W3C website</a>
</body>
</html>
在此示例中,选中了a元素,对它使用了 :before和:after为选择器。使用这类选择器的时候,通过设置content属性的值可以指定要插入的内容。这个属性比较特别,只能跟伪选择器一起使用。在上述代码中,Click here to 会插入a元素的内容前,感叹号会插入a元素的内容之后。效果图如下:
3.4 使用CSS计数器
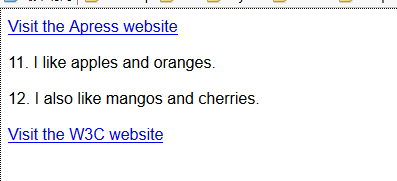
:before 和 :after 选择器经常跟CSS计数器特性一起使用,结合两者可生成数值内容。
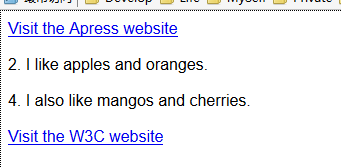
<!DOCTYPE html>
<html lang="en">
<head>
    <meta charset="UTF-8">
    <title>CSS</title>
    <style type="text/css">
        body{counter-reset: paracount;}
        p:before{content:counter(paracount) ". "; counter-increment: paracount;}
    </style>
</head>
<body>
<a href="http;//apress.com">Visit the Apress website</a>
<p>I like <span>apples</span> and oranges.</p>
<p>I also like <span>mangos</span> and cherries.</p>
<a href="http://w3c.org">Visit the W3C website</a>
</body>
</html>
此例效果图如下:

要创建计数器,需要使用专门的counter-reset属性为计数器设置名称:
counter-reset: paracount;
这一行代码会初始化名为 paracount 的计数器,将它的值设置为1.也可以指定其他初始值,只要在计数器名称后面添加一个数字即可:
counter-reset: paracount 10;
效果图:
如果想多定义几个计数器,只需在同一条counter-reset声明中添加计数器名称就可以了(也可以带上初始值),像这样:
counter-reset: paracount 10 othercounter;
这条声明创建了两个计数器:一个名为paracount,初始值为10;另一个名为othercounter,初始值为1。计数器初始化后就能作为content属性的值,跟:before和:after选择器一起使用来指定样式了,像这样:
content:counter(paracount) ".";
这条声明用在包括:before的选择器中,其效果是将当前计数器的值呈现在选择器匹配的所有元素之前,此处,还要在相应的值后面追加一个句点和空格。计数器的值默认表示为十进制数(1、2、3等) ,不过,也可以指定其他数值格式,像这样:
content:counter(paracount, lower-alpha) ". ";
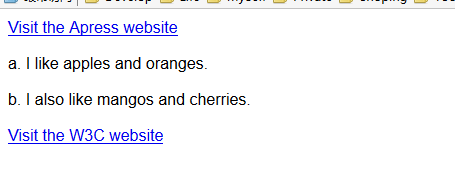
此处对计数器添加了参数lower-alpha,其功能是指定数值样式。这个参数可以是list-style-type属性支持的任意值。
counter-increment 属性专门用来设置计数器增量,该属性的值是要增加计数的计数器的名称,像这样:
counter-increment: paracount;
计数器默认增量为1,当然也可以自行指定其他增量,像这样:
counter-increment: paracount 2;
效果图: