[教程]GNUstep Gorm第一个视窗程序,第一个图形界面,第一个helloworld gui
GNUstep是苹果系统下开发语言Objective-C在windows或linux下进行开发的一种平台,为我们这些暂时没有苹果电脑,却想要学习的人提供了方便,但是毕竟是不同,没有太多教程,靠我们自己摸索了.
网上倒是有许多关于GNUstep的第一个helloworld,但是是命令行的,图形界面,第一个视窗程序也有,在一个页面的GNUstep教程,是英文的,也有对应的繁体版本,在GNUstep 入門(官方的吧),但是非常难懂,我看了许久才明白是怎么回事,其实很简单,但是除了这个,网上就没有对应的gui helloworld的教程了,我就在这里发一个!
前提:你必须安装 GNUstep的core和system,安装一个应用程序app,在GNUstep Windows Installer页面下方,除了必须的,还有一些app,如下,选择Gorm,下载!
接下来我们开始!
一,不用Gorm的第一个图形界面,helloworld!
这个helloworld程序共有五个文件:main.m、AppController.h、AppController.m、helloworldInfo.plist和GNUmakefile。图形界面的设计全部在代码中,和第二个程序不一样,第二个程序的图形界面设计在.gorm的二进制文件中,如果是.nib文件,不是二进制,是xml格式的.既然在Gorm下开发,就用.gorm文件吧,
Main.m
1. #include "AppController.h"
2. #include <AppKit/AppKit.h>
3.
4. int main(int argc, const char *argv[])
5. {
6. NSAutoreleasePool *pool;
7. AppController *delegate;
8.
9. pool = [[NSAutoreleasePool alloc] init];
10. delegate = [[AppController alloc] init];
11.
12. [NSApplication sharedApplication];
13. [NSApp setDelegate: delegate];
14.
15. RELEASE(pool);
16. return NSApplicationMain (argc, argv);
17. }
复制代码
AppController.h
1. #ifndef _AppController_H_
2. #define _AppController_H_
3.
4. #include <Foundation/NSObject.h>
5.
6. @class NSWindow;
7. @class NSTextField;
8. @class NSNotification;
9.
10. @interface AppController : NSObject
11. {
12. NSWindow *window;
13. NSTextField *label;
14. }
15.
16. - (void)applicationWillFinishLaunching:(NSNotification *) not;
17. - (void)applicationDidFinishLaunching:(NSNotification *) not;
18.
19. @end
20.
21. #endif /* _AppController_H_ */
复制代码
AppController.m
1. #include "AppController.h"
2. #include <AppKit/AppKit.h>
3.
4. @implementation AppController
5. - (void) applicationWillFinishLaunching: (NSNotification *) not
6. {
7. /* Create Menu */
8. NSMenu *menu;
9. NSMenu *info;
10.
11. menu = [NSMenu new];
12. [menu addItemWithTitle: @"Info"
13. action: NULL
14. keyEquivalent: @""];
15. [menu addItemWithTitle: @"Hide"
16. action: @selector(hide:)
17. keyEquivalent: @"h"];
18. [menu addItemWithTitle: @"Quit"
19. action: @selector(terminate:)
20. keyEquivalent: @"q"];
21.
22. info = [NSMenu new];
23. [info addItemWithTitle: @"Info Panel..."
24. action: @selector(orderFrontStandardInfoPanel:)
25. keyEquivalent: @""];
26. [info addItemWithTitle: @"Preferences"
27. action: NULL
28. keyEquivalent: @""];
29. [info addItemWithTitle: @"Help"
30. action: @selector (orderFrontHelpPanel:)
31. keyEquivalent: @"?"];
32.
33. [menu setSubmenu: info
34. forItem: [menu itemWithTitle:@"Info"]];
35. RELEASE(info);
36.
37. [NSApp setMainMenu:menu];
38. RELEASE(menu);
39.
40. /* Create Window */
41. window = [[NSWindow alloc] initWithContentRect: NSMakeRect(300, 300, 200, 100)
42. styleMask: (NSTitledWindowMask |
43. NSMiniaturizableWindowMask |
44. NSResizableWindowMask)
45. backing: NSBackingStoreBuffered
46. defer: YES];
47. [window setTitle: @"Hello World"];
48.
49. /* Create Label */
50. label = [[NSTextField alloc] initWithFrame: NSMakeRect(30, 30, 80, 30)];
51. [label setSelectable: NO];
52. [label setBezeled: NO];
53. [label setDrawsBackground: NO];
54. [label setStringValue: @"Hello World"];
55.
56. [[window contentView] addSubview: label];
57. RELEASE(label);
58. }
59.
60. - (void) applicationDidFinishLaunching: (NSNotification *) not
61. {
62. [window makeKeyAndOrderFront: self];
63. }
64.
65. - (void) dealloc
66. {
67. RELEASE(window);
68. [super dealloc];
69. }
70.
71. @end
复制代码
接下来是helloworldInfo.plist文件:
1. {
2. ApplicationDescription = "Hello World Tutorial";
3. ApplicationIcon = "";
4. ApplicationName = HelloWorld;
5. ApplicationRelease = 0.1;
6. Authors = "";
7. Copyright = "Copyright (C) 200x by ...";
8. CopyrightDescription = "Released under...";
9. FullVersionID = 0.1;
10. URL = "";
11. }
复制代码
最后是比较重要的GNUmakefile:
1. GNUSTEP_MAKEFILES=/GNUstep/System/Library/Makefiles
2.
3. include $(GNUSTEP_MAKEFILES)/common.make
4.
5. APP_NAME = HelloWorld
6. HelloWorld_HEADERS = AppController.h
7. HelloWorld_OBJC_FILES = main.m AppController.m
8. HelloWorld_RESOURCE_FILES = HelloWorldInfo.plist
9.
10. include $(GNUSTEP_MAKEFILES)/application.make
复制代码
注意:在GNUmakefile当中,第一行为GNUstep的Makefile文件夹的变量,本来应该在路径中的,但是我运行的时候找不到这些make文件,所以我手工添加.
接下来,把这些文件放到一个文件夹下,如helloworld1,然后运行sh,或者从GNUstep的shell,cd到这里,运行make就ok了!!如果已经运行过,会什么也不干,你需要 make clean;make就ok了!
接下来运行./HelloWorld.app/HelloWorld.exe,欣赏你的gui 的helloworld程序吧.
附件:如果你懒得自己copy或者自己写,我传个附件:Helloworld1
二,使用Gorm的第一个图形界面,helloworld!
打开Gorm,你不会?如果你安装了Gorm,打开sh,然后运行/GNUstep/Local/Tools/Gorm,此时sh处于占用状态,Ctrl+C则会关闭Gorm.其实这个Gorm是个脚本,真正的程序在/GNUstep/Local/Applications/Gorm.app/Gorm.exe 。
1. #! /bin/sh
2.
3. exec openapp "Gorm" "$@"
复制代码
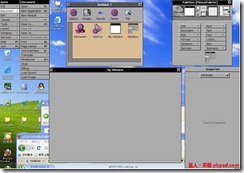
下面我们开始,打开Gorm后,在主菜单,一般位于左上角,点击Document->New Application就会出现一个简单的窗口叫My Window,除了菜单,重要的设计窗口还有Untitled-7(你的程序名称,不知道怎么称呼这个窗口),Palette窗口,一般的控件都是从这里面拖出来的;Inspect窗口,设置各种属性. 
2010-12-30 22:09 上传
接下来我们开始设计.
1.改变My Window的大小和设置标题,拖拉此窗口右下角(鼠标形状不变,让我崩溃),让窗口变小点;标题必须在Inspect手动设置,先点击下My Window,Inspect就会出现My Window的属性,在Title文本域输入你要的标题:Hello GNUstep Window,同时标题也变了,至于窗口大小也可以在Inspect窗口改变,点击Attributes,出现下拉菜单,选择size,改变即可,这个就不贴图了. 
2010-12-30 22:09 上传
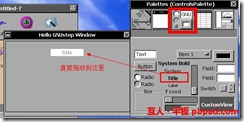
2.添加一个Title控件,在palettes窗口中,拖动Title到你的窗口中. 
2010-12-30 22:09 上传
再双击这个Title,直接输入你要的内容:HelloWorld
3.再你的窗口菜单中添加info子菜单:
有个莫民奇妙的bug,运行后的菜单info->info panel有时候无法显示,选择两次,app崩溃.