一、定义路由
方法一:直接在app.module.ts中配置

 1 import { BrowserModule } from '@angular/platform-browser';
 2 import { NgModule } from '@angular/core';
 3 import { AppComponent } from './app.component';
 4 import { TestComponent } from './test/test.component';
 5 import { Test1Component } from './test1/test1.component';
 6 import { Test2Component } from './test2/test2.component';
 7 import {Routes, RouterModule} from '@angular/router'
 8
 9 const appRoutes: Routes = [
10   {path:'',component:TestComponent},  //代表默认路径,当URL为空时匹配的组件
11   {path:'test1',component: Test1Component},
12   {path:'test2',component: Test2Component},
13   {path:'**',component:TestComponent}  //代表匹配其他未定义路径显示的组件,可以在这里展示404页面
14 ]
15
16 @NgModule({ //功能合集
17   declarations: [ //可以放组件,指令,管道
18     AppComponent,
19     TestComponent,
20     Test1Component,
21     Test2Component
22   ],
23   imports: [
24     RouterModule.forRoot(appRoutes),
25     BrowserModule,
26   ],
27   providers: [], //服务,放公用的业务逻辑
28   bootstrap: [AppComponent] //从那个组件开始启动
29 })
30 export class AppModule { }
方法二:路由模块
首先使用 ng g module app-routing --flat --module=app 创建 app-routing.module.ts文件

 1 import { BrowserModule } from '@angular/platform-browser';
 2 import { NgModule } from '@angular/core';
 3 import { AppComponent } from './app.component';
 4 import { TestComponent } from './test/test.component';
 5 import { Test1Component } from './test1/test1.component';
 6 import { Test2Component } from './test2/test2.component';
 7 import { RouterModule} from '@angular/router';
 8 import { AppRoutingModule } from './app-routing.module'
 9
10
11 @NgModule({ //功能合集
12   declarations: [ //可以放组件,指令,管道
13     AppComponent,
14     TestComponent,
15     Test1Component,
16     Test2Component,
17   ],
18   imports: [
19     RouterModule,
20     BrowserModule,
21   ],
22   providers: [], //服务,放公用的业务逻辑
23   bootstrap: [AppComponent] //从那个组件开始启动
24 })
25 export class AppModule { }

 1 import { NgModule } from '@angular/core';
 2 import { CommonModule } from '@angular/common';
 3 import { Routes, RouterModule } from '@angular/router'
 4 import { TestComponent } from "./test/test.component";
 5 import { Test1Component } from "./test1/test1.component";
 6 import { Test2Component } from "./test2/test2.component";
 7
 8 const routes: Routes = [
 9   {path:'',component:TestComponent},
10   {path:'test1',component: Test1Component},
11   {path:'test2',component: Test2Component},
12   {path:'**',component:TestComponent}
13 ]
14
15 @NgModule({
16   imports: [
17     CommonModule,
18     RouterModule.forRoot(routes)
19   ],
20   declarations: []
21 })
22 export class AppRoutingModule { }
注意:两种方法只能使用其一
二、路由出口
<router-outlet></router-outlet>
注意:需要在app.module.ts中写 import { RouterModule} from '@angular/router';
三、路由常用配置项
1. path 路径
2. component 组件
3. redirectTo 路由重定向
4. pathMatch 是一个用来指定路由匹配策略的字符串。可选项有 prefix(默认值) 和 full
【prefix:以指定的路径开头;full:与指定路径完全一样。】
四、路由跳转
1. a标签跳转
在html标签内使用routerLink跳转

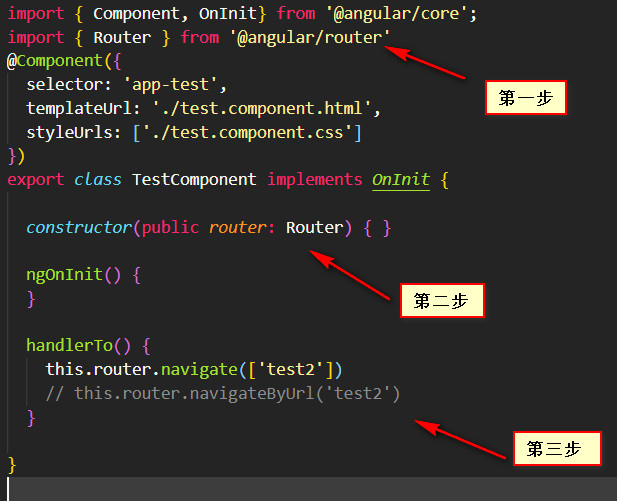
2. 编程式导航
首先在test.component.html页面中添加点击事件

然后在test.component.ts中

五、路由传参
例子是由test页面跳转到test1
方法一:动态路由传参
第一步:在路由配置中将test1的路由配置为如下:

第二步:在test页面的HTML中跳转的地方写成如下格式:

第三步:在test1的ts文件下如下接收传过来的参数:

import { Component, OnInit } from '@angular/core';
import {ActivatedRoute} from "@angular/router"  //要先进行引入

@Component({
  selector: 'app-test1',
  templateUrl: './test1.component.html',
  styleUrls: ['./test1.component.css']
})
export class Test1Component implements OnInit {

  constructor(private routeInfo:ActivatedRoute) { }  //先定义routeInfo,可以是任意名字

  ngOnInit() {
    console.log(this.routeInfo.snapshot.params)
  }

}
方法二:查询方式传参
第一步:在test页面跳转的地方:

第二步:在test1中接收

方法三:query传参
第一步: 在test页面添加跳转的点击事件

第二步: 在test.component.ts中对将要传入的数据进行定义

第三步: 在test1.component.ts中接收传递的参数

