1.表单
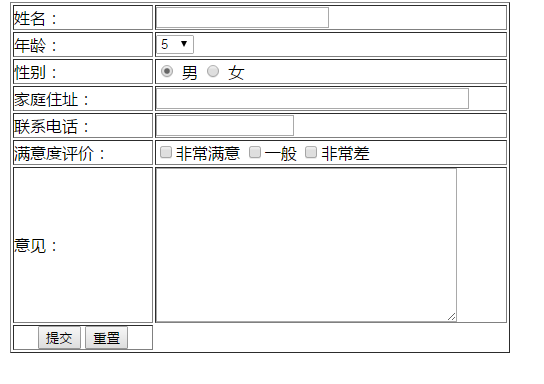
页面如下:


 1 <html>
 2     <head>
 3         <title>注册表单页面</title>
 4     </head>
 5     <body>
 6         <form name="form1" method="post" action="">
 7             <table width="500" border="1" align="center" cellpadding="0" cellspacing="2">
 8                 <tr>
 9                     <td width="143" height="25">姓名:</td>
10                     <td width="351"><input name="name" type="text" id="name" size="20"></td>
11                 </tr>
12                 <tr>
13                     <td height="25">年龄:</td>
14                     <td>
15                         <select name="age" id="age">
16                            <option value="5" selected>5</option>
17                            <option value="5" >6</option>
18                            <option value="5" >7</option>
19                            <option value="5" >8</option>
20                            <option value="5" >9</option>
21                            <option value="5" >10</option>
22                            <option value="5" >11</option>
23                            <option value="5" >12</option>
24                         </select>
25                     </td>
26                 </tr>
27                 <tr>
28                     <td height="25">性别:</td>
29                     <td>
30                         <input name="radiobutton" type="radio" value="radiobutton" checked>
31                         男
32                         <input name="radiobutton" type="radio" value="radiobutton" >
33                         女
34                     </td>
35                 </tr>
36                 <tr>
37                     <td height="25">家庭住址:</td>
38                     <td><input name="textfie2" type="text" size="40"></td>
39                 </tr>
40                 <tr>
41                     <td height="25">联系电话:</td>
42                     <td><input name="textfie3" type="text" size="15"></td>
43                 </tr>
44                 <tr>
45                     <td height="25">满意度评价:</td>
46                     <td>
47                         <input type="checkbox" name="checkbox" value="checkbox">非常满意
48                         <input type="checkbox" name="checkbox" value="checkbox">一般
49                         <input type="checkbox" name="checkbox" value="checkbox">非常差
50                     </td>
51                 </tr>
52                 <tr>
53                     <td height="25">意见:</td>
54                     <td>
55                         <textarea name="textarea" cols="40" rows="10"></textarea>
56                     </td>
57                 </tr>
58                 <tr>
59                     <td align="center">
60                         <input type="submit" name="Submit1" value="提交">
61                         <input type="reset" name="Submit2" value="重置">
62                     </td>
63                 </tr>
64             </table>
65         </form>
66     </body>
67 </html>
2.背景变换的导航菜单
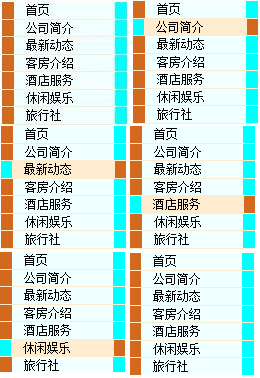
2.1.菜单效果图如下

当鼠标点击菜单中的某一项时,此项的背景颜色发生变化,并且中间显示目录的长度变宽。
2.2 代码如下

 1 <html>
 2     <head>
 3         <title>一列宽度</title>
 4         <meta charset="utf-8" />
 5         <style type="text/css">
 6             #button{
 7                 width: 500px;
 8                 margin-top: 300px;
 9                 margin-left:800px;
10                 font-family: 宋体;
11                 font-size: 12px;
12                 background-color:#000000;
13             }
14             #button ul{
15                 list-style: none;
16                 margin: 0;
17                 padding: 0;
18                 border: none;
19
20             }
21             #button li{
22                 margin: 0;
23                 border-bottom-width: 1px;
24                 border-bottom-style: solid;
25                 border-bottom-color:#FFEBCD;
26             }
27             #button li a{
28                 display: block;
29                 padding: 5px 5px 5px 1em ;
30                 background-color:azure;
31                 color:#000000;
32                 text-decoration: none;
33                 width: 80%;
34                 border-left-width: 50px;
35                 border-right-width: 50px;
36                 border-right-style: solid;
37                 border-left-style: solid;
38                 border-left-color: chocolate;
39                 border-right-color: aqua;
40             }
41             html>body #button li a{
42                 width: auto;
43             }
44             #button li a:hover{
45                 background-color:#FFEBCD;
46                 color:#000000;
47                 border-left-width: 45px;
48                 border-right-width: 45px;
49                 border-right-style: solid;
50                 border-left-style: solid;
51                 border-left-color:aqua;
52                 border-right-color: chocolate;
53
54             }
55         </style>
56     </head>
57     <body>
58         <div id="button">
59             <ul>
60                 <li><a href="#">首页</a></li>
61                 <li><a href="#">公司简介</a></li>
62                 <li><a href="#">最新动态</a></li>
63                 <li><a href="#">客房介绍</a></li>
64                 <li><a href="#">酒店服务</a></li>
65                 <li><a href="#">休闲娱乐</a></li>
66                 <li><a href="#">旅行社</a></li>
67             </ul>
68         </div>
69
70     </body>
71 </html>
代码分析:
利用#button定义div,包括宽度,右边框,填充的复合属性,字体,字号,背景颜色和字体颜色。
利用#button ul定义div下的ul对象的样式,包括列表属性list-style,边距margin,填充padding,边框border属性。
利用#button li 定义li对象的样式。
利用#button li a定义定义对象下的链接文字样式。
利用#button li a:hover定义li 对象下的链接文字激活样式。
ul是css布局中使用的很广泛的一种元素,主要用来描述列表的内容,每一个<ul></ul>中的内容为一个列表块,快中每一个列表数据用<li></li>来描述。
3.背景变换的横向导航栏
3.1.页面效果如下
开始页面

鼠标点击时的页面

3.2.代码

 1 <html>
 2     <head>
 3         <title>利用CSS制作横向导航</title>
 4         <meta charset="utf-8" />
 5         <style>
 6             #n li{
 7                 float: left;
 8                 font-family: 宋体;
 9                 font-size: 60px;
10                 margin-top: 50px;
11                 margin-left:100px;
12             }
13             #n li a{
14                 color:ivory;
15                 text-decoration: none;
16                 padding-top: 4px;
17                 display: block;
18                 width: 300px;
19                 height: 80px;
20                 text-align: center;
21                 background-color:blue;
22                 margin-left: 4px;
23             }
24             #n li a:hover{
25                 background-color:#00FFFF;
26                 color:black;
27             }
28         </style>
29     </head>
30     <body>
31         <div id="n">
32             <ul>
33
34                 <li><a href="#">首页</a></li>
35                 <li><a href="#">学校概况</a></li>
36                 <li><a href="#">机构设置</a></li>
37                 <li><a href="#">人才培养</a></li>
38                 <li><a href="#">师资队伍</a></li>
39                 <li><a href="#">科学建设</a></li>
40                 <li><a href="#">科学研究</a></li>
41             </ul>
42
43         </div>
44     </body>
45 </html>
代码分析:首先定义了ul下的li对象,给#n li 指定了float:left属性,所有的li对象都向左浮动,从而形成横向的排列方式。
导航的关键在于a链接对象的样式控制,在这里使用#n li a{}给li 下的每一个链接对象编写了样式。
display:block使得a链接对象的显示方式由一段文本变为一个块状对象,这样就可以使用CSS的外边距,内边距,边框等属性给a链接标签上加一系列的样式,通过display:block的应用,对a标签元素设置宽度with,高度heigh,并在每一个a标签对象你之间使用margin-left:2px形成左侧的外边距像素为2像素,
利用# n li a:hover定义定义链接文字激活后的状态,利用background-color:设置激活后的背景颜色,利用color设置文字颜色。
4.改变按钮的北京颜色和文字颜色
1.按钮页面如下:

2.代码:

 1 <html>
 2     <head>
 3         <meta charset="utf-8" />
 4         <title>按钮的背景颜色和字体</title>
 5         <style type="text/css">
 6             input.ann{border: 1 solid ##D2691E;
 7             color: #000000;
 8             font-size: 50pt;
 9             font-style:normal;
10             font-variant: normal;
11             font-weight: normal;
12             height: 100pt;
13             width: 300pt;
14             line-height: normal;
15             background-color:#D2691E;
16             }
17
18         </style>
19     </head>
20     <body>
21         <input type="submit" value="登录" name="Sumbit" class="ann" />
22         <input type="reset" value="取消" name="close" class="ann" />
23     </body>
24 </html>
代码分析:定义一个名为ann的按钮样式,设置边框border为1,颜色,字号,字体风格和加粗都为正常,按钮的高度height,行高为正常,背景颜色为background-color。
