一、前言
二、主要内容
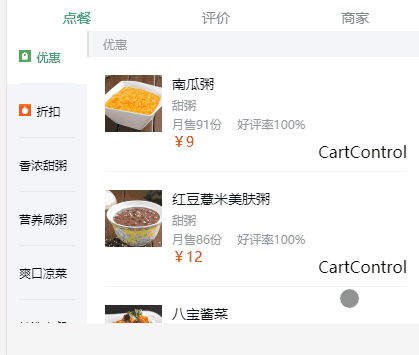
(1)文字说明:滑动右侧左侧对应的类别显示高亮,点击左侧的类别名称右侧滑动到对应的位置
(2)图示
(1)分析:滑动右侧的时候左侧对应的类高亮,高亮显示是通过current类来控制的,当右边滑动到不同个类的时候,同时更新左侧的current的显示。
(2)要做的事情: ①current来设置当前高亮, ②要实时监听scrollY, ③将右侧每一个类的顶部位置记录下来
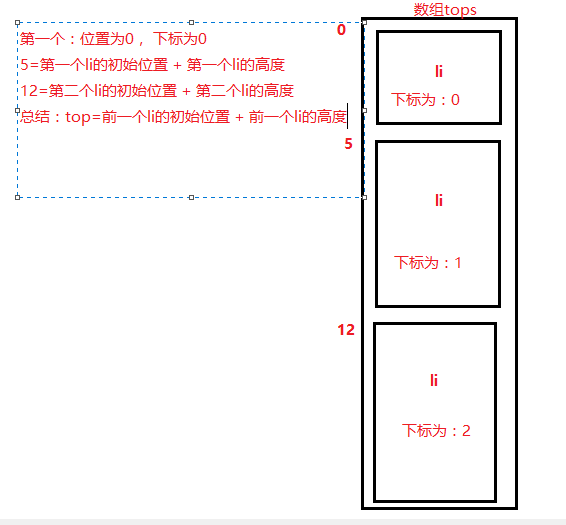
(3)根据滑动的位置scrollY,与记录的每个类的顶部,来计算当前下标
第零步:在data中定义两个属性,分别来接收滑动的scrollY的值,和右侧每个分类的位置
data(){
          return{
              scrollY:0,
              tops:[]  //存放每一个类的初始位置
          }
      }
第一步:用到better-scroll库(http://ustbhuangyi.github.io/better-scroll/doc/api.html)
/*下载better-scroll库*/
npm install better-scroll -S
第二步:在组件中引入这个库,并且分别创建左右两个滑动列表,注意这个滑动列表时后台数据异步请求完成之后才创建的,所以在this.$nextTick()里面创建这两个滑动列表
mounted(){
          //异步请求可以传过去两个参数,
       this.$store.dispatch('getShopGoods',()=>{
           //数据请求完之后再执行这里了
             //初始化左边滚动
          this.$nextTick(()=>{
              new BScroll('.menu-wrapper',{
                  click:true
               })
               //创建右边的滚动
               this.foodswrapper = new BScroll('.foods-wrapper',{
                   click:true,
                   probeType:3

               })
          })
       })
  }
第三步:将获取当前scrollY的函数,和获取右侧top的函数提取出来,定义在method中
methods:{
   //获取scrollY
   _initScrollY()
   //获取右侧tops
   _initTops()
}
第四步:实现_initScrollY()
//初始化BScroll
          _initScrollY(){
              new BScroll('.menu-wrapper',{
                  click:true  //滑动列表默认是没有点击的,必须加上这个才能出发点击事件

               })
               //创建右边的
               this.foodswrapper = new BScroll('.foods-wrapper',{
                   click:true,
                   probeType:2  //这里可以取4个值:默认为0, 1, 2 , 3具体解释参考官方文档

               })

               //给右侧绑定的BScroll绑定监听事件,获取滑动过程中的位置
               this.foodswrapper.on('scroll',({x,y})=>{
                   console.log(x,y)//默认没有分发滚动事件
                   this.scrollY=Math.abs(y);
               })

               //获取停下来的位置
               //给右侧绑定的BScrollEnd绑定监听事件,获取滑动结束时的位置
               this.foodswrapper.on('scrollEnd',({x,y})=>{
                   //console.log(x,y)//默认没有分发滚动事件
                   this.scrollY=Math.abs(y);
               })
          }
第五步:实现_initTops()
先分析:
代码:
//初始化数组,获取到每个li 的坐标
        ,_initTops(){
            var tops=[] //定义一个空数组
            let top=0;
            tops[0]=0 //第一个li的坐标为0

            var lis = this.$refs.foodsUl.children; //获取到了每个li
            Array.prototype.slice.call(lis).forEach((li,index)=>{
                top = top + li.clientHeight//当前的位置,等于上一个的位置,加上这一个的高度
                tops.push(top)
            })

            this.tops=tops
            console.log(tops)

        },
第六步:计算currentIndex
    computed:{

          currentIndex(){
                  //如果滑动的位置在当前这个和下一个之间,返回的是这个的下标
                /*比如: tops=[0, 5, 12,18,23]
                   如果scrollY=4 ----返回0
                         scrollY=8-----返回1

               */
              return this.tops.findIndex((top,index)=>{
                return this.scrollY>=top && this.scrollY<this.tops[index+1]
              })
          }
      }
有了前面几步,就可以很容易的实现我们想要的功能
(1)滑动右侧,左侧高亮,只需在左侧加current类的时候,判断计算的currentIndex是否等于当前的index
<ul>
          <!--current-->
          <li class="menu-item " v-for="(good,index) in goods" :key="index" :class="{current:index===currentIndex}" @click="clickMenuItem(index)">
            <span class="text bottom-border-1px">
              <img class="icon" :src="good.icon" v-if="good.icon" >
              {{good.name}}
            </span>
          </li>
        </ul>
(2)点击左侧,右侧滑动到相应的位置
注册点击事件:
 <!--current-->
          <li class="menu-item " v-for="(good,index) in goods" :key="index" :class="{current:index===currentIndex}" @click="clickMenuItem(index)">
            <span class="text bottom-border-1px">
              <img class="icon" :src="good.icon" v-if="good.icon" >
              {{good.name}}
            </span>
          </li>
methods中定义这个点击事件‘’
//将当前的index传进来
        clickMenuItem(index){
           //先得到目标位置scrollY
           const top = this.tops[index];
           // 立即更新scrollY,更新当前分类,点击的分类项成为当前
           this.scrollY=top
           //平滑滚动右侧列表
           this.foodswrapper.scrollTo(0, -top, 3);

        }


<template>
  <div>
    <div class="goods">
      <div class="menu-wrapper"  >
        <ul>
          <!--current-->
          <li class="menu-item " v-for="(good,index) in goods" :key="index" :class="{current:index===currentIndex}" @click="clickMenuItem(index)">
            <span class="text bottom-border-1px">
              <img class="icon" :src="good.icon" v-if="good.icon" >
              {{good.name}}
            </span>
          </li>
        </ul>
      </div>
      <div class="foods-wrapper">
        <ul ref="foodsUl">
          <li class="food-list-hook" v-for="(good, index) in goods" :key="index" >
            <h1 class="title">{{good.name}}</h1>
            <ul>
              <li class="food-item bottom-border-1px" v-for="(food, index) in good.foods" :key="index">
                <div class="icon">
                  <img width="57" height="57" :src="food.icon">
                </div>
                <div class="content">
                  <h2 class="name">{{food.name}}</h2>
                  <p class="desc">{{food.description}}</p>
                  <div class="extra">
                    <span class="count">月售{{food.sellCount}}份</span>
                    <span>好评率{{food.rating}}%</span>
                  </div>
                  <div class="price">
                    <span class="now">¥{{food.price}}</span>
                    <span class="old" v-if="food.oldPrice">¥{{food.oldPrice}}</span>
                  </div>
                  <div class="cartcontrol-wrapper">
                  CartControl
                  </div>
                </div>
              </li>
            </ul>
          </li>
        </ul>
      </div>

    </div>
       food
  </div>
</template>

<script>
    import {mapState} from 'vuex'
    import BScroll from 'better-scroll'
  export default {
      data(){
          return{
              scrollY:0,
              tops:[]  //存放每一个类的初始位置
          }
      },
      //这里的数据是异步显示的,所以我们要等数据异步请求之后再创建这个滑动列表
      mounted(){
          //异步请求可以传过去两个参数,
       this.$store.dispatch('getShopGoods',()=>{
           //数据请求完之后再执行这里了
          //初始化滚动
          this.$nextTick(()=>{
              //初始化,并且实时获取滚动坐标
             this._initScrollY()

            //初始化右边的数组
             this._initTops();
          })
       })
      },
      methods:{
          //初始化BScroll
          _initScrollY(){
              new BScroll('.menu-wrapper',{
                  click:true

               })
               //创建右边的
               this.foodswrapper = new BScroll('.foods-wrapper',{
                   click:true,
                   probeType:3

               })

               //给右侧绑定的BScroll绑定监听事件,但是你会发现并没有调用
               this.foodswrapper.on('scroll',({x,y})=>{
                   console.log(x,y)//默认没有分发滚动事件
                   this.scrollY=Math.abs(y);
               })

               //获取停下来的位置
               //给右侧绑定的BScroll绑定监听事件,但是你会发现并没有调用
               this.foodswrapper.on('scrollEnd',({x,y})=>{
                   //console.log(x,y)//默认没有分发滚动事件
                   this.scrollY=Math.abs(y);
               })
          }


        //初始化数组,获取到每个li 的坐标
        ,_initTops(){
            var tops=[] //定义一个空数组
            let top=0;
            tops[0]=0 //第一个li的坐标为0

            var lis = this.$refs.foodsUl.children; //获取到了每个li
            Array.prototype.slice.call(lis).forEach((li,index)=>{
                top = top + li.clientHeight//当前的位置,等于上一个的位置,加上这一个的高度
                tops.push(top)
            })

            this.tops=tops
            console.log(tops)

        },
//将当前的index传进来
        clickMenuItem(index){
           //先得到目标位置scrollY
           const top = this.tops[index];
           // 立即更新scrollY,更新当前分类,点击的分类项成为当前
           this.scrollY=top
           //平滑滚动右侧列表
           this.foodswrapper.scrollTo(0, -top, 3);


        }
      },
      computed:{
          ...mapState(['goods']),
          currentIndex(){
              return this.tops.findIndex((top,index)=>{
                return this.scrollY>=top && this.scrollY<this.tops[index+1]
              })
          }
      }
  }

</script>

<style lang="stylus" rel="stylesheet/stylus">
  @import "../../../common/stylus/mixins.styl"
  .goods
    display: flex
    position: absolute
    top: 195px
    bottom: 46px
     100%
    background: #fff;
    overflow: hidden
    .menu-wrapper
      flex: 0 0 80px
       80px
      background: #f3f5f7
      .menu-item
        display: table
        height: 54px
         56px
        padding: 0 12px
        line-height: 14px
        &.current
          position: relative
          z-index: 10
          margin-top: -1px
          background: #fff
          color: $green
          font-weight: 700
          .text
            border-none()
        .icon
          display: inline-block
          vertical-align: top
           12px
          height: 12px
          margin-right: 2px
          background-size: 12px 12px
          background-repeat: no-repeat
        .text
          display: table-cell
           56px
          vertical-align: middle
          bottom-border-1px(rgba(7, 17, 27, 0.1))
          font-size: 12px
    .foods-wrapper
      flex: 1
      .title
        padding-left: 14px
        height: 26px
        line-height: 26px
        border-left: 2px solid #d9dde1
        font-size: 12px
        color: rgb(147, 153, 159)
        background: #f3f5f7
      .food-item
        display: flex
        margin: 18px
        padding-bottom: 18px
        bottom-border-1px(rgba(7, 17, 27, 0.1))
        &:last-child
          border-none()
          margin-bottom: 0
        .icon
          flex: 0 0 57px
          margin-right: 10px
        .content
          flex: 1
          .name
            margin: 2px 0 8px 0
            height: 14px
            line-height: 14px
            font-size: 14px
            color: rgb(7, 17, 27)
          .desc, .extra
            line-height: 10px
            font-size: 10px
            color: rgb(147, 153, 159)
          .desc
            line-height: 12px
            margin-bottom: 8px
          .extra
            .count
              margin-right: 12px
          .price
            font-weight: 700
            line-height: 24px
            .now
              margin-right: 8px
              font-size: 14px
              color: rgb(240, 20, 20)
            .old
              text-decoration: line-through
              font-size: 10px
              color: rgb(147, 153, 159)
          .cartcontrol-wrapper
            position: absolute
            right: 0
            bottom: 12px
</style>
三、总结