接上一节。
在EmployeeController.java中添加
    //来到员工添加页面
    @GetMapping("/emp")
    public String toAddPage(Model model){
        //来到添加页面,查出所有的部门,在页面显示
        Collection<Department> departments = departmentDao.getDepartments();
        model.addAttribute("depts",departments);
        return "emp/add";
    }

    //员工添加
    //SpringMVC自动将请求参数和入参对象的属性进行一一绑定;要求请求参数的名字和javaBean入参的对象里面的属性名是一样的
    @PostMapping("/emp")
    public String addEmp(Employee employee){
        //来到员工列表页面

        System.out.println("保存的员工信息:"+employee);
        //保存员工
        employeeDao.save(employee);
        // redirect: 表示重定向到一个地址  /代表当前项目路径
        // forward: 表示转发到一个地址
        return "redirect:/emps";
    }
在EmployeeDao.java中添加
    private static Integer initId = 1006;

    public void save(Employee employee){
        if(employee.getId() == null){
            employee.setId(initId++);
        }

        employee.setDepartment(departmentDao.getDepartment(employee.getDepartment().getId()));
        employees.put(employee.getId(), employee);
    }
emp/add.html
<!DOCTYPE html>
<!-- saved from url=(0052)http://getbootstrap.com/docs/4.0/examples/dashboard/ -->
<html lang="en" xmlns:th="http://www.thymeleaf.org">

    <head>
        <meta http-equiv="Content-Type" content="text/html; charset=UTF-8">
        <meta name="viewport" content="width=device-width, initial-scale=1, shrink-to-fit=no">
        <meta name="description" content="">
        <meta name="author" content="">

        <title>Dashboard Template for Bootstrap</title>
        <!-- Bootstrap core CSS -->
        <link href="asserts/css/bootstrap.min.css" th:href="@{/webjars/bootstrap/4.1.2/css/bootstrap.css}" rel="stylesheet">

        <!-- Custom styles for this template -->
        <link href="asserts/css/dashboard.css" th:href="@{/asserts/css/dashboard.css}" rel="stylesheet">
        <style type="text/css">
            /* Chart.js */

            @-webkit-keyframes chartjs-render-animation {
                from {
                    opacity: 0.99
                }
                to {
                    opacity: 1
                }
            }

            @keyframes chartjs-render-animation {
                from {
                    opacity: 0.99
                }
                to {
                    opacity: 1
                }
            }

            .chartjs-render-monitor {
                -webkit-animation: chartjs-render-animation 0.001s;
                animation: chartjs-render-animation 0.001s;
            }
        </style>
    </head>

    <body>
        <!--引入抽取的topbar-->
        <!--模板名:会使用thymeleaf的前后缀配置规则进行解析-->
        <div th:replace="commons/bar::topbar"></div>

        <div class="container-fluid">
            <div class="row">
                <!--引入侧边栏-->
                <div th:replace="commons/bar::#sidebar(activeUri='emps')"></div>

                <main role="main" class="col-md-9 ml-sm-auto col-lg-10 pt-3 px-4">
                    <!--需要区分是员工修改还是添加;-->
                    <form th:action="@{/emp}" method="post">
                        <!--发送put请求修改员工数据-->
                        <!--
                        1、SpringMVC中配置HiddenHttpMethodFilter;(SpringBoot自动配置好的)
                        2、页面创建一个post表单
                        3、创建一个input项,name="_method";值就是我们指定的请求方式
                        -->
                        <input type="hidden" name="_method" value="put" th:if="${emp!=null}"/>
                        <input type="hidden" name="id" th:if="${emp!=null}" th:value="${emp.id}">
                        <div class="form-group">
                            <label>LastName</label>
                            <input name="lastName" type="text" class="form-control" placeholder="zhangsan" th:value="${emp!=null}?${emp.lastName}">
                        </div>
                        <div class="form-group">
                            <label>Email</label>
                            <input name="email" type="email" class="form-control" placeholder="zhangsan@atguigu.com" th:value="${emp!=null}?${emp.email}">
                        </div>
                        <div class="form-group">
                            <label>Gender</label><br/>
                            <div class="form-check form-check-inline">
                                <input class="form-check-input" type="radio" name="gender" value="1" th:checked="${emp!=null}?${emp.gender==1}">
                                <label class="form-check-label">男</label>
                            </div>
                            <div class="form-check form-check-inline">
                                <input class="form-check-input" type="radio" name="gender" value="0" th:checked="${emp!=null}?${emp.gender==0}">
                                <label class="form-check-label">女</label>
                            </div>
                        </div>
                        <div class="form-group">
                            <label>department</label>
                            <!--提交的是部门的id-->
                            <select class="form-control" name="department.id">
                                <option th:selected="${emp!=null}?${dept.id == emp.department.id}" th:value="${dept.id}" th:each="dept:${depts}" th:text="${dept.departmentName}">1</option>
                            </select>
                        </div>
                        <div class="form-group">
                            <label>Birth</label>
                            <input name="birth" type="text" class="form-control" placeholder="zhangsan" th:value="${emp!=null}?${#dates.format(emp.birth, 'yyyy-MM-dd HH:mm')}">
                        </div>
                        <button type="submit" class="btn btn-primary" th:text="${emp!=null}?'修改':'添加'">添加</button>
                    </form>
                </main>
            </div>
        </div>

        <!-- Bootstrap core JavaScript
    ================================================== -->
        <!-- Placed at the end of the document so the pages load faster -->
        <script type="text/javascript" src="asserts/js/jquery-3.2.1.slim.min.js" th:src="@{/webjars/jquery/3.3.1/jquery.js}"></script>
        <script type="text/javascript" src="asserts/js/popper.min.js" th:src="@{/webjars/popper.js/1.11.1/dist/popper.js}"></script>
        <script type="text/javascript" src="asserts/js/bootstrap.min.js" th:src="@{/webjars/bootstrap/4.0.0/js/bootstrap.js}"></script>

        <!-- Icons -->
        <script type="text/javascript" src="asserts/js/feather.min.js" th:src="@{/asserts/js/feather.min.js}"></script>
        <script>
            feather.replace()
        </script>

    </body>

</html>
启动服务器:
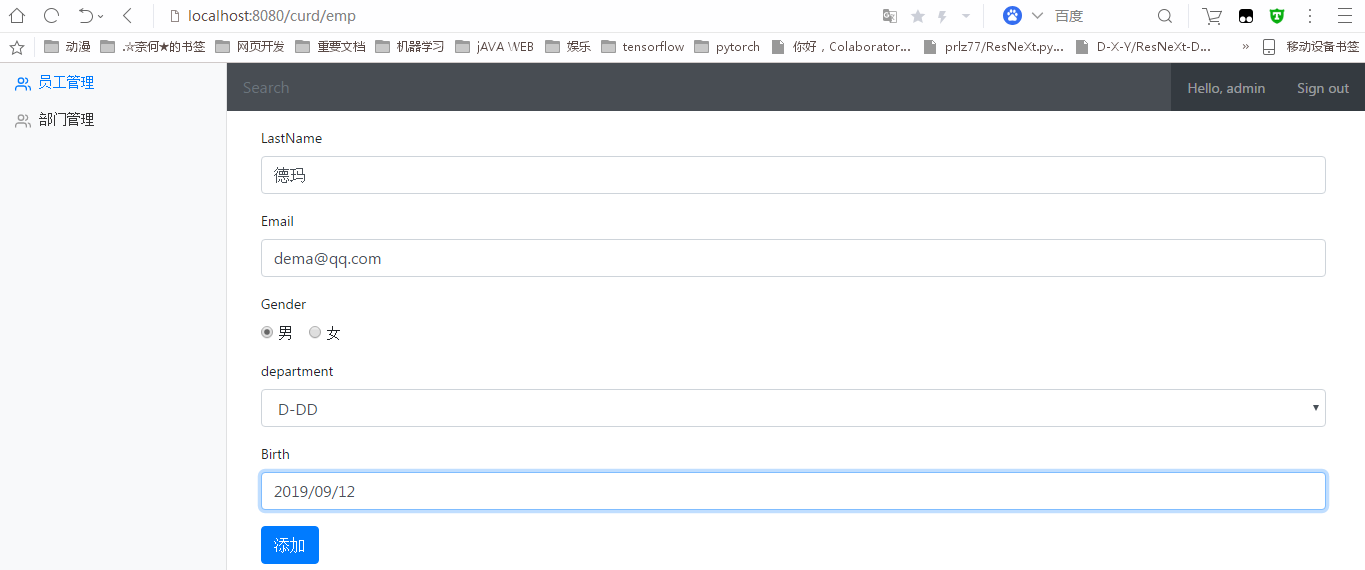
点击新增跳转到添加员工界面,输入相关信息,注意,springboot默认使用的日期格式是:yyyy/MM/dd,即以“/” 进行分隔。点击添加:
我们也可以在主配置文件中进行格式的更改:
spring.mvc.date-format=yyyy-MM-dd HH:mm
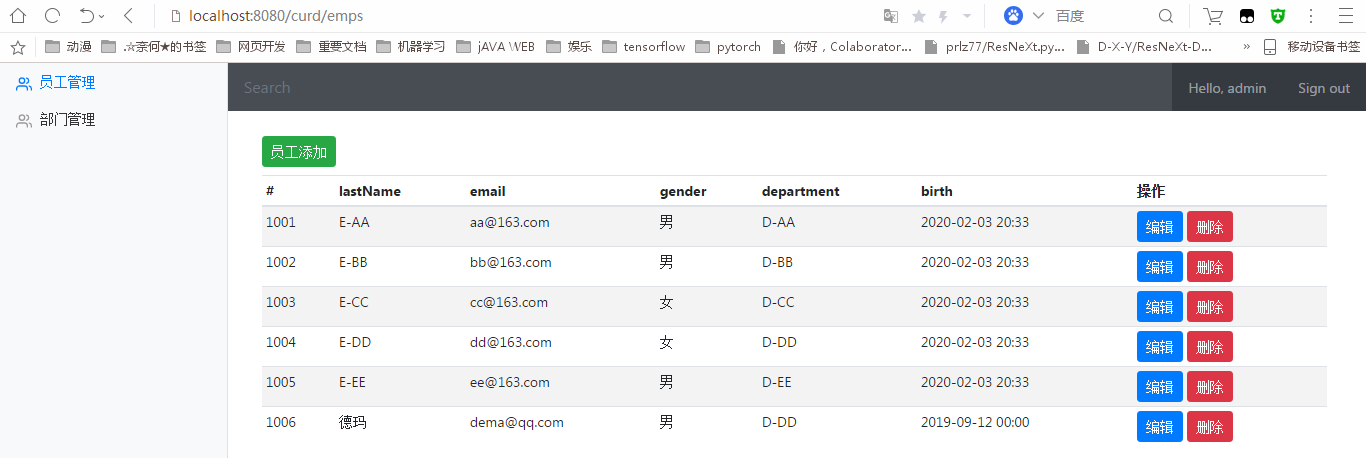
新增功能也就完成了。