 class VueRouter {
            constructor(options) {
                this.$options = options;
                this.routeMap = {};
                // 路由响应式
                this.app = new Vue({
                    data: {
                        current: "/"
                    }
                });
            }
            i
            nit() {
                this.bindEvents(); //监听url变化
                this.createRouteMap(this.$options); //解析路由配置
                this.initComponent(); // 实现两个组件
            }
            b
            indEvents() {
                window.addEventListener("load", this.onHashChange.bind(this));
                window.addEventListener("hashchange", this.onHashChange.bind(this));
            }
            o
            nHashChange() {
                this.app.current = window.location.hash.slice(1) || "/";
            }
            c
            reateRouteMap(options) {
                options.routes.forEach(item => {
                    this.routeMap[item.path] = item.component;
                });
            }
            i
            nitComponent() {
                // router-link,router-view
                // <router-link to="">fff</router-link>
                Vue.component("router-link", {
                    props: {
                        to: String
                    },
                    render(h) {
                        // h(tag, data, children)
                        return h("a", {
                            attrs: {
                                href: "#" + this.to
                            }
                        }, [
                            this.$slots.default
                        ]);
                    }
                });
                // <router-view></router-view>
                Vue.component("router-view", {
                    render: h => {
                        const comp = this.routeMap[this.app.current];
                        return h(comp);
                    }
                });
            }
        }
        V
        ueRouter.install = function (Vue) {
            // 混入
            Vue.mixin({
                beforeCreate() {
                    // this是Vue实例
                    if (this.$options.router) {
                        // 仅在根组件执行一次
                        Vue.prototype.$router = this.$options.router;
                        this.$options.router.init();
                    }
                }
            });
        };
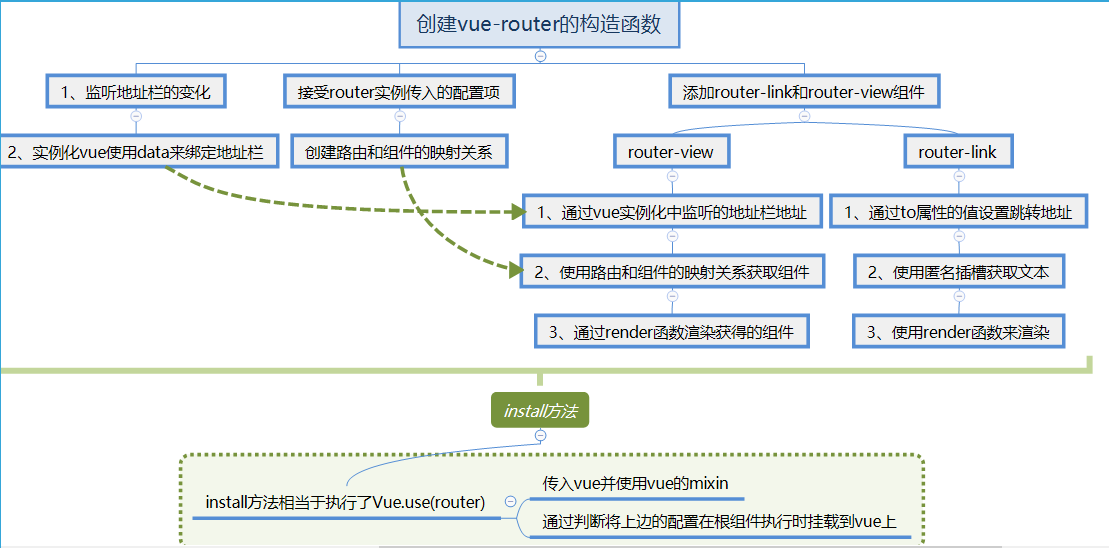
以上是简易的实现过程,一下是我整理了一份思路导图
