tf.nn.conv2d
在使用TF搭建CNN的过程中,卷积的操作如下
convolution = tf.nn.conv2d(X, filters, strides=[1,2,2,1], padding="SAME")
这个函数中各个参数的含义是什么呢?
- X:输入数据的mini-batch,为一个4D tensor;分别表示的含义为[n_batch,height,width,channel]
- filters:为卷积核,为一个4D tensor,分别表示的含义为 [filter_height, filter_width, in_channels, out_channels]
- stride:为步长,使用方法为[1,stride,stride,1]
该方法先将filter展开为一个2D的矩阵,形状为[filter_heightfilter_width in_channels, out_channels],再在图片上面选择一块大小进行卷积计算的到一个大小为[batch, out_height, out_width, filter_height * filter_width * in_channels]的虚拟张量。
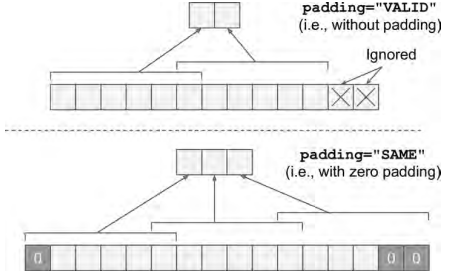
再将上面两部相乘(右乘filter矩阵) - padding:string类型的量,只能是"SAME","VALID"其中之一,这个值决定了不同的卷积方式。下面使用图表示两种的计算形式

当使用VALID的时候,如果卷积计算过程中,剩下的不够一步,则剩下的像素会被抛弃,SAME则会补0.
filter_primes = np.array([2., 3., 5., 7., 11., 13.], dtype=np.float32)
x = tf.constant(np.arange(1, 13+1, dtype=np.float32).reshape([1, 1, 13, 1]))
filters = tf.constant(filter_primes.reshape(1, 6, 1, 1))

valid_conv = tf.nn.conv2d(x, filters, strides=[1, 1, 5, 1], padding='VALID')
same_conv = tf.nn.conv2d(x, filters, strides=[1, 1, 5, 1], padding='SAME')

with tf.Session() as sess:
    print("VALID:
", valid_conv.eval())
    print("SAME:
", same_conv.eval())
输出内容为
VALID:
 [[[[ 184.]
   [ 389.]]]]
SAME:
 [[[[ 143.]
   [ 348.]
   [ 204.]]]]
实际计算向量如下所示:
print("VALID:")
print(np.array([1,2,3,4,5,6]).T.dot(filter_primes))
print(np.array([6,7,8,9,10,11]).T.dot(filter_primes))
print("SAME:")
print(np.array([0,1,2,3,4,5]).T.dot(filter_primes))
print(np.array([5,6,7,8,9,10]).T.dot(filter_primes))
print(np.array([10,11,12,13,0,0]).T.dot(filter_primes))
>>

VALID:
184.0
389.0
SAME:
143.0
348.0
204.0
再来做一个小实验,使用VALID的时候:
input = tf.Variable(tf.random_normal([1,5,5,5]))
filter = tf.Variable(tf.random_normal([3,3,5,1]))
op = tf.nn.conv2d(input, filter, strides=[1, 2, 2, 1], padding='VALID')
init = tf.global_variables_initializer()
with tf.Session() as sess:
    sess.run(init)
    print(op)
# print(sess.run(op))
>>Tensor("Conv2D:0", shape=(1, 2, 2, 1), dtype=float32)
使用SAME的时候
input = tf.Variable(tf.random_normal([1,5,5,5]))
filter = tf.Variable(tf.random_normal([3,3,5,1]))
op = tf.nn.conv2d(input, filter, strides=[1, 2, 2, 1], padding='SAME')
init = tf.global_variables_initializer()
with tf.Session() as sess:
    sess.run(init)
    print(op)
# print(sess.run(op))
>>Tensor("Conv2D:0", shape=(1, 3, 3, 1), dtype=float32)
note:在做卷积的过程中filter的shape为[hight,width,channel],也就是说如果为如果输入只有一个channel的时候,filter为一个矩阵,如果channel为3的时候,这个时候的filter就有了厚度为3。
tf.layer.conv2d
同时TF也提供了tf.layer.conv2d的方法
def conv2d(inputs,
           filters,
           kernel_size,
           strides=(1, 1),
           padding='valid',
           data_format='channels_last',
           dilation_rate=(1, 1),
           activation=None,
           use_bias=True,
           kernel_initializer=None,
           bias_initializer=init_ops.zeros_initializer(),
           kernel_regularizer=None,
           bias_regularizer=None,
           activity_regularizer=None,
           trainable=True,
           name=None,
           reuse=None):
这个方法和tf.nn.conv2d有着相同的作用,相当于对其的更高层的api。两个方法的调用过程如下:
tf.layers.conv2d-> tf.nn.convolution .
tf.layers.conv2d->Conv2D->Conv2D.apply()->_Conv->_Conv.apply()->_Layer.apply()->_Layer.\__call__()->_Conv.call()->nn.convolution()...
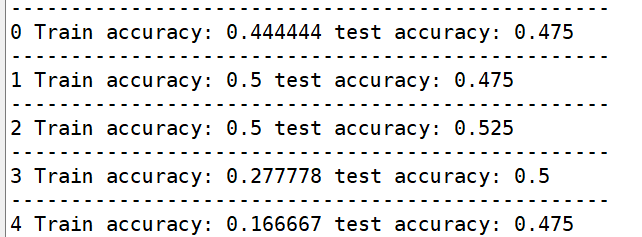
我用这两个方法搭建了相同的神经网络,可是得到的准确率相差很大,其他部分代码一张样。代码和准确率如下。为何差别这么的大?
    def conv2d(self,input,ksize,stride,name):
        with tf.name_scope(name):
            with tf.variable_scope(name):
                w = tf.get_variable("%s-w" %name,shape= ksize,initializer=tf.truncated_normal_initializer())
                b = tf.get_variable("%s-b" %name,shape = [ksize[-1]],initializer = tf.constant_initializer())
                out = tf.nn.conv2d(input,w,strides=[1,stride,stride,1],padding="SAME",name="%s-conv"%name)
                out = tf.nn.bias_add(out,b,name='%s-bias_add' %name)
                out = tf.nn.relu(out,name="%s-relu"%name)
        return out

conv1 = tf.layers.conv2d(X,filters=conv1_fmaps,
                         kernel_size = conv1_ksize,strides=conv1_stride,
                         padding=conv1_pad,activation=tf.nn.relu,name='conv1')

为何差异这么大呢?我现在还没弄查出结果,如果知道答案请指出,先谢过。
tf.layers.conv2d中默认的kernel_initializer
tf.layer.conv2d这里面默认的kernel_initializer为None,经查阅源码
    self.kernel = vs.get_variable('kernel',
                                  shape=kernel_shape,
                                  initializer=self.kernel_initializer,
                                  regularizer=self.kernel_regularizer,
                                  trainable=True,
                                  dtype=self.dtype)
这里面有一段说明
   If initializer is `None` (the default), the default initializer passed in
    the constructor is used. If that one is `None` too, we use a new
    `glorot_uniform_initializer`. If initializer is a Tensor, we use
    it as a value and derive the shape from the initializer.
也就是说使用的是
glorot_uniform_initializer来进行初始化的。这种方法又被称为Xavier uniform initializer,相关的文献在这里 。另外TF中tf.layers.dense也是使用的这个初始化方法。我把初始化方法都改成了使用tf.truncated_normal_initializer,上面模型的结果没有什么改善。看来初始化方法不是主要原因。求解。