react脚手架:
全局安装:npm i create-react-app -g
查看脚手架版本:create-react-app -V
脚手架创建项目:
create-react-app myrouter(要求node版本最低是v10.14.2)
react路由:
安装:npm i react-router-dom
基本使用:
1、路由的形式:
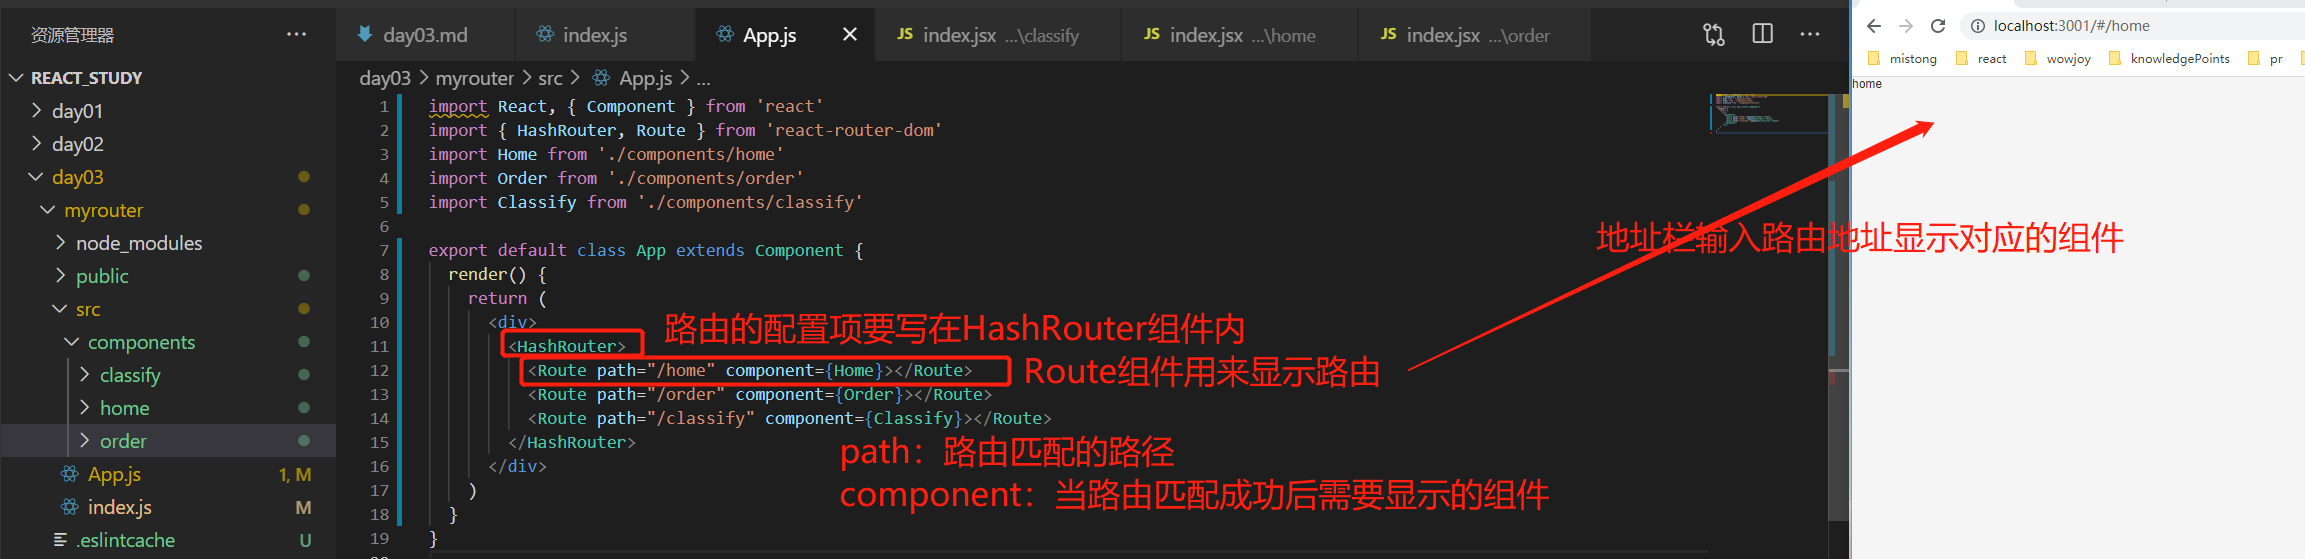
hash路由:HashRouter
history路由:BrowserRouter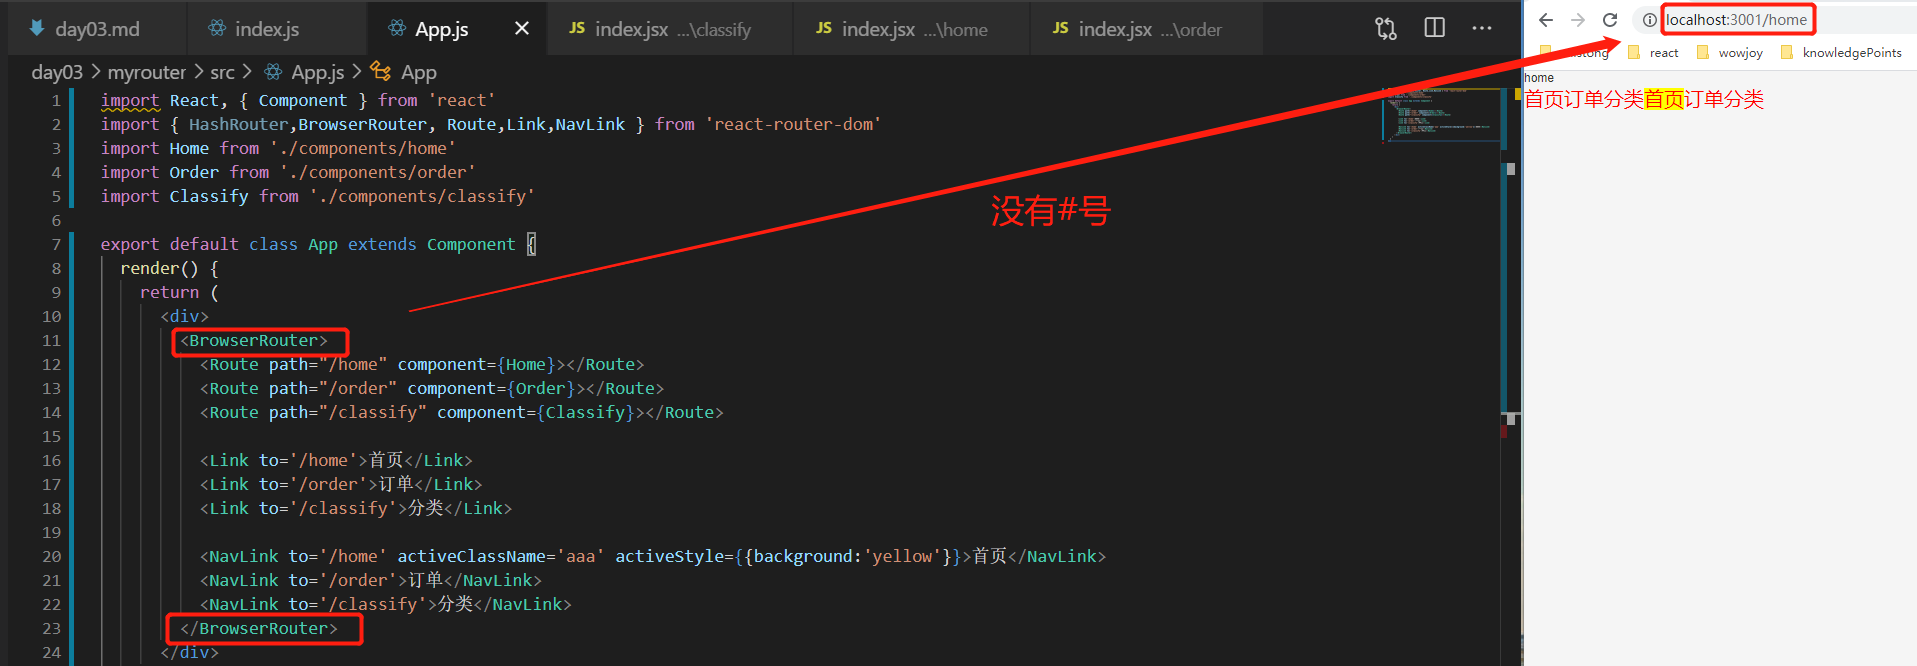
路由的所有配置必须在HashRouter或BrowserRouter的包裹范围之内
2、路由的显示:
route:
作用:用来配置路由以及路由的显示
配置项:
path:路由匹配的路径
component:当路径匹配成功后需要渲染的组件(值为组件名称)
render:当路径匹配成功后需要渲染的组件(值是一个函数)
exact:完全匹配
3、路由跳转的方式:
①a标签
          <a href="#/home">首页</a>
          <a href="#/classify">分类</a>
          <a href="#/order">订单</a>
②Link(没有选中标识的,使用场景:返回)
          <Link to='/home'>首页</Link>
          <Link to='/order'>订单</Link>
          <Link to='/classify'>分类</Link>
如果重复点击某个路由会报警告:

警告:哈希历史不能推送相同的路径;新的条目不会被添加到历史堆栈中
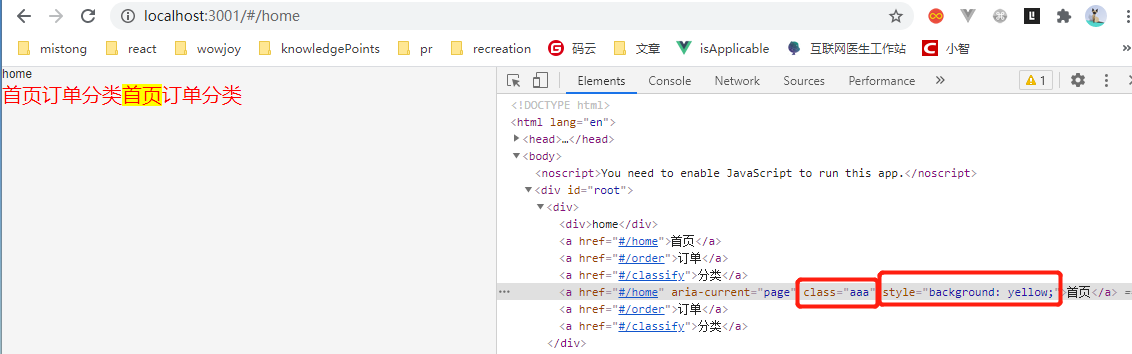
③NavLink(使用场景:底部导航、有选中标识的导航)
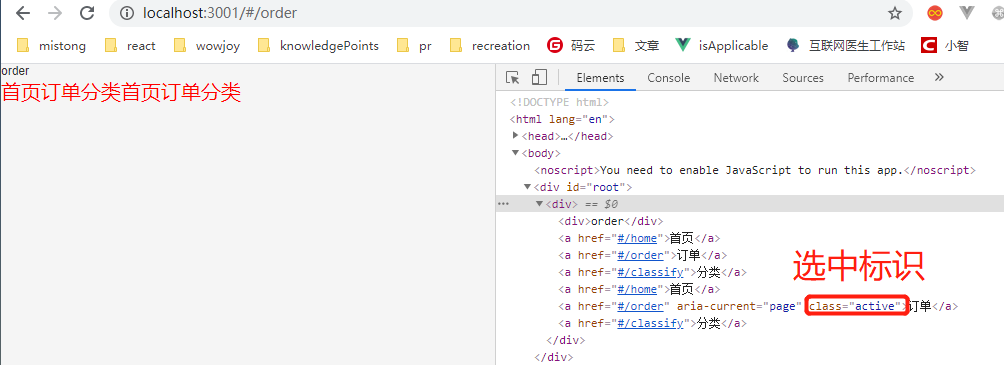
          <NavLink to='/home' activeClassName='aaa' activeStyle={{background:'yellow'}}>首页</NavLink>
          <NavLink to='/order'>订单</NavLink>
          <NavLink to='/classify'>分类</NavLink>
配置项:
to:需要跳转的路径
activeClassName:更改选中后的标识
activeStyle:选中后的样式
④编程式导航
4、路由传值:
①动态路由:(地址栏上有参数:details/xxx/xxx,刷新不丢失)
在定义的时候通过 /:属性 的方式来定义传递的属性

在路由跳转的时候通过 /值 的方式进行传值

在需要接收数据的页面通过 this.props.match.params 来接收

②query传值:(地址栏上有参数:details?id=xxx&name=xxx,刷新不丢失)
路由:
在路由跳转的时候通过 query 进行传值

在需要接收数据的页面通过 this.props.location.search 来接收(?id=0&name=%E9%A6%99%E8%95%89)

③内存传值:(地址栏上没有参数,刷新会丢失)
路由:
在路由跳转的时候通过 to={{pathname:'', query:{}}} 进行传值

在需要接收的页面通过 this.props.location.query 来接收

5、路由嵌套:
6、编程式导航:
this.props.history.push()


this.props.history.goBack()
this.props.history.goForward()
this.props.history.go()
this.props.history.replace()
7、component渲染和render渲染的区别:
①在route组件中通过component属性进行页面渲染的时候会默认的给当前组件传递三个值(history match location)


②render渲染的时候可以渲染组件也可以渲染标签

③render渲染的时候可以进行传值

④一般情况下会通过render的方式进行路由的嵌套
⑤render可以进行更多的业务逻辑
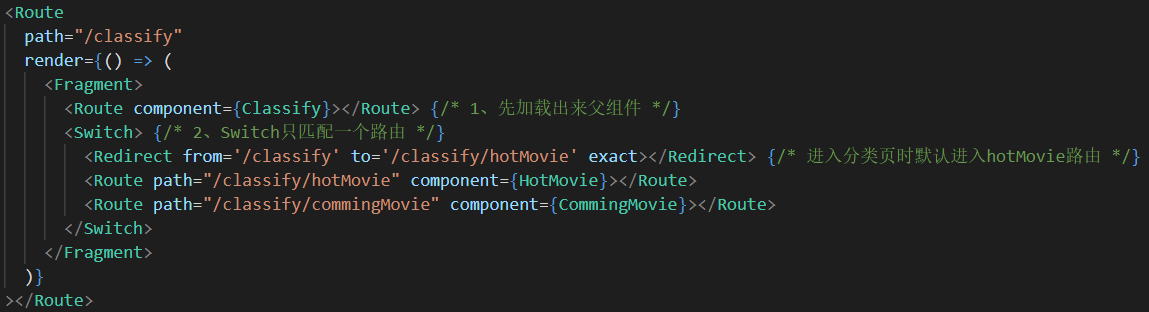
8、路由重定向:
import {Redirect} from 'react-router-dom'

9、Switch
作用:只匹配一个路由
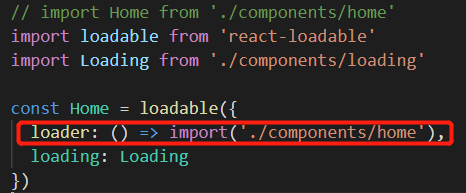
10、路由懒加载:
①安装:npm i react-loadable
②引入并使用:
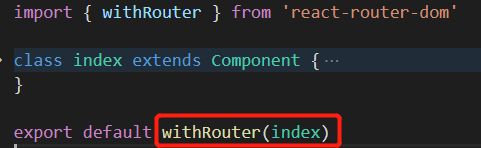
11、withRouter:
高阶组件:
作用:可以给当前组件的props传入一个对象,这个对象就是路由的三个值{history match location}
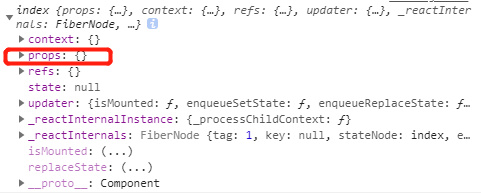
当使用render方式渲染组件时,如果没有手动去传路由的三个值:

此时在order组件中的this.props是一个空对象:
使用withRouter将组件包裹:
此时再打印this:
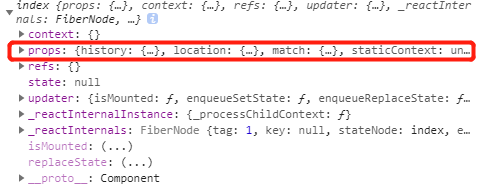
说明withRouter给当前被包裹的组件传递了路由的三个值,就可以正常使用编程式导航等功能了。
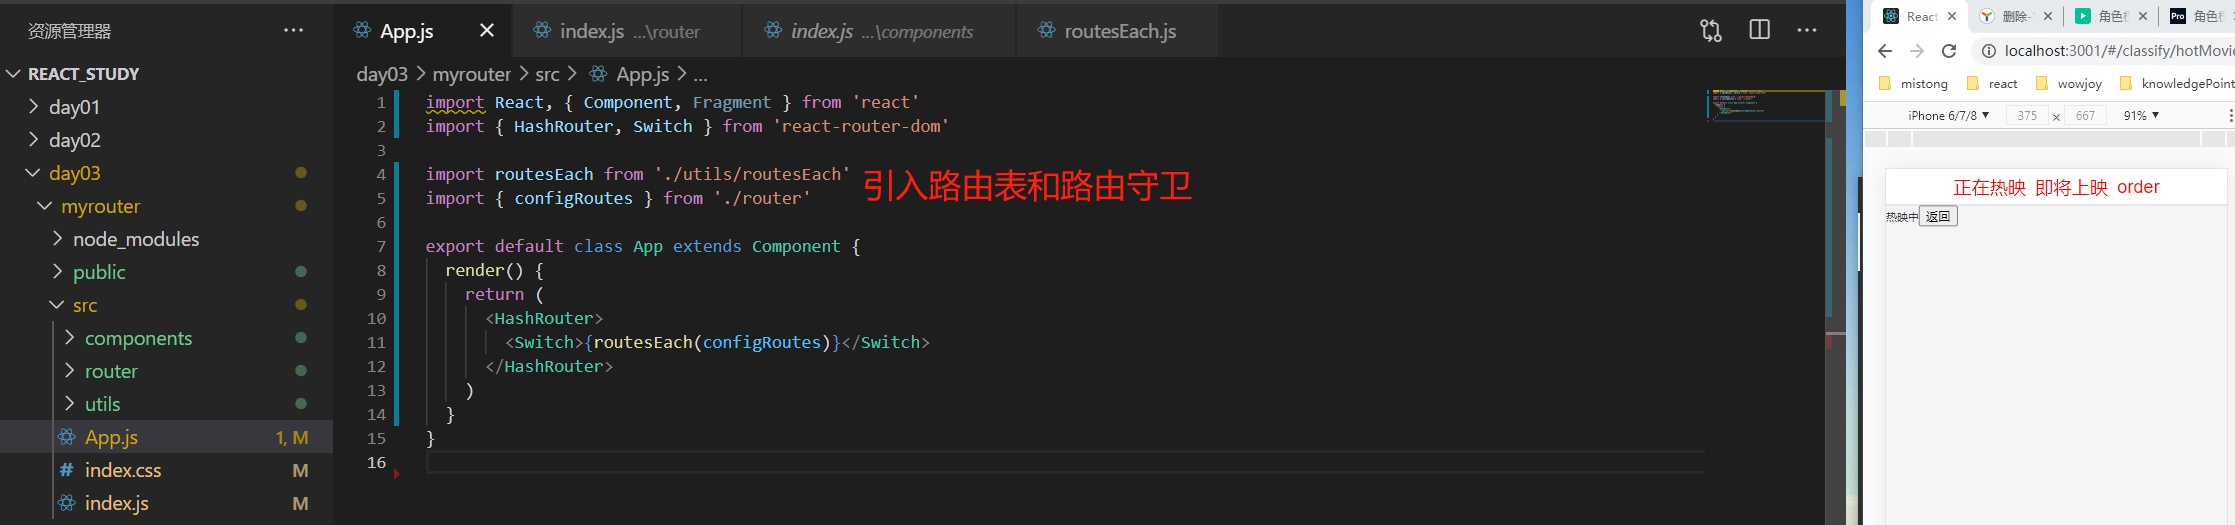
路由表封装:
1、在components中新建index.js文件,将所有的页面都用懒加载的方式引入,整体导出出去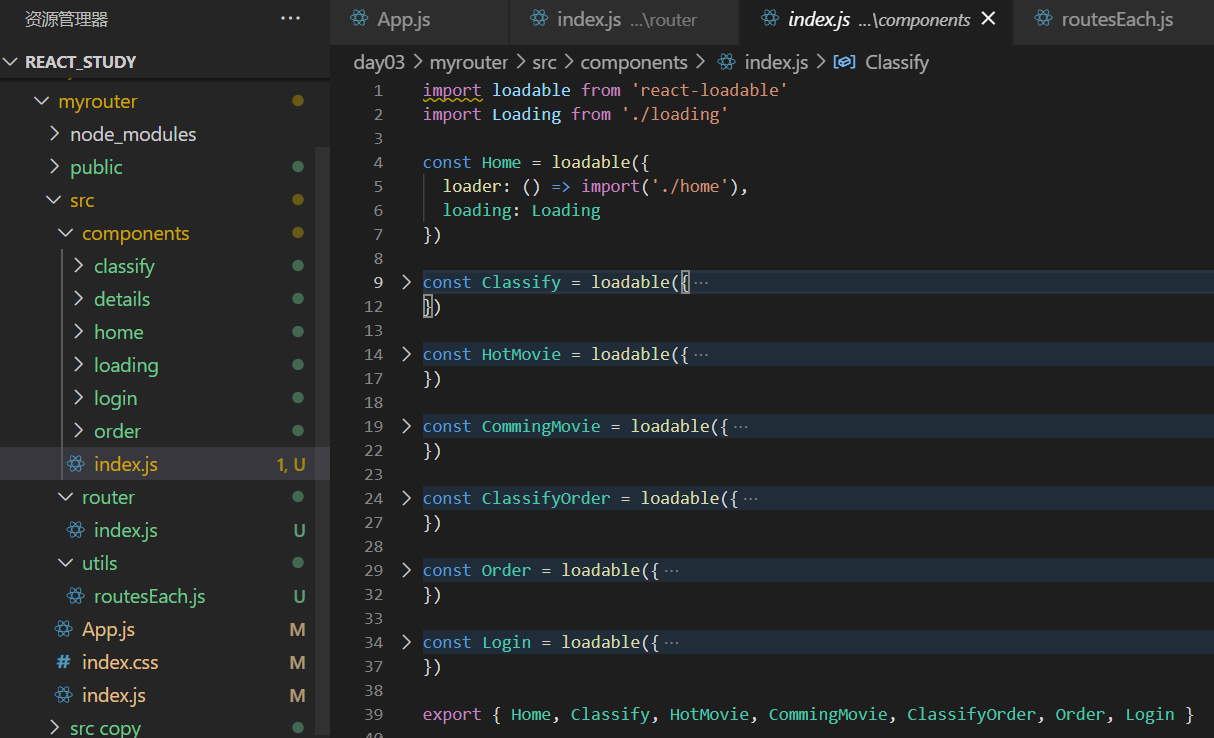
2、src下新建router/index.js:将路由放入路由表中
        import {
          Home,
          Classify,
          HotMovie,
          CommingMovie,
          ClassifyOrder,
          Order,
          Login
        } from '../components'

        // 有layout布局的路由表
        export const layoutRoutes = [
          {
            path: '/home',
            component: Home,
            icon: '',
            meta: {}
          },
          {
            path: '/classify',
            component: Classify,
            icon: '',
            meta: {},
            children: [
              {
                path: '/classify/hotMovie',
                component: HotMovie,
                meta: {}
              },
              {
                path: '/classify/commingMovie',
                component: CommingMovie,
                meta: {}
              },
              {
                path: '/classify/order',
                component: ClassifyOrder,
                meta: {}
              }
            ]
          },
          {
            path: '/order',
            component: Order,
            icon: '',
            meta: {}
          }
        ]

        // 没有layout布局的路由表
        export const notLayoutRoutes = [
          {
            path: '/login',
            component: Login,
            meta: {}
          }
        ]

        // 所有路由的配置项
        export const configRoutes = layoutRoutes.concat(notLayoutRoutes)
3、src下新建utils/routesEach.js:传入路由表返回对应的组件,并且模拟vue中路由守卫
        import React, { Fragment } from 'react'
        import { Switch, Redirect, Route } from 'react-router-dom'

        export default (routes) => {
          function routesEach(routeConfig) {
            return routeConfig.map((item) => {
              if (item.children) {
                return (
                  <Route
                    path={item.path}
                    key={item.path}
                    render={() => {
                      return (
                        <Fragment>
                          <Route component={item.component}></Route>
                          <Switch>
                            <Redirect
                              from={item.path}
                              to={item.children[0].path} // 重定向到第一个路由
                              exact
                            ></Redirect>
                            {item.children.map((child) => {
                              return (
                                <Route
                                  path={child.path}
                                  key={item.path}
                                  render={() => {
                                    return isAuthRequired(child) // 权限验证
                                  }}
                                ></Route>
                              )
                            })}
                          </Switch>
                        </Fragment>
                      )
                    }}
                  ></Route>
                )
              } else {
                return (
                  <Route
                    path={item.path}
                    key={item.path}
                    render={() => {
                      return isAuthRequired(item)
                    }}
                  ></Route>
                )
              }
            })
          }
          // 权限验证:路由守卫
          function isAuthRequired(item) {
            // 先判断当前路由是否需要权限验证
            if (item.meta.authRequired) {
              // 当前路由需要权限验证,判断token是否存在
              if (localStorage.getItem('token')) {
                return <item.component></item.component>
              } else {
                return <Redirect to="/login"></Redirect>
              }
            } else {
              return <item.component></item.component> // 不需要权限验证的路由可以直接返回
            }
          }
          return routesEach(routes)
        }
4、app.js