首先呢,先在windows环境搞个redis吧,下载地址:http://redis.cn/download.html
启动命令:cmd redis-server.exe redis.windows.conf
停止命令,先启动客户端redis-cli.exe 再输入shutdown
添加密码:修改redis.windows.conf 搜索requirepass
密码认证 在客户端输入auth 密码
以服务方式启动redis ,先查看windwos是否已经存在redis服务,如果存在 则执行 redis-server.exe --service-uninstall
如果不存在,则执行 redis-server.exe --service-install redis.windows.conf
然后手动启动redis服务
接下来编写springboot代码
xml如下:
<dependencies>
<!-- 必须引入,否则报错 -->
<dependency>
<groupId>org.springframework.boot</groupId>
<artifactId>spring-boot-starter-security</artifactId>
</dependency>
<dependency>
<groupId>org.springframework.boot</groupId>
<artifactId>spring-boot-starter-data-redis</artifactId>
</dependency>
<dependency>
<groupId>org.springframework.boot</groupId>
<artifactId>spring-boot-starter-web</artifactId>
</dependency>
<dependency>
<groupId>org.springframework.session</groupId>
<artifactId>spring-session-data-redis</artifactId>
</dependency>
<!-- 热部署插件 -->
<dependency>
<groupId>org.springframework.boot</groupId>
<artifactId>spring-boot-devtools</artifactId>
<optional>true</optional>
</dependency>
<dependency>
<groupId>org.springframework.boot</groupId>
<artifactId>spring-boot-starter-test</artifactId>
<scope>test</scope>
<exclusions>
<exclusion>
<groupId>org.junit.vintage</groupId>
<artifactId>junit-vintage-engine</artifactId>
</exclusion>
</exclusions>
</dependency>
</dependencies>
<build>
<plugins>
<plugin>
<groupId>org.springframework.boot</groupId>
<artifactId>spring-boot-maven-plugin</artifactId>
</plugin>
</plugins>
</build>
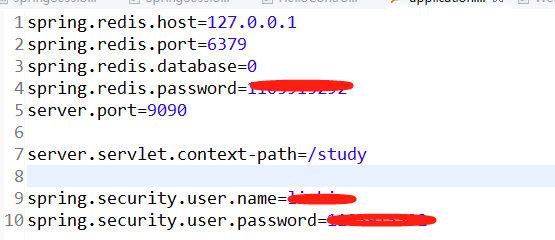
application.properties 如下

Controller类如下:
@RestController
public class HelloController {
@Value("${server.port}")
Integer port;
@GetMapping("set")
public String set(HttpSession session) {
session.setAttribute("user", port);
return String.valueOf(port);
}
@GetMapping("get")
public String get(HttpSession session) {
Integer port = (Integer) session.getAttribute("user");
return "port:" + port;
}
}
config配置类如下,忽略get和set请求的安全认证
@Configuration // 配置类
@EnableWebSecurity // 注解开启Spring Security的功能
public class WebSecurityConfig extends WebSecurityConfigurerAdapter {
//等同于在application配置
@Autowired
public void configureGlobal(AuthenticationManagerBuilder auth) throws Exception {
auth.inMemoryAuthentication().passwordEncoder(new BCryptPasswordEncoder()).withUser("liubin")
.password(new BCryptPasswordEncoder().encode("123456")).roles("USER");
}
@Override
public void configure(WebSecurity web) {
super.configure(web);
//忽略get和set请求,如果不忽略,则会自动跳转到认证页面,需要认证后才能访问所有请求
web.ignoring().antMatchers("/get").antMatchers("/set");
}
/**
以“/css/**”开头的资源和“/index”资源不需要验证,外界请求可以直接访问这些资源。
以“/user/**”和“/blogs/**”开头的资源需要验证,并且需要用户的角色是“USER”。
表单登录的地址是“/login”,登录失败的地址是“/login-error”。
异常处理会重定向到“/401”界面。
注销登录成功,重定向到首页。
**/
/* @Override
protected void configure(HttpSecurity http) throws Exception {
http
.authorizeRequests()
.antMatchers("/css/**", "/index").permitAll()
.antMatchers("/get/**").hasRole("USER")
.antMatchers("/set/**").hasRole("USER")
.and()
.formLogin().loginPage("/login").failureUrl("/login-error")
.and()
.exceptionHandling().accessDeniedPage("/401");
http.logout().logoutSuccessUrl("/");
}*/
}
将项目打成jar包,使用maven install 或者到pom.xml路径下,执行mvn package命令,会将打好的jar包放入target目录下
使用jar包启动不同端口的两个项目
java -jar xxxx.jar --server.port=8081
java -jar xxx.jar --server.port=8082
访问http://localhost:8081/study/set 将端口放入session, 在访问http://localhost:8082/study/get 取出session ,可以看到取出的端口是一样的,session实现共享.