两个参考地址:
NGINX的百度百科:https://baike.baidu.com/item/nginx/3817705?fr=aladdin
NGINX的中文网站:http://www.nginx.cn/doc/
keepalived官网: http://www.keepalived.org/
获取安装包和源码
Nginx组件在Windows服务器上的安装与部署,重点是,生产环境建议还是使用Linux版本的Nginx,Windows 版本的 Nginx在访问量较大的网站上并不是十分稳定,可能出现需要定期重启得情况;
所以不建议在Windows服务器上安装和部署Nginx组件!
一、BIN包安装
获取最新的安装包,使用winscp或者lrzsz软件上传至服务器,
[root@localhost ~]# sha256sum Nginx_INSTALL_2016-11-05_00-03-15.bin #计算文件sha值,文件名称以官网的为准
c39728537943b1d263da0d92a5af2824a21924437c955872bee58cda4b2ce336  Nginx_INSTALL_2016-11-05_00-03-15.bin
#上面的一长串的字符就是我们要对比的内容
[root@localhost ~]# sh Nginx_INSTALL_2016-11-05_00-03-15.bin #执行安装操作
#######省略输出########
clean the install tmp files......
try start the nginx...
Starting nginx (via systemctl):                            [  OK  ]
start_success
try stop the nginx...
Stopping nginx (via systemctl):                            [  OK  ]
stop success

出现如上信息表示安装成功,使用BIN包安装后,我们会帮你尝试启动服务并检测是否启动,如果再次执行安装命令
[root@localhost ~]# sh Nginx_INSTALL_2016-11-05_00-03-15.bin #再次执行安装命令
.........省略输出.........

we find nginx is install,you want reinstall?[y/n] #请输入`y`、`n`选择是否重新安装
如果确认重新安装,我们会将已有的nginx.conf文件备份为/root/nginx.conf.bak文件,且会自动加载到开机自启动项中
[root@localhost ~]# chkconfig --list   #检查是否设置开机启动项
...................省略输出...................
netconsole      0:off   1:off   2:off   3:off   4:off   5:off   6:off
network         0:off   1:off   2:on    3:on    4:on    5:on    6:off
nginx           0:off   1:off   2:on    3:on    4:on    5:on    6:off   #出现该项就可以了
BIN包操作系统支持范围如下
该BIN包目前支持的的操作系统如下,这里需要着重注意,BIN包支持安装的前提是系统需要最小化安装,如果未最小化安装肯定安装不成功!

二、源码编译安装
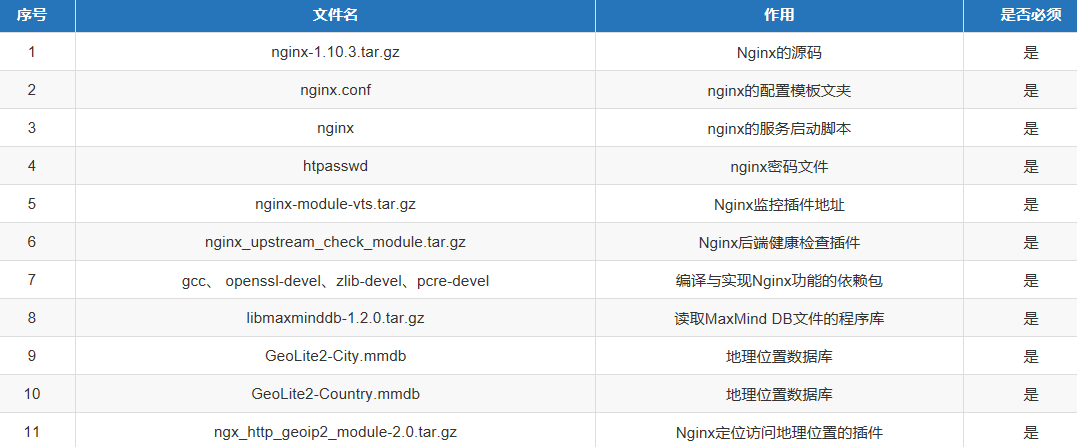
使用官网的源码编译安装Nginx,首先获取官方源码,我们需要准备的材料如下

2.1、安装系统依赖包
该步骤需要连接网络,且要可以使用yum源,对于RedHat的为授权用户可能需要进行换源操作
[root@localhost ~]# yum install gcc openssl openssl-devel zlib zlib-devel pcre pcre-devel patch GeoIP GeoIP-devel  #安装依赖包

# gcc:编译源码时需要
# openssl openssl-devel:配置ssl证书时需要,为了网站应用的安装,建议安装
# zlib zlib-devel:如果启动gzip压缩功能,则必须安装该包,为了更好的网络传输效率,建议安装
# pcre pcre-devel:如果需要使用Nginx的rewrite功能则需要安装包,在主流的网站类应用中可能会需要用到,建议安装
# patch:打Nginx补丁包时需要使用到
# GeoIP GeoIP-devel:实现Nginx定位地理位置信息的依赖包

#如果你的操作系统是Centos7.0或者RedHat7.0的需要更新一下systemd这个系统包,以解决开机启动项的问题
[root@localhost redis-3.0.6]# yum update systemd
2.2、上传源码包并检查防火墙与selinux的设置
[root@localhost ~]#  setenforce 0 #  临时关闭selinx
[root@localhost ~]#  sed  -i 's/SELINUX=enforcing/SELINUX=disabled/g' /etc/sysconfig/selinux #修改selinux的配置文件,下次重启时生效
[root@localhost ~]#  sed  -i 's/SELINUX=enforcing/SELINUX=disabled/g' /etc/selinux/config


#关闭防火墙,如果想针对特殊端口配置请参照《Linux快速入门手册》

# Centos7或RedHat7以后关闭防火墙,重启后会再次开启
[root@localhost ~]#  service firewalld stop
# Centos6或RedHat6关闭防火墙,重启后会再次开启
[root@localhost ~]#  service iptables stop
2.3、编译安装Nginx
请按照上面表格中所列的内容上传所有的编译文件至服务器的/root目录下
#编译安装libmaxminddb
[root@node1 ~]# tar -zxvf libmaxminddb-1.2.0.tar.gz
[root@node1 ~]# cd libmaxminddb-1.2.0
[root@node1 ~]# ./configure && make && make install
[root@node1 ~]# cp -rf  /usr/local/include/maxminddb*.h  /usr/include/
[root@node1 ~]# ldconfig /usr/local/lib #此步骤必须做因为部分系统可能出现无法加载依赖库的问题

#解压安装包

[root@localhost ~]# tar -zxvf nginx-1.10.3.tar.gz
[root@localhost ~]# tar -zxvf nginx_upstream_check_module.tar.gz
[root@localhost ~]# tar -zxvf nginx-module-vts.tar.gz
[root@localhost ~]# tar -zxvf ngx_http_geoip2_module-2.0.tar.gz
[root@localhost ~]# cd nginx-1.10.3 #必须要进入到nginx的源码目录中,因为下面的打布丁步骤与目录路径密切相关
[root@localhost nginx-1.10.3]# patch -p0 < ../nginx_upstream_check_module/check_1.9.2+.patch #添加后端健康检查的补丁
############命令输出##################
patching file src/http/modules/ngx_http_upstream_hash_module.c
patching file src/http/modules/ngx_http_upstream_ip_hash_module.c
patching file src/http/modules/ngx_http_upstream_least_conn_module.c
patching file src/http/ngx_http_upstream_round_robin.c
patching file src/http/ngx_http_upstream_round_robin.h

#开始编译Nginx,启用性能监控插件,后端检查插件,安装置/opt/nginx1.10.3
[root@localhost nginx-1.10.3]# ./configure --with-stream --add-module=../nginx_upstream_check_module --add-module=../nginx-module-vts --add-module=../ngx_http_geoip2_module-2.0  --with-http_ssl_module   --prefix=/opt/nginx1.10.3
[root@localhost nginx-1.10.3]# make
[root@localhost nginx-1.10.3]# make install

####Nginx的配置工作
[root@localhost ~]# ln -s /opt/nginx1.10.3 /usr/local/nginx  #在/usr/local目录下创建一个nginx的链接,服务的启动脚本依赖该目录
[root@localhost ~]# cp -rf nginx.conf /usr/local/nginx/conf/ #将配置模板文件覆盖默认配置文件
cp: overwrite ‘/usr/local/nginx/conf/nginx.conf’? y #确认覆盖
[root@localhost ~]# cp htpasswd /usr/local/nginx/conf/ #复制密码文件至配置文件目录,如果没有该文件会导致性能监控插件页面打不开
[root@localhost ~]# cp -rf GeoLite2-City.mmdb /usr/local/nginx/conf/ #将地理位置书库拷贝至默认配置文件文件夹
[root@localhost ~]# cp -rf GeoLite2-Country.mmdb /usr/local/nginx/conf/ #将地理位置数据库拷贝至默认配置文件文件夹
[root@localhost ~]# echo 'export PATH=/usr/local/nginx/sbin:$PATH' >> /etc/profile && source /etc/profile #将Nginx安装路径加入到环境变量中
[root@localhost ~]# cp nginx /etc/init.d/ #拷贝Nginx的启动脚本以注册服务
[root@localhost ~]# chmod +x /etc/init.d/nginx #赋予启动脚本可执行权限
[root@localhost ~]# useradd -r -M nginx # 添加一个nginx用户
[root@localhost ~]# chmod +x -R /usr/local/nginx # 给nginx安装目录添加可执行权限
[root@localhost ~]# chkconfig nginx on #设置nginx随机启动
三、验证是否安装成功
按照前面的章节完成Nginx的安装,不管是BIN包还是编译安装都支持如下方式启动与停止Nginx
service nginx start # 启动Nginx
service nginx stop # 停止Nginx
service nginx restart # 重新启动Nginx
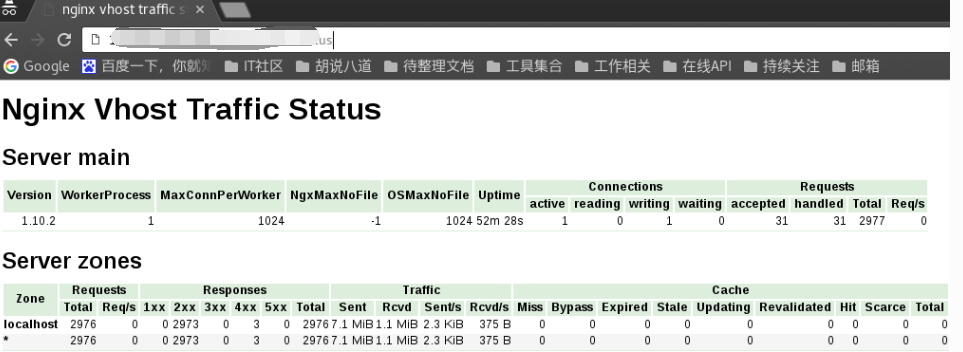
为了检验是否安装成功,可以在浏览器端输入http://ip:port/xxx访问地址, 输入用户名和密码即可见如下图所示的监控数据表示安装成功

四、卸载
不管使用BIN包安装还是编译安装,卸载Nginx的方式是一样的,删除安装文件即可,但是如果代理一些静态网站,则需要将网站目录事先备份出来。
[root@localhost ]# service nginx stop # 停止正在运行的Nginx
[root@localhost ]# rm -rf /opt/nginx1.10.3
[root@localhost ]# rm -rf /usr/local/nginx
[root@localhost ]# rm -rf /etc/init.d/nginx
五、Nginx高可用配置
配置Nginx的高可用之前请确认正确安装部署单台服务器上的Nginx。Nginx高可用的实现借助于keepalived,因此配置Nginx的关键在于安装与配置keepalived。
5.1、编译安装部署keepalived
需要在集群内每一台服务器上安装配置keepalived。从官网获取到keepalived的安装部署包。具体的安装材料需求如下:

[root@localhost ~]# yum install gcc openssl  openssl-devel  popt popt-devel #编译与功能依赖包
[root@localhost ~]# tar -zxvf keepalived-1.2.16.tar.gz #解压安装部署包
[root@localhost keepalived-1.2.16]# cd keepalived-1.2.16
#编译安装keepalived
[root@localhost keepalived-1.2.16]# ./configure
[root@localhost keepalived-1.2.16]# make
[root@localhost keepalived-1.2.16]# make install
[root@localhost keepalived-1.2.16]# cp /usr/local/sbin/keepalived /usr/sbin/
[root@localhost keepalived-1.2.16]# cp /usr/local/etc/rc.d/init.d/keepalived /etc/init.d/
[root@localhost keepalived-1.2.16]# cp /usr/local/etc/sysconfig/keepalived /etc/sysconfig/
[root@localhost keepalived-1.2.16]# chmod +x /etc/init.d/keepalived
[root@localhost keepalived-1.2.16]# chkconfig keepalived on
[root@localhost keepalived-1.2.16]# mkdir /etc/keepalived
5.2、配置Nginx高可用
主节点的配置
如上图所示,首先在Nginx_Master节点上配置keepalived。
[root@localhost ~]# vi /etc/keepalived/keepalived.conf #创建keepalived的配置文件

#####配置文件内容###########
! Configuration File for keepalived

global_defs {
   notification_email {
     #abc@example.com
   }
   #notification_email_from admin@example.com
   #smtp_server smtp.example.com
   #smtp_connect_timeout 30
   router_id nginx_master
}

vrrp_script chk_http_port {
    script "</dev/tcp/127.0.0.1/80"    #监控本地Nginx端口,根据实际配置
    interval 1
    weight -10
}

vrrp_instance VI_1 {
    state MASTER                    #主服务器
    interface eth0                #通信网卡,根据实际配置
    virtual_router_id 51  #路由标识,同网段内不可冲突且需与备用服务器一致
    priority 100                    #优先级,0-254
    advert_int 1
    authentication {
        auth_type PASS
        auth_pass qwe123!@#
    }
    virtual_ipaddress {
        192.168.202.200            #虚拟IP,根据实际配置
    }
    track_script {
        chk_http_port
    }
}
[root@localhost ~]# service keepalived start #启动keepalived服务
从节点的配置
编辑从节点的keepalived配置文件。
[root@localhost ~]# vi /etc/keepalived/keepalived.conf #创建keepalived的配置文件

#####配置文件内容###########
! Configuration File for keepalived

global_defs {
   notification_email {
     #abc@example.com
   }
   #notification_email_from admin@example.com
   #smtp_server smtp.example.com
   #smtp_connect_timeout 30
   router_id nginx_backup
}

vrrp_script chk_http_port {
    script "</dev/tcp/127.0.0.1/80"    #监控本地Nginx端口
    interval 1                        #执行间隔
    weight -10                    #执行失败,服务优先级-10
}

vrrp_instance VI_1 {
    state BACKUP                    #备用服务器
    interface eth0                    #通信网卡,根据实际配置
    virtual_router_id 51                #路由标识,需与主服务器一致,同网段内不可冲突
    priority 99                        #优先级,比主服务器要低,0-254
    advert_int 1
    authentication {
        auth_type PASS
        auth_pass qwe123!@#
    }
    virtual_ipaddress {
        192.168.202.200            #虚拟IP,根据实际配置
    }
    track_script {
        chk_http_port
    }
}
[root@localhost ~]# service keepalived start #启动keepalived服务
分别在主服务器和从服务器上依次启动nginx与keepalived`服务即可启用高可用构架。
如何检验高可用构架
首先按照上节所说的配置配置好keepalived,并按照顺序启动服务,检测方法如下。
- 在主服务器上使用
ip addr查看主服务器是否获取到虚拟IP -
[root@localhost ~]# ip addr
1: lo: <LOOPBACK,UP,LOWER_UP> mtu 65536 qdisc noqueue state UNKNOWN  #本地网卡不用看
    link/loopback 00:00:00:00:00:00 brd 00:00:00:00:00:00
    inet 127.0.0.1/8 scope host lo
       valid_lft forever preferred_lft forever
    inet6 ::1/128 scope host
       valid_lft forever preferred_lft forever
2: enp0s3: <BROADCAST,MULTICAST,UP,LOWER_UP> mtu 1500 qdisc pfifo_fast state UP qlen 1000 #网卡名为你配置文件中的值
    link/ether 08:00:27:49:7c:9c brd ff:ff:ff:ff:ff:ff
    inet 192.168.149.177/24 brd 192.168.149.255 scope global enp0s3
       valid_lft forever preferred_lft forever
    inet 192.168.149.190/32 scope global enp0s3 #虚拟IP
       valid_lft forever preferred_lft forever
-
确认好
虚拟IP已经绑定在指定网卡上,在浏览器中键入http://虚拟IP:port/xxx能够看到监控页面即可,完成以上检测方可进行第二步配置,否则请检查你的配置是否按照文档进行配置。 -
确认单台服务器能够正确访问,可以将主服务器
nginx服务停止,再次使用ip addr观察虚拟IP是否在绑定网卡上(正确的状态是不应该存在),确认不存在后,在从服务器上使用ip addr查看虚拟ip是否切换到从服务器上(方法同主服务器上的操作),确认虚拟IP存在后再次访问http://虚拟IP:port/xxxx如果依然可用即可证明高可用的Nginx配置成功!
-