搭建Mysql的主从环境,一台主机,一台从机
主从原理:
1、在主库上把数据更改记录到二进制日志(Binary Log)中,这些记录称为二进制日志事件。
2、从库通过IO线程将主库上的日志复制到自己的中继日志(Relay Log)中。
3、从库通过SQL线程读取中继日志中的事件,将其重放到自己数据上。
Mysql的一些关键文件的位置:
1、配置文件位置:
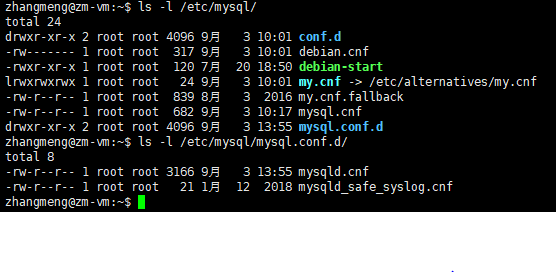
配置文件一般在/etc/mysql中,如下所示:
2、Binary Log所在的位置
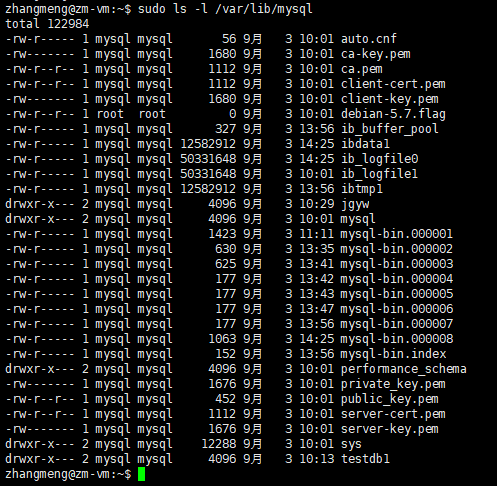
Binary Log文件一般放在/var/lib/mysql 目录,如下所示:
在/var/lib/mysql 下还会有各个数据库的目录,每个目录下就是这个数据库里面的表文件,例如jgyw数据库就会对应一个jgyw目录,目录内容如下所示:

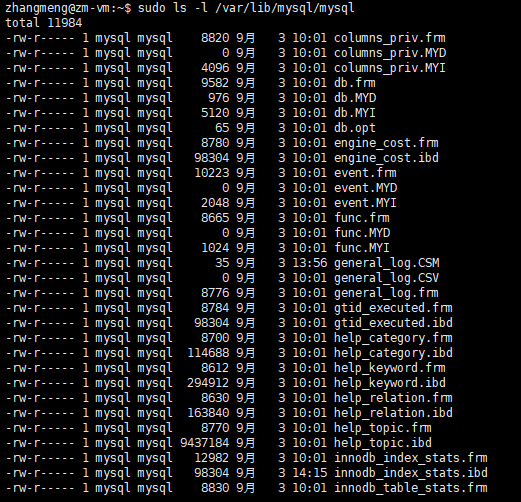
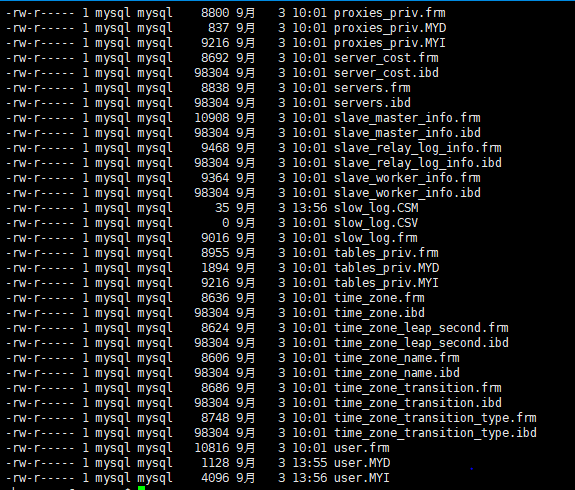
在/var/lib/mysql下还有一个mysql目录,这个是自带的mysql数据库,里面包含很多表,内容如下:
3、log所在的位置
log一般在/var/log/mysql 目录下,如下:

现在这个目录下只有一个error.log,一般还会有慢查询日志mysql-slow.log, Binary Log日志 mysql-bin.log,通用日志mysql.log。
4、字符集文件
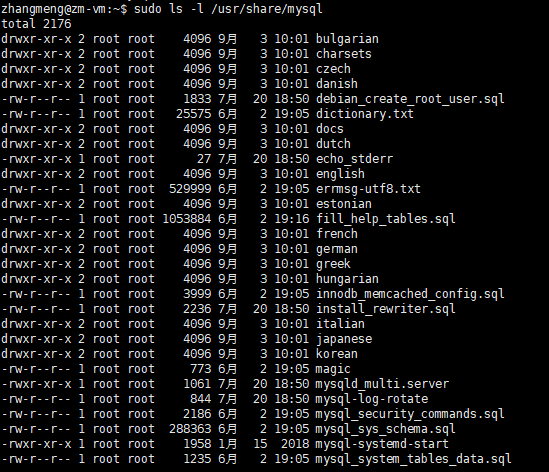
字符集文件一般在 /usr/share/mysql 目录,如下:
5、pid文件和sock文件
pid文件和sock文件一般在/var/run/mysqld 目录下,如下所示:

配置主库:
1、修改master机器的配置, 修改配置文件/etc/mysql/mysql.conf.d/mysqld.cnf
  1 #
  2 # The MySQL database server configuration file.
  3 #
  4 # You can copy this to one of:
  5 # - "/etc/mysql/my.cnf" to set global options,
  6 # - "~/.my.cnf" to set user-specific options.
  7 #
  8 # One can use all long options that the program supports.
  9 # Run program with --help to get a list of available options and with
 10 # --print-defaults to see which it would actually understand and use.
 11 #
 12 # For explanations see
 13 # http://dev.mysql.com/doc/mysql/en/server-system-variables.html
 14
 15 # This will be passed to all mysql clients
 16 # It has been reported that passwords should be enclosed with ticks/quotes
 17 # escpecially if they contain "#" chars...
 18 # Remember to edit /etc/mysql/debian.cnf when changing the socket location.
 19
 20 # Here is entries for some specific programs
 21 # The following values assume you have at least 32M ram
 22
 23 [mysqld_safe]
 24 socket        = /var/run/mysqld/mysqld.sock
 25 nice        = 0
 26
 27 [mysqld]
 28 server-id=1
 29 log-bin=mysql-bin
 30 binlog_format=ROW
 31 binlog_row_image=minimal
 32 binlog-do-db=jgyw
 33 #
 34 # * Basic Settings
 35 #
 36 user        = mysql
 37 pid-file    = /var/run/mysqld/mysqld.pid
 38 socket        = /var/run/mysqld/mysqld.sock
 39 port        = 3306
 40 basedir        = /usr
 41 datadir        = /var/lib/mysql
 42 tmpdir        = /tmp
 43 lc-messages-dir    = /usr/share/mysql
 44 skip-external-locking
 45 #
 46 # Instead of skip-networking the default is now to listen only on
 47 # localhost which is more compatible and is not less secure.
 48 # bind-address        = 127.0.0.1
 49 bind-address=0.0.0.0
 50 #
 51 # * Fine Tuning
 52 #
 53 key_buffer_size        = 16M
 54 max_allowed_packet    = 16M
 55 thread_stack        = 192K
 56 thread_cache_size       = 8
 57 # This replaces the startup script and checks MyISAM tables if needed
 58 # the first time they are touched
 59 myisam-recover-options  = BACKUP
 60 #max_connections        = 100
 61 #table_open_cache       = 64
 62 #thread_concurrency     = 10
 63 #
 64 # * Query Cache Configuration
 65 #
 66 query_cache_limit    = 1M
 67 query_cache_size        = 16M
 68 #
 69 # * Logging and Replication
 70 #
 71 # Both location gets rotated by the cronjob.
 72 # Be aware that this log type is a performance killer.
 73 # As of 5.1 you can enable the log at runtime!
 74 #general_log_file        = /var/log/mysql/mysql.log
 75 #general_log             = 1
 76 #
 77 # Error log - should be very few entries.
 78 #
 79 log_error = /var/log/mysql/error.log
 80 #
 81 # Here you can see queries with especially long duration
 82 #slow_query_log        = 1
 83 #slow_query_log_file    = /var/log/mysql/mysql-slow.log
 84 #long_query_time = 2
 85 #log-queries-not-using-indexes
 86 #
 87 # The following can be used as easy to replay backup logs or for replication.
 88 # note: if you are setting up a replication slave, see README.Debian about
 89 #       other settings you may need to change.
 90 #server-id        = 1
 91 #log_bin            = /var/log/mysql/mysql-bin.log
 92 expire_logs_days    = 10
 93 max_binlog_size   = 100M
 94 #binlog_do_db        = include_database_name
 95 #binlog_ignore_db    = include_database_name
 96 #
 97 # * InnoDB
 98 #
 99 # InnoDB is enabled by default with a 10MB datafile in /var/lib/mysql/.
100 # Read the manual for more InnoDB related options. There are many!
101 #
102 # * Security Features
103 #
104 # Read the manual, too, if you want chroot!
105 # chroot = /var/lib/mysql/
106 #
107 # For generating SSL certificates I recommend the OpenSSL GUI "tinyca".
108 #
109 # ssl-ca=/etc/mysql/cacert.pem
110 # ssl-cert=/etc/mysql/server-cert.pem
111 # ssl-key=/etc/mysql/server-key.pem
28行到32行是为了配置主从而新加的行,48行要改成49行的样子,后面会详细解释。
2、service mysql restart 重启主节点的mysql服务
3、创建从库同步数据的账号
1 grant replication slave on *.* to 'jgyw'@'192.168.61.135' identified by 'jgyw@123';
2 flush privileges;
第一行的意思是允许host为192.168.61.135的客户端以jgyw为用户名,jgyw@123为密码来访问这个数据库。
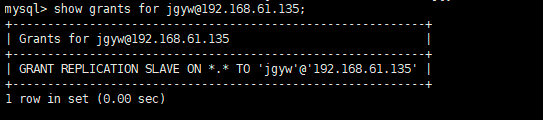
查看jgyw的授权:
1 show grants for jgyw@192.168.61.135;
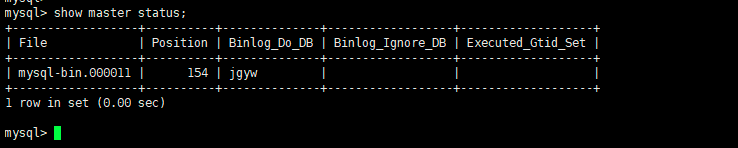
4、查看主库的执行状态
show master statusG;
主库ip:

主库状态:
配置从库:
1、修改配置文件
  1 #
  2 # The MySQL database server configuration file.
  3 #
  4 # You can copy this to one of:
  5 # - "/etc/mysql/my.cnf" to set global options,
  6 # - "~/.my.cnf" to set user-specific options.
  7 #
  8 # One can use all long options that the program supports.
  9 # Run program with --help to get a list of available options and with
 10 # --print-defaults to see which it would actually understand and use.
 11 #
 12 # For explanations see
 13 # http://dev.mysql.com/doc/mysql/en/server-system-variables.html
 14
 15 # This will be passed to all mysql clients
 16 # It has been reported that passwords should be enclosed with ticks/quotes
 17 # escpecially if they contain "#" chars...
 18 # Remember to edit /etc/mysql/debian.cnf when changing the socket location.
 19
 20 # Here is entries for some specific programs
 21 # The following values assume you have at least 32M ram
 22
 23 [mysqld_safe]
 24 socket        = /var/run/mysqld/mysqld.sock
 25 nice        = 0
 26
 27 [mysqld]
 28 server-id=2
 29 log-bin=mysql-bin
 30 binlog_format=ROW
 31 binlog_row_image=minimal
 32 replicate-do-db=jgyw
 33 #
 34 # * Basic Settings
 35 #
 36 user        = mysql
 37 pid-file    = /var/run/mysqld/mysqld.pid
 38 socket        = /var/run/mysqld/mysqld.sock
 39 port        = 3306
 40 basedir        = /usr
 41 datadir        = /var/lib/mysql
 42 tmpdir        = /tmp
 43 lc-messages-dir    = /usr/share/mysql
 44 skip-external-locking
 45 #
 46 # Instead of skip-networking the default is now to listen only on
 47 # localhost which is more compatible and is not less secure.
 48 bind-address        = 127.0.0.1
 49 #
 50 # * Fine Tuning
 51 #
 52 key_buffer_size        = 16M
 53 max_allowed_packet    = 16M
 54 thread_stack        = 192K
 55 thread_cache_size       = 8
 56 # This replaces the startup script and checks MyISAM tables if needed
 57 # the first time they are touched
 58 myisam-recover-options  = BACKUP
 59 #max_connections        = 100
 60 #table_open_cache       = 64
 61 #thread_concurrency     = 10
 62 #
 63 # * Query Cache Configuration
 64 #
 65 query_cache_limit    = 1M
 66 query_cache_size        = 16M
 67 #
 68 # * Logging and Replication
 69 #
 70 # Both location gets rotated by the cronjob.
 71 # Be aware that this log type is a performance killer.
 72 # As of 5.1 you can enable the log at runtime!
 73 #general_log_file        = /var/log/mysql/mysql.log
 74 #general_log             = 1
 75 #
 76 # Error log - should be very few entries.
 77 #
 78 log_error = /var/log/mysql/error.log
 79 #
 80 # Here you can see queries with especially long duration
 81 #slow_query_log        = 1
 82 #slow_query_log_file    = /var/log/mysql/mysql-slow.log
 83 #long_query_time = 2
 84 #log-queries-not-using-indexes
 85 #
 86 # The following can be used as easy to replay backup logs or for replication.
 87 # note: if you are setting up a replication slave, see README.Debian about
 88 #       other settings you may need to change.
 89 #server-id        = 1
 90 #log_bin            = /var/log/mysql/mysql-bin.log
 91 expire_logs_days    = 10
 92 max_binlog_size   = 100M
 93 #binlog_do_db        = include_database_name
 94 #binlog_ignore_db    = include_database_name
 95 #
 96 # * InnoDB
 97 #
 98 # InnoDB is enabled by default with a 10MB datafile in /var/lib/mysql/.
 99 # Read the manual for more InnoDB related options. There are many!
100 #
101 # * Security Features
102 #
103 # Read the manual, too, if you want chroot!
104 # chroot = /var/lib/mysql/
105 #
106 # For generating SSL certificates I recommend the OpenSSL GUI "tinyca".
107 #
108 # ssl-ca=/etc/mysql/cacert.pem
109 # ssl-cert=/etc/mysql/server-cert.pem
110 # ssl-key=/etc/mysql/server-key.pem
第18行到32行是新加的。
2、重启mysql服务 service mysqld restart
3、执行同步命令
1 # 设置主服务器ip,同步账号密码,同步位置
2 change master to master_host='192.168.61.140',master_user='jgyw',master_password='jgyw@123',master_log_file='mysql-bin.000001',master_log_pos=145;
3
4 # 开启同步功能
5 start slave;
其中master_host是主服务器的ip,master_user是在主服务器上为这个从机设置的用户名,master_password是在主服务器上为这个从机设置的密码。
4、查看从机的状态
1 show slave statusG;
从库ip:

从库状态:
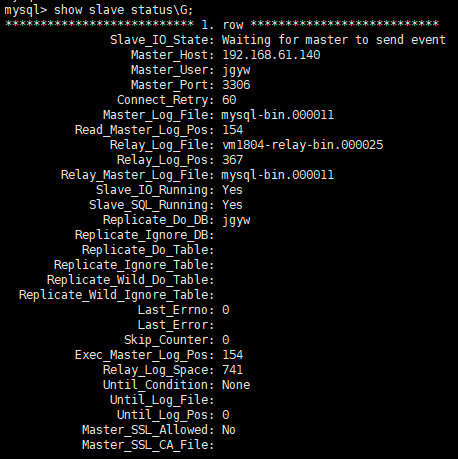
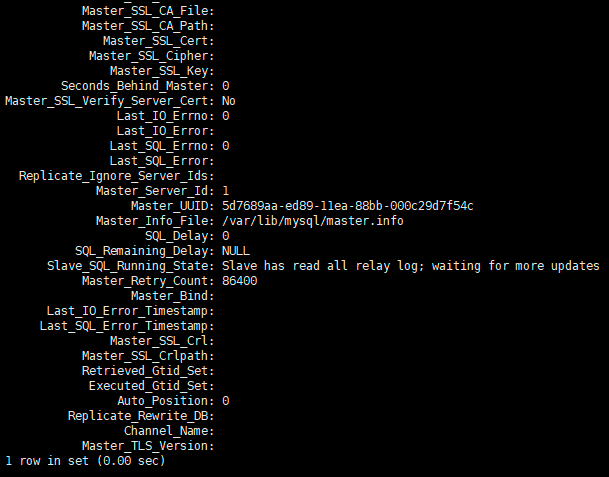
可以看到Slave_IO_Running和Slave_SQL_Running都是yes。说明同步成功了。
如果执行stop slave,那么这两行都为No,说明主从不同步。 需要执行start slave再次同步。
可能出现的问题:
1、master配置文件的第48行是默认配置,默认是监听在127.0.0.1上,这个地址是环回地址,这样的话master数据库就只能接受本机的连接,而不能接受其他机器的连接,表现出来的形式就是从库执行完start slave之后,show slave status一直显示connecting,但是始终连接不上。这时可以在从库所在的机器上用mysql命令尝试去连接一下,例如 mysql -uusername -h ip -p。如果连接不上,那么就有可能是主库的配置文件中配置了监听环回地址。这时只需要修改成通配地址即可。
如果修改成通配地址还是连接不上,那么可能是主库的授权账户有问题,使用主库进行授权时需要确认,授权的地址是从库的ip,用户名和密码也是给从库分配的,而这个用户名和密码和主库所在的机器的用户名和密码没有任何关系,这一点需要注意。
授权如果检查没有问题了,这是还是连接不上,那么很有可能是从库进行change master设置时有问题。用change master进行设置时,master_host一定是主库所在机器的ip地址,master_user是主库为这个从库授权的用户名,master_password是主库为从库授权的用户名对应的密码,这一点不要弄错了。
以上几点设置好之后基本就可以连接上了,参考:https://blog.csdn.net/qq_34355232/article/details/88396574