什么是 Eureka?
Eureka 是基于 REST(Representational State Transfer)服务。主要用于AWS云中的定位/发现服务,从而实现对于中间层服务器的负载均衡(Load Balance)和故障切换(failover)。
同时,Eureka 还提供了一个基于JAVA的客户端组件(Eurake Client),便于与Eureka Server进行交互。在客户端中,同样内置了负载均衡,用于执行基本的负载均衡轮询制度。
而 Netflix 将它们集合成一个更加负载的负载均衡器,通过对流量、资源使用等因素,提供了更加合理的加权负载均衡策略服务。Eureka 具有心跳检测、健康检查和客户端缓存等多种机制提高了服务系统的灵活性。
Eureka 架构机制
我们的 Eureka 集群服务其实就是靠 Server 与 Client 之间的交互来实现的。
1. 前面说过,Eureka Server 具有服务定位/发现的能力,在各个微服务启动时,会通过Eureka Client向Eureka Server进行注册自己的信息(例如网络信息)。
2. 一般情况下,微服务启动后,Eureka Client 会周期性向 Eureka Server 发送心跳检测(默认周期为30秒)以注册/更新自己的信息。
3. 如果 Eureka Server 在一定时间内(默认90秒)没有收到 Eureka Client 的心跳检测,就会注销掉该微服务点。
4. 同时,Eureka Server 它本身也是 Eureka Client,多个 Eureka Server 通过复制注册表的方法来完成服务注册表的同步从而达到集群的效果
创建“服务注册中心”
创建一个基础的Spring Boot工程,并在pom.xml中引入需要的依赖内容:
|
1
2
3
4
5
6
7
8
9
10
11
12
13
14
15
16
17
18
19
20
21
22
23
24
25
26
27
28
29
30
31
|
<parent>
<groupId>org.springframework.boot</groupId>
<artifactId>spring-boot-starter-parent</artifactId>
<version>1.3.5.RELEASE</version>
<relativePath/> <!-- lookup parent from repository -->
</parent>
<dependencies>
<dependency>
<groupId>org.springframework.boot</groupId>
<artifactId>spring-boot-starter-test</artifactId>
<scope>test</scope>
</dependency>
<dependency>
<groupId>org.springframework.cloud</groupId>
<artifactId>spring-cloud-starter-eureka-server</artifactId>
</dependency>
</dependencies>
<dependencyManagement>
<dependencies>
<dependency>
<groupId>org.springframework.cloud</groupId>
<artifactId>spring-cloud-dependencies</artifactId>
<version>Brixton.RELEASE</version>
<type>pom</type>
<scope>import</scope>
</dependency>
</dependencies>
</dependencyManagement>
|
通过@EnableEurekaServer注解启动一个服务注册中心提供给其他应用进行对话。这一步非常的简单,只需要在一个普通的Spring Boot应用中添加这个注解就能开启此功能,比如下面的例子:
|
1
2
3
4
5
6
7
8
9
10
|
public class Application {
public static void main(String[] args) {
new SpringApplicationBuilder(Application.class).web(true).run(args);
}
}
|
在默认设置下,该服务注册中心也会将自己作为客户端来尝试注册它自己,所以我们需要禁用它的客户端注册行为,只需要在application.properties中问增加如下配置:
|
1
2
3
4
5
|
server.port=8761
eureka.client.register-with-eureka=false
eureka.client.fetch-registry=false
eureka.client.serviceUrl.defaultZone=http://localhost:${server.port}/eureka/
|
为了与后续要进行注册的服务区分,这里将服务注册中心的端口通过server.port属性设置为8761。
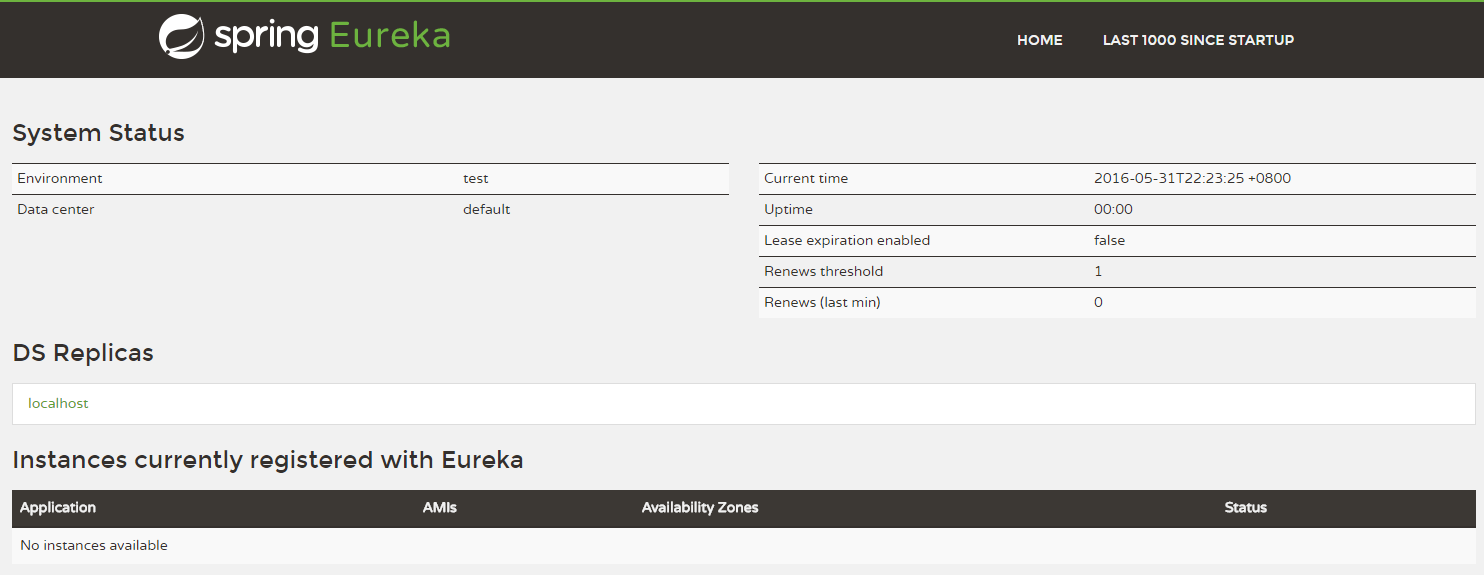
启动工程后,访问:http://localhost:8761
可以看到下面的页面,其中还没有发现任何服务
创建“服务提供方”
下面我们创建提供服务的客户端,并向服务注册中心注册自己。
假设我们有一个提供计算功能的微服务模块,我们实现一个RESTful API,通过传入两个参数a和b,最后返回a + b的结果。
首先,创建一个基本的Spring Boot应用,在pom.xml中,加入如下配置:
|
1
2
3
4
5
6
7
8
9
10
11
12
13
14
15
16
17
18
19
20
21
22
23
24
25
26
27
28
29
30
31
32
|
<parent>
<groupId>org.springframework.boot</groupId>
<artifactId>spring-boot-starter-parent</artifactId>
<version>1.3.5.RELEASE</version>
<relativePath/> <!-- lookup parent from repository -->
</parent>
<dependencies>
<dependency>
<groupId>org.springframework.boot</groupId>
<artifactId>spring-boot-starter-test</artifactId>
<scope>test</scope>
</dependency>
<dependency>
<groupId>org.springframework.cloud</groupId>
<artifactId>spring-cloud-starter-eureka</artifactId>
</dependency>
</dependencies>
<dependencyManagement>
<dependencies>
<dependency>
<groupId>org.springframework.cloud</groupId>
<artifactId>spring-cloud-dependencies</artifactId>
<version>Brixton.RELEASE</version>
<type>pom</type>
<scope>import</scope>
</dependency>
</dependencies>
</dependencyManagement>
|
其次,实现/add请求处理接口,通过DiscoveryClient对象,在日志中打印出服务实例的相关内容。
|
1
2
3
4
5
6
7
8
9
10
11
12
13
14
15
16
17
|
public class ComputeController {
private final Logger logger = Logger.getLogger(getClass());
private DiscoveryClient client;
public Integer add(@RequestParam Integer a, @RequestParam Integer b) {
ServiceInstance instance = client.getLocalServiceInstance();
Integer r = a + b;
logger.info("/add, host:" + instance.getHost() + ", service_id:" + instance.getServiceId() + ", result:" + r);
return r;
}
}
|
最后在主类中通过加上@EnableDiscoveryClient注解,该注解能激活Eureka中的DiscoveryClient实现,才能实现Controller中对服务信息的输出。
|
1
2
3
4
5
6
7
8
9
10
|
public class ComputeServiceApplication {
public static void main(String[] args) {
new SpringApplicationBuilder(ComputeServiceApplication.class).web(true).run(args);
}
}
|
我们在完成了服务内容的实现之后,再继续对application.properties做一些配置工作,具体如下:
|
1
2
3
4
5
|
spring.application.name=compute-service
server.port=8080
eureka.client.serviceUrl.defaultZone=http://localhost:8761/eureka/
|
通过spring.application.name属性,我们可以指定微服务的名称后续在调用的时候只需要使用该名称就可以进行服务的访问。
eureka.client.serviceUrl.defaultZone属性对应服务注册中心的配置内容,指定服务注册中心的位置。
为了在本机上测试区分服务提供方和服务注册中心,使用server.port属性设置不同的端口。
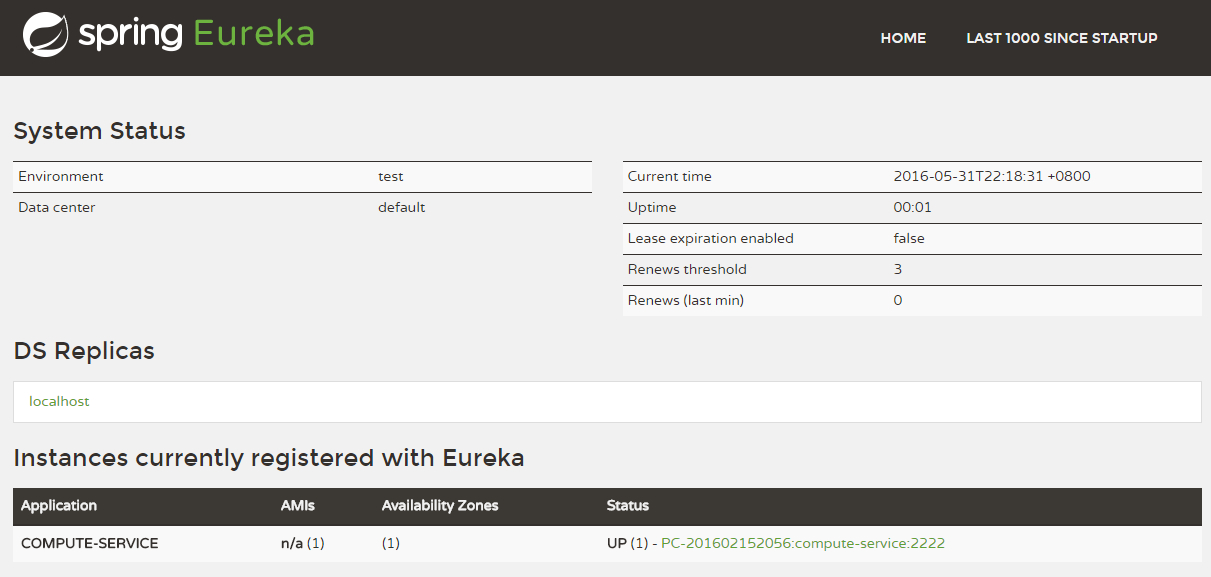
启动该工程后,再次访问:http://localhost:8761/
可以看到,我们定义的服务被注册了。

