前言
一直觉得 SnapKit 和 Masonry 这两个框架设计和封装的很好,用起来的体验也是一致的,翻了下它们的源码,对其设计方式和涉及的技术做了下记录。文章打算围绕,给谁做约束?如何设置约束?设置完后如何处理?这三个问题看看 SnapKit 和 Masnory 分别是怎么做的,正好也能够窥探下作者是如何利用 Swift 和 Objective-C 两个不同语言的不同特性做到一致的使用体验的。
如果还不了解这两个框架的使用的话可以参看它们项目 GitHub 说明:GitHub - SnapKit/SnapKit: A Swift Autolayout DSL for iOS & OS X,GitHub - SnapKit/Masonry: Harness the power of AutoLayout NSLayoutConstraints with a simplified, chainable and expressive syntax. Supports iOS and OSX Auto Layout
如果还不了解自动布局或者还没有用过的同学可以参看我三年前这篇文章,里面有详细的介绍和相关资料:深入剖析Auto Layout,分析iOS各版本新增特性 | 星光社 - 戴铭的博客
进入那三个问题之前我们先看看两个框架的整体结构图,对它们有个大概的印象。
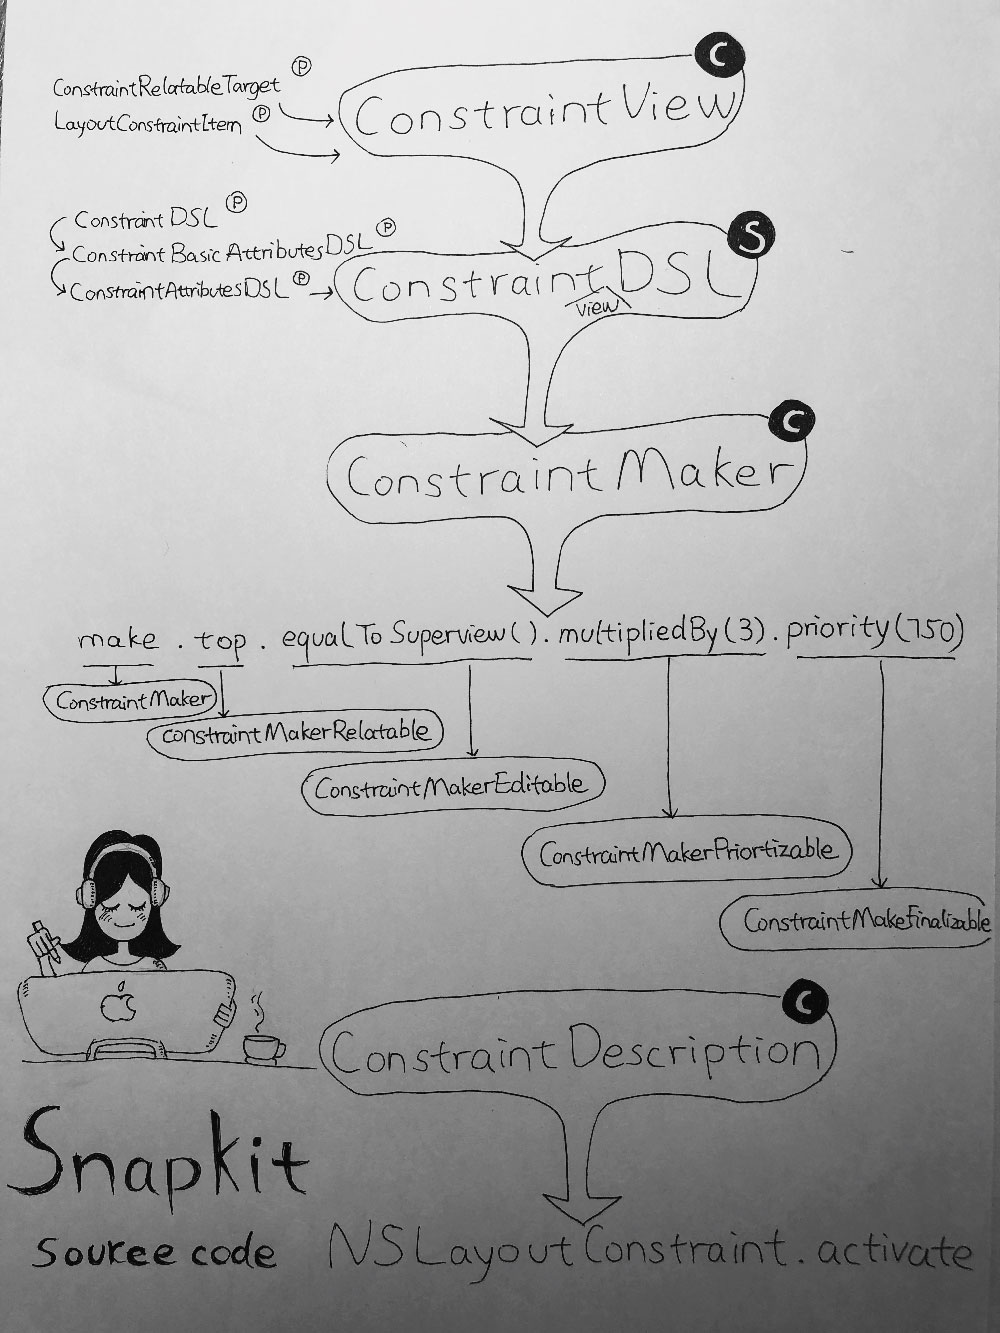
SnapKit 源码结构图
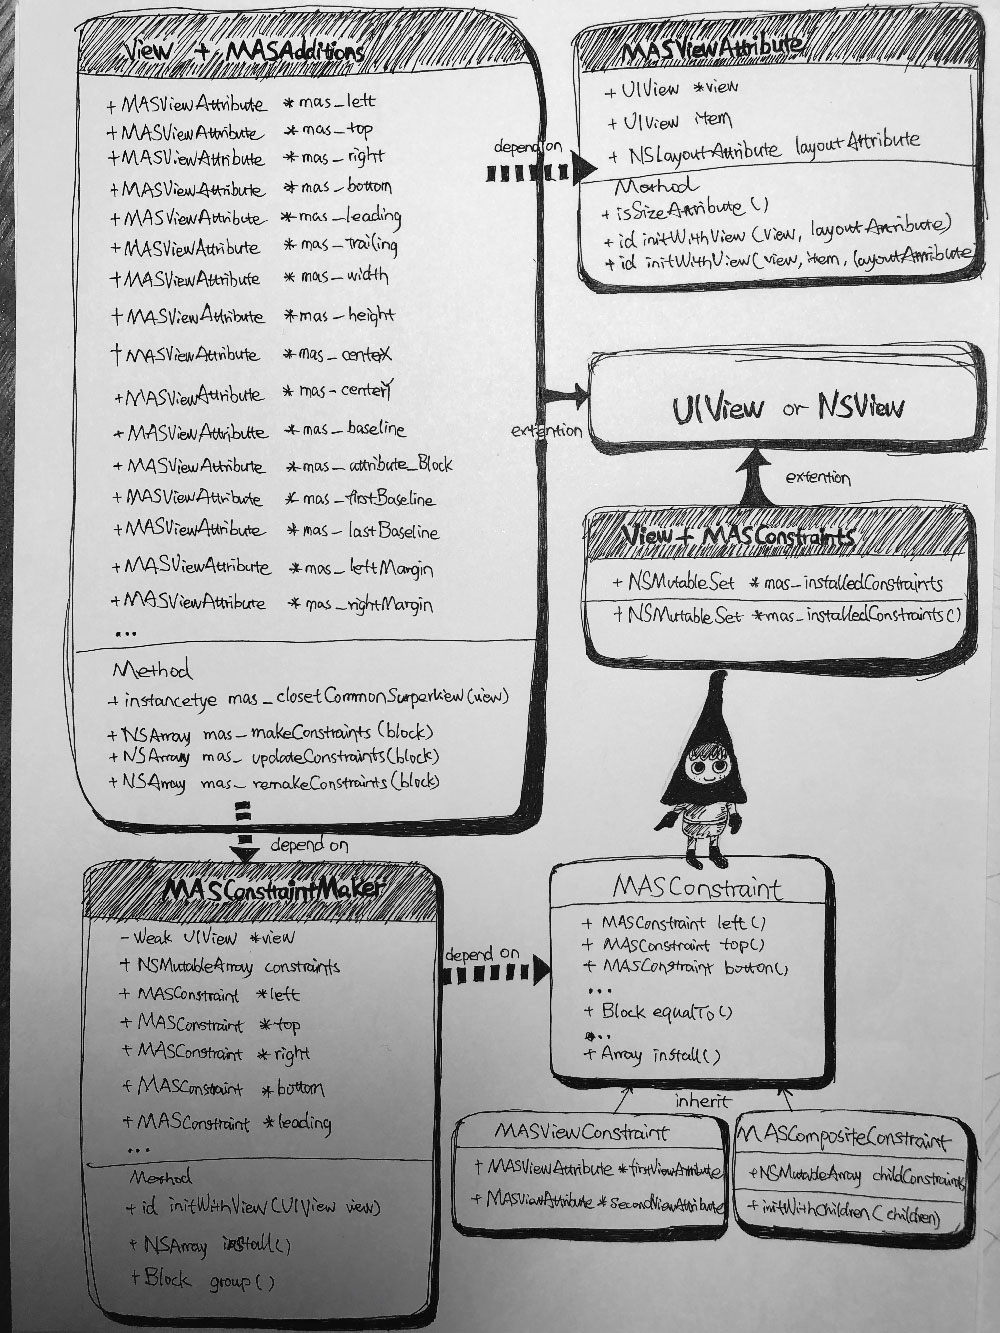
Masonry 源码结构图
接下来我们来详细看看两个框架的内部,首先来看看刚才那三个问题中的第一个问题。
给谁做约束?
SnapKit
ConstraintView
这个 View 实际上在 iOS 里就是 UIView,在 macOS 上就是 NSView。
|
1
2
3
4
5
|
#if os(iOS) || os(tvOS)
public typealias ConstraintView = UIView
#else
public typealias ConstraintView = NSView
#endif
|
对 ConstraintView 做扩展,里面定义里一个属性 snp
|
1
2
3
4
5
|
public extension ConstraintView {
public var snp: ConstraintViewDSL {
return ConstraintViewDSL(view: self)
}
}
|
这个 snp 属性的类型就是结构体 ConstraintViewDSL。下面来看看 ConstraintViewDSL 这个结构体做什么用的。
ConstraintViewDSL
这个结构体会在初始化时通过 view 属性持有 ConstraintView。
|
1
2
3
4
5
6
|
internal let view: ConstraintView
internal init(view: ConstraintView) {
self.view = view
}
|
同时还提供了那些我们必调用的 makeConstraints,contentHuggingHorizontalPriority 等等函数。这样我们就可以在 UIView 中直接调用这些函数来进行视图的约束设置了。
|
1
2
3
4
5
6
7
8
9
10
11
12
13
14
|
public func makeConstraints(_ closure: (_ make: ConstraintMaker) -> Void) {
ConstraintMaker.makeConstraints(item: self.view, closure: closure)
}
public var contentHuggingHorizontalPriority: Float {
get {
return self.view.contentHuggingPriority(for: .horizontal).rawValue
}
set {
self.view.setContentHuggingPriority(LayoutPriority(rawValue: newValue), for: .horizontal)
}
}
//还有 remakeConstraints,contentCompressionResistanceHorizontalPriority 等等就不一一列出了
...
|
ConstraintViewDSL 是继承自 ConstraintAttributesDSL。
ConstraintAttributesDSL
ConstraintAttributesDSL 是个协议,继承于 ConstraintBasicAttributesDSL 这个协议,为什么要多这一层呢,因为 ConstraintAttributesDSL 这个里面定了 iOS 8 系统出现的新的属性,比如 lastBaseline,firstBaseline,leftMargin 等。而 ConstraintBasicAttributesDSL 里定义的是一开始就有的那些属性比如 left,top,centerX,size 等。
Masonry
接下来我们看看 Masonry 是给谁做的约束。
View+MASAdditions
View+MASAdditions 就是 Masonry 的一个外部的入口,实质上就是 UIView 的一个 Category 作用就是用来设置 MASViewAttribute 的属性,并实例化,并且指定当前的 UIView 对应的 LayoutAttribute。和 SnapKit 一样, Masonry 也对 iOS 和 macOS 做了兼容,在 macOS 里就是 NSView,相关代码在 MASUtilities.h 文件里,这里除了平台相关代码外,还有些宏的定义和静态方法。这里我们可以看看静态方法 static inline id _MASBoxValue(const char *type, …) 的作用:
|
1
2
3
4
5
6
7
8
9
10
11
12
13
14
15
16
17
18
19
20
21
22
23
24
25
26
27
28
29
30
31
32
33
34
35
36
37
38
39
40
41
42
43
44
45
46
47
48
49
50
51
52
53
54
55
56
57
58
59
|
static inline id _MASBoxValue(const char *type, ...) {
va_list v;
va_start(v, type);
id obj = nil;
if (strcmp(type, @encode(id)) == 0) {
id actual = va_arg(v, id);
obj = actual;
} else if (strcmp(type, @encode(CGPoint)) == 0) {
CGPoint actual = (CGPoint)va_arg(v, CGPoint);
obj = [NSValue value:&actual withObjCType:type];
} else if (strcmp(type, @encode(CGSize)) == 0) {
CGSize actual = (CGSize)va_arg(v, CGSize);
obj = [NSValue value:&actual withObjCType:type];
} else if (strcmp(type, @encode(MASEdgeInsets)) == 0) {
MASEdgeInsets actual = (MASEdgeInsets)va_arg(v, MASEdgeInsets);
obj = [NSValue value:&actual withObjCType:type];
} else if (strcmp(type, @encode(double)) == 0) {
double actual = (double)va_arg(v, double);
obj = [NSNumber numberWithDouble:actual];
} else if (strcmp(type, @encode(float)) == 0) {
float actual = (float)va_arg(v, double);
obj = [NSNumber numberWithFloat:actual];
} else if (strcmp(type, @encode(int)) == 0) {
int actual = (int)va_arg(v, int);
obj = [NSNumber numberWithInt:actual];
} else if (strcmp(type, @encode(long)) == 0) {
long actual = (long)va_arg(v, long);
obj = [NSNumber numberWithLong:actual];
} else if (strcmp(type, @encode(long long)) == 0) {
long long actual = (long long)va_arg(v, long long);
obj = [NSNumber numberWithLongLong:actual];
} else if (strcmp(type, @encode(short)) == 0) {
short actual = (short)va_arg(v, int);
obj = [NSNumber numberWithShort:actual];
} else if (strcmp(type, @encode(char)) == 0) {
char actual = (char)va_arg(v, int);
obj = [NSNumber numberWithChar:actual];
} else if (strcmp(type, @encode(bool)) == 0) {
bool actual = (bool)va_arg(v, int);
obj = [NSNumber numberWithBool:actual];
} else if (strcmp(type, @encode(unsigned char)) == 0) {
unsigned char actual = (unsigned char)va_arg(v, unsigned int);
obj = [NSNumber numberWithUnsignedChar:actual];
} else if (strcmp(type, @encode(unsigned int)) == 0) {
unsigned int actual = (unsigned int)va_arg(v, unsigned int);
obj = [NSNumber numberWithUnsignedInt:actual];
} else if (strcmp(type, @encode(unsigned long)) == 0) {
unsigned long actual = (unsigned long)va_arg(v, unsigned long);
obj = [NSNumber numberWithUnsignedLong:actual];
} else if (strcmp(type, @encode(unsigned long long)) == 0) {
unsigned long long actual = (unsigned long long)va_arg(v, unsigned long long);
obj = [NSNumber numberWithUnsignedLongLong:actual];
} else if (strcmp(type, @encode(unsigned short)) == 0) {
unsigned short actual = (unsigned short)va_arg(v, unsigned int);
obj = [NSNumber numberWithUnsignedShort:actual];
}
va_end(v);
return obj;
}
|
看这段代码是不是就能猜出来是做什么的了,对,它就是我们经常使用的 mas_equalTo 这个方法,这里可以看到它是如何支持变参和如何将 float,double,int 这样的值类型数据转换成和 equalTo 一样的对象 NSNumber 数据的。这个写法灵感来自GitHub - specta/expecta: A Matcher Framework for Objective-C/Cocoa。 mas_equalTo 和 equalTo 都是宏定义的。
|
1
2
3
4
5
|
|
MASBoxValue 这个宏定义就是上面的 _MASBoxValue 这个方法。细心同学会发现这两个 equal 的宏对应的方法是不同的,一个是 equalTo(MASBoxValue((VA_ARGS))) 另一个是 mas_equalTo(VA_ARGS) 但是这两个方法的实现是一样的。
|
1
2
3
4
5
6
7
8
9
10
11
|
- (MASConstraint * (^)(id))equalTo {
return ^id(id attribute) {
return self.equalToWithRelation(attribute, NSLayoutRelationEqual);
};
}
- (MASConstraint * (^)(id))mas_equalTo {
return ^id(id attribute) {
return self.equalToWithRelation(attribute, NSLayoutRelationEqual);
};
}
|
这样写就是避免宏定义冲突的一种方式。
这个 Category 还有那些我们总是调用的 mas_makeConstraints,mas_updateConstraints,mas_remakeConstraint 等方法。
mas_makeConstraints 的 block 参数会将创建的 MASConstraintMaker 这个工厂类对象暴露出去,让我们去设置这个类对象中的 MASConstraint 属性,然后通过该对象的 install 方法将当前视图中所有添加的约束添加到一个数组里。该数组里存储是 MASViewConstraint 对象,对应的就是 NSLayoutConstraint。具体代码如下:
|
1
2
3
4
5
6
|
- (NSArray *)mas_makeConstraints:(void(^)(MASConstraintMaker *))block {
self.translatesAutoresizingMaskIntoConstraints = NO;
MASConstraintMaker *constraintMaker = [[MASConstraintMaker alloc] initWithView:self];
block(constraintMaker);
return [constraintMaker install];
}
|
这种设计模式和 SnapKit 的一样使用了闭包来获取用户设置的数据,在设计模式里叫做好莱坞原则。
mas_updateConstraints 和 mas_makeConstraints 差不多,不过里面多了一行:
|
1
|
constraintMaker.updateExisting = YES;
|
这样当添加约束时会通过这个属性是否为真来检查约束是否 intall 了,是的话就更新,没有就添加。
|
1
2
3
4
5
6
7
8
9
10
11
12
|
if (self.updateExisting) {
existingConstraint = [self layoutConstraintSimilarTo:layoutConstraint];
}
if (existingConstraint) {
// just update the constant
existingConstraint.constant = layoutConstraint.constant;
self.layoutConstraint = existingConstraint;
} else {
[self.installedView addConstraint:layoutConstraint];
self.layoutConstraint = layoutConstraint;
[firstLayoutItem.mas_installedConstraints addObject:self];
}
|
mas_remakeConstraints 的话是添加了这一句:
|
1
|
constraintMaker.removeExisting = YES;
|
设置为 YES 后会将以前设置的约束 uninstall 掉,后面再把新设置的约束添加上。
|
1
2
3
4
5
6
|
if (self.removeExisting) {
NSArray *installedConstraints = [MASViewConstraint installedConstraintsForView:self.view];
for (MASConstraint *constraint in installedConstraints) {
[constraint uninstall];
}
}
|
最后还有个方法 mas_closestCommonSuperview,这个方法一般我们都不会主动调用,所以很多人应该都太熟悉,不过这个断言报错大家应该会有很深刻的印象 couldn’t find a common superview for … 。所以这个方法如其名就是去找共同的父视图,还是最近的。框架内部也就在 MASViewConstraint 的 install 方法里用了一次。
|
1
2
3
4
5
6
7
8
9
10
11
12
13
14
15
16
|
- (instancetype)mas_closestCommonSuperview:(MAS_VIEW *)view {
MAS_VIEW *closestCommonSuperview = nil;
MAS_VIEW *secondViewSuperview = view;
while (!closestCommonSuperview && secondViewSuperview) {
MAS_VIEW *firstViewSuperview = self;
while (!closestCommonSuperview && firstViewSuperview) {
if (secondViewSuperview == firstViewSuperview) {
closestCommonSuperview = secondViewSuperview;
}
firstViewSuperview = firstViewSuperview.superview;
}
secondViewSuperview = secondViewSuperview.superview;
}
return closestCommonSuperview;
}
|
这个查找是 N 方的,谁有办法能够优化下么。
如何设置约束?
SnapKit
先看看这张图,里面是我们使用框架时用的最多的设置 make 的过程,图里将每个操作对应的不同 ConstraintMaker 做了说明。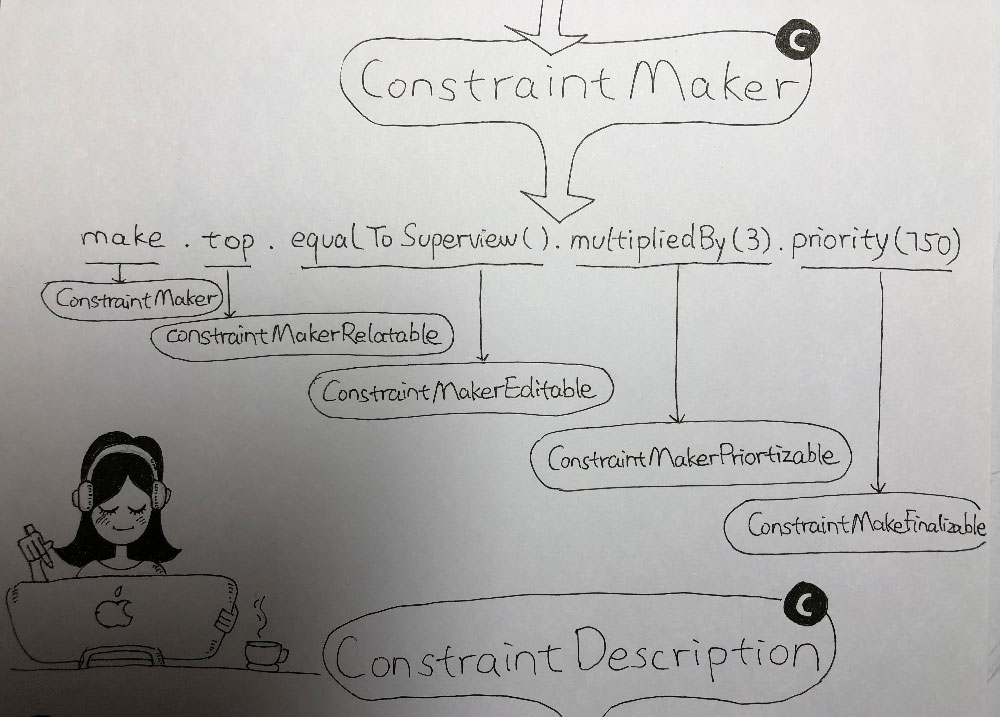
下面来对这几种 ConstraintMaker 来详细说下。
ConstraintMaker
这个是设置的入口,makeConstraints 函数一个闭包参数可以提供外部去设置ConstraintMaker 自己的 left,right,top 等属性来描述约束。这些属性的 getter 方法会返回 ConstraintMakerExtendable 实例。
先看看 ConstraintMaker 的构造函数:
|
1
2
3
4
|
internal init(item: LayoutConstraintItem) {
self.item = item
self.item.prepare()
}
|
LayoutConstraintItem 会通过给扩展 ConstraintLayoutGuide 和 ConstraintView 来达到约束 item 类型的作用。下面看看 prepare 这个函数的作用。
|
1
2
3
4
5
|
internal func prepare() {
if let view = self as? ConstraintView {
view.translatesAutoresizingMaskIntoConstraints = false
}
}
|
看,禁用 AutoresizeMask 是在这里统一处理了。
接下来看看闭包参数设置属性的 getter 方法。
|
1
2
3
4
5
6
7
8
9
|
public var left: ConstraintMakerExtendable {
return self.makeExtendableWithAttributes(.left)
}
internal func makeExtendableWithAttributes(_ attributes: ConstraintAttributes) -> ConstraintMakerExtendable {
let description = ConstraintDescription(item: self.item, attributes: attributes)
self.descriptions.append(description)
return ConstraintMakerExtendable(description)
}
|
ConstraintMaker 包含了一个 ConstraintDescription 数组,里面会记录用户设置的各个属性,然后返回 ConstraintMakerExtendable。
OptionSet
这里的 ConstraintAttributes 是个 OptionSet,ConstraintAttributes 结构体来遵从 OptionSet 选项集合协议,为什么不用枚举呢?因为在一次只有一个选项被选中是枚举是 OK 的。但是在 Swift 里的枚举是没法将多个枚举选项组成一个值的,比如 ConstraintAttributes 里的 edges,size 和 center 等就是组合而成的。而 OptionSet 结构体使用了高效的位域来表示的。还有,OptionSet 继承于 ExpressibleByArrayLiteral,这样还能够使用数组字面量来生成选项的集合。下面看看这个 ConstraintAttributes 是如何定义的。
|
1
2
3
4
5
6
7
8
9
10
11
12
13
14
15
16
17
18
19
20
21
22
|
internal static var none: ConstraintAttributes { return self.init(0) }
internal static var left: ConstraintAttributes { return self.init(1) }
internal static var top: ConstraintAttributes { return self.init(2) }
internal static var right: ConstraintAttributes { return self.init(4) }
internal static var bottom: ConstraintAttributes { return self.init(8) }
internal static var leading: ConstraintAttributes { return self.init(16) }
internal static var trailing: ConstraintAttributes { return self.init(32) }
internal static var ConstraintAttributes { return self.init(64) }
internal static var height: ConstraintAttributes { return self.init(128) }
internal static var centerX: ConstraintAttributes { return self.init(256) }
internal static var centerY: ConstraintAttributes { return self.init(512) }
//更多就不一一列出来
...
// 组合的
internal static var edges: ConstraintAttributes { return self.init(15) }
internal static var size: ConstraintAttributes { return self.init(192) }
internal static var center: ConstraintAttributes { return self.init(768) }
internal static var margins: ConstraintAttributes { return self.init(61440) }
//还有一些,先不列了
...
|
可以看到组合的 size 就是 width(64) + height(128)= size(192)。
重载和自定义操作符
ConstraintAttributes 重载了 +,+=,-= 和 == 这些操作符。我们先看看代码
|
1
2
3
4
5
6
7
8
9
10
11
12
13
14
15
|
internal func + (left: ConstraintAttributes, right: ConstraintAttributes) -> ConstraintAttributes {
return left.union(right)
}
internal func +=(left: inout ConstraintAttributes, right: ConstraintAttributes) {
left.formUnion(right)
}
internal func -=(left: inout ConstraintAttributes, right: ConstraintAttributes) {
left.subtract(right)
}
internal func ==(left: ConstraintAttributes, right: ConstraintAttributes) -> Bool {
return left.rawValue == right.rawValue
}
|
这种重载很适合对自定义的结构体进行一些熟悉的简化符号操作。
如果希望自定义一些操作符的话就需要先声明下,让编译器知道这是个操作符,比如我们自定义一个操作符☃
|
1
2
3
4
5
6
7
|
struct A {
var v:Int = 0
}
infix operator ☃
func ☃(left: A, right: A) -> Bool {
return left.v + 1 == right.v
}
|
这里的 infix 是中间运算符的意思,还有前置运算符 prefix 和后置运算符 postfix。自定义运算符之能是类似,/,=,-,+,*,%,<,>,!,&,|,^,。,~ 等这样的符号组成,也能支持一些特殊的字符比如刚才的用的☃,还有⨁,∉ 这样的特殊符号。
自定义运算符还能够指定优先级分组 precedencegroup,如下:
|
1
2
3
4
5
6
|
infix operator ⊆ : CPrecedence
precedencegroup CPrecedence {
associativity: left
higherThan: AdditionPrecedence
lowerThan: MultiplicationPrecedence
}
|
下面列下常用类型对应的group
|
1
2
3
4
5
6
7
8
9
10
11
12
13
14
15
16
17
18
19
20
21
22
23
24
|
// "Exponentiative"
infix operator << : BitwiseShiftPrecedence
infix operator &<< : BitwiseShiftPrecedence
infix operator >> : BitwiseShiftPrecedence
infix operator &>> : BitwiseShiftPrecedence
// "Multiplicative"
infix operator * : MultiplicationPrecedence
infix operator &* : MultiplicationPrecedence
infix operator / : MultiplicationPrecedence
infix operator % : MultiplicationPrecedence
infix operator & : MultiplicationPrecedence
// "Additive"
infix operator + : AdditionPrecedence
infix operator &+ : AdditionPrecedence
infix operator - : AdditionPrecedence
infix operator &- : AdditionPrecedence
infix operator | : AdditionPrecedence
infix operator ^ : AdditionPrecedence
// FIXME: is this the right precedence level for "..." ?
infix operator ... : RangeFormationPrecedence
infix operator ..< : RangeFormationPrecedence
|
完整的操作符的定义和 precedencegroup 之间的优先级关系在 Swift 源码的 swift/stdlib/public/core/Policy.swift 文件里,在线看地址是:https://github.com/apple/swift/blob/a7ff0da33488b9050cf83df95f46e5b9aa2348d5/stdlib/public/core/Policy.swift 。那些操作符优先级高些或者低些在这个文件里是一目了然。
ConstraintMakerExtendable
ConstraintMakerExtendable 继承 ConstraintMakerRelatable,它可以实现链式的多属性,有left,right,top 等等这样的属性,用以产生一个 ConstraintMakerRelatable 类型的实例。
我们看看 left 属性的 getter 定义:
|
1
2
3
4
|
public var left: ConstraintMakerExtendable {
self.description.attributes += .left
return self
}
|
这里可以看到通过重载的操作符 += 能够将 .left 加到 ConstraintAttributes 里。
ConstraintMakerRelatable
用于指定约束关系比如常用的 equalTo。equalTo 函数里面是调用的 relatedTo 函数,返回 ConstraintMakerEditable 类型的实例。
|
1
2
3
4
5
6
7
8
9
10
11
12
13
14
15
16
17
18
19
20
21
22
23
24
25
26
27
28
29
30
31
32
33
34
35
36
37
38
39
|
@discardableResult
public func equalTo(_ other: ConstraintRelatableTarget, _ file: String = #file, _ line: UInt = #line) -> ConstraintMakerEditable {
return self.relatedTo(other, relation: .equal, file: file, line: line)
}
internal func relatedTo(_ other: ConstraintRelatableTarget, relation: ConstraintRelation, file: String, line: UInt) -> ConstraintMakerEditable {
let related: ConstraintItem
let constant: ConstraintConstantTarget
if let other = other as? ConstraintItem {
guard other.attributes == ConstraintAttributes.none ||
other.attributes.layoutAttributes.count <= 1 ||
other.attributes.layoutAttributes == self.description.attributes.layoutAttributes ||
other.attributes == .edges && self.description.attributes == .margins ||
other.attributes == .margins && self.description.attributes == .edges else {
fatalError("Cannot constraint to multiple non identical attributes. ((file), (line))");
}
related = other
constant = 0.0
} else if let other = other as? ConstraintView {
related = ConstraintItem(target: other, attributes: ConstraintAttributes.none)
constant = 0.0
} else if let other = other as? ConstraintConstantTarget {
related = ConstraintItem(target: nil, attributes: ConstraintAttributes.none)
constant = other
} else if #available(iOS 9.0, OSX 10.11, *), let other = other as? ConstraintLayoutGuide {
related = ConstraintItem(target: other, attributes: ConstraintAttributes.none)
constant = 0.0
} else {
fatalError("Invalid constraint. ((file), (line))")
}
let editable = ConstraintMakerEditable(self.description)
editable.description.sourceLocation = (file, line)
editable.description.relation = relation
editable.description.related = related
editable.description.constant = constant
return editable
}
|
这里的 ConstraintRelatableTarget 是约束,equalTo 这个方法里面能传的参数类型比较多,可以通过这个协议来扩展下只支持的类型,达到限制类型的功能。ConstraintPriorityTarget,ConstraintInsetTarget,ConstraintOffsetTarget 和 ConstraintInsetTarget 也都有类似的作用,不过这几个还有个作用就是将 Float,Double,Int 和 UInt 这几种类型都转成 CGFloat。我们拿 ConstraintInsetTarget 来看看实现如下:
|
1
2
3
4
5
6
7
8
9
10
11
12
13
14
15
16
17
18
19
20
21
|
extension ConstraintInsetTarget {
internal var constraintInsetTargetValue: ConstraintInsets {
if let amount = self as? ConstraintInsets {
return amount
} else if let amount = self as? Float {
return ConstraintInsets(top: CGFloat(amount), left: CGFloat(amount), bottom: CGFloat(amount), right: CGFloat(amount))
} else if let amount = self as? Double {
return ConstraintInsets(top: CGFloat(amount), left: CGFloat(amount), bottom: CGFloat(amount), right: CGFloat(amount))
} else if let amount = self as? CGFloat {
return ConstraintInsets(top: amount, left: amount, bottom: amount, right: amount)
} else if let amount = self as? Int {
return ConstraintInsets(top: CGFloat(amount), left: CGFloat(amount), bottom: CGFloat(amount), right: CGFloat(amount))
} else if let amount = self as? UInt {
return ConstraintInsets(top: CGFloat(amount), left: CGFloat(amount), bottom: CGFloat(amount), right: CGFloat(amount))
} else {
return ConstraintInsets(top: 0, left: 0, bottom: 0, right: 0)
}
}
}
|
ConstraintMakerEditable
ConstraintMakerEditable 继承 ConstraintMakerPriortizable,主要是设置约束的 offset 和 inset 还有 multipliedBy 和 dividedBy 函数。
|
1
2
3
4
5
6
7
8
9
10
11
12
13
14
15
16
17
18
19
20
21
22
23
24
25
26
|
public class ConstraintMakerEditable: ConstraintMakerPriortizable {
@discardableResult
public func multipliedBy(_ amount: ConstraintMultiplierTarget) -> ConstraintMakerEditable {
self.description.multiplier = amount
return self
}
@discardableResult
public func dividedBy(_ amount: ConstraintMultiplierTarget) -> ConstraintMakerEditable {
return self.multipliedBy(1.0 / amount.constraintMultiplierTargetValue)
}
@discardableResult
public func offset(_ amount: ConstraintOffsetTarget) -> ConstraintMakerEditable {
self.description.constant = amount.constraintOffsetTargetValue
return self
}
@discardableResult
public func inset(_ amount: ConstraintInsetTarget) -> ConstraintMakerEditable {
self.description.constant = amount.constraintInsetTargetValue
return self
}
}
|
ConstraintMakerPriortizable
ConstraintMakerPriortizable 继承 ConstraintMakerFinalizable,用来设置优先级,返回 ConstraintMakerFinalizable 类型的实例。
ConstraintMakerFinalizable
里面类型为 ConstraintDescription 的属性的类是一个完整的约束描述,有了这个描述就可以做后面的处理了。里面的内容是完整的,这个类是一个描述类, 用于描述一条具体的约束, 包含了包括 ConstraintAttributes 在内的各种与约束有关的元素,一个 ConstraintDescription 实例,就可以提供与一种约束有关的所有内容。可以看到前面设置的属性,关系,乘除系数,优先级等因有尽有,如下:
|
1
2
3
4
5
6
7
8
9
10
11
12
13
14
15
16
17
18
19
20
21
22
23
24
25
26
27
28
29
30
31
32
33
34
35
36
37
38
39
|
public class ConstraintDescription {
internal let item: LayoutConstraintItem
internal var attributes: ConstraintAttributes
internal var relation: ConstraintRelation? = nil
internal var sourceLocation: (String, UInt)? = nil
internal var label: String? = nil
internal var related: ConstraintItem? = nil
internal var multiplier: ConstraintMultiplierTarget = 1.0
internal var constant: ConstraintConstantTarget = 0.0
internal var priority: ConstraintPriorityTarget = 1000.0
internal lazy var constraint: Constraint? = {
guard let relation = self.relation,
let related = self.related,
let sourceLocation = self.sourceLocation else {
return nil
}
let from = ConstraintItem(target: self.item, attributes: self.attributes)
return Constraint(
from: from,
to: related,
relation: relation,
sourceLocation: sourceLocation,
label: self.label,
multiplier: self.multiplier,
constant: self.constant,
priority: self.priority
)
}()
// MARK: Initialization
internal init(item: LayoutConstraintItem, attributes: ConstraintAttributes) {
self.item = item
self.attributes = attributes
}
}
|
Masonry
在 Masonry 也有对应的 ConstraintMaker。
MASConstraintMaker
MASConstraintMaker 是创建 MASConstraint 对象的。里面有个 constraints 数组专门用来存储创建的这些对象。前面 mas_makeConstraints 的那个 Block 暴露出的就是 MASConstraintMaker 对象。
接下来看看 MASConstraint 属性的 getter 方法:
|
1
2
3
|
- (MASConstraint *)left {
return [self addConstraintWithLayoutAttribute:NSLayoutAttributeLeft];
}
|
会发现这些 getter 方法都会调用 addConstraintWithLayoutAttribute 这个方法。
|
1
2
3
4
5
6
7
8
9
10
11
12
13
14
15
16
17
|
- (MASConstraint *)constraint:(MASConstraint *)constraint addConstraintWithLayoutAttribute:(NSLayoutAttribute)layoutAttribute {
MASViewAttribute *viewAttribute = [[MASViewAttribute alloc] initWithView:self.view layoutAttribute:layoutAttribute];
MASViewConstraint *newConstraint = [[MASViewConstraint alloc] initWithFirstViewAttribute:viewAttribute];
if ([constraint isKindOfClass:MASViewConstraint.class]) {
//replace with composite constraint
NSArray *children = @[constraint, newConstraint];
MASCompositeConstraint *compositeConstraint = [[MASCompositeConstraint alloc] initWithChildren:children];
compositeConstraint.delegate = self;
[self constraint:constraint shouldBeReplacedWithConstraint:compositeConstraint];
return compositeConstraint;
}
if (!constraint) {
newConstraint.delegate = self;
[self.constraints addObject:newConstraint];
}
return newConstraint;
}
|
这里会发现每次 getter 都会创建一个新的 MASViewConstraint 对象,这里通过将新的 MASViewConstraint 对象的 delegate 设置成自己的方式让新对象也能够调用相同的方法创建一个新的 MASViewConstraint 对象,使得能够支持进行链式的调用。
设置完后如何处理?
SnapKit
下面通过 makeConstraints 我们来看看 ConstraintMaker 是如何在外部通过一个闭包来写约束关系的。
|
1
2
3
4
5
6
7
8
9
10
11
12
13
14
|
internal static func makeConstraints(item: LayoutConstraintItem, closure: (_ make: ConstraintMaker) -> Void) {
let maker = ConstraintMaker(item: item)
closure(maker)
var constraints: [Constraint] = []
for description in maker.descriptions {
guard let constraint = description.constraint else {
continue
}
constraints.append(constraint)
}
for constraint in constraints {
constraint.activateIfNeeded(updatingExisting: false)
}
}
|
这个闭包给叫做 maker 的 ConstraintMaker 实例写入了信息,遍历 maker 的 descriptions 之后(我们之前说一条约束语句最终得到一个 self.description,但往往会有多条约束,所以 ConstraintMakerFinalizable 里面的 self.description,在 ConstraintMaker 里被一个数组维护),我们得到了 Constraint 数组。
跟进 Constraint 里的 activateIfNeeded 这个函数看看约束是怎么写出来的了
|
1
2
3
4
5
6
7
8
9
10
11
12
13
14
15
16
17
18
19
20
21
22
23
24
25
26
27
|
internal func activateIfNeeded(updatingExisting: Bool = false) {
guard let item = self.from.layoutConstraintItem else {
print("WARNING: SnapKit failed to get from item from constraint. Activate will be a no-op.")
return
}
let layoutConstraints = self.layoutConstraints
if updatingExisting {
var existingLayoutConstraints: [LayoutConstraint] = []
for constraint in item.constraints {
existingLayoutConstraints += constraint.layoutConstraints
}
for layoutConstraint in layoutConstraints {
let existingLayoutConstraint = existingLayoutConstraints.first { $0 == layoutConstraint }
guard let updateLayoutConstraint = existingLayoutConstraint else {
fatalError("Updated constraint could not find existing matching constraint to update: (layoutConstraint)")
}
let updateLayoutAttribute = (updateLayoutConstraint.secondAttribute == .notAnAttribute) ? updateLayoutConstraint.firstAttribute : updateLayoutConstraint.secondAttribute
updateLayoutConstraint.constant = self.constant.constraintConstantTargetValueFor(layoutAttribute: updateLayoutAttribute)
}
} else {
NSLayoutConstraint.activate(layoutConstraints)
item.add(constraints: [self])
}
}
|
Masonry
MASViewConstraint
这个类是对 NSLayoutConstriant 的封装。它的父类是 MASConstraint,MASConstraint 是一个抽象不可实例的类,里面有接口和协议。它的兄弟类是 MASCompositeConstraint,里面有个数组专门存储 MASViewConstraint 对象。
MASViewConstraint 对象的 install 方法会将各个约束 install 到对应的视图上。我们看看 MASConstraintMaker 的 install 方法:
|
1
2
3
4
5
6
7
8
9
10
11
12
13
14
15
|
- (NSArray *)install {
if (self.removeExisting) {
NSArray *installedConstraints = [MASViewConstraint installedConstraintsForView:self.view];
for (MASConstraint *constraint in installedConstraints) {
[constraint uninstall];
}
}
NSArray *constraints = self.constraints.copy;
for (MASConstraint *constraint in constraints) {
constraint.updateExisting = self.updateExisting;
[constraint install];
}
[self.constraints removeAllObjects];
return constraints;
}
|
这个方法会遍历 constraints 里每个约束进行 install。在这个 install 方法里会创建 MASLayoutConstraint 对象,然后把这个对象添加到对应的的视图上。
|
1
2
3
4
5
6
7
8
9
10
11
|
MASLayoutConstraint *layoutConstraint
= [MASLayoutConstraint constraintWithItem:firstLayoutItem
attribute:firstLayoutAttribute
relatedBy:self.layoutRelation
toItem:secondLayoutItem
attribute:secondLayoutAttribute
multiplier:self.layoutMultiplier
constant:self.layoutConstant];
layoutConstraint.priority = self.layoutPriority;
layoutConstraint.mas_key = self.mas_key;
|
创建完 MASLayoutConstraint 对象后,会根据约束的设置判断将约束添加到哪个视图上。
|
1
2
3
4
5
6
7
8
9
10
11
12
13
14
15
16
17
18
19
20
21
22
23
24
25
26
|
if (self.secondViewAttribute.view) {
MAS_VIEW *closestCommonSuperview = [self.firstViewAttribute.view mas_closestCommonSuperview:self.secondViewAttribute.view];
NSAssert(closestCommonSuperview,
@"couldn't find a common superview for %@ and %@",
self.firstViewAttribute.view, self.secondViewAttribute.view);
self.installedView = closestCommonSuperview;
} else if (self.firstViewAttribute.isSizeAttribute) {
self.installedView = self.firstViewAttribute.view;
} else {
self.installedView = self.firstViewAttribute.view.superview;
}
MASLayoutConstraint *existingConstraint = nil;
if (self.updateExisting) {
existingConstraint = [self layoutConstraintSimilarTo:layoutConstraint];
}
if (existingConstraint) {
// just update the constant
existingConstraint.constant = layoutConstraint.constant;
self.layoutConstraint = existingConstraint;
} else {
[self.installedView addConstraint:layoutConstraint];
self.layoutConstraint = layoutConstraint;
[firstLayoutItem.mas_installedConstraints addObject:self];
}
|
通过上面代码里的条件判断可以看出,如果有设置相对的那个视图就用先前提到的那个 mas_closestCommonSuperview 方法去找两视图的共同父视图,不然如果只设置了高宽,就把约束加到当前视图上,其它情况就加到当前视图的父视图上。