我的博客园博文地址:http://www.cnblogs.com/tenglongwentian/
Lucene,最新版是Lucene6.2.1,匹配的jdk版本是1.8正式版。
这里用jdk7最后一版,所以用Lucene5.3.3。
新建一个maven项目,如果不会可以参考前面的博文,前面的博文有专门提到如何新建maven项目。
新建的maven项目:<packaging>jar</packaging>,
 1 <dependencies>
 2         <!-- https://mvnrepository.com/artifact/org.apache.lucene/lucene-core -->
 3         <dependency>
 4             <groupId>org.apache.lucene</groupId>
 5             <artifactId>lucene-core</artifactId>
 6             <version>5.5.3</version>
 7         </dependency>
 8         <!-- https://mvnrepository.com/artifact/org.apache.lucene/lucene-queryparser -->
 9         <dependency>
10             <groupId>org.apache.lucene</groupId>
11             <artifactId>lucene-queryparser</artifactId>
12             <version>5.5.3</version>
13         </dependency>
14         <!-- https://mvnrepository.com/artifact/org.apache.lucene/lucene-analyzers-common -->
15         <dependency>
16             <groupId>org.apache.lucene</groupId>
17             <artifactId>lucene-analyzers-common</artifactId>
18             <version>5.5.3</version>
19         </dependency>
20     </dependencies>
因为我用jdk7,不喜欢每次更新maven仓库都要手动调整项目的jdk版本,所以
 1 <!-- 源码目录,插件管理等配置 -->
 2     <build>
 3         <finalName>Lucene</finalName>
 4         <plugins>
 5             <plugin>
 6                 <groupId>org.apache.maven.plugins</groupId>
 7                 <artifactId>maven-compiler-plugin</artifactId>
 8                 <version>3.3</version>
 9                 <configuration>
10                     <!-- 指定source和target的版本 -->
11                     <!-- source 指定用哪个版本的编译器对java源码进行编译 -->
12                     <source>1.7</source>
13                     <!-- target 指定生成的class文件将保证和哪个版本的虚拟机进行兼容 -->
14                     <target>1.7</target>
15                 </configuration>
16             </plugin>
17         </plugins>
18     </build>
可以这样。
新建两个类:
Indexer
import java.io.File;
import java.io.FileReader;
import java.nio.file.Paths;

import org.apache.lucene.analysis.Analyzer;
import org.apache.lucene.analysis.standard.StandardAnalyzer;
import org.apache.lucene.document.Document;
import org.apache.lucene.document.Field;
import org.apache.lucene.document.TextField;
import org.apache.lucene.index.IndexWriter;
import org.apache.lucene.index.IndexWriterConfig;
import org.apache.lucene.store.Directory;
import org.apache.lucene.store.FSDirectory;

public class Indexer {
    private IndexWriter writer;// 写索引实例

    /**
     * 构造方法实例化IndexWriter
     *
     * @param indexDir
     * @throws Exception
     */
    public Indexer(String indexDir) throws Exception {
        Directory dir = FSDirectory.open(Paths.get(indexDir));
        Analyzer analyzer = new StandardAnalyzer();// 标准分词器
        IndexWriterConfig iwc = new IndexWriterConfig(analyzer);
        writer = new IndexWriter(dir, iwc);
    }

    /**
     * 关闭写索引
     *
     * @throws Exception
     */
    public void close() throws Exception {
        writer.close();
    }

    /**
     * 索引指定目录的所有文件
     *
     * @param dataDir
     * @throws Exception
     */
    public int index(String dataDir) throws Exception {
        File[] files = new File(dataDir).listFiles();
        for (File f : files) {
            indexFile(f);
        }
        return writer.numDocs();
    }

    /**
     * 索引指定文件
     *
     * @param f
     */
    private void indexFile(File f) throws Exception {
        // TODO Auto-generated method stub
        System.out.println("索引文件:" + f.getCanonicalFile());
        Document doc = getDocument(f);
        writer.addDocument(doc);
    }

    /**
     * 获取文档,文档里在设置每个字段
     *
     * @param f
     * @return
     * @throws Exception
     */
    private Document getDocument(File f) throws Exception {
        // TODO Auto-generated method stub
        Document doc = new Document();
        doc.add(new TextField("contents", new FileReader(f)));
        doc.add(new TextField("fileName", f.getName(), Field.Store.YES));
        doc.add(new TextField("fullPath", f.getCanonicalPath(), Field.Store.YES));
        return doc;
    }
    public static void main(String[] args){
        String indexDir="E:\lucene";
        String dataDir="E:\lucene\data";
        Indexer indexer = null;
        int numIndexed=0;
        long start=System.currentTimeMillis();
        try {
            indexer = new Indexer(indexDir);
            numIndexed=indexer.index(dataDir);
        } catch (Exception e) {
            // TODO Auto-generated catch block
            e.printStackTrace();
        }finally {
            try {
                indexer.close();
            } catch (Exception e) {
                // TODO Auto-generated catch block
                e.printStackTrace();
            }
        }
        long end=System.currentTimeMillis();
        System.out.println("索引:"+numIndexed+"个文件,花费了"+(end-start)+"毫秒");
    }
}
String indexDir="E:\lucene";
String dataDir="E:\lucene\data";
看到这里不要好奇,盘符随意,在任意盘符根目录下新建文件夹,最好英文无空格,中文未测试,然后拷贝几个txt文件到data文件夹下面,一会测试用的到。
然后运行这个类,可以看到
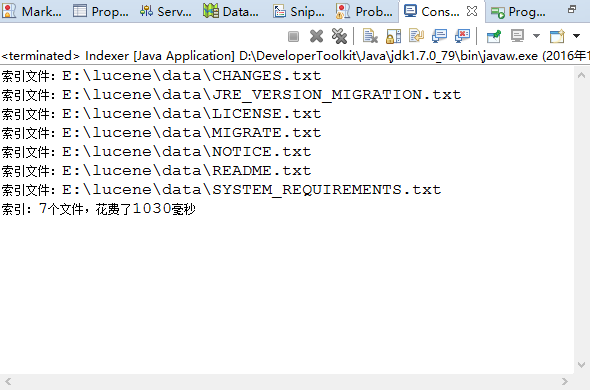
然后可以在lucene文件夹下看到这几个奇怪的文件,是什么后面会提到,稍安勿躁。
新建另一个类:
Searcher
 1 import java.nio.file.Paths;
 2
 3 import org.apache.lucene.analysis.Analyzer;
 4 import org.apache.lucene.analysis.standard.StandardAnalyzer;
 5 import org.apache.lucene.document.Document;
 6 import org.apache.lucene.index.DirectoryReader;
 7 import org.apache.lucene.index.IndexReader;
 8 import org.apache.lucene.queryparser.classic.QueryParser;
 9 import org.apache.lucene.search.IndexSearcher;
10 import org.apache.lucene.search.Query;
11 import org.apache.lucene.search.ScoreDoc;
12 import org.apache.lucene.search.TopDocs;
13 import org.apache.lucene.store.Directory;
14 import org.apache.lucene.store.FSDirectory;
15
16 public class Searcher {
17     public static void search(String indexDir, String q) throws Exception {
18         Directory dir = FSDirectory.open(Paths.get(indexDir));
19         IndexReader reader = DirectoryReader.open(dir);
20         IndexSearcher is = new IndexSearcher(reader);
21         Analyzer analyzer = new StandardAnalyzer();
22         QueryParser parse = new QueryParser("contents", analyzer);
23         Query query = parse.parse(q);
24         long start = System.currentTimeMillis();
25         TopDocs hits = is.search(query, 10);
26         long end = System.currentTimeMillis();
27         System.out.println("匹配" + q + ",总共花费" + (end - start) + "毫秒," + "查询到" + hits.totalHits + "个记录");
28         for (ScoreDoc scoreDoc : hits.scoreDocs) {
29             Document doc = is.doc(scoreDoc.doc);
30             System.out.println(doc.get("fullPath"));
31         }
32         reader.close();
33     }
34
35     public static void main(String[] args) {
36         String indexDir = "E:\lucene";
37         //String q = "LICENSE-2.0";
38         String q = "Zygmunt Saloni";
39         try {
40             search(indexDir, q);
41         } catch (Exception e) {
42             // TODO Auto-generated catch block
43             e.printStackTrace();
44         }
45     }
46 }
运行这个类,

不要把第一个类生成的几个特殊的文件删除,任性的话,试试看,会报错,如果删除运行第一个类生成的几个特殊的奇怪文件后再运行第二个类的时候会报错。
还是任性的试试看吧。
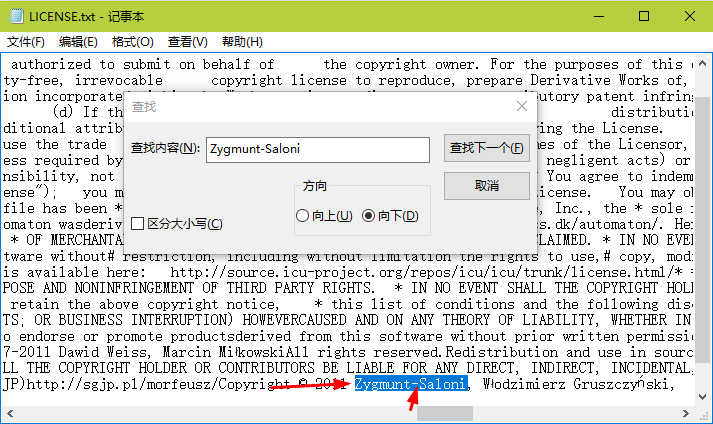
对比String q = "Zygmunt Saloni";事实证明没什么影响,因为分词了,整体切割。
加上-运行第二个类的话,结果一样,自己试试看。
转载请注明出处,谢谢。