前言
整理本篇博文的目的如下:
在使用中学习、掌握vue语法,能修改、实现简单的vue操作。
监控项目中用的是ElementUI,一套为开发者、设计师和产品经理准备的基于 Vue 2.0 的桌面端组件库。
- Element UI是基于Vue 2.0的;
- Element UI 提供一组组件;
- Element UI 提供组件的参考实例, 直接复制。
即并非原生的vue语法,用起来更加方便。
通过功能点掌握vue使用的主要元素:分成如下两部分去记忆:
- <template>标签下,是页面展示信息;
- <script>标签下,是一些函数、数据绑定等信息;
- <style>中都是统一引入的样式,不再说。
这次实现执行结果查询功能包含:
1、创建一个页面,构建页面展示元素的标签:查询条件(el-form)、table元素(el-table)、分页显示(利用组件Pagination,并在request.js中添加拦截器,设置分页参数)。
2、vue常用的主要语法如下:
- router-路由;
- components-组件;(组件及自定义组件,v-model等语法实现数据的传递与绑定;用到了分页组件)
- data-数据;
- filters-过滤器;(用到了日期格式化过滤器、金额格式化过滤器、自定义的过滤器)
- vue的生命周期;(created等函数,用到了beforeCreate、created)
- method;
- watch-监听;
3、具体功能:
- 菜单样式调整:vue项目启动类入口,引入样式,了解掌握路由知识-router(设置菜单及子菜单),编写配置文件及api调用后台项目api。
- 分页查询:method(查询等方法)、components(分页组件使用)、beforeCreate及created周期函数(在vue进行实例化时,动态获取字段信息,并通过过滤器filters将代码映射为中文)、data(组织入参等数据信息)、在request.js中编写拦截器设置分页属性。
- 通过超链接跳转到外部项目。
下面根据前言中的几个点进行详细说明。
一、vue的项目入口、配置信息
1.1项目创建
关于vue项目的搭建,及其需要的开发环境,在vue基础入门中有说明,具体的步骤及详细了解也可以参看链接:https://blog.csdn.net/muzidigbig/article/details/80490884
这里只简单介绍项目的目录结构。
1.1.1通过npm的方式创建vue项目(参看该链接的vue.js的第三种安装方式)
1.1.2项目入口及配置
监控项目用的是elementUI框架,参看如下链接:https://yezonggang.blog.csdn.net/article/details/109313711
了解项目结构及打包build原理。
1.1.3启动
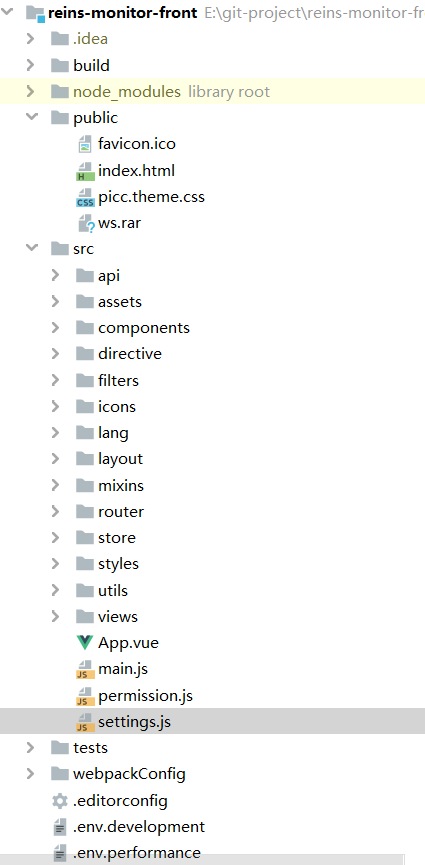
介绍一下目录及其作用:

     build:最终发布的代码的存放位置。

     config:配置路径、端口号等一些信息,我们刚开始学习的时候选择默认配置。

     node_modules:npm 加载的项目所需要的各种依赖模块。

     src:这里是我们开发的主要目录(源码),基本上要做的事情都在这个目录里面,里面包含了几个目录及文件:

             assets:放置一些图片(会根据图片大小分类进行base64命名还是其他方式命名),如logo等

             components:目录里放的是一个个的组件文件

             router/index.js:配置路由的地方

             App.vue:项目入口组件(跟组件),我们也可以将组件写这里,而不使用components目录。主要作用就是将我们自己定义的组件通过它与页面建立联系进行渲染,这里面的<router-view/>必不可少。

             main.js :项目的核心文件(整个项目的入口js)引入依赖包、默认页面样式等(项目运行后会在index.html中形成一个app.js文件)。

     static:静态资源目录(会原分不动的对文件进行处理),如图片、字体等。

     test:初始测试目录,可删除

      .XXXX文件:配置文件。

     index.html:html单页面的入口页面,可以添加一些meta信息或者同统计代码啥的或页面的重置样式等。

     package.json:项目配置信息文件/所依赖的开发包的版本信息及所依赖的插件信息。(大概版本)

     package-lock.json:项目配置信息文件/所依赖的开发包的版本信息及所依赖的插件信息。(具体版本)

     README.md:项目的说明文件。

     webpack.config.js:webpack的配置文件,例:把.vue的文件打包成浏览器能读懂的文件。

     .babelrc:是检测es6语法的配置文件,例:适配哪些浏览器的限制

     .gitignore:上传到服务器忽略哪些文件的配置(比如模拟本地数据mock不让他在get提交/打包上线的时候忽略不使用可在这里配置)

     .postcssrc.js:前缀的配置 (css转化的配置)

     .editorconfig:对代码进行规范,例:root是否进行检测,代码尾部是否换行,缩行前面几个空格...(建议定义这个规范)

     .eslintrc.js:配置eslint语法规则(在这里面的rules属性中配置让哪个语法规则失效)

     .eslintignore:忽略eslint对项目某些文件的语法规则的检查

    这就是整个项目的目录结构,其中,我们主要在src目录中做修改(模块化开发)。
通过上述知识点,我们知道main.js是项目的入口。监控项目的入口,也是这个js文件。如下:
/*
 * XXXX web template 入口文件
 * { xxxx} XXXX公共组件
 * { ./icons } 全局svg图标
 * { filters } 全局vue自定义过滤
 */
import "babel-polyfill";
import Vue from "vue";
import Element from "element-ui";
import App from "./App";
import store from "./store";
import router from "./router";
import { showLoading, hideLoading } from '@/utils/loading';
import "./icons"; // icon
import "./permission"; // permission control
import * as filters from "./filters"; // global filters
// picc components
import "web-plugin/common/theme/index.css";
import xxxx from "web-plugin";
import "web-plugin/common/xxxx.css";
import "@/styles/index.scss";

// i18n languages
import i18n from "@/lang";
// 引入vue-quill-editor富文本编辑器
import VueQuillEditor from "vue-quill-editor";

import "quill/dist/quill.core.css"; // import styles
import "quill/dist/quill.snow.css"; // for snow theme
import "quill/dist/quill.bubble.css"; // for bubble theme
import echarts from "echarts";
Vue.prototype.$echarts = echarts; // eslint-disable-line no-undef
Vue.prototype.showLoading = showLoading;
Vue.prototype.hideLoading = hideLoading;
Vue.use(VueQuillEditor /* { default global options } */); // eslint-disable-line no-undef
Vue.use(Element);
Vue.use(xxxx);

Object.keys(filters).forEach((key) => {
    Vue.filter(key, filters[key]); // eslint-disable-line no-undef
});
Vue.config.productionTip = false; // eslint-disable-line no-undef
/* eslint-disable */
new Vue({
    // eslint-disable-line no-undef
    el: "#app",
    router,
    store,
    i18n,
    render: (h) => h(App)
});
1.1.4在这里,还引入了权限控制permission.js。
1.1.5src路径下layout中是布局设置。通过在路由中引入,设置菜单的样式。

二、调试
2.1在idea中开发的几点经验
2.1.1配置开发环境
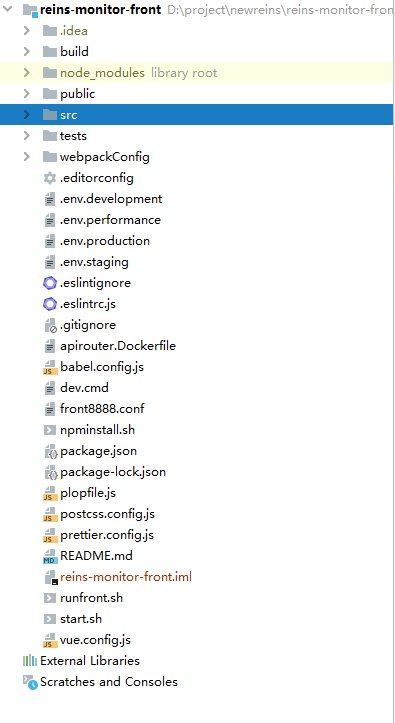
项目目录
1、下载项目并配置开发环境
- 从git上克隆项目到本地,在idea里直接克隆项目即可;
- 将项目依赖的node_model放到项目根路径下;
- 下载完项目需要配置下开发环境,参看链接:https://blog.csdn.net/qq_38377190/article/details/106207211;主要就是集成vue.js,支持ES6;vue是支持ES6写法的,所以这边设置ES6,这样写js脚本的时候不会报错。
- 配置自定义的配置文件文件;(这一步不需要了)
- 然后执行npm install 集成项目;(根据package.json与package-lock.json下载项目依赖)
- 在终端terminal:下执行 npm run dev即可。
2、关于打包配置文件
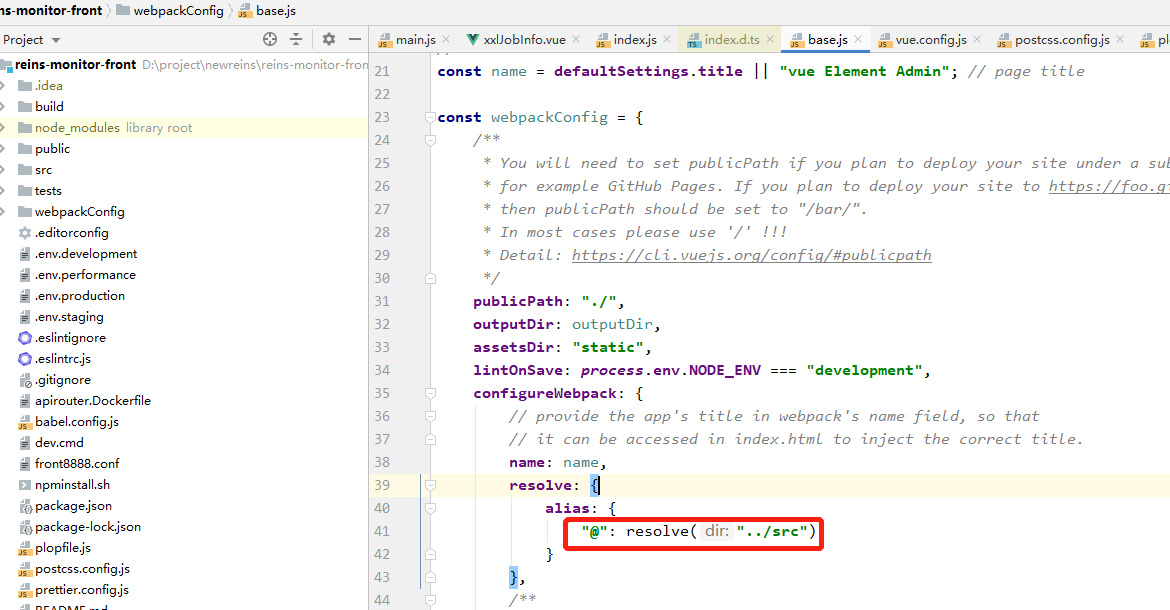
监控项目中的打包相关配置文件均放在webpackConfig目录下;通过vue.config.js进行引用。

base.js里设置了@的别名:
3、关于配置启动项
除了可以在项目目录下cmd:npm run dev启动,还可以在idea的终端启动:

也可以在这里配置启动项:

4、关于配置文件.iml与.idea
.iml文件
idea 对module 配置信息之意, infomation of module
iml是 intellij idea的工程配置文件,里面是当前project的一些配置信息。

.idea文件夹
.idea存放项目的配置信息,包括历史记录,版本控制信息等。

可以点击file->Settings->File types,在右下角的Ignore files and folders中可以输入.idea;和*.iml;将其隐藏。


原文链接:https://blog.csdn.net/weixin_41699562/article/details/99552780
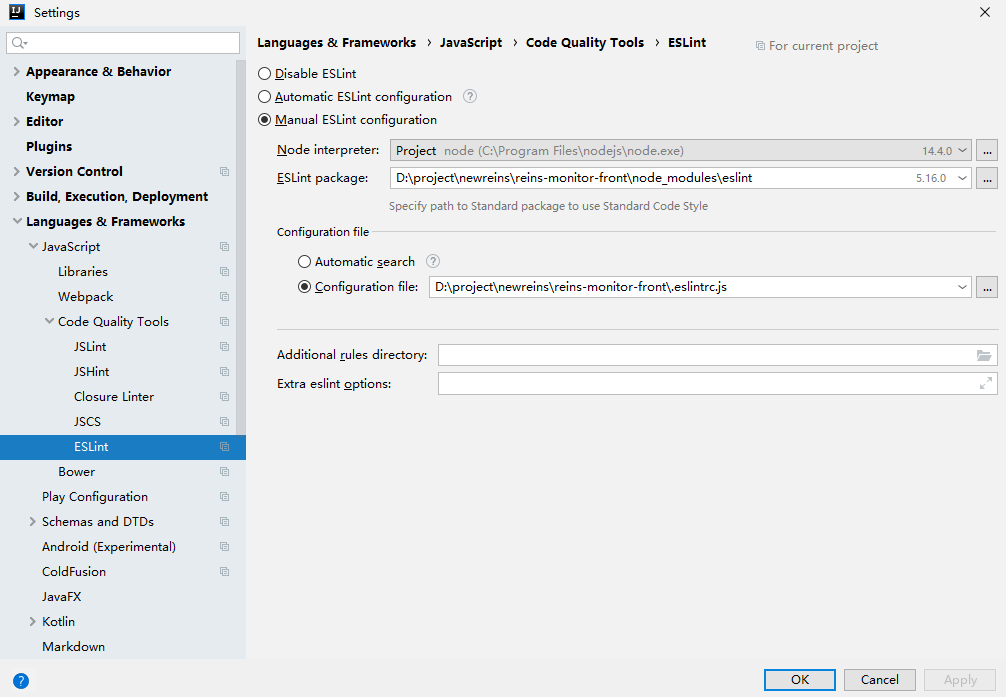
5、设置代码规范检验
ESLint 是一个语法规则和代码风格的检查工具,可以用来保证写出语法正确、风格统一的代码。使用它可以避免低级错误和统一代码的风格。
IDEA 设置 基于ESlint的代码格式化。
IDEA 配置ESlint
设置快捷键
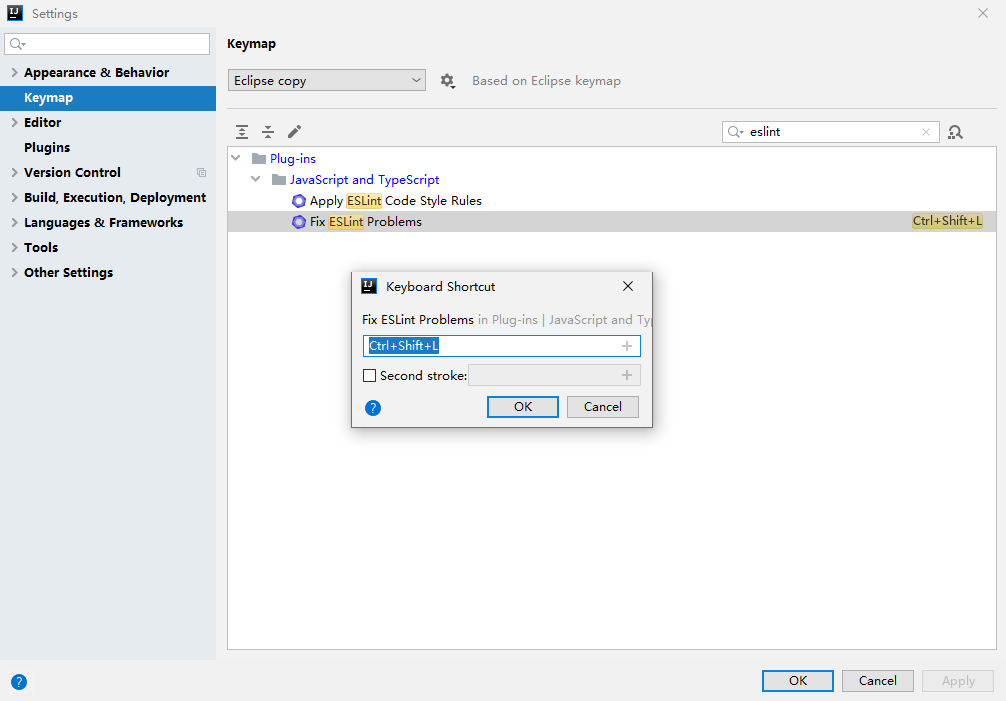
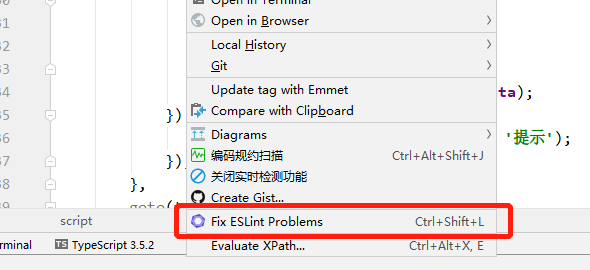
右键使用或通过设置的快捷键。
参看链接:https://blog.csdn.net/zysen1995/article/details/107035499
2.2调试
写在前面的话:
- 百度一下vue调试的方式、技巧。
- 下面是自己实际开发中用到的。
2.2.1在程序里打印日志
1、将想查看的信息输出到控制台,在浏览器端控制台可以查看返回信息
console.log('response.data', response);

console.log("nihao1",res.size,response.headers['content-disposition']);

alert('nihao');

2、在程序里设置debug断点:

debugger;

浏览器端走到这里会停止。
2.2.2打断点在浏览器进行调试

1、选择源文件,设置断点
选择文件打断点

也可以ctrl+p搜索文件

在右侧可以看到打的断点

在watch里进行调试。选中,右键,add select text to watch

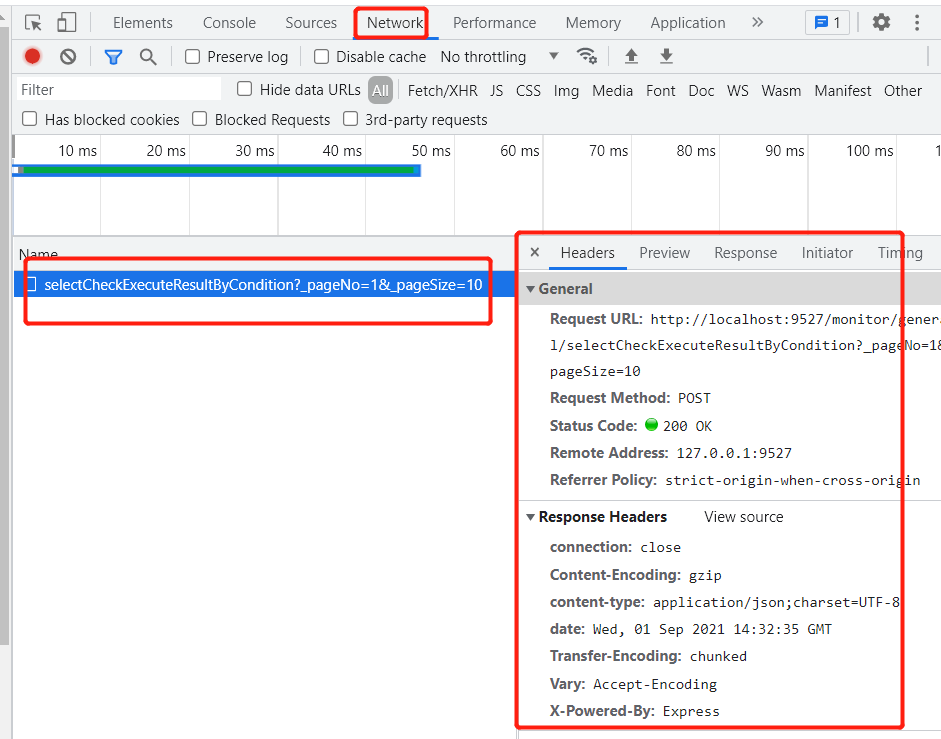
2、查看请求及返回信息
三、vue的菜单、路由设置
3.1写在前面的话:
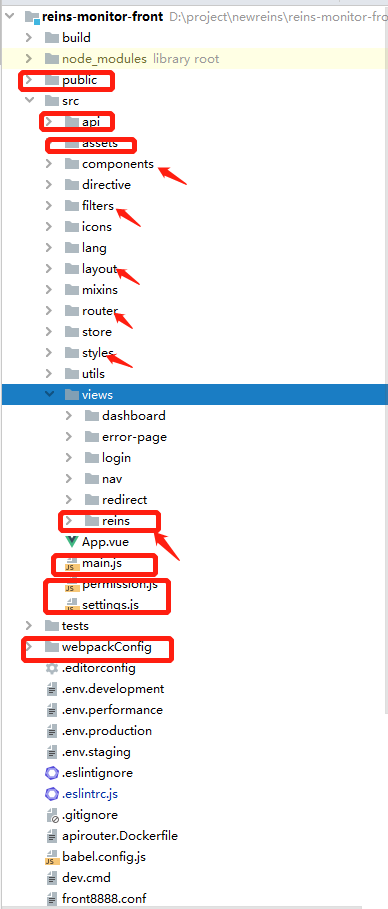
上面的前言及一、二部分对于开发环境配置,项目搭建、vue项目目录结构及常用语法进行了简单整理,下面会针对实际开发中,实现的功能,详细整理vue的语法知识点。如上图:
- public中的index.html静态页面为单页面入口,可能会添加一些引用(用到的时候再说);
- build目录下是打包文件;
- node_modules下是项目依赖;
- webpackConfig下是项目打包(构建)的配置文件;
- main.js是项目入口;permission.js中是用户登录权限管控;
可以看出来,我们在实际开发中需要关心的就是src目录下的文件。
- api下是调用后台的接口;
- assets下是一些静态文件;
- directive是指令;
- filters是过滤器;
- layout下是一些通用布局;
- router下是项目的路由;
- view下是实现功能的页面。
可以看出来,其实我们真正实现业务逻辑的地方,就在view目录下。
我在这里新建了一个reins目录,用来实现项目功能。
3.2配置跨域访问配置文件,配置request.js请求及响应,定义后台跳转api,设置路由及配置项目菜单,并设置样式
3.2.1跨域访问配置
1、搜索关键词
了解vue远程调用后端接口的方式:
- 如何调用到后端项目接口?
- vue调用后端接口的方式?
- vue通过webpackconfig与axios与后端对接?
2、下面是一些代码示例:
vue.config.js:调用webpackConfig下的相关配置信息。
/*eslint-disable */
"use strict";

// All configuration item explanations can be find in https://cli.vuejs.org/config/
let webpackConfig;
let env = process.env.ENV;
webpackConfig = require(`./webpackConfig/${env}.js`)
module.exports = webpackConfig;
webpackConfig文件夹下的proxy.js:设置远程调用接口的地址。


/*
 * @Author: your name
 * @Date: 2021-07-15 15:45:12
 * @LastEditTime: 2021-07-16 10:47:08
 * @LastEditors: your name
 * @Description: In User Settings Edit
 * @FilePath:
einsre-web-1webpackConfigproxy.js
 */
module.exports = {
    "/api/misc": {
        // target: "http://localhost:8080",
        target: "http://10.22.195.74:10000",
        // target: "http://11.204.17.233:8080",
        changeOrigin: true, // 是否跨域
        pathRewrite: {
            "^/api/misc": "" // 重写接口
        }
    },
    "/monitor": {
        target: "http://127.0.0.1:8888",
        // target: "http://10.22.195.75:10000",
        // target: "http://11.205.240.113:8080",
        changeOrigin: true, // 是否跨域
        pathRewrite: {
            "^/monitor": "" // 重写接口
        }
    }
};
3.2.2 配置request.js请求及响应
1、文件信息
/*
 * @Author: your name
 * @Date: 2021-06-04 16:42:36
 * @LastEditTime: 2021-06-04 16:58:23
 * @LastEditors: your name
 * @Description: In User Settings Edit
 * @FilePath:
einsre-web-1srcutils
equest.js
 */
import axios from "axios";
import { Message, MessageBox } from "element-ui";
// TODO: wwr
import { getToken, setToken } from "@/utils/auth";
// 引入uuid插件
import { v4 as uuidv4 } from "uuid";
// create an axios instance
const service = axios.create({
    baseURL: process.env.BASE_API, // api 的 base_url
    timeout: 60000 // request timeout
});

service.defaults.withCredentials = true;

// request interceptor
service.interceptors.request.use(
    (config) => {
        config.headers["Content-Type"] = "application/json;";
        config.headers.Authorization = getToken();
        config.headers.requestId = uuidv4();
        // 添加分页拦截器
        if (config.data && config.data.pageNo && config.data.pageSize) {
            let tmp = config.params;
            if (tmp === undefined) {
                // 如果没有定义 则新建object
                tmp = {};
            }
            if (!tmp._pageNo) {
                tmp._pageNo = config.data.pageNo;
            }
            if (!tmp._pageSize) {
                tmp._pageSize = config.data.pageSize;
            }
            config.params = tmp;
        }
        return config;
    },
    (error) => {
        // Do something with request error
        Promise.reject(error);
    }
);
// response interceptor
service.interceptors.response.use(
    // response => response,
    /**
     * 下面的注释为通过在response里,自定义code来标示请求状态
     * 当code返回如下情况则说明权限有问题,登出并返回到登录页
     * 如想通过 xmlhttprequest 来状态码标识 逻辑可写在下面error中
     * 以下代码均为样例,请结合自生需求加以修改,若不需要,则可删除
     */
    (response) => {
        // console.log('response.data', response)
        const res = response.data;
        // 灰度接口
        const { code, data } = response.data;
        if (code === "0" && data) {
            return data;
        }
        // 如果返回不是null 并且是blob类型 直接返回
        if (res && Object.getPrototypeOf(res) === Blob.prototype) {
            return response;
        }
        if (res.status !== 0 && res.status !== 403) {
            return Promise.reject(res);
        }
        console.log('res.status', res.status);
        if (res.status === 403) {
            MessageBox.confirm('您的会话已超时,请重新登录!', '确认', {
                confirmButtonText: '重新登录',
                type: 'warning'
            }).then(async () => {
                await setToken('');
                localStorage.removeItem('token');
                localStorage.removeItem('userInfo');
                localStorage.removeItem('gradeList');
                localStorage.removeItem('menuList');
                location.reload();
            });
            return Promise.reject(res);
        }
        if (res.data) {
            return res;
        } else {
            return response.data;
        }
    },
    (error) => {
        Message({
            message: error.message,
            type: "error",
            duration: 5 * 1000
        });
        return Promise.reject(error);
    }
);

export default service;
如文件中所示,在request.js中,对所有的请求及响应,都进行了拦截。
2、请求方式及拦截器
请求方式,是通过axios实现,并且在请求中,添加了分页拦截器,为所有的分页查询,添加了参数pageNo、pageSize。要是不在这进行设置,就需要在后台跳转的api中添加分页参数:
/* 执行查询结果页面-分页查询 */
export function selectAllCheckResult(data) {
  return request({
    url: '/monitor/general/selectCheckExecuteResultByCondition',
    method: 'post',
    data:data,
    params: {
      _pageNo: data.pageNo,
      _pageSize: data.pageSize
    }
  })
}
分页功能是通过组件Pagination实现的。

3、数据返回的响应格式
如下,后端代码,自己封装的格式,与前端的response的拦截器对应
/**
     * 查询所有检查科目的type及描述
     *  用于前端填充下拉列表
     * @return 检查科目的map key=type,value=desc
     */
    @PostMapping("/general/selectCheckItemsTypeAndDesc")
    public  ApiResponse<Map<String,String>> selectCheckItemsTypeAndDesc(){
        Map<String,String> map = new TreeMap<>();
        CheckMethodEnum[] enums = CheckMethodEnum.values();
        Arrays.sort(enums,Comparator.comparing(CheckMethodEnum::getGroup));
        for (CheckMethodEnum value : enums) {
            map.put(value.getType(),value.getDesc());
        }
        return ApiResponseMapper.ok(map);
    }

    /**
     * 查询所有执行结果-分页查询
     * @param  checkExecuteResult 查询条件
     * @return 所有执行结果
     */
    @PostMapping("/general/selectCheckExecuteResultByCondition")
    public ApiResponse<PageInfo<CheckExecuteResult>> selectCheckExecuteResultByCondition(@RequestBody CheckExecuteResult checkExecuteResult){
        PageInfo<CheckExecuteResult> pageInfo = generalService.selectCheckExecuteResultByCondition(checkExecuteResult);
        return ApiResponseMapper.ok(pageInfo);
    }
4、搜索关键词
vue通过axios实现跨域请求。
参看链接:
https://blog.csdn.net/wwwkm123/article/details/110734774
https://www.cnblogs.com/ysx215/p/11446615.html
什么是axios?
1、
axios:

1、用于浏览器和node环境下的http请求,基于promise异步

2、可以自动将数据转换为json格式

3、支持防止CSRF( 跨站请求伪造)
2、
ajax:
传统 Ajax 指的是 XMLHttpRequest(XHR),
1:原生ajax的创建:
var xhr = new XmlHttpRequest();
2:获取ajax对象,并接收返回
xhr.onreadystatechange = function(){
if(this.readystatus == 4 ){
console.log(this.responsetext); //readystate为4代表成功接收到返回
}
}
xhr.open(‘get’,url,false); //false代表同步,true代表异步

最早出现的发送后端请求技术,隶属于原始js中,核心使用XMLHttpRequest对象,多个请求之间如果有先后关系的话,就会出现回调地狱。

JQuery ajax 是对原生XHR的封装,除此以外还增添了对JSONP的支持。
axios与ajax的区别?
区别
axios是通过promise实现对ajax技术的一种封装,就像jQuery实现ajax封装一样。
简单来说: ajax技术实现了网页的局部数据刷新,axios实现了对ajax的封装。
axios是ajax ajax不止axios。
优缺点:
ajax:
本身是针对MVC的编程,不符合现在前端MVVM的浪潮
基于原生的XHR开发,XHR本身的架构不清晰,已经有了fetch的替代方案
JQuery整个项目太大,单纯使用ajax却要引入整个JQuery非常的不合理(采取个性化打包的方案又不能享受CDN服务
axios:
从 node.js 创建 http 请求
支持 Promise API
客户端支持防止CSRF(( 跨站请求伪造))
提供了一些并发请求的接口(重要,方便了很多的操作)
请求方式示例:
axios({
            url: '/getUsers',
            method: 'get',
            responseType: 'json', // 默认的
            data: {
                //'a': 1,
                //'b': 2,
            }
        }).then(function (response) {
            console.log(response);
            console.log(response.data);
        }).catch(function (error) {
            console.log(error);
            })


$.ajax({
            url: '/getUsers',
            type: 'get',
            dataType: 'json',
            data: {
                //'a': 1,
                //'b': 2,
            },
            success: function (response) {
                console.log(response);
            }
        })
参看了链接:
https://www.cnblogs.com/szrs/p/12654105.html
https://www.cnblogs.com/lzhh/p/ajax.html
https://blog.csdn.net/qq_42942555/article/details/88400721
https://blog.csdn.net/qq_37029026/article/details/91813053
vue的promise原理?异步机制?使用场景及实例。什么是回调函数?
. promise是一种异步解决方案。
- 由于ajax异步方式请求数据时,我们不能知道数据具体回来的事件,所以过去只能将一个callback函数传递给ajax封装的方法,当ajax异步请求完成时,执行callback函数。
- promise对象接受resolve和reject两个参数,当一个异步动作发生时,promise对象会通过resolve完成对动作成功进行解析,reject会捕获这个动作的异常。一个promise对象,通过new Promise().then()执行下一步骤操作。
- axios is a promise based HTTP client for the browser and node.js。也就是说,使用axios发出请求,难免涉及promise
Promise构造函数的参数是一个函数,函数里面的代码是异步的,即Promise里面的操作,和Promise()外面的操作时异步"同时"进行的。Promise中的函数的第一个参数是回调函数,resolve用来触发then里面的代码,第二个参数是回调函数,reject用来触发catch中的代码,throw new Error();也可以触发catch。
参看链接:
https://www.cnblogs.com/kongrui/p/13299410.html
https://www.cnblogs.com/zhuzhenwei918/p/6915451.html
https://www.cnblogs.com/cyyz-le/p/11278903.html
https://blog.csdn.net/pengwangguo/article/details/61614339
5、登录界面
项目启动入口main.js,进行权限验证并跳转到登录界面。登录界面输入用户名、密码,会调用用户系统进行用户名密码的权限验证。现在在后台跳转的api目录下,mock目录是针对用户系统的跳转api。现在都写死了,没有调用,里面用到promise异步。
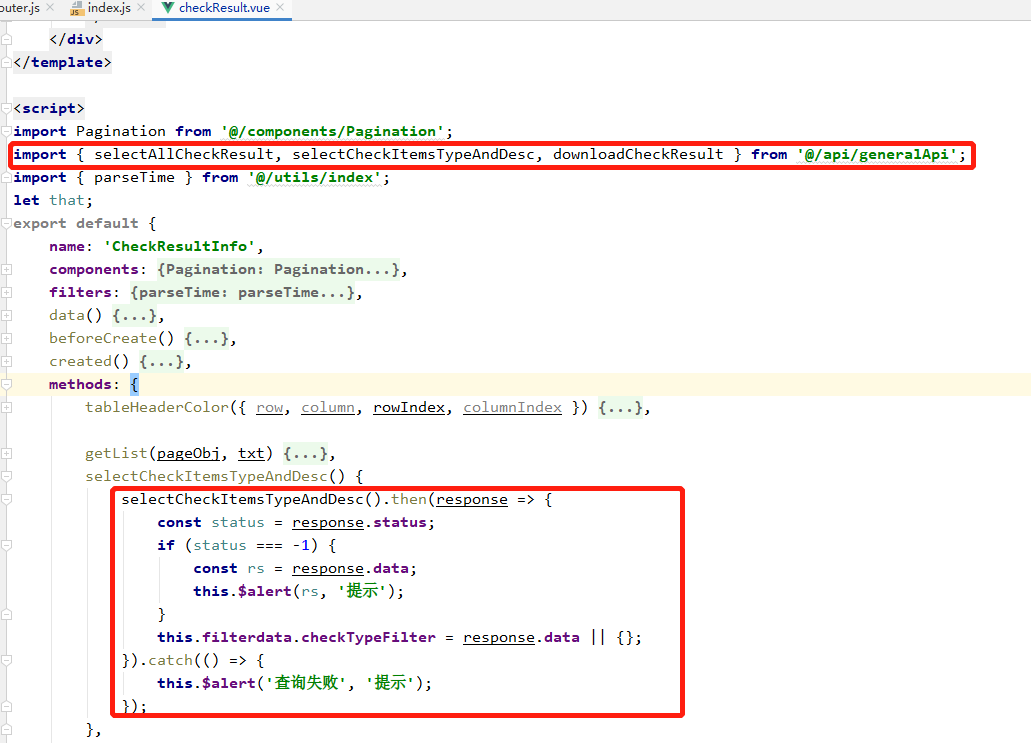
3.2.3定义后台跳转api
格式如下:
import request from "@/utils/request";

/**
 * 获取所有的检查项目
 */
export function selectAllCheckItems() {
    return request({
        url: '/monitor/general/selectAllCheckItems',
        method: 'post'
    });
}

/* 执行结果查询页面-分页查询 */
export function selectAllCheckResult(data) {
    return request({
        url: '/monitor/general/selectCheckExecuteResultByCondition',
        method: 'post',
        data: data
    });
}

/** 执行查询结果页面-分页查询 */
export function selectAllXxlInfo(data) {
    return request({
        url: '/monitor/general/selectXxlJobInfoByExecutorHandler',
        method: 'post',
        data: data
    });
}

/* 执行结果查询下载 */
export function downloadCheckResult(data) {
    return request({
        url: '/monitor/general/download/checkresult',
        responseType: 'blob',
        method: 'post',
        data: data
    });
}

/* 查询所有检查科目的type及描述 */
export function selectCheckItemsTypeAndDesc(data) {
    return request({
        url: '/monitor/general/selectCheckItemsTypeAndDesc',
        method: 'post',
        data: data
    });
}

/* 获取xxl-job的url */
export function getXxlUrl() {
    return request({
        url: '/monitor/general/xxl/url',
        method: 'post'
    });
}
如果是下载功能,因为是通过Blob方式实现的,所以返回格式要添加如下配置:
responseType: 'blob',
后端对应格式如下:
/**
     * 根据输入的sql 直接导出unl
     * @param executeVo 输入条件 json
     * @return 执行结果
     */
    @PostMapping("/general/executeFree")
    public ApiResponse<String> executeFree(@RequestBody ExecuteOrderVo executeVo){
        freeService.executeFree(executeVo);
        return ApiResponseMapper.ok();
    }

    /**
     * 根据ID下载文件
     * @param checkId id
     * @return 文件流
     * @throws Exception 异常
     */
    @PostMapping("/general/download/checkresult")
    public ResponseEntity<byte[]> downLoad(@RequestParam("checkId") String checkId) throws Exception {
        String basePath =  ResourceUtils.getURL(ResourceUtils.FILE_URL_PREFIX).getPath();
        CheckExecuteResult result =  generalService.getCheckExecuteResultByKey(checkId);
        // 空检验
        if(result == null || StringUtils.isEmpty(result.getFilePath())){
            return null;
        }
        String filePath = basePath+result.getFilePath();
        String fileNameWithSuffix = result.getFileName()+Constant.DOT+result.getFileSuffix();
        HttpHeaders headers = new HttpHeaders();
        headers.add(HttpHeaders.CONTENT_DISPOSITION,"attachment;filename="+fileNameWithSuffix);
        return new ResponseEntity<>(FileUtils.readFileToByteArray(new File(filePath)),
                // ie 不支持 HttpStatus.CREATED 需要修改为 HttpStatus.OK
                headers, HttpStatus.OK);
    }
前端页面调用:
3.2.4设置路由及配置项目菜单并设置样式
3.2.4.1 格式如下:
/*
 * @Descripttion:
 * @Author: cuiJH
 * @Date: 2021-05-10 15:14:41
 * @LastEditors: Please set LastEditors
 * @LastEditTime: 2021-05-12 13:44:56
 */

import Layout from "@/layout";

export default {
    path: "/accountChecking",
    component: Layout,
    alwaysShow: true,
    hidden: false,
    name: "accountCheckingRouter",
    meta: { title: "做账检查", icon: "bug" },
    children: [
        {
            path: "checkItems",
            component: () => import("@/views/reins/checklist/checkList"),
            name: "checkItems",
            hidden: false,
            title: "checkItems",
            meta: { title: "检查项目", icon: "tree-table" }
        },
        {
            path: "checkResult",
            component: () => import("@/views/reins/checkresult/checkResult"),
            name: "checkResult",
            hidden: false,
            title: "checkResult",
            meta: { title: "执行结果查询", icon: "example" }
        },
        {
            path: "xxl",
            component: () => import("@/views/reins/xxljob/xxlJob"),
            name: "xxl",
            hidden: false,
            title: "xxl",
            meta: { title: "XXL-JOB-ADMIN", icon: "star" }
        },
        {
            path: "xxlJobInfo",
            component: () => import("@/views/reins/xxljob/xxlJobInfo"),
            name: "xxlJobInfo",
            hidden: false,
            title: "xxlJobInfo",
            meta: { title: "XXL-JOB-Info", icon: "bug" }
        }
    ]
};
3.2.4.2样式设置
在路由设置里引入布局,设置菜单的统一样式。
import Layout from "@/layout";
给菜单设置图标:


这里用的是elementUI封装好的。
代码不再贴,dealRouter.js里设置菜单的父子关系。
index.js引入vue对路由的配置。

通过在这里的配置,点击菜单,进行跳转,或在一个页面里,点击跳转到另一个页面。
3.2.4.3注意及常见问题
3.2.4.3.1vue项目中的跳转
1、页面跳转的几种方式,包含项目内部跳转,跳转到外系统。代码如下:
methods: {
        getXxlUrl() {
            getXxlUrl().then(response => {
                // console.log('response',response);
                const status = response.status;
                if (status === -1) {
                    const rs = response.data;
                    this.$alert(rs, '提示');
                }
                this.goto('newPage1', response.data);
            }).catch(() => {
                this.$alert('xxl-job路径获取失败', '提示');
            });
        },
        goto(type, url) {
            switch (type) {
                case 'currentPage1': {
                    // 直接在当前页面进行跳转,无法通过浏览器返回键返回到上一页面
                    window.location.href = url;
                    break;
                }
                case 'newPage1': {
                    // 在新窗口打开外链接
                    window.open(url, '_blank');
                    break;
                }
                case 'currentPage2': {
                    // 这个方法是在项目内部,通过设置的路由进行跳转到新页面
                    this.$router.push({
                        path: '/accountChecking/checkResult',
                        query: { treatyid: '', sectionno: '' }
                    });
                    break;
                }
                case 'newPage2': {
                    break;
                }
                case 'currentPage3': {
                    break;
                }
                case 'newPage3': {
                    break;
                }
                default: {
                    window.open(url, '_blank'); // 在新窗口打开外链接
                    break;
                }
            }
        }
    }
2、vue路由的默认方式
Vue路由的默认显示模式“hash”模式,还有一种是我们比较习惯的,看起来比 较好看的“history”模式,其url中不会存在“#”这种符号。


参看链接:https://www.cnblogs.com/massami1999/p/12679171.html
3、vue路由的两种模式的区别
前后端分离 ===> 利用Ajax,可以在不刷新浏览器的情况下异步数据请求交互。
单页应用(只有一个html文件,整个网站的所有内容都在这一个html里,通过js来处理)不仅仅是在页面交互是无刷新的,连页面跳转都是无刷新的。为了实现单页应用 ==> 前后端分离 + 前端路由。(更新视图但不重新请求页面)
前端路由实现起来其实也很简单,就是匹配不同的 url 路径,进行解析,加载不同的组件,然后动态的渲染出区域 html 内容。
参看链接:https://www.cnblogs.com/ceceliahappycoding/p/10552620.html
四、vue的组件components
4.1 分页组件
1、利用组件pagination。问题是前端如何传递pageSize、pageNo。后端怎么接收pageSize、pageNo。
2、解决方案是将这两个参数写入到request.js请求拦截器中。后端通过MybatisApiUtils接收:
/**
     * 查询所有执行结果-分页查询
     * @param checkExecuteResult 查询条件
     * @return 所有执行结果
     */
    @Override
    public PageInfo<CheckExecuteResult> selectCheckExecuteResultByCondition(CheckExecuteResult checkExecuteResult) {
        PageHelper.startPage(MybatisApiUtils.getPageParam().getPage(),
                MybatisApiUtils.getPageParam().getLimit(),
                true).setCountColumn("*");
        return new PageInfo<>(checkExecuteResultDao.selectCheckExecuteResultByCondition(checkExecuteResult)) ;
    }
想要详细了解MybatisApiUtils用法及原理需要下面自己百度。
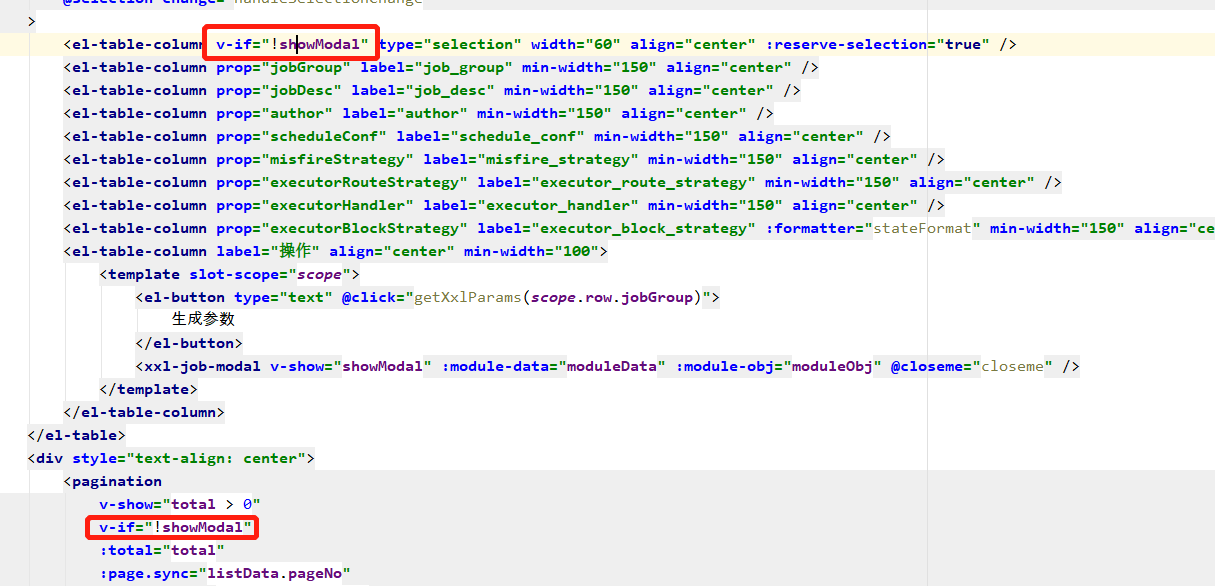
4.2 自己编写的一个跳转的模态框,用法,怎么动态传值。

1、点击事件控制模态框的弹出
<el-table-column label="操作" align="center" min-width="100">
    <template slot-scope="scope">
        <el-button type="text" @click="getXxlParams(scope.row.jobGroup)">
            生成参数
        </el-button>
        <xxl-job-modal v-show="showModal" :module-data="moduleData" :module-obj="moduleObj" @closeme="closeme" />
    </template>
</el-table-column>
2、数据绑定

通过showModal来控制模态框的显示与隐藏,并控制其他组件隐藏。
通过moduleData、与moduleObj将父界面的数据传递到子页面,因为这里是动态传值,所以在标签里需要加上:
3、跳转方法
closeme: function() {
            this.showModal = !this.showModal;
        },

        getXxlParams(val) {
            this.moduleData = {};
            this.moduleObj = {};
            const data = {
                jobGroup: val.toString()
            };
            getXxlParams(data).then(response => {
                console.log('response111', response);
                const status = response.status;
                if (status === -1) {
                    const rs = response.data;
                    this.$alert(rs, '提示');
                }
                // 改变对象引用地址,防止多次监听
                this.moduleData = JSON.parse(JSON.stringify(response.data || {}));
                // 提前处理参数列名,因为如果直接在后面动态遍历参数列名,无法录入input域。需要提前定义好参数列名,所以在父组件里先处理好再传给子页面
                for (const key in this.moduleData) {
                    this.moduleObj[key] = '';
                }
                this.moduleObj = JSON.parse(JSON.stringify(this.moduleObj));
            }).catch(() => {
                this.$alert('查询失败', '提示');
            });
            this.showModal = !this.showModal;
        },
4、模态框组件
<template>
    <div class="modal-backdrop">
        <div class="modal">
            <div class="modal-header">
                <h3>XXL-JOB</h3>
            </div>
            <div class="modal-body">
                <!--<p>我是一个Modal的内容</p>-->
                <el-form ref="mantainTab" :inline="true" label-width="auto" :model="childModuleObj" class="demo-form-inline" label-position="right">
                    <div v-for="(value, key) in moduleData" :key="key">
                        <!--{{ key }} ,{{ value }}-->
                        <el-form-item :label="key" :prop="key">
                            <el-input v-model="childModuleObj[key]" style=" 200px;" class="filter-item" :placeholder="value|placeholderFilter(value)" />
                        </el-form-item>
                    </div>
                </el-form>
            </div>
            <div class="modal-footer">
                <button type="button" class="btn-close" @click="closeSelf">
                    关闭
                </button>
                <button type="button" class="btn-confirm" @click="confirm">
                    确认
                </button>
            </div>
        </div>
    </div>
</template>

<script>
export default {
    name: 'XxlJobModal',
    filters: {
        placeholderFilter(key) {
            const dataModules = {
                'class java.lang.String': '字符串,输入格式:abc',
                'class [Ljava.lang.String;': '数组,输入格式:a,b,c'
            };
            return dataModules[key];
        }
    },
    props: ['moduleData', 'moduleObj'],
    data() {
        return {

            listData: {
                name: '1',
                sex: '2'
            },
            childModuleObj: {}
        };
    },
    watch: {
        // 监听父页面的moduleObj,提前给子页面的参数类名对象childModuleObj赋值
        moduleObj: {
            handler(val) {
                this.childModuleObj = JSON.parse(JSON.stringify(val));
            },
            immediate: true
        }
    },
    methods: {
        closeSelf() {
            this.childModuleObj = {};
            this.$emit("closeme");
        },
        confirm() {
            console.log('ppp', this.childModuleObj);
            const xxlJobParams = JSON.stringify(this.childModuleObj);
            alert(xxlJobParams);
            // 下次查询结果之前,清空上次查询的数据
            this.childModuleObj = {};
            this.$emit("closeme");
        }
    }
};
</script>

<style>
  .modal-backdrop {
    position: fixed;
    top: 0;
    right: 0;
    bottom: 0;
    left: 0;
    background-color: rgba(0,0,0,.3);
    display: flex;
    justify-content: center;
    align-items: center;
  }
  .modal {
    background-color: #fff;
    box-shadow: 2px 2px 20px 1px;
    overflow-x:auto;
    display: flex;
    flex-direction: column;
    border-radius: 16px;
     700px;
  }
  .modal-header {
    border-bottom: 1px solid #eee;
    color: #313131;
    justify-content: space-between;
    padding: 15px;
    display: flex;
  }
  .modal-footer {
    border-top: 1px solid #eee;
    justify-content: flex-end;
    padding: 15px;
    display: flex;
  }
  .modal-body {
    position: relative;
    padding: 20px 10px;
  }
  .btn-close, .btn-confirm {
    border-radius: 8px;
    margin-left:16px;
    56px;
    height: 36px;
    border:none;
    cursor: pointer;
  }
  .btn-close {
    color: #313131;
    background-color:transparent;
  }
  .btn-confirm {
    color: #fff;
    background-color: #2d8cf0;
  }

</style>
4.3常见问题
1、组件之间互相遮盖
解决方案:设置组件的隐藏。这里的解决方案:
其他方式自行百度,遇到了用的时候再说。
2、父界面与子界面的数据传递。
子页面定义:
props: ['moduleData', 'moduleObj'],
3、动态加载input域
<div class="modal-body">
                <!--<p>我是一个Modal的内容</p>-->
                <el-form ref="mantainTab" :inline="true" label-width="auto" :model="childModuleObj" class="demo-form-inline" label-position="right">
                    <div v-for="(value, key) in moduleData" :key="key">
                        <!--{{ key }} ,{{ value }}-->
                        <el-form-item :label="key" :prop="key">
                            <el-input v-model="childModuleObj[key]" style=" 200px;" class="filter-item" :placeholder="value|placeholderFilter(value)" />
                        </el-form-item>
                    </div>
                </el-form>
            </div>
注意,后台传过来的是一个map对象。
placeholder实现输入域内添加提示语。并通过过滤器设置提示语。
v-model="childModuleObj[key]",来绑定输入的数据信息。
4、设置监听
watch: {
        // 监听父页面的moduleObj,提前给子页面的参数类名对象childModuleObj赋值
        moduleObj: {
            handler(val) {
                this.childModuleObj = JSON.parse(JSON.stringify(val));//改变对象引用地址,防止多次监听
            },
            immediate: true
        }
    },
后续了解学习。
5、对象转json
methods: {
        closeSelf() {
            this.childModuleObj = {};
            this.$emit("closeme");
        },
        confirm() {
            console.log('ppp', this.childModuleObj);
            const xxlJobParams = JSON.stringify(this.childModuleObj);
            alert(xxlJobParams);
            // 下次查询结果之前,清空上次查询的数据
            this.childModuleObj = {};
            this.$emit("closeme");
        }
    }
1、对象转换为JSON格式字符串:JSON.stringify(object)
2、JSON格式字符串转换为对象:JSON.parse(jsonString);
6、vue Element验证input提示
<el-form-item prop="userName" class="userName_color">
            <b>详细地址<i class="red">*</i></b>
              <el-input
                  placeholder="请填写详细地址"
                  v-model="loginRuleForm.userName"
                  class="Channel_account"
                  maxlength="18"
              ></el-input>
          </el-form-item>

           loginRuleForm: {
                    userName: ''
                },
                rules: {
                    userName: [
                        {required: true, message: "统一社会信用代码不能为空" ,trigger: 'blur'},
                    ]
                },
五、vue的生命周期
参看链接:https://www.jianshu.com/p/410b6099be69
六、过滤器-filters
6.1代码示例
filters: {
  parseAmountFilter,
  parseTimeFilter,
  parseDate,
  statusModeFilter(key) {
    const dataModules = {
      '0': '暂存',
      '3': '已确认',
      'A': '预付账',
      'B': '调整账'
    }
    return dataModules[key]
    // return adjustQueryStatus[key]
  },
  distributeflagFilter(key) {
    const dataModules = {
      '0': '否',
      '1': '是'
    }
    return dataModules[key]
  }
},
七、方法-method
八、监听-watch
后续了解学习。
九、功能实现
9.1下载zip文件
1、后端代码:
/**
     * 根据ID下载文件
     * @param checkId id
     * @return 文件流
     * @throws Exception 异常
     */
    @PostMapping("/general/download/checkresult")
    public ResponseEntity<byte[]> downLoad(@RequestParam("checkId") String checkId) throws Exception {
        String basePath =  ResourceUtils.getURL(ResourceUtils.FILE_URL_PREFIX).getPath();
        CheckExecuteResult result =  generalService.getCheckExecuteResultByKey(checkId);
        // 空检验
        if(result == null || StringUtils.isEmpty(result.getFilePath())){
            return null;
        }
        String filePath = basePath+result.getFilePath();
        String fileNameWithSuffix = result.getFileName()+Constant.DOT+result.getFileSuffix();
        HttpHeaders headers = new HttpHeaders();
        headers.add(HttpHeaders.CONTENT_DISPOSITION,"attachment;filename="+fileNameWithSuffix);
        return new ResponseEntity<>(FileUtils.readFileToByteArray(new File(filePath)),
                // ie 不支持 HttpStatus.CREATED 需要修改为 HttpStatus.OK
                headers, HttpStatus.OK);
    }
2、前段代码
downloadCheckResult() {
            const flag = this.commonOperate();
            if (!flag) return false;
            /* const data = {
                checkId: this.selectList[0].checkId
            } */
            const params = new FormData();
            params.append('checkId', this.selectList[0].checkId);
            downloadCheckResult(params).then(res => {
                this.exportZip(res);
            }).catch((err) => {
                console.log(err);
            });
        },
        exportZip(response) {
            const blob = new Blob([response.data], { type: "application/zip" });
            const name = response.headers['content-disposition'].split('=')[1];
            const link = document.createElement("a");
            link.style.display = "none";
            link.href = URL.createObjectURL(blob);
            link.setAttribute("download", decodeURI(name, "UTF-8"));
            // console.log('response:',response,';type:',response.data.type,';filename:',name);
            document.body.appendChild(link);
            link.click();
            document.body.removeChild(link);
            this.$message({
                message: "下载成功",
                type: "success"
            });
        },

        commonOperate() {
            let flag = false;
            if (this.selectList && this.selectList.length === 1) {
                flag = true;
            } else {
                flag = false;
                this.$alert('请选择其中一条数据进行此操作。', '提示');
            }
            return flag;
        },
3、postman测试
手动设置文件格式为zip,可能是因为postman的版本问题,我这里是response.bin文件,手动改成.zip文件即可。
参看链接:https://blog.csdn.net/qzh2018/article/details/108208362
4、后端获取项目根路径
这种方式获取到的是class文件路径。
String basePath = ResourceUtils.getURL("classpath:").getPath();//.../tar/class
下面这种方式获取到的是:“”。系统用的是这种方式。
String basePath = ResourceUtils.getURL("file:").getPath();
filepath是:
download611230106f891c9ea62ef669611230106f891c9ea62ef669.zip
在用idea进行测试,需要在src同级目录下,创建download611230106f891c9ea62ef669611230106f891c9ea62ef669.zip
在进行打包测试时,需要在jar包同级目录下,创建download611230106f891c9ea62ef669611230106f891c9ea62ef669.zip。
5、vue-以文件流-blob-的形式-下载-导出文件操作。
参看链接:
https://blog.csdn.net/qq_40241957/article/details/105554227
https://www.cnblogs.com/51net/p/13736501.html
6、vue获取content-disposition中的值
7、vue判断response返回类型为blob
// 如果返回不是null 并且是blob类型 直接返回
        if (res && Object.getPrototypeOf(res) === Blob.prototype) {
            return response;
        }
相关问题:参看链接: https://blog.csdn.net/weixin_42142057/article/details/97655591
我这里是因为在接收响应结果时,response进行了返回格式的校验。
参看链接:
https://www.cnblogs.com/DeerLin/p/14699524.html
https://developer.mozilla.org/zh-CN/docs/Web/JavaScript/Reference/Global_Objects/Object/GetPrototypeOf
十、知识点整理
10.1、vue构建一个页面及其功能实现用到的知识点
10.2搜索关键词
1、vue动态绑定input;vue 遍历取对象中的 键,动态改变input;
2、vue弹出模态框后隐藏其他组件;vue控制组件的显示和隐藏;
3、vue使用v-for遍历map,获得对应的 key 和 value
4、Vue中Element Table表格隐藏列:https://blog.csdn.net/m0_37835906/article/details/89022255
10.3数据绑定
10.4参数设置
1、json对象转换
1、对象转换为JSON格式字符串:JSON.stringify(object)
2、JSON格式字符串转换为对象:JSON.parse(jsonString);
2、json形式:后台接收到的是json串
后端:
/**
     *  获取xxl-job需要的入参
     * @param jobGroup xxl-job的任务类型
     * @return 检查结果
     */
    @PostMapping("check/xxlJob/xxlJobParams")
    public ApiResponse<Map<String,String>> getXxlParams(@RequestBody String jobGroup) {
        Map<String, String> map;
        JSONObject jsonObject = JSON.parseObject(jobGroup);
        String  group = (String) jsonObject.get("jobGroup");
        switch (group){
            case "3":
                map = genColumnsArray(FarmRepremiumAndCommInputParam.class);
                break;
            case "4":
                map = genColumnsArray(CarRateInputParamWrapper.class);
                break;
            default:
                map = genColumnsArray(ZrjInputParam.class);
                break;
        }
        return ApiResponseMapper.ok(map);
    }
前端:
getXxlParams(val) {
            this.moduleData = {};
            this.moduleObj = {};
            const data = {
                jobGroup: val.toString()
            };
            getXxlParams(data).then(response => {
                console.log('response111', response);
                const status = response.status;
                if (status === -1) {
                    const rs = response.data;
                    this.$alert(rs, '提示');
                }
                // 改变对象引用地址,防止多次监听
                this.moduleData = JSON.parse(JSON.stringify(response.data || {}));
                // 提前处理参数列名,因为如果直接在后面动态遍历参数列名,无法录入input域。需要提前定义好参数列名,所以在父组件里先处理好再传给子页面
                for (const key in this.moduleData) {
                    this.moduleObj[key] = '';
                }
                this.moduleObj = JSON.parse(JSON.stringify(this.moduleObj));
            }).catch(() => {
                this.$alert('查询失败', '提示');
            });
            this.showModal = !this.showModal;
        },
3、加注解:@RequestParam("checkId") String checkId
后端:
/**
     * 根据ID下载文件
     * @param checkId id
     * @return 文件流
     * @throws Exception 异常
     */
    @PostMapping("/general/download/checkresult")
    public ResponseEntity<byte[]> downLoad(@RequestParam("checkId") String checkId) throws Exception {
        String basePath =  ResourceUtils.getURL(ResourceUtils.FILE_URL_PREFIX).getPath();
        CheckExecuteResult result =  generalService.getCheckExecuteResultByKey(checkId);
        // 空检验
        if(result == null || StringUtils.isEmpty(result.getFilePath())){
            return null;
        }
        String filePath = basePath+result.getFilePath();
        String fileNameWithSuffix = result.getFileName()+Constant.DOT+result.getFileSuffix();
        HttpHeaders headers = new HttpHeaders();
        headers.add(HttpHeaders.CONTENT_DISPOSITION,"attachment;filename="+fileNameWithSuffix);
        return new ResponseEntity<>(FileUtils.readFileToByteArray(new File(filePath)),
                // ie 不支持 HttpStatus.CREATED 需要修改为 HttpStatus.OK
                headers, HttpStatus.OK);
    }
前端:
downloadCheckResult() {
            const flag = this.commonOperate();
            if (!flag) return false;
            /* const data = {
                checkId: this.selectList[0].checkId
            } */
            const params = new FormData();
            params.append('checkId', this.selectList[0].checkId);
            downloadCheckResult(params).then(res => {
                this.exportZip(res);
            }).catch((err) => {
                console.log(err);
            });
        },
十一、常见问题
11.1 let 与 const 的区别
11.2 elementUI的常用标签
1、scope