什么是堡垒机

搭建简易堡垒机
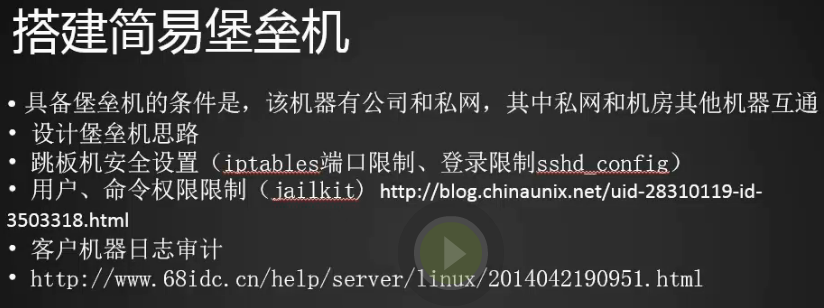
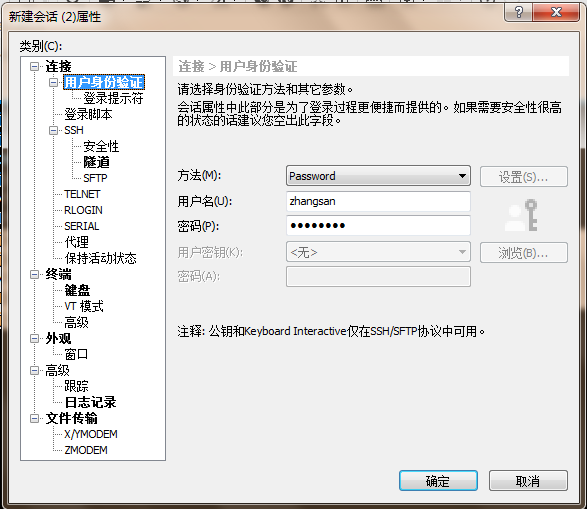
1.用户只可以通过ssh秘钥登录不允许账号登录

安装jailkit实现chroot
1.目的:普通用户登录,我们把用户限制在一个虚拟的系统里面,让它使用有限的命令和有限的环境,这样可以保证系统的安全性,它不能执行更多的命令来修改跳板机的设置。
2.安装jailkit
[root@centos-02 ~]# wget https://olivier.sessink.nl/jailkit/jailkit-2.19.tar.bz2
[root@centos-02 ~]# cd /usr/local/src/
[root@centos-02 src]# wget https://olivier.sessink.nl/jailkit/jailkit-2.19.tar.bz2
--2018-05-17 00:18:14--  https://olivier.sessink.nl/jailkit/jailkit-2.19.tar.bz2
正在解析主机 olivier.sessink.nl (olivier.sessink.nl)... 95.97.76.243, 2001:470:7a44::243
正在连接 olivier.sessink.nl (olivier.sessink.nl)|95.97.76.243|:443... 已连接。
已发出 HTTP 请求,正在等待回应... 200 OK
长度:116665 (114K) [application/x-bzip2]
正在保存至: “jailkit-2.19.tar.bz2”

100%[===============================================>] 116,665     87.4KB/s 用时 1.3s

2018-05-17 00:18:17 (87.4 KB/s) - 已保存 “jailkit-2.19.tar.bz2” [116665/116665])

[root@centos-02 src]# tar jxvf jailkit-2.19.tar.bz2
[root@centos-02 src]# cd jailkit-2.19
[root@centos-02 jailkit-2.19]# ./configure
[root@centos-02 jailkit-2.19]# make && make install
3.将常用的命令搞到虚拟系统的根目录下
[root@centos-02 jailkit-2.19]# mkdir /home/jail  (创建虚拟系统的根目录,chroot到这个目录)
[root@centos-02 jailkit-2.19]# jk_init -v -j /home/jail/ basicshell
[root@centos-02 jailkit-2.19]# jk_init -v -j /home/jail/ editors
[root@centos-02 jailkit-2.19]# jk_init -v -j /home/jail/ netutils
[root@centos-02 jailkit-2.19]# jk_init -v -j /home/jail/ ssh
4.创建系统用户
[root@centos-02 jailkit-2.19]# useradd zhangsan
[root@centos-02 jailkit-2.19]# passwd zhangsan
更改用户 zhangsan 的密码 。
新的 密码:
重新输入新的 密码:
passwd:所有的身份验证令牌已经成功更新。
[root@centos-02 jailkit-2.19]# mkdir /home/jail/usr/sbin
[root@centos-02 jailkit-2.19]# cp /usr/sbin/jk_lsh /home/jail/usr/sbin/jk_lsh (将虚拟系统的shell搞到home下)
[root@centos-02 jailkit-2.19]#
5.创建虚拟系统里面的用户
[root@centos-02 jailkit-2.19]# jk_jailuser -m -j /home/jail zhangsan
[root@centos-02 jailkit-2.19]# cd /home/jail/
[root@centos-02 jail]# ls -l
总用量 0
lrwxrwxrwx 1 root root   7 5月  17 00:28 bin -> usr/bin
drwxr-xr-x 2 root root  44 5月  17 00:33 dev
drwxr-xr-x 2 root root 240 5月  17 00:33 etc
drwxr-xr-x 3 root root  22 5月  17 00:45 home
lrwxrwxrwx 1 root root   9 5月  17 00:28 lib64 -> usr/lib64
drwxr-xr-x 7 root root  70 5月  17 00:39 usr
[root@centos-02 jail]#
6.需要将usr/sbin/jk_lsh SHELL改成bin/bash这样我们才能用账号登录,默认是不能用账号登录的。
[root@centos-02 jail]# cat etc/passwd
root:x:0:0:root:/root:/bin/bash
zhangsan:x:1008:1008::/home/zhangsan:/usr/sbin/jk_lsh改成bin/bash
[root@centos-02 jail]#
[root@centos-02 jail]# vim etc/passwd
[root@centos-02 jail]# cat etc/passwd
root:x:0:0:root:/root:/bin/bash
zhangsan:x:1008:1008::/home/zhangsan:/bin/bash
[root@centos-02 jail]#
7.登录虚拟用户zhangsan
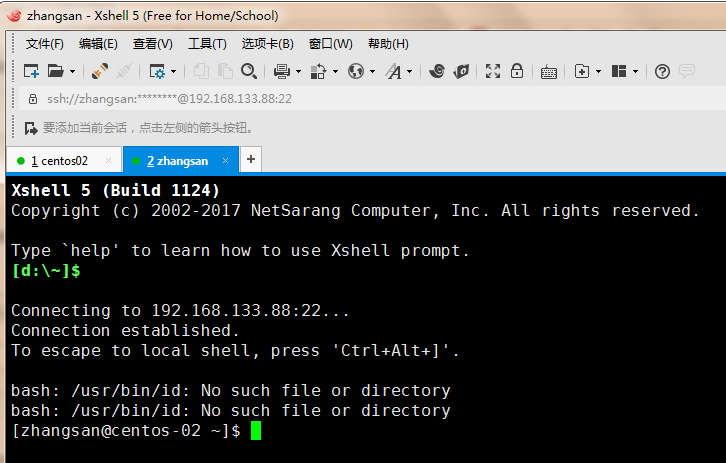
8.这就是我们的虚拟系统
[zhangsan@centos-02 ~]$ ls -l /
total 0
lrwxrwxrwx 1 root root   7 May 16 16:28 bin -> usr/bin
drwxr-xr-x 2 root root  44 May 16 16:33 dev
drwxr-xr-x 2 root root 240 May 17 14:19 etc
drwxr-xr-x 3 root root  22 May 16 16:45 home
lrwxrwxrwx 1 root root   9 May 16 16:28 lib64 -> usr/lib64
drwxr-xr-x 7 root root  70 May 16 16:39 usr
[zhangsan@centos-02 ~]$
Display all 116 possibilities? (y or n)
!          command    elif       gunzip     more       sh         typeset
./         compgen    else       gzip       mv         shift      ulimit
:          complete   enable     hash       popd       shopt      umask
[          compopt    esac       help       printf     sleep      unalias
[[         continue   eval       history    pushd      source     unset
]]         coproc     exec       if         pwd        ssh        until
alias      cp         exit       in         read       suspend    vi
bash       cpio       export     jobs       readarray  sync       vim
bg         date       false      kill       readonly   tar        wait
bind       dd         fc         let        return     test       wget
break      declare    fg         ln         rm         then       while
builtin    dirs       fgrep      local      rmdir      time       zcat
caller     disown     fi         logout     rsync      times      {
case       do         for        ls         scp        touch      }
cat        done       function   mapfile    sed        trap
cd         echo       getopts    mkdir      select     true
chmod      egrep      grep       mktemp     set        type
[zhangsan@centos-02 ~]$
9.如果想要只是秘钥登录需要设置
[root@centos-02 ~]# cat /etc/ssh/sshd_config |grep PasswordA
#PasswordAuthentication yes
PasswordAuthentication yes 改为  no
# PasswordAuthentication.  Depending on your PAM configuration,
# PAM authentication, then enable this but set PasswordAuthentication
[root@centos-02 ~]#
10.配置允许192.168.133.0的网段访问,其他的都拒绝,不能远程登录了
[root@centos-02 ~]# cat /etc/hosts.allow |grep sshd
sshd: 192.168.133.0/24
[root@centos-02 ~]#
[root@centos-02 ~]# cat /etc/hosts.deny |grep sshd
sshd ALL
[root@centos-02 ~]#
日志审计
1.到客户机上做一些限制,用户只能用我们的跳板机登录,其他机器都不能登录,我们登录03客户机,设置允许登录的ip为我们的跳板机ip,拒绝其他所有ip
[root@centos-03 ~]# vim /etc/hosts.allow
[root@centos-03 ~]# cat /etc/hosts.allow
#
# hosts.allow	This file contains access rules which are used to
#		allow or deny connections to network services that
#		either use the tcp_wrappers library or that have been
#		started through a tcp_wrappers-enabled xinetd.
#
#		See 'man 5 hosts_options' and 'man 5 hosts_access'
#		for information on rule syntax.
#		See 'man tcpd' for information on tcp_wrappers
#
sshd: 192.168.133.88
[root@centos-03 ~]#
[root@centos-03 ~]# vi /etc/hosts.deny
[root@centos-03 ~]# cat /etc/hosts.deny
#
# hosts.deny	This file contains access rules which are used to
#		deny connections to network services that either use
#		the tcp_wrappers library or that have been
#		started through a tcp_wrappers-enabled xinetd.
#
#		The rules in this file can also be set up in
#		/etc/hosts.allow with a 'deny' option instead.
#
#		See 'man 5 hosts_options' and 'man 5 hosts_access'
#		for information on rule syntax.
#		See 'man tcpd' for information on tcp_wrappers
#
sshd: ALL
[root@centos-03 ~]#
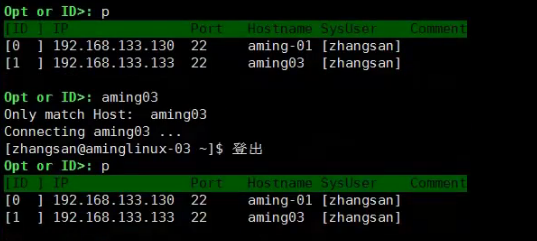
2.设置好后我们再次直接登录03服务器发现不能登录了
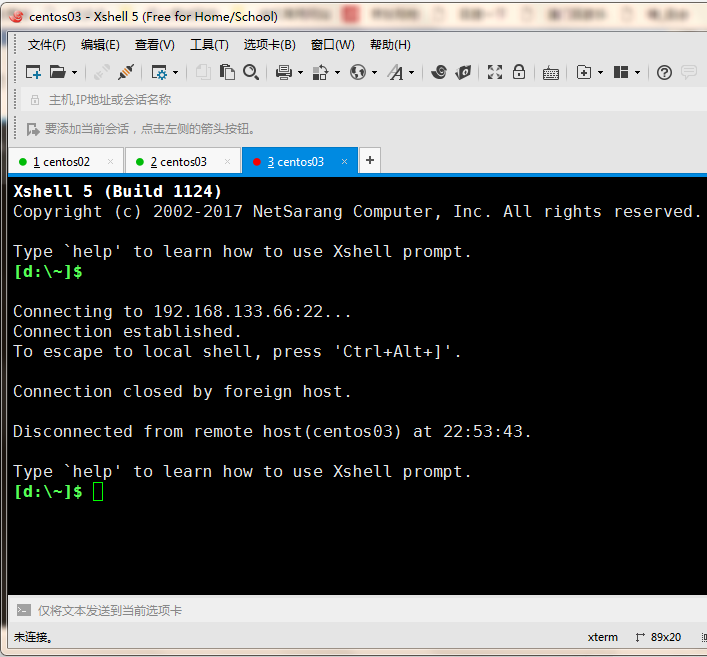
3.我们通过zhangsan这台机器可以登录,这样我们就做成了一个跳板机
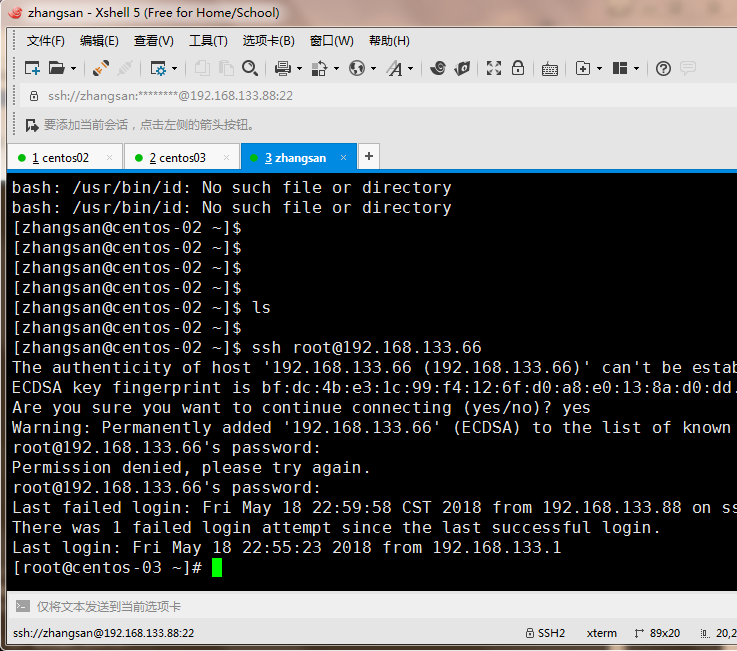
4.为了做实验方便我们增加一个ip 192.168.133.1,我们再登录03服务器发现能登录了
[root@centos-03 ~]# vim /etc/hosts.allow
[root@centos-03 ~]# cat /etc/hosts.allow
#
# hosts.allow	This file contains access rules which are used to
#		allow or deny connections to network services that
#		either use the tcp_wrappers library or that have been
#		started through a tcp_wrappers-enabled xinetd.
#
#		See 'man 5 hosts_options' and 'man 5 hosts_access'
#		for information on rule syntax.
#		See 'man tcpd' for information on tcp_wrappers
#
sshd: 192.168.133.88 192.168.133.1
[root@centos-03 ~]#
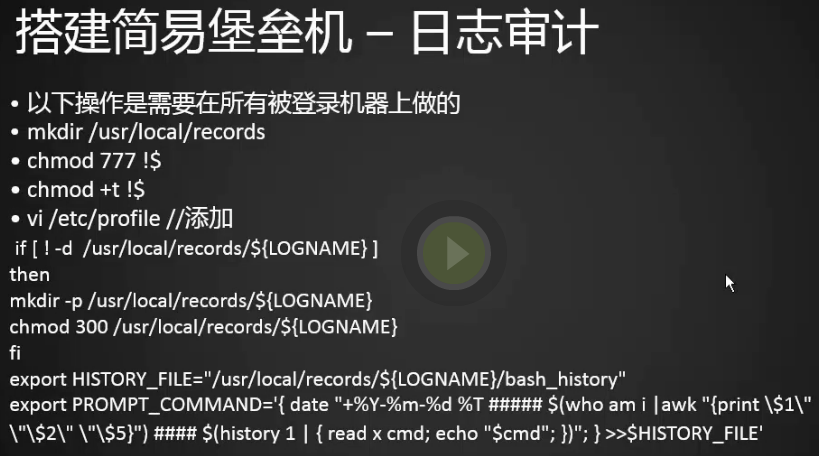
5.某个人登录了一台机器做了哪些操作我们需要做一个记录,首先创建一个records目录,给777权限,给t权限防删除
[root@centos-03 ~]# mkdir /usr/local/records
[root@centos-03 ~]# chmod 777 !$
chmod 777 /usr/local/records
[root@centos-03 ~]# chmod +t !$
chmod +t /usr/local/records
[root@centos-03 ~]#
6.编辑profile文件添加代码,目的是将最后一条命令记录下来
[root@centos-03 ~]# vim /etc/profile
[root@centos-03 ~]# cat /etc/profile
# /etc/profile

# System wide environment and startup programs, for login setup
# Functions and aliases go in /etc/bashrc

# It's NOT a good idea to change this file unless you know what you
# are doing. It's much better to create a custom.sh shell script in
# /etc/profile.d/ to make custom changes to your environment, as this
# will prevent the need for merging in future updates.

pathmunge () {
    case ":${PATH}:" in
        *:"$1":*)
            ;;
        *)
            if [ "$2" = "after" ] ; then
                PATH=$PATH:$1
            else
                PATH=$1:$PATH
            fi
    esac
}


if [ -x /usr/bin/id ]; then
    if [ -z "$EUID" ]; then
        # ksh workaround
        EUID=`/usr/bin/id -u`
        UID=`/usr/bin/id -ru`
    fi
    USER="`/usr/bin/id -un`"
    LOGNAME=$USER
    MAIL="/var/spool/mail/$USER"
fi

# Path manipulation
if [ "$EUID" = "0" ]; then
    pathmunge /usr/sbin
    pathmunge /usr/local/sbin
else
    pathmunge /usr/local/sbin after
    pathmunge /usr/sbin after
fi

HOSTNAME=`/usr/bin/hostname 2>/dev/null`
HISTSIZE=1000
if [ "$HISTCONTROL" = "ignorespace" ] ; then
    export HISTCONTROL=ignoreboth
else
    export HISTCONTROL=ignoredups
fi

export PATH USER LOGNAME MAIL HOSTNAME HISTSIZE HISTCONTROL

# By default, we want umask to get set. This sets it for login shell
# Current threshold for system reserved uid/gids is 200
# You could check uidgid reservation validity in
# /usr/share/doc/setup-*/uidgid file
if [ $UID -gt 199 ] && [ "`/usr/bin/id -gn`" = "`/usr/bin/id -un`" ]; then
    umask 002
else
    umask 022
fi

for i in /etc/profile.d/*.sh ; do
    if [ -r "$i" ]; then
        if [ "${-#*i}" != "$-" ]; then
            . "$i"
        else
            . "$i" >/dev/null
        fi
    fi
done

unset i
unset -f pathmunge

if [ ! -d  /usr/local/records/${LOGNAME} ]
then
mkdir -p /usr/local/records/${LOGNAME}
chmod 300 /usr/local/records/${LOGNAME}
fi
export HISTORY_FILE="/usr/local/records/${LOGNAME}/bash_history"
export PROMPT_COMMAND='{ date "+%Y-%m-%d %T ##### $(who am i |awk "{print $1" "$2" "$5}") #### $(history 1 | { read x cmd; echo "$cmd"; })"; } >>$HISTORY_FILE'
[root@centos-03 ~]#
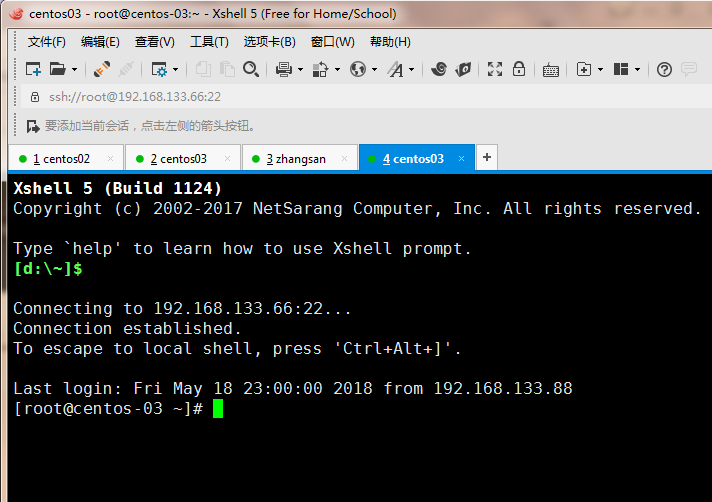
7.我们重新登录下03服务器,查看root下面的bash_history文件发现详细记录了我们敲过的命令
Connecting to 192.168.133.66:22...
Connection established.
To escape to local shell, press 'Ctrl+Alt+]'.

Last login: Fri May 18 23:27:38 2018 from 192.168.133.1
[root@centos-03 ~]# cd /usr/local/records/
[root@centos-03 records]# cd root/
[root@centos-03 root]# ls
bash_history
[root@centos-03 root]# cat bash_history
2018-05-18 23:29:31 ##### root pts/2 (192.168.133.1) #### ls
2018-05-18 23:29:34 ##### root pts/2 (192.168.133.1) #### cd /usr/local/records/
2018-05-18 23:29:35 ##### root pts/2 (192.168.133.1) #### ls
2018-05-18 23:32:05 ##### root pts/2 (192.168.133.1) #### cd /root/
2018-05-18 23:32:07 ##### root pts/2 (192.168.133.1) #### ls
2018-05-18 23:32:40 ##### root pts/2 (192.168.133.1) #### cd /usr/local/records/
2018-05-18 23:32:46 ##### root pts/2 (192.168.133.1) #### cd root/
2018-05-18 23:32:47 ##### root pts/2 (192.168.133.1) #### ls
[root@centos-03 root]#
8.在03服务器上添加一个新用户zhangsan,然后用跳板机登录下
[root@centos-03 root]# useradd zhangsan
[root@centos-03 root]# passwd zhangsan
更改用户 zhangsan 的密码 。
新的 密码:
无效的密码: 密码包含用户名在某些地方
重新输入新的 密码:
passwd:所有的身份验证令牌已经成功更新。
[root@centos-03 root]#
[zhangsan@centos-02 ~]$ ssh zhangsan@192.168.133.66
zhangsan@192.168.133.66's password:
[zhangsan@centos-03 ~]$ pw
-bash: pw: 未找到命令
[zhangsan@centos-03 ~]$ pwd
/home/zhangsan
[zhangsan@centos-03 ~]$ df -h
文件系统        容量  已用  可用 已用% 挂载点
/dev/sda3        18G  3.6G   15G   20% /
devtmpfs        479M     0  479M    0% /dev
tmpfs           489M     0  489M    0% /dev/shm
tmpfs           489M  6.7M  482M    2% /run
tmpfs           489M     0  489M    0% /sys/fs/cgroup
/dev/sda1       197M  109M   88M   56% /boot
tmpfs            98M     0   98M    0% /run/user/0
tmpfs            98M     0   98M    0% /run/user/1000
[zhangsan@centos-03 ~]$ fee
-bash: fee: 未找到命令
[zhangsan@centos-03 ~]$ free
              total        used        free      shared  buff/cache   available
Mem:         999936      295832      378908        7012      325196      536208
Swap:       2097148           0     2097148
[zhangsan@centos-03 ~]$
9.我们再进03服务器发现多了一个zhangsan目录并且我们刚敲的命令都被记录下来了。
[root@centos-03 root]# cd /usr/local/records/
[root@centos-03 records]# ls
root  zhangsan
[root@centos-03 records]# cd zhangsan/
[root@centos-03 zhangsan]# cat bash_history
2018-05-18 23:40:23 ##### zhangsan pts/1 (192.168.133.88) ####
2018-05-18 23:40:40 ##### zhangsan pts/1 (192.168.133.88) #### pw
2018-05-18 23:40:41 ##### zhangsan pts/1 (192.168.133.88) #### pwd
2018-05-18 23:40:54 ##### zhangsan pts/1 (192.168.133.88) #### df -h
2018-05-18 23:41:00 ##### zhangsan pts/1 (192.168.133.88) #### fee
2018-05-18 23:41:02 ##### zhangsan pts/1 (192.168.133.88) #### free
[root@centos-03 zhangsan]#
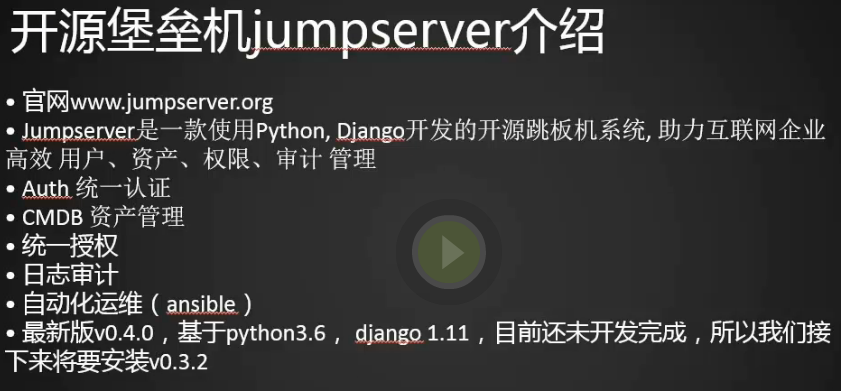
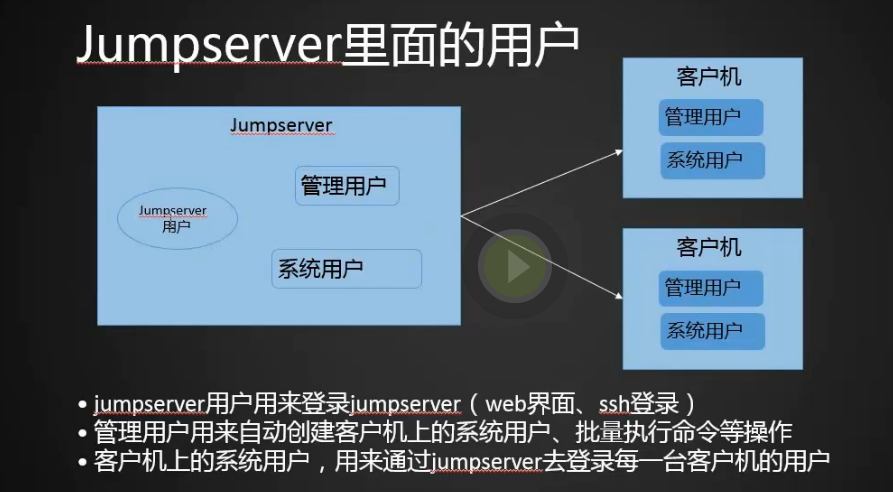
jumpserver介绍
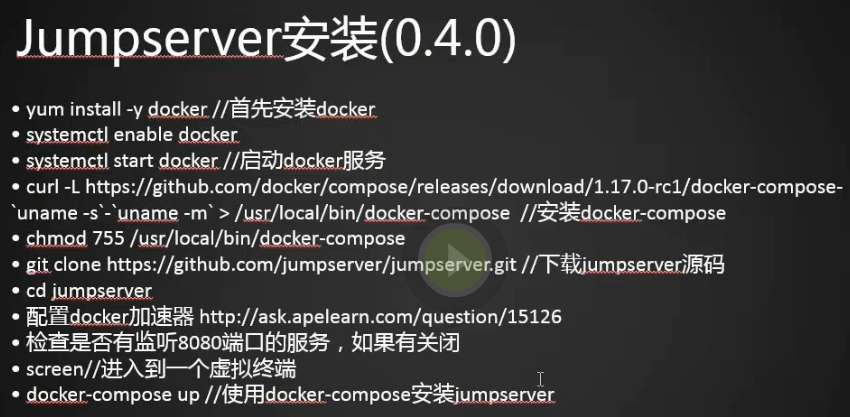
安装jumpserver

1.停掉gitlab
[root@centos-03 zhangsan]# systemctl stop gitlab-runsvdir.service
Failed to stop gitlab-runsvdir.service: Unit gitlab-runsvdir.service not loaded.
[root@centos-03 zhangsan]# gitlab-ctl stop
-bash: gitlab-ctl: 未找到命令
[root@centos-03 zhangsan]#
2.安装git,我们这里安装0.3.3版本的,(如果安装最新版的执行https://github.com/jumpserver/jumpserver.git,如果不在master分支需要切换到master分支下)
[root@centos-02 ~]# yum install -y git
[root@centos-02 src]# wget https://github.com/jumpserver/jumpserver/archive/0.3.3.zip
[root@centos-02 src]# unzip 0.3.3.zip -d /home/
[root@centos-02 src]# cd /home/
[root@centos-02 home]# ls
elastic  git  jail  jumpserver-0.3.3  myproject  sunyujun  sunyujun1  user1  user2
[root@centos-02 home]# cd jumpserver-0.3.3/
[root@centos-02 jumpserver-0.3.3]# ls
connect.py           init.sh  jperm            keys       README.md      templates
docker-compose.yaml  install  jumpserver       LICENSE    run_server.py
Dockerfile           jasset   jumpserver.conf  logs       service.sh
docs                 jlog     juser            manage.py  static
[root@centos-02 jumpserver-0.3.3]#
[root@centos-02 jumpserver-0.3.3]# cd install/
[root@centos-02 install]# ls
developer_doc.txt  functions          install.py  requirements.txt
docker             initial_data.yaml  next.py
[root@centos-02 install]# python install.py
请输入您服务器的IP地址,用户浏览器可以访问 [192.168.133.88]:
是否安装新的MySQL服务器? (y/n) [y]: n
请输入数据库服务器IP [127.0.0.1]:
请输入数据库服务器端口 [3306]:
请输入数据库服务器用户 [jumpserver]:
 3.到这里我们需要再开一个终端设置下mysql
[root@centos-02 ~]# mysql -uroot -p
Enter password:
Welcome to the MySQL monitor.  Commands end with ; or g.
Your MySQL connection id is 292
Server version: 5.6.39 MySQL Community Server (GPL)

Copyright (c) 2000, 2018, Oracle and/or its affiliates. All rights reserved.

Oracle is a registered trademark of Oracle Corporation and/or its
affiliates. Other names may be trademarks of their respective
owners.

Type 'help;' or 'h' for help. Type 'c' to clear the current input statement.

mysql>
mysql> create database jumpserver;
Query OK, 1 row affected (0.24 sec)

mysql> grant all on jumpserver.* to 'jumpserver'@'127.0.0.1' identified by 'jumpserver';
Query OK, 0 rows affected (0.49 sec)

mysql>
4.再回到之前的终端
请输入数据库服务器密码: jumpserver
请输入使用的数据库 [jumpserver]:
连接数据库成功
请输入SMTP地址: smtp.163.com
请输入SMTP端口 [25]:
请输入账户: sunyujun_de@163.com
请输入密码: sunyujun
(535, 'Error: authentication failed')
是否跳过(y/n) [n]? : y

	请登陆邮箱查收邮件, 然后确认是否继续安装

是否继续? (y/n) [y]: y
开始写入配置文件
开始安装Jumpserver ...
开始更新jumpserver
Creating tables ...
Creating table django_admin_log
Creating table auth_permission
Creating table auth_group_permissions
Creating table auth_group
Creating table django_content_type
Creating table django_session
Creating table setting
Creating table juser_usergroup
Creating table juser_user_group
Creating table juser_user_groups
Creating table juser_user_user_permissions
Creating table juser_user
Creating table juser_admingroup
Creating table juser_document
Creating table jasset_assetgroup
Creating table jasset_idc
Creating table jasset_asset_group
Creating table jasset_asset
Creating table jasset_assetrecord
Creating table jasset_assetalias
Creating table jperm_permlog
Creating table jperm_permsudo
Creating table jperm_permrole_sudo
Creating table jperm_permrole
Creating table jperm_permrule_asset_group
Creating table jperm_permrule_role
Creating table jperm_permrule_asset
Creating table jperm_permrule_user_group
Creating table jperm_permrule_user
Creating table jperm_permrule
Creating table jperm_permpush
Creating table jlog_log
Creating table jlog_alert
Creating table jlog_ttylog
Creating table jlog_execlog
Creating table jlog_filelog
Creating table jlog_termlog_user
Creating table jlog_termlog
Installing custom SQL ...
Installing indexes ...
Installed 0 object(s) from 0 fixture(s)

请输入管理员用户名 [admin]:
请输入管理员密码: [5Lov@wife]:
请再次输入管理员密码: [5Lov@wife]:
Starting jumpserver service:                               [  确定  ]

安装成功,Web登录请访问http://ip:8000, 祝你使用愉快。
请访问 https://github.com/jumpserver/jumpserver/wiki 查看文档
[root@centos-02 install]#
5.查看jumpserver的配置文件
[root@centos-02 install]# cat ../jumpserver.conf
[base]
url = http://192.168.133.88
key = rb506fp2ir5713xe
ip = 0.0.0.0
port = 8000
log = debug

[db]
engine = mysql
host = 127.0.0.1
port = 3306
user = jumpserver
password = jumpserver
database = jumpserver

[mail]
mail_enable = 1
email_host = smtp.163.com
email_port = 25
email_host_user = sunyujun_de@163.com
email_host_password = sunyujun
email_use_tls = False
email_use_ssl = False

[connect]
nav_sort_by = ip

[root@centos-02 install]#
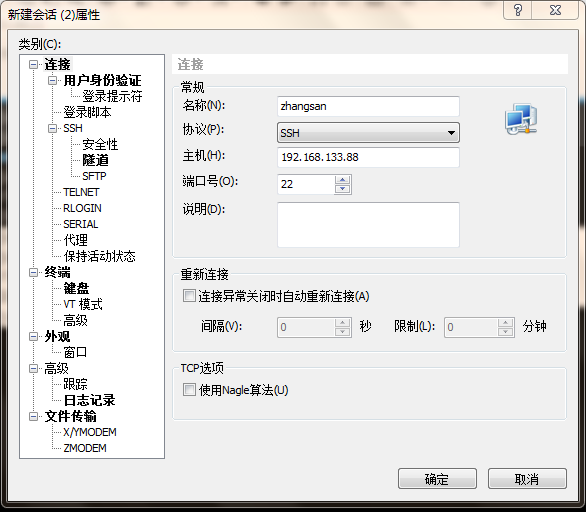
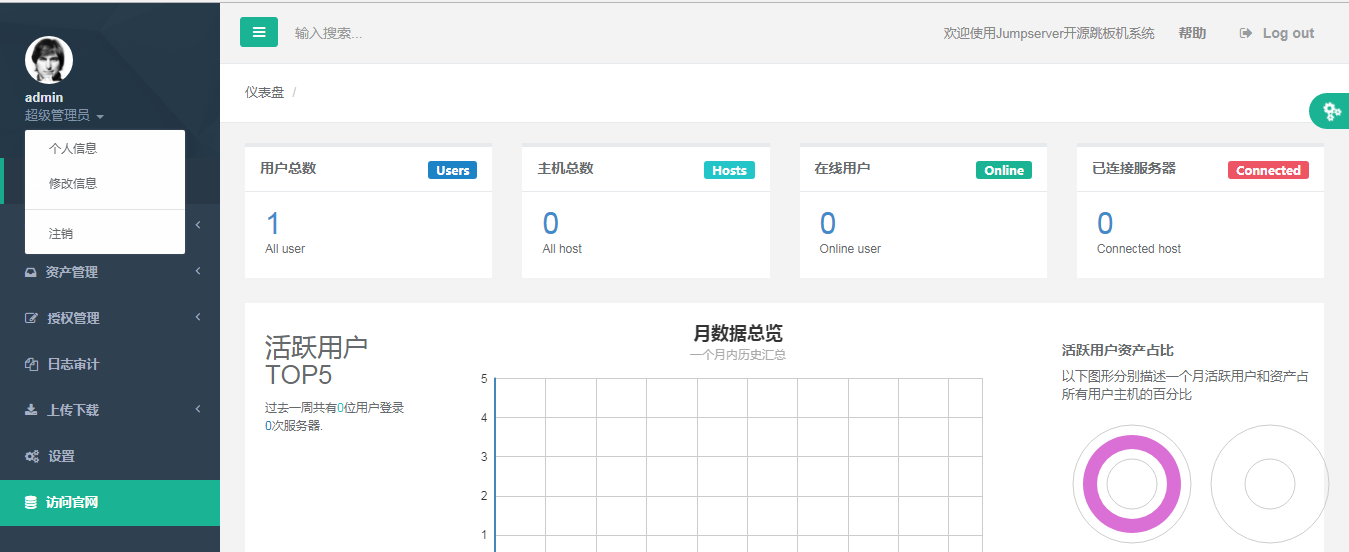
登录jumpserver
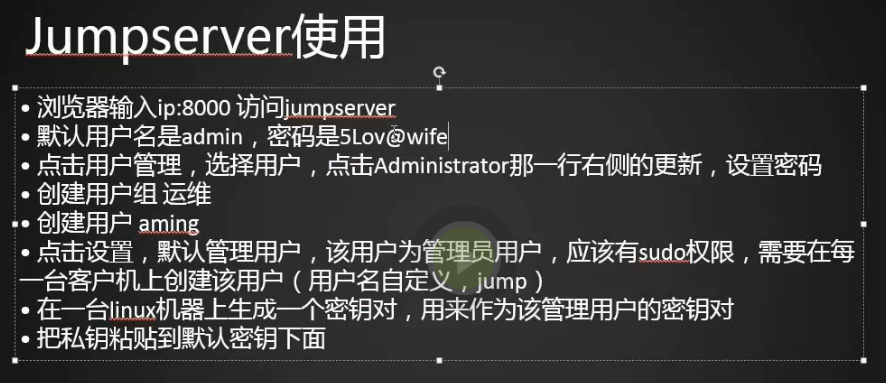
1.修改管理员密码
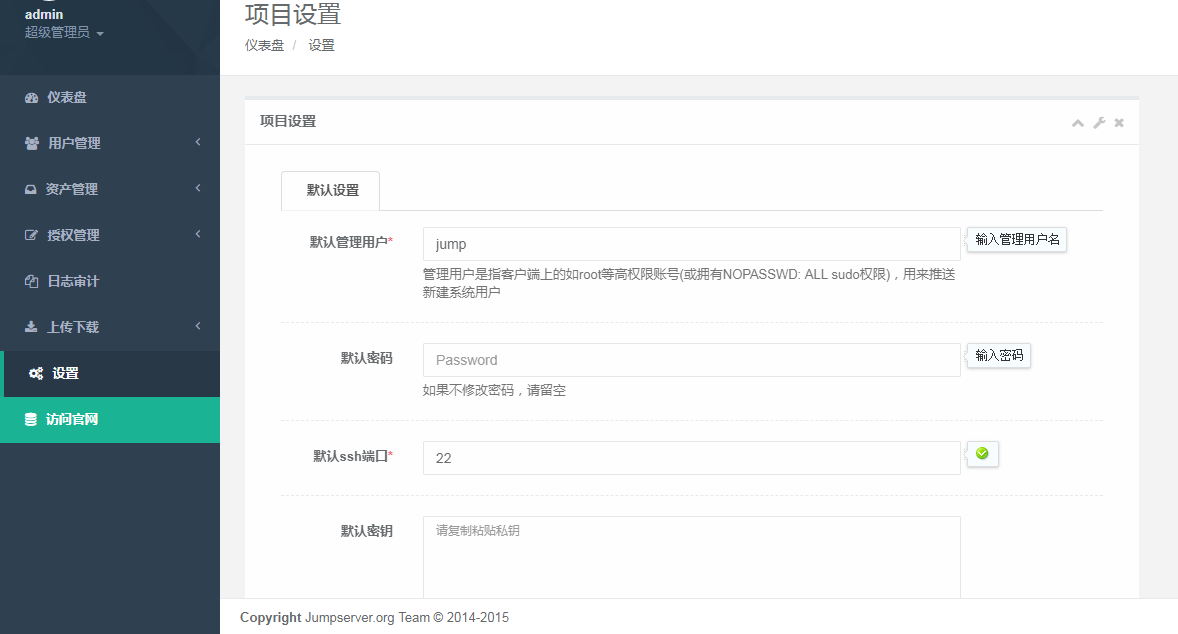
创建管理用户
1.点击设置-》添加管理员
2.在jumpserver这台机器上生成秘钥对
[root@centos-02 ~]# cd .ssh/
[root@centos-02 .ssh]# ls
authorized_keys  known_hosts
[root@centos-02 .ssh]# ssh-keygen
Generating public/private rsa key pair.
Enter file in which to save the key (/root/.ssh/id_rsa): ^C
[root@centos-02 .ssh]#
[root@centos-02 .ssh]# cd
[root@centos-02 ~]#
[root@centos-02 ~]# cd .ssh/
[root@centos-02 .ssh]# ls
authorized_keys  known_hosts
[root@centos-02 .ssh]# ssh-keygen -f jump
Generating public/private rsa key pair.
Enter passphrase (empty for no passphrase):
Enter same passphrase again:
Your identification has been saved in jump.
Your public key has been saved in jump.pub.
The key fingerprint is:
89:f6:66:48:74:c2:20:60:ef:e9:5f:27:d1:16:32:1c root@centos-02
The key's randomart image is:
+--[ RSA 2048]----+
|.o. .  E         |
|. .. o. .        |
|   .  ++..       |
|  . .. ++..      |
|   o  +.So       |
|  .  o oo        |
|   .  .o+.       |
|    . .oo        |
|     .           |
+-----------------+
[root@centos-02 .ssh]# ls
authorized_keys  jump  jump.pub  known_hosts
[root@centos-02 .ssh]#
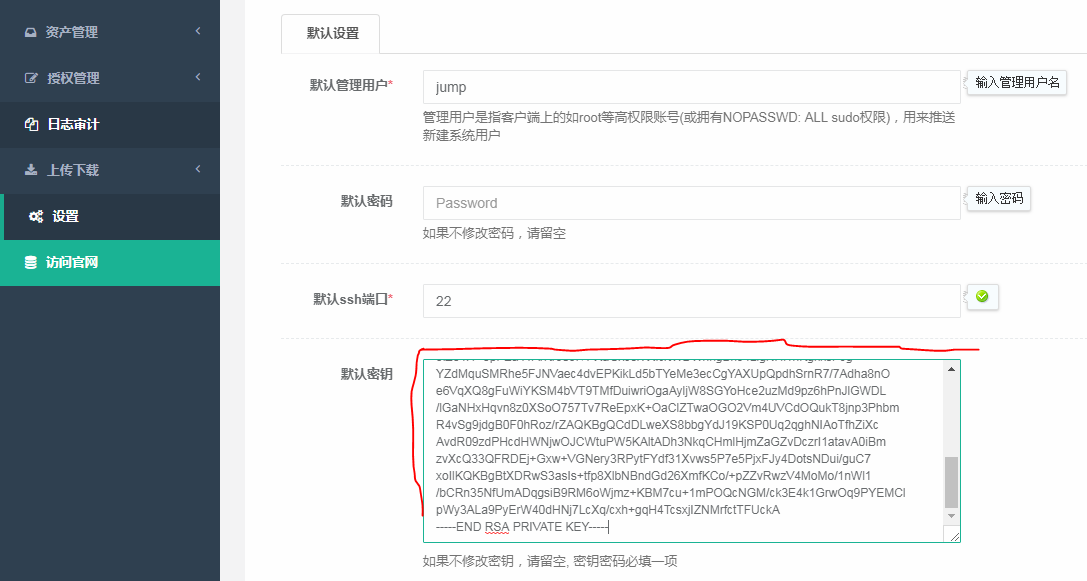
3.将私钥粘贴到浏览器中,点击确认保存。
[root@centos-02 .ssh]# cat jump
-----BEGIN RSA PRIVATE KEY-----
MIIEowIBAAKCAQEAvjBGz7yHY7smdrhxLdWvrwFx9Apy3v/jKibumfIT0u1t2sv9
DcFidkcmbrYzU+7TBuvHX/cN7uOgnZUvicxFBC4MTUEgXe8Eqgq5B700yf+0PiSF
Zh/nkeqfeSTJHbxA40bhoU7whq1gDKZx/TiIjndvnWJM6o1WjLtG6yrg4DS6h9eP
XtIOMU6lLOSoz/M6f1GCwxcInc4xXTNtBP7dik8EEQsSqqmdwcB6fiIO6IJB2l0V
Duh/WJUDOIwpkDLu9VIEAvzEzVrvDVoCWikidyHlyhKEi83j0etb21OXzi2Zes/W
zBJ6hGVdEfXbiCMzm5JkDAhqUfkeVUdvgoRc5wIDAQABAoIBAH+1XSdLOkKOvgJE
UcNsVL8YIlOz3HS/sONyJw/6jLM7OWQNTAw7iglQN49qC0dV/CAOnN9kvtdlxEls
jvJh1wo6fYo2rCxHPoOMFbkLpPHrITYFQgpUbCQAPzuSpvWvnoa+5u1xW3Oj4fY8
ohheKNw5eRpekrWBWNfBPZrWPRBvTMjP5WcrAOzf5ZDLEnTRnbwzR3TfbPrF70Ah
F5Sm+UdOiSpVBkA6lcEz0D/GnnygUlEnpkqu574x2gofBjDJ9HhFpjP+a9cjk7iw
oU36hyuWxDLJ7ew378JLcnjGhFLthsiuxEcXd1lxMhnOC4DmqQ6uliOgxEo661PK
EQYGGgECgYEA/AS0qGz9fysJiohOkhgG2XCRdDj2C3tdzQXSZM6U5pHr1bUcIuZk
UAPtfte3YVGDBG4hNROjv56XuKCMn1+D9lbD9UhTPk/Ye6Ruqzu1qdE6ZaJl4O1x
CmnvbnpRLIJURcbLDP8jmxzRI+XJ9c8LCD/oyZQAkDqGOR0XjFzYqQECgYEAwTF/
sp+2KDv504LlFG7SwzUacoOYxdWj3mSPFsfLqnu8gJe12rHygziEtwsyFJmyhbSK
5lZ84I1+3pFEa41ArKr909lVPXaGxJ3/7Xfc/tWDWhngBk64LigNHl1hKgkksPJg
YZdMquSMRhe5FJNVaec4dvEPKikLd5bTYeMe3ecCgYAXUpQpdhSrnR7/7Adha8nO
e6VqXQ8gFuWiYKSM4bVT9TMfDuiwriOgaAyljW8SGYoHce2uzMd9pz6hPnJlGWDL
/lGaNHxHqvn8z0XSoO757Tv7ReEpxK+OaClZTwaOGO2Vm4UVCdOQukT8jnp3Phbm
R4vSg9jdgB0F0hRoz/rZAQKBgQCdDLweXS8bbgYdJ19KSP0Uq2qghNIAoTfhZiXc
AvdR09zdPHcdHWNjwOJCWtuPW5KAltADh3NkqCHmlHjmZaGZvDczrI1atavA0iBm
zvXcQ33QFRDEj+Gxw+VGNery3RPytFYdf31Xvws5P7e5PjxFJy4DotsNDui/guC7
xoIlKQKBgBtXDRwS3asIs+tfp8XlbNBndGd26XmfKCo/+pZZvRwzV4MoMo/1nWl1
/bCRn35NfUmADqgsiB9RM6oWjmz+KBM7cu+1mPOQcNGM/ck3E4k1GrwOq9PYEMCl
pWy3ALa9PyErW40dHNj7LcXq/cxh+gqH4TcsxjIZNMrfctTFUckA
-----END RSA PRIVATE KEY-----
[root@centos-02 .ssh]#
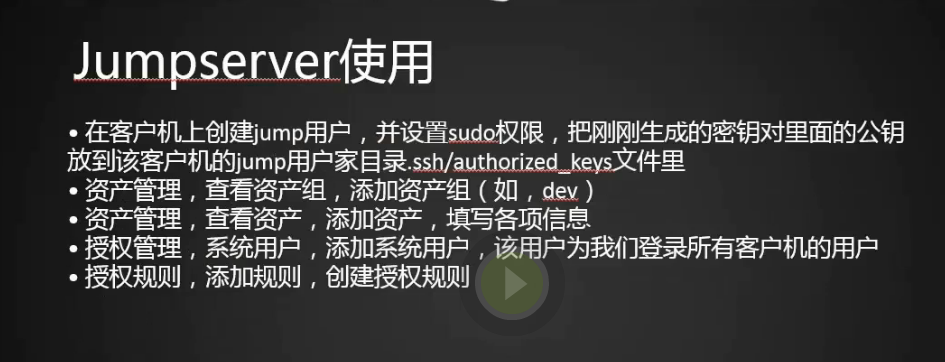
4.我们增加一台机器03,创建一个用户jump,将02上的公钥复制到03服务器jump用户的.ssh/authoirzed_keys文件中,以后每增加一台机器都增加一个jump用户
[root@centos-02 .ssh]# cat jump.pub
ssh-rsa AAAAB3NzaC1yc2EAAAADAQABAAABAQC+MEbPvIdjuyZ2uHEt1a+vAXH0CnLe/+MqJu6Z8hPS7W3ay/0NwWJ2RyZutjNT7tMG68df9w3u46CdlS+JzEUELgxNQSBd7wSqCrkHvTTJ/7Q+JIVmH+eR6p95JMkdvEDjRuGhTvCGrWAMpn
H9OIiOd2+dYkzqjVaMu0brKuDgNLqH149e0g4xTqUs5KjP8zp/UYLDFwidzjFdM20E/t2KTwQRCxKqqZ3BwHp+Ig7ogkHaXRUO6H9YlQM4jCmQMu71UgQC/MTNWu8NWgJaKSJ3IeXKEoSLzePR61vbU5fOLZl6z9bMEnqEZV0R9duIIzObkmQM
CGpR+R5VR2+ChFzn root@centos-02
[root@centos-02 .ssh]#
[root@centos-03 ~]# useradd jump
[root@centos-03 ~]# su - jump
[jump@centos-03 ~]$ mkdir .ssh
[jump@centos-03 ~]$ vim .ssh/authorized_keys
[jump@centos-03 ~]$ cat .ssh/authorized_keys
ssh-rsa AAAAB3NzaC1yc2EAAAADAQABAAABAQC+MEbPvIdjuyZ2uHEt1a+vAXH0CnLe/+MqJu6Z8hPS7W3ay/0NwWJ2RyZutjNT7tMG68df9w3u46CdlS+JzEUELgxNQSBd7wSqCrkHvTTJ/7Q+JIVmH+eR6p95JMkdvEDjRuGhTvCGrWAMpnH
9OIiOd2+dYkzqjVaMu0brKuDgNLqH149e0g4xTqUs5KjP8zp/UYLDFwidzjFdM20E/t2KTwQRCxKqqZ3BwHp+Ig7ogkHaXRUO6H9YlQM4jCmQMu71UgQC/MTNWu8NWgJaKSJ3IeXKEoSLzePR61vbU5fOLZl6z9bMEnqEZV0R9duIIzObkmQMC
GpR+R5VR2+ChFzn root@centos-02
[jump@centos-03 ~]$
5.修改目录权限为700,文件权限为400
[root@centos-02 .ssh]# cd
[root@centos-02 ~]# chmod 700 .ssh
[root@centos-02 ~]# chmod 400 .ssh/authorized_keys
[root@centos-02 ~]# getenforce
6.02机器上登录测试
[root@centos-02 .ssh]# ssh -i jump jump@192.168.133.66
Last login: Mon May 21 22:56:49 2018
[jump@centos-03 ~]$
创建jumpserver普通用户
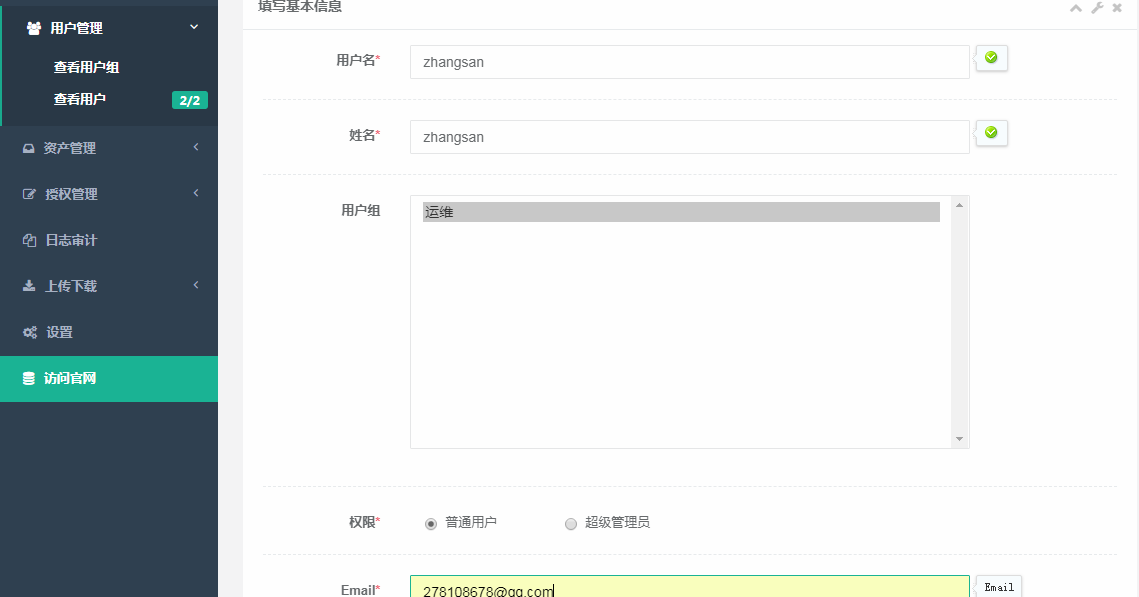
1.创建用户组:运维

2.创建用户
3.用zhangsan登录jumpserver下载key

4.再用admin账号登录,查看用户
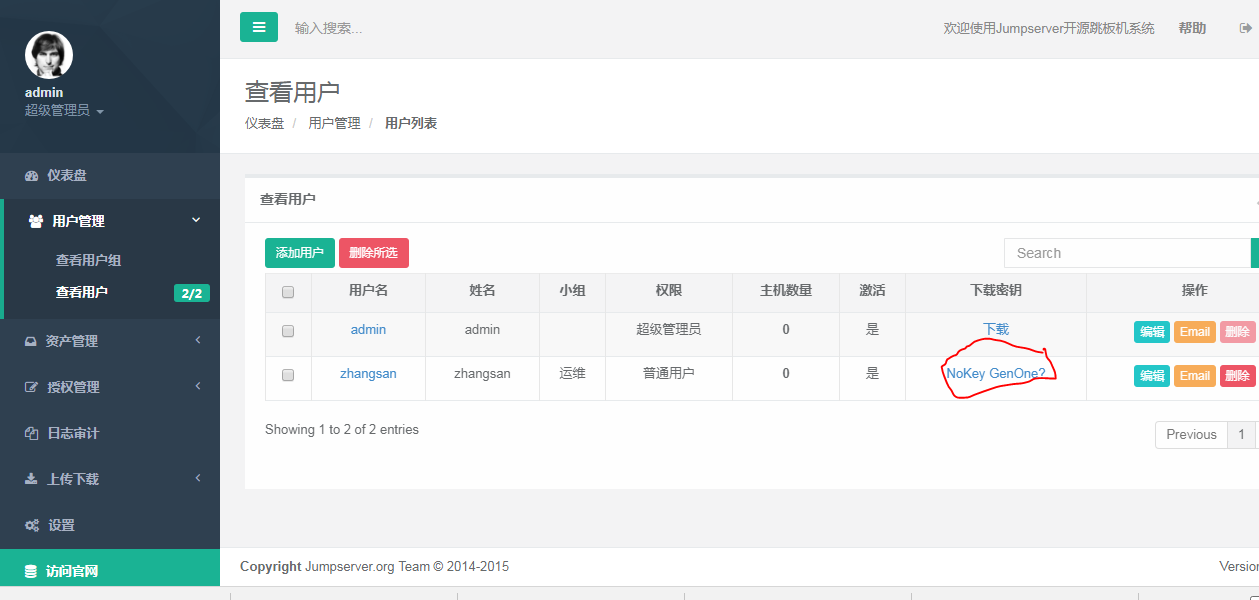
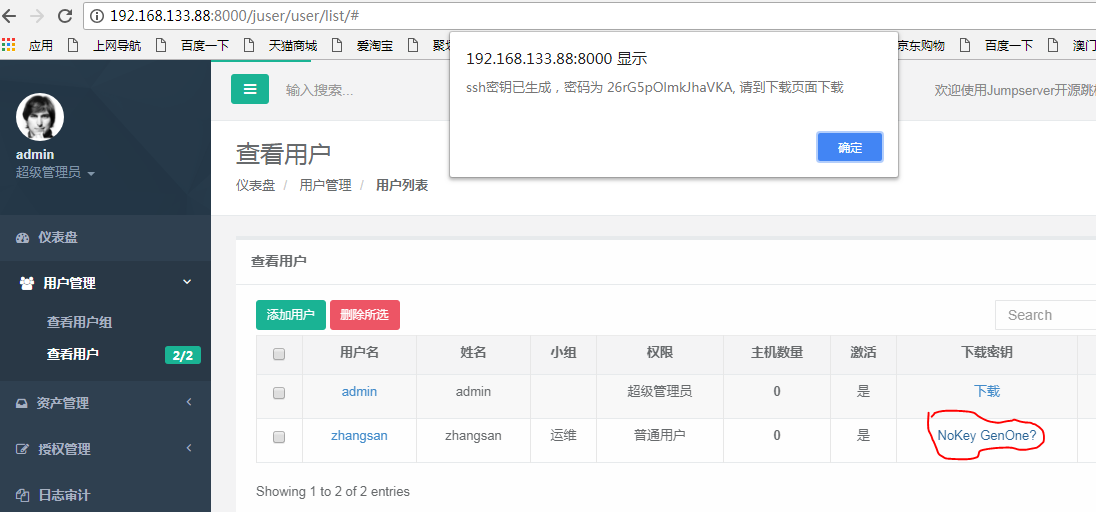
5.点击nokey,生成密码
添加机器
1.之前我们添加用户的时候发送邮件失败了,我们改下邮件服务器的密码,注意163服务器的密码是客户端授权密码,这个千万不能填错了。
[root@centos-02 jumpserver-0.3.3]# cat jumpserver.conf
[base]
url = http://192.168.133.88
key = rb506fp2ir5713xe
ip = 0.0.0.0
port = 8000
log = debug

[db]
engine = mysql
host = 127.0.0.1
port = 3306
user = jumpserver
password = jumpserver
database = jumpserver

[mail]
mail_enable = 1
email_host = smtp.163.com
email_port = 25
email_host_user = sunyu***_de@163.com
email_host_password = sunyu***163
email_use_tls = False
email_use_ssl = False

[connect]
nav_sort_by = ip

[root@centos-02 jumpserver-0.3.3]#
2.改完配置文件,重启jumpserver服务器
[root@centos-02 jumpserver-0.3.3]# sh service.sh restart
Stopping jumpserver service:                               [  OK  ]
Starting jumpserver service:                               [  OK  ]
[root@centos-02 jumpserver-0.3.3]#
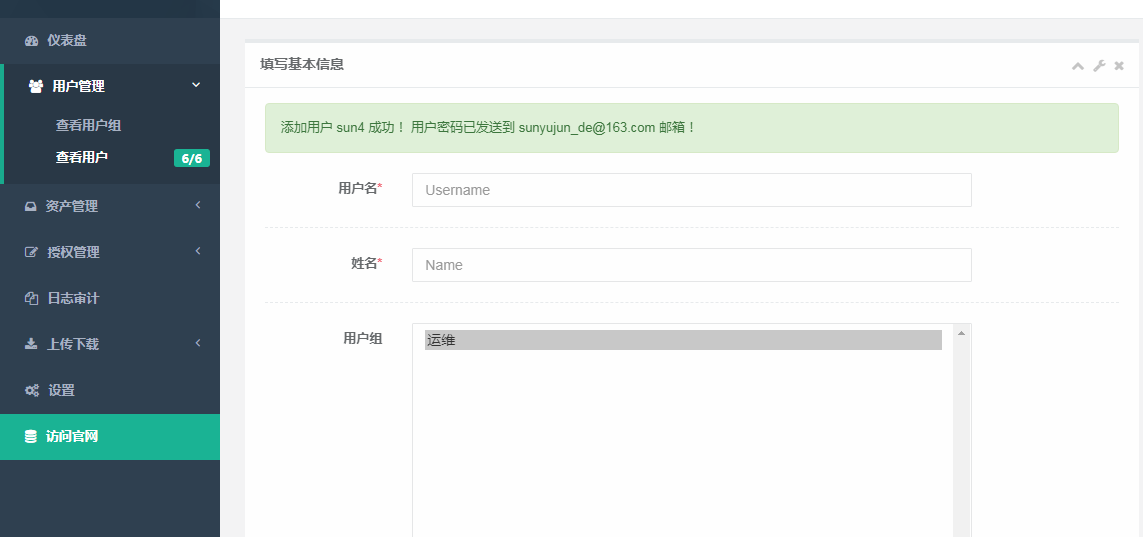
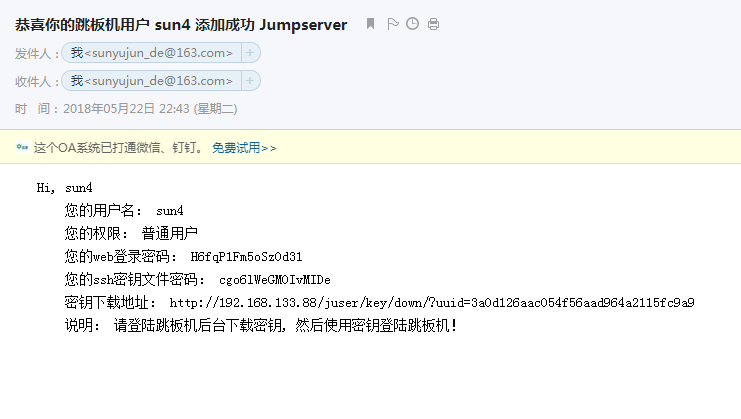
3.添加新用户sun4,添加成功。
添加资产
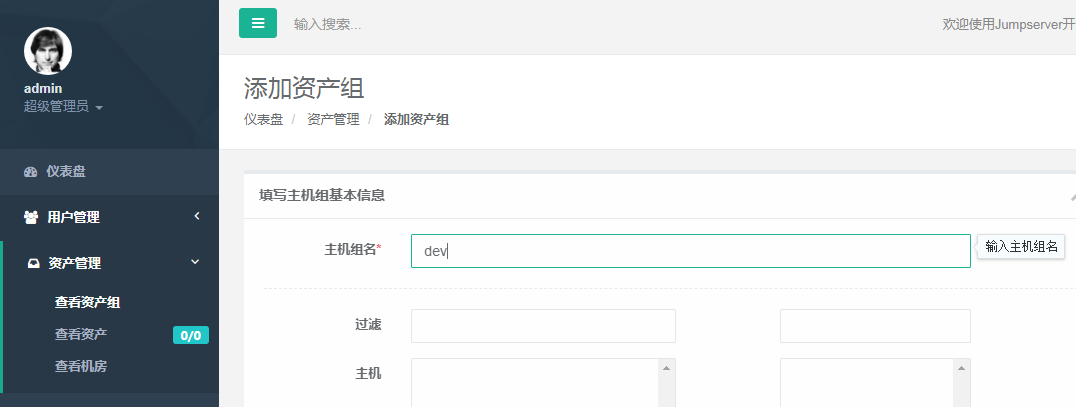
1.添加资产组
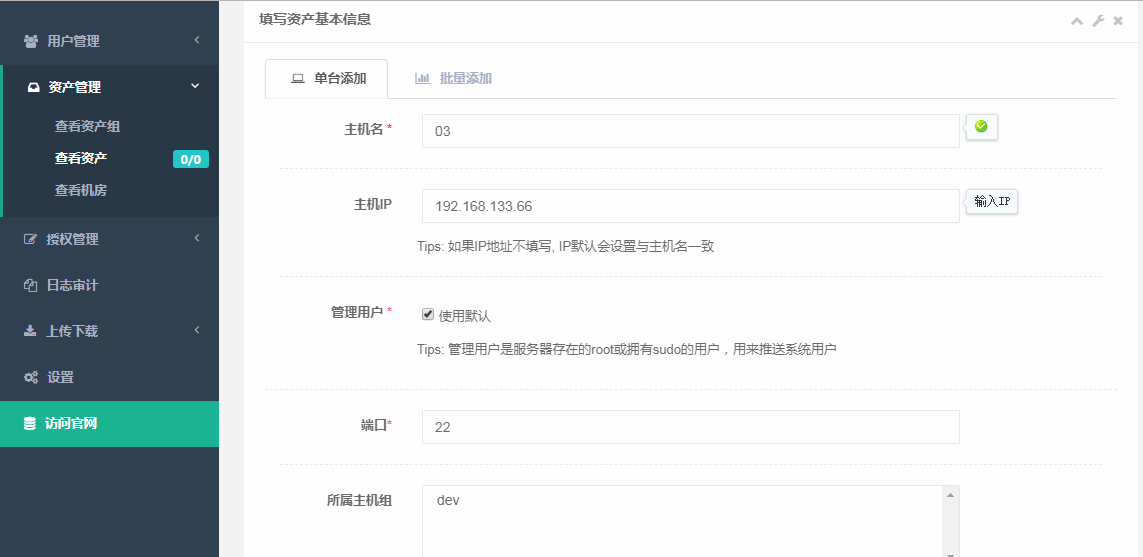
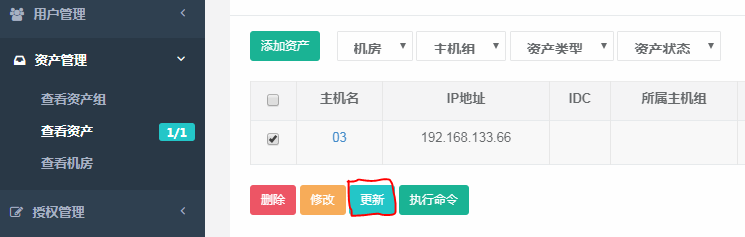
2.添加资产
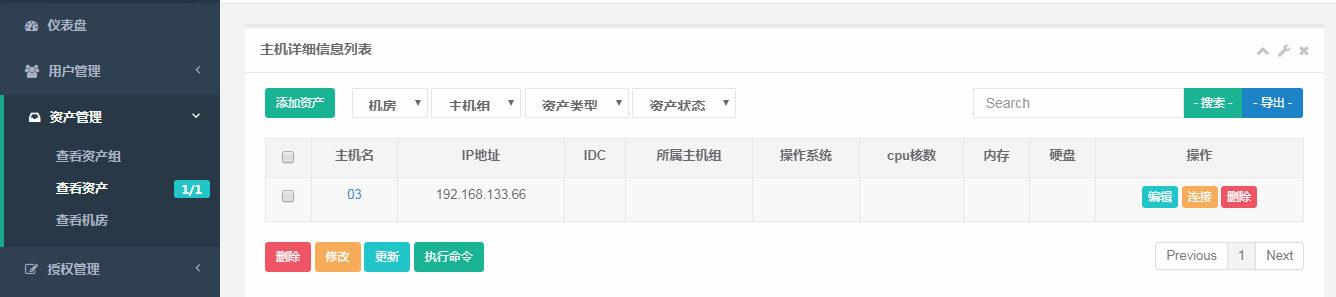
3.资产管理有个更新的功能,点击这个更新可以将idc、所属主机组等信息记录下来,这个其实是通过我们之前在03服务器上建的jump用户同步的,这里我们首先需要给jump用户一个sudo的权限
4.执行visudo,添加jump用户权限,这样jump就有了sudo的权限了,jump用户就可以创建用户了。
[root@centos-03 ~]# visudo
## Same thing without a password
# %wheel        ALL=(ALL)       NOPASSWD: ALL
jump ALL=(ALL) NOPASSWD: ALL
5.然后我们点击更新,更新成功,说明管理用户配置成功了。

添加系统用户并授权
1.系统用户就是通过跳板机登录到03服务器上的那个用户,首先我们创建一个zhangsan的系统用户。
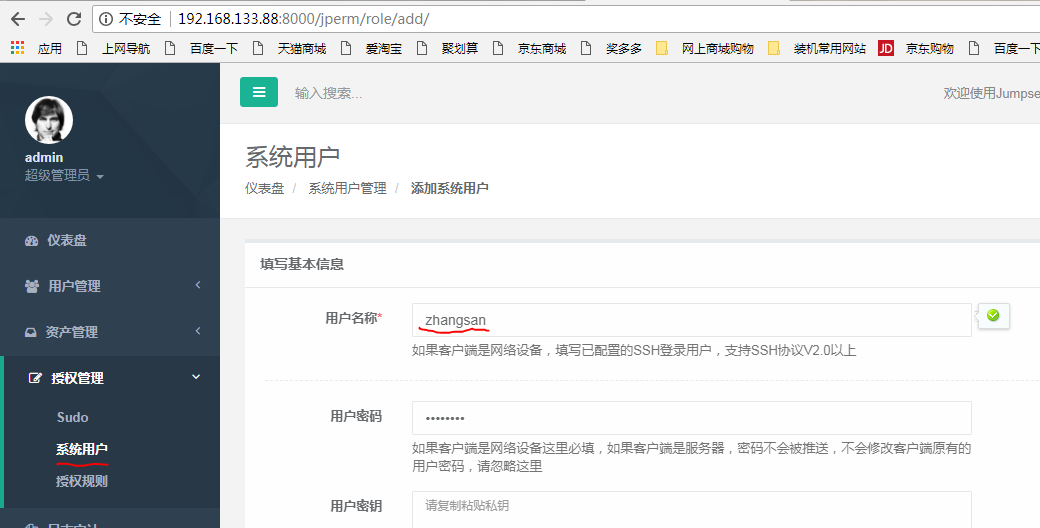
2.想要系统用户登录,我们还需要给用户创建秘钥,将生成的zhangsan秘钥文件粘贴到上面截图中的用户秘钥框中,然后保存
[root@centos-02 ~]# cd .ssh/
[root@centos-02 .ssh]# ssh-keygen -f zhangsan
Generating public/private rsa key pair.
Enter passphrase (empty for no passphrase):
Enter same passphrase again:
Your identification has been saved in zhangsan.
Your public key has been saved in zhangsan.pub.
The key fingerprint is:
73:43:07:ee:dc:bc:f4:09:24:88:7c:dd:86:cf:43:6b root@centos-02
The key's randomart image is:
+--[ RSA 2048]----+
|          .      |
|     . . + +     |
|      o o * *    |
|       . + @ .   |
|        S = E    |
|         o + = . |
|            . o  |
|                 |
|                 |
+-----------------+
[root@centos-02 .ssh]# cat zhangsan
-----BEGIN RSA PRIVATE KEY-----
MIIEowIBAAKCAQEAtk3G8yx6/BGzxCnrbKHBQcjnLwCuDZ936ZHISzMi/rx3ElhD
iHfwc+Td94aeDUPfggmLuA05pwcbyKq6C9enz3pzg3O54qzjh9hJnTFp0oX0HAnz
ySsf8toGug7MWaisqmsZJs0a/ImqIwKQzx+h/ALm2PLCBwyrap3788/EYuIB/zCN
62oFizQ100Zt25g/4NpfGURdFn0bL21WBEGJPrlXA7R/tmRkH3br/X0QLEMWUOC8
OF8ejfmnKOLFWsm+LuirWW09KkbKZ5N8a/QrMwVzs95xVGyTG4kLFK/E2rz5Mztx
7Q2ruNwwSVcHWs3rTWQeYAxguvnKNpjZNwyLQQIDAQABAoIBAEBKXYcUgKq0c3kS
b3v373eLqjvhOYCEZH1yc/hRKF49iKBnkCloYtv8MmtAhiyXaxMo2qUlxNcqopm5
27KhcwSwYlxRS5Ss8/DMTempq3Aa3WOl/ttK4hF64jRrU5Wq7nmLG2ubmZDF28JM
/VSOC0ocm9yWf+aMiUcoP9pTwyY7hX2KluBU1MML4wuMX4h9PsaNlpuISoT0xaaD
a5JiWfSnjhkhfIaK0y9wQlIalLBxyRAThvhUJPPoNUNs7fD66XMDVUMAM43axPdi
iWEzplyWQ+tXO/2m737BnZFA0dV6ZX/QHn+yt6KkZ3fv1WsqId5/l9vyS8YMjiyo
6M9e5YECgYEA4oi0QU3ExgyI4O5qGHiuvKo/hXxGsReX751TY/685vDvZ5jgYCKr
VX4+NavC5l+0yQNnaL3gB/zNcJ6ShwuOUXNy0eou0l3LttxpfM+vqAQt4uQIJHmu
w2rvQt3NkvAp+3QUhIedOt4B1CCWivvdUbh2SUl1pb8wzASWkY+/x2UCgYEAzgRD
iecnAhaLAmcJweHXFuMsNIRHxeaflLd71qouod8vMC9f4/Dce5jxRX1yfVOeDuYw
rMG0un+osy1Vz5FTxCBsztHO9ZYuIUEttjLDf4wZZhVGIsxamPQFqeCX52mYzn31
xDGWdnd5ZSZHSz8iFAlZVj7LdSdKOyWdBkE43K0CgYBrgpOBtqXflE1V6vCBQq0z
Lt1MvalTHK5n8tODzn7aX5hPI1fBaFLGFU7y69xotx02lR37sLllMQ5TF37VBp/5
egARLcIg5pDq7PpHWM21wJ4CY1SV8wYFCngY1Olehgp2oyWlrDLroDdf9ENeHKBx
y0igCXQDQJSpDrhixsUunQKBgAD4qizbRybOXmdrfvNIElCMT6gLu57mQHheCRpx
APlIaRuMDaKwfwmiJfkS51hJ7aPaV/5oh2adtXjqzM3GvKNfF8Q93wDvbVZAzWtf
f+Z5DaGalhMR7ZdtBx3O7khsCglnNKJxLWlvlMXyUUG8kXeQt7gdYa4yujnfKode
BVudAoGBALWZbB+jEJEV+C/Zvo7e6v/A5OHvDF9izr/cSntv17dtE6BROIqV0KcU
+UOT1gxudCbC8bBjvR5uxzv4vG7c0bfk93JObqFqGCp/8KJqIrIZXnnUNWr0gN3+
vdhbyniUeICpQBkNCxwtdvU18FLhVYTLF2npFZnyyDE0XVQQU+EI
-----END RSA PRIVATE KEY-----
[root@centos-02 .ssh]#
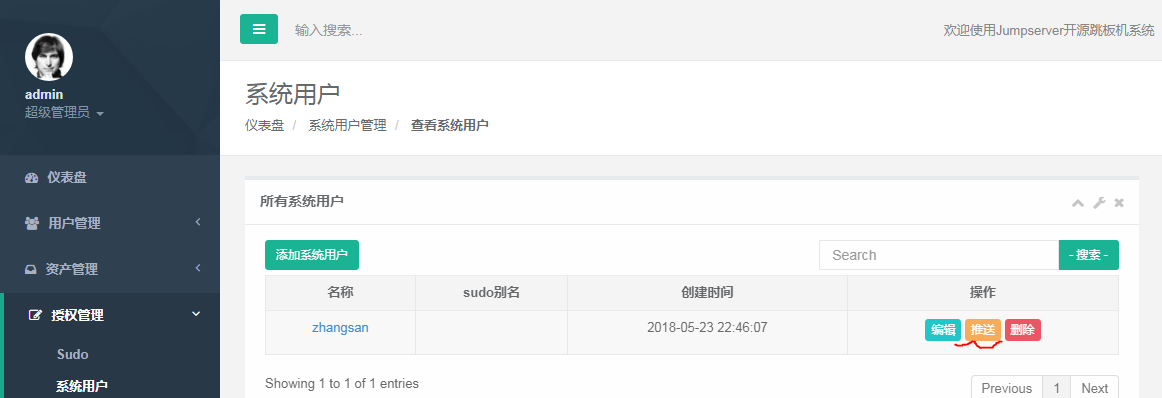
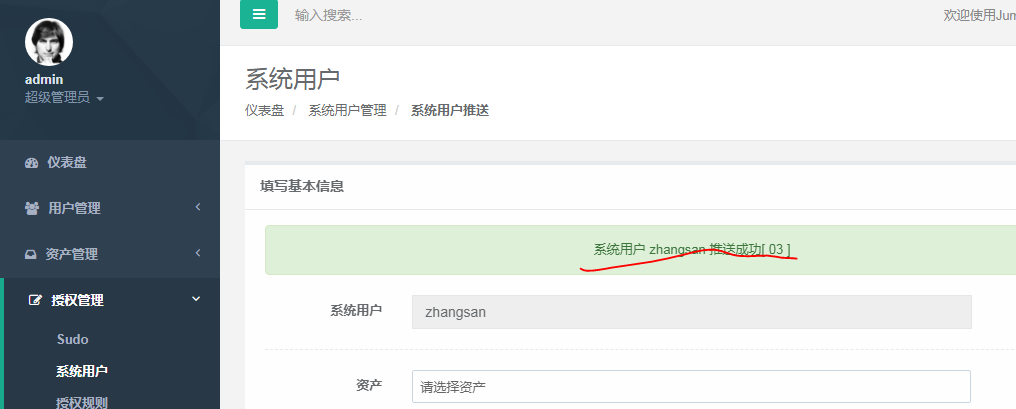
3.点击推送,推送其实就是在03服务器上创建系统用户张三,推送这个过程就是管理用户完成的,抓我们系统配置的那个用户,还可以创建对应用户的公钥。

4.推送成功
[root@centos-03 ~]# id zhangsan
uid=1000(zhangsan) gid=1000(zhangsan) 组=1000(zhangsan)
[root@centos-03 ~]#
5.查看张三用户的公钥
[root@centos-03 ~]# cat /home/zhangsan/.ssh/authorized_keys
ssh-rsa AAAAB3NzaC1yc2EAAAADAQABAAABAQC2TcbzLHr8EbPEKetsocFByOcvAK4Nn3fpkchLMyL+vHcSWEOId/Bz5N33hp4NQ9+CCYu4DTmnBxvIqroL16fPenODc7nirOOH2EmdMWnShfQcCfPJKx/y2ga6DsxZqKyqaxkmzRr8iaojAp
DPH6H8AubY8sIHDKtqnfvzz8Ri4gH/MI3ragWLNDXTRm3bmD/g2l8ZRF0WfRsvbVYEQYk+uVcDtH+2ZGQfduv9fRAsQxZQ4Lw4Xx6N+aco4sVayb4u6KtZbT0qRspnk3xr9CszBXOz3nFUbJMbiQsUr8TavPkzO3HtDau43DBJVwdazetNZB5g
DGC6+co2mNk3DItB jumpserver@centos-02
[root@centos-03 ~]#
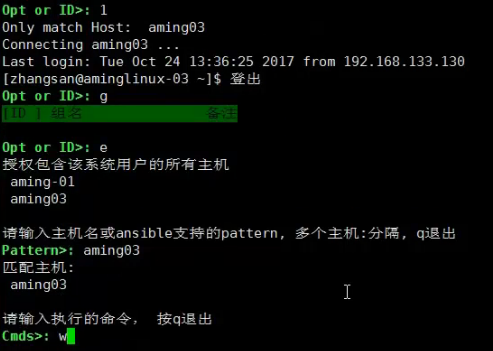
添加授权规则
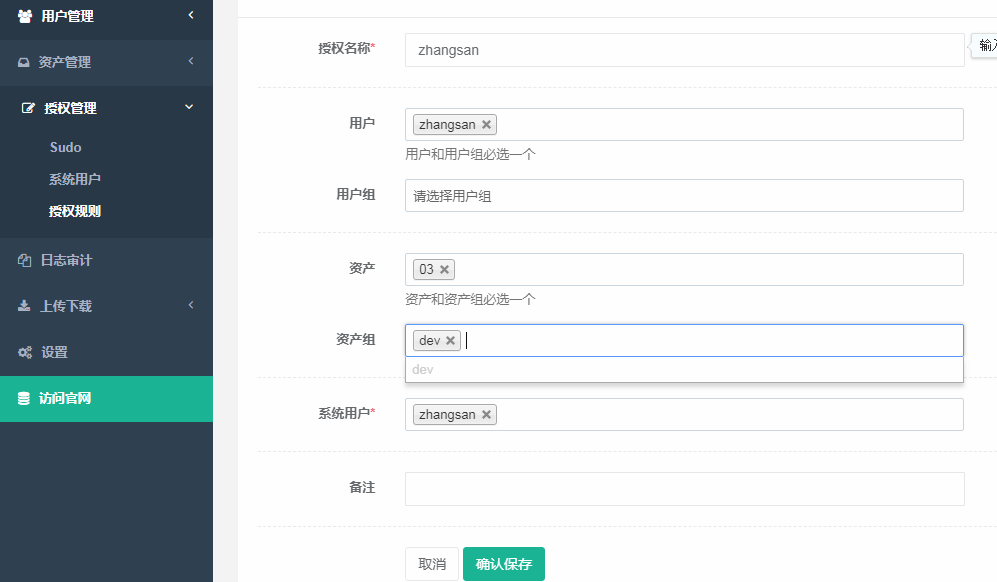
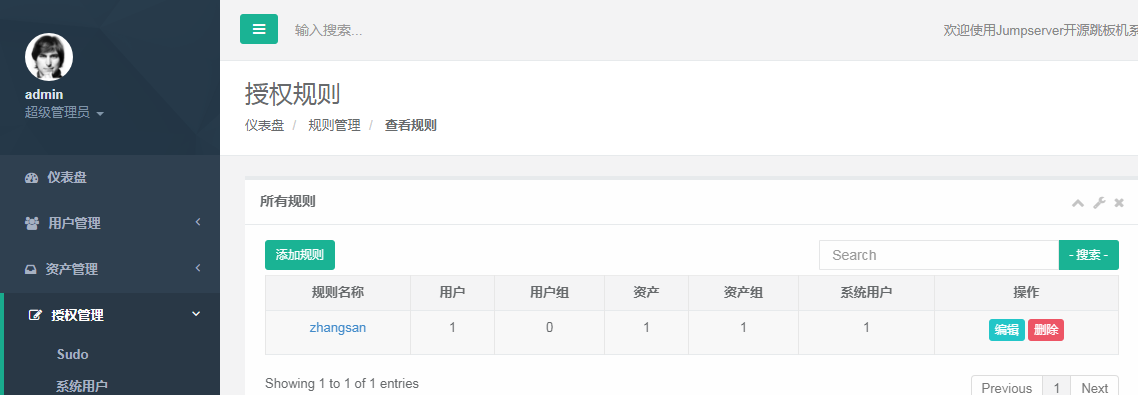
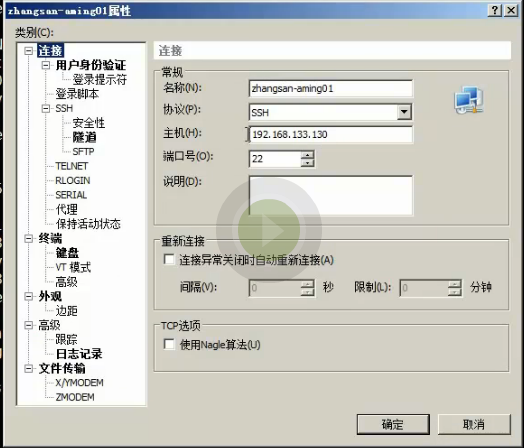
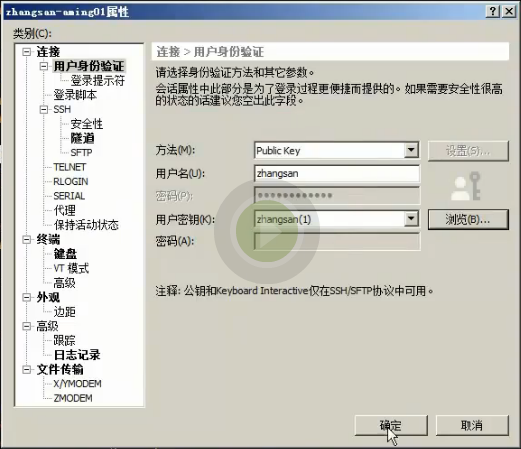
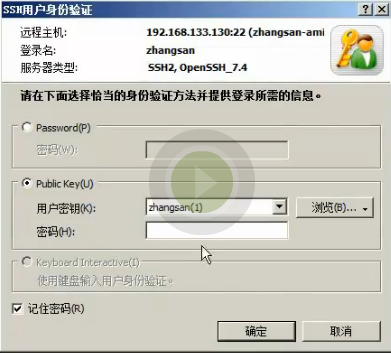
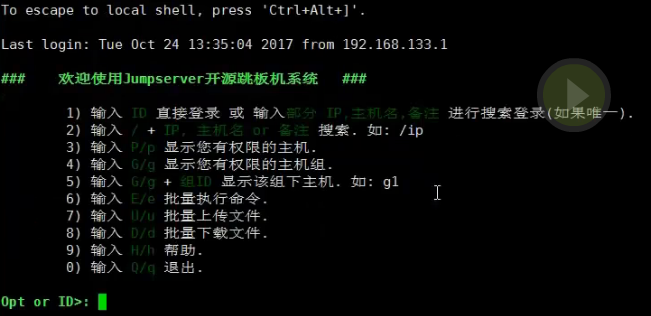
客户端登录jumpserver