一、安装环境
宿主机=> win7,虚拟机 centos => 系统版本:centos-release-7-5.1804.el7.centos.x86_64

二、MySQL下载
MySQL Community Server 5.5.62 下载: https://dev.mysql.com/downloads/mysql/
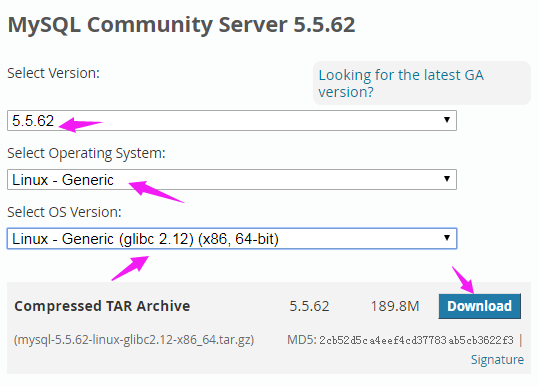
进入下载页面,复制链接地址

执行命令 wget https://dev.mysql.com/get/Downloads/MySQL-5.5/mysql-5.5.62-linux-glibc2.12-x86_64.tar.gz
将其下载到 /usr/local/src 目录
[root@bogon src]# wget https://dev.mysql.com/get/Downloads/MySQL-5.5/mysql-5.5.62-linux-glibc2.12-x86_64.tar.gz
--2018-12-18 03:52:54-- https://dev.mysql.com/get/Downloads/MySQL-5.5/mysql-5.5.62-linux-glibc2.12-x86_64.tar.gz
Resolving dev.mysql.com (dev.mysql.com)... 137.254.60.11
Connecting to dev.mysql.com (dev.mysql.com)|137.254.60.11|:443... connected.
HTTP request sent, awaiting response... 302 Found
Location: https://cdn.mysql.com//Downloads/MySQL-5.5/mysql-5.5.62-linux-glibc2.12-x86_64.tar.gz [following]
--2018-12-18 03:52:55-- https://cdn.mysql.com//Downloads/MySQL-5.5/mysql-5.5.62-linux-glibc2.12-x86_64.tar.gz
Resolving cdn.mysql.com (cdn.mysql.com)... 23.13.185.161
Connecting to cdn.mysql.com (cdn.mysql.com)|23.13.185.161|:443... connected.
HTTP request sent, awaiting response... 200 OK
Length: 198993245 (190M) [application/x-tar-gz]
Saving to: ‘mysql-5.5.62-linux-glibc2.12-x86_64.tar.gz’
100%[=========================================================>] 198,993,245 11.0MB/s in 19s
2018-12-18 03:53:14 (10.1 MB/s) - ‘mysql-5.5.62-linux-glibc2.12-x86_64.tar.gz’ saved [198993245/198993245]
三、安装MySQL Community Server 5.5.62
1、解压 MySQL Community Server 5.5.62 并移动到 /usr/local 下重命名为 mysql
[root@bogon src]# tar -zxf mysql-5.5.62-linux-glibc2.12-x86_64.tar.gz
[root@bogon src]# mv mysql-5.5.62-linux-glibc2.12-x86_64 /usr/local/mysql
[root@bogon src]# ls /usr/local
etc  games  lib  lib64  libevent  libexec  memcached  mysql  nginx  php7  sbin  share  src
2、创建mysql用户组和mysql用户名并添加到mysql用户组
[root@bogon local]# groupadd mysql
[root@bogon local]# useradd -g mysql mysql
3、进入/usr/local/mysql目录修改拥有者为mysql用户(组)
[root@bogon mysql]# chown -R mysql:mysql ./
[root@bogon mysql]# ll
total 56
drwxr-xr-x.  2 mysql mysql  4096 Dec 18 03:55 bin
-rw-r--r--.  1 mysql mysql 17987 Aug 28 17:12 COPYING
drwxr-xr-x.  3 mysql mysql    18 Dec 18 03:55 data
drwxr-xr-x.  2 mysql mysql    55 Dec 18 03:55 docs
drwxr-xr-x.  3 mysql mysql  4096 Dec 18 03:55 include
-rw-r--r--.  1 mysql mysql   301 Aug 28 17:12 INSTALL-BINARY
drwxr-xr-x.  3 mysql mysql  4096 Dec 18 03:55 lib
drwxr-xr-x.  4 mysql mysql    30 Dec 18 03:55 man
drwxr-xr-x. 10 mysql mysql  4096 Dec 18 03:55 mysql-test
-rw-r--r--.  1 mysql mysql  2496 Aug 28 17:12 README
drwxr-xr-x.  2 mysql mysql    30 Dec 18 03:55 scripts
drwxr-xr-x. 27 mysql mysql  4096 Dec 18 03:55 share
drwxr-xr-x.  4 mysql mysql  4096 Dec 18 03:55 sql-bench
drwxr-xr-x.  2 mysql mysql  4096 Dec 18 03:55 support-files
4、编辑 /etc/my.cnf ,加入以下内容
# 设置客户端
[mysql]
default-character-set=utf8
socket=/var/lib/mysql/mysql.sock
# 设置服务端
[mysqld]
skip-name-resolve
port = 3306
socket=/var/lib/mysql/mysql.sock
# 设置mysql的安装目录
basedir=/usr/local/mysql
# 设置mysql数据库的数据的存放目录
datadir=/usr/local/mysql/data
# 允许最大连接数
max_connections=200
# 服务端使用的字符集默认为8比特编码的latin1字符集
character-set-server=utf8
# 创建新表时将使用的默认存储引擎
default-storage-engine=INNODB
lower_case_table_names=1
max_allowed_packet=16M
5、安装mysql
执行 ./scripts/mysql_install_db --user=mysql --basedir=/usr/local/mysql/ --datadir=/usr/local/mysql/data
[root@bogon mysql]# ./scripts/mysql_install_db --user=mysql --basedir=/usr/local/mysql/ --datadir=/usr/local/mysql/data
Installing MySQL system tables...
181218  4:14:48 [Note] Ignoring --secure-file-priv value as server is running with --bootstrap.
181218  4:14:48 [Note] /usr/local/mysql//bin/mysqld (mysqld 5.5.62) starting as process 2032 ...
OK
Filling help tables...
181218  4:14:49 [Note] Ignoring --secure-file-priv value as server is running with --bootstrap.
181218  4:14:49 [Note] /usr/local/mysql//bin/mysqld (mysqld 5.5.62) starting as process 2039 ...
OK

To start mysqld at boot time you have to copy
support-files/mysql.server to the right place for your system

PLEASE REMEMBER TO SET A PASSWORD FOR THE MySQL root USER !
To do so, start the server, then issue the following commands:

/usr/local/mysql//bin/mysqladmin -u root password 'new-password'
/usr/local/mysql//bin/mysqladmin -u root -h 218.28.144.38 password 'new-password'

Alternatively you can run:
/usr/local/mysql//bin/mysql_secure_installation

which will also give you the option of removing the test
databases and anonymous user created by default.  This is
strongly recommended for production servers.

See the manual for more instructions.

You can start the MySQL daemon with:
cd /usr/local/mysql/ ; /usr/local/mysql//bin/mysqld_safe &

You can test the MySQL daemon with mysql-test-run.pl
cd /usr/local/mysql//mysql-test ; perl mysql-test-run.pl

Please report any problems at http://bugs.mysql.com/
6、配置mysql
6.1 修改data拥有者和权限
[root@bogon mysql]# chown -R mysql:mysql data
[root@bogon mysql]# chmod 777 data
6.2 修改my.cnf权限
[root@bogon mysql]# chmod 777 /etc/my.cnf
[root@bogon mysql]# ll /etc/my.cnf
-rwxrwxrwx. 1 root root 596 Dec 16 02:50 /etc/my.cnf
6.3 修改/var/lib/mysql拥有者为mysql用户(组)
[root@bogon ~]# chown -R mysql:mysql /var/lib/mysql
6.4 复制mysql.server到/etc/rc.d/init.d/并重命名为mysqld
[root@bogon mysql]# cp ./support-files/mysql.server /etc/rc.d/init.d/mysqld
[root@bogon mysql]# ls /etc/rc.d/init.d
functions  mysqld  netconsole  network  README
6.5 增加mysqld执行权限
[root@bogon mysql]# chmod +x /etc/rc.d/init.d/mysqld
6,6 将mysqld添加到自启动列表
[root@bogon mysql]# chkconfig --add mysqld
7、开启mysqld服务
[root@bogon mysql]# service mysqld start
8、配置PATH环境
[root@bogon mysql]# vi ~/.bash_profile
最后一行加入 export PATH=$PATH:/usr/local/mysql/bin
# .bash_profile

# Get the aliases and functions
if [ -f ~/.bashrc ]; then
        . ~/.bashrc
fi

# User specific environment and startup programs

PATH=$PATH:$HOME/bin

export PATH
export PATH=$PATH:/usr/local/mysql/bin
刷新文件
[root@bogon mysql]# source ~/.bash_profile
四、登陆mysql
[root@bogon mysql]# mysql -u root -p
Warning: World-writable config file '/etc/my.cnf' is ignored
Enter password:
Welcome to the MySQL monitor.  Commands end with ; or g.
Your MySQL connection id is 5
Server version: 5.5.62 MySQL Community Server (GPL)

Copyright (c) 2000, 2018, Oracle and/or its affiliates. All rights reserved.

Oracle is a registered trademark of Oracle Corporation and/or its
affiliates. Other names may be trademarks of their respective
owners.

Type 'help;' or 'h' for help. Type 'c' to clear the current input statement.

mysql>
10、修改root密码
mysql> use mysql;
Database changed
mysql> update user set password=password('abc123456') where user='root' and host='localhost';
Query OK, 1 row affected (0.00 sec)
Rows matched: 1  Changed: 1  Warnings: 0

mysql> flush privileges;
Query OK, 0 rows affected (0.00 sec)
五、配置远程连接mysql
mysql> grant all privileges on *.* to 'root'@'%' identified by 'abc123456' with grant option;
Query OK, 0 rows affected (0.00 sec)

mysql> flush privileges;
Query OK, 0 rows affected (0.00 sec)
使用navicat远程连接mysql
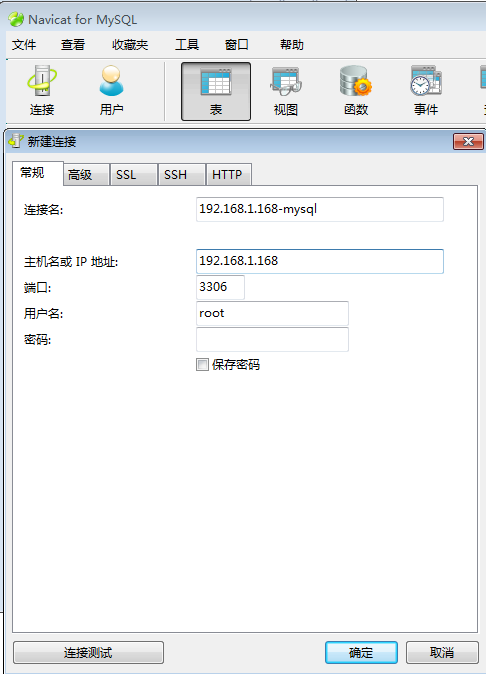
连接

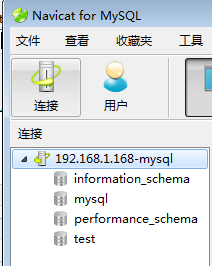
至此,CentOS 7下安装 MySQL-5.5.62 完毕。