一般服务器上版本更新迭代,需要把老版本目录替换成新版本,让用户全部使用新版本。如果新版本有bug,或者新版本用户使用不习惯导致用户体验差甚至流失。而灰度发布时介于黑白之间的发布,可以让一部分用户使用新版本,其他用户继续使用老版本,这样新版本有问题也可以把损失降到最低。
Lua脚本基础语法
Lua 是一个简洁、轻量、可扩展的脚本语言
直接使用 yum install lua -y 安装,在base库。CentOS7.2以上版本默认安装
## 命令行交互模式运行
[root@Nginx ~]# lua
Lua 5.1.4 Copyright (C) 1994-2008 Lua.org, PUC-Rio
> print("hello world")
hello world
## 脚本方式运行
[root@Nginx ~]# vim test.lua
#!/usr/bin/lua
print("hello world")
[root@Nginx ~]# lua test.lua
hello world
判断语句
if  如果你有房 then
    我就嫁给你
elseif  你有车 or 你有钱 then
    我就嫁给你
else
    再见
end
while循环语句
## 1到100之间所有数字相加
[root@Nginx ~]# vim while.lua
#!/usr/bin/lua
sum=0
num=1
while num <=100 do
        sum=sum+num
        num=num+1
end
print("sum="..sum)
for循环语句
## 1到100之间所有数字相加
[root@Nginx ~]# vim for.lua
#!/usr/bin/lua
sum=0
for i=1,100 do
        sum=sum+i
end
print("sum="..sum)
Nginx+Lua环境搭建
默认情况下 Nginx 不支持 Lua 模块, 需要安装 LuaJIT 解释器, 并且需要重新编译 Nginx
安装依赖包
[root@Nginx ~]# yum -y install gcc gcc-c++ make pcre-devel zlib-devel openssl-devel 下载并解压最新的包
## 创建目录
[root@Nginx ~]# mkdir /soft/src -p && cd /soft/src
## 下载 luajit 和 ngx_devel_kit 以及 lua-nginx-module
[root@Nginx src]# wget http://luajit.org/download/LuaJIT-2.0.5.tar.gz
[root@Nginx src]# wget https://github.com/simplresty/ngx_devel_kit/archive/v0.3.1rc1.tar.gz
[root@Nginx src]# wget https://github.com/openresty/lua-nginx-module/archive/v0.10.15.tar.gz
## 解压 luajit 和 ngx_devel_kit 以及 lua-nginx-module
[root@Nginx src]# tar xf v0.10.15.tar.gz
[root@Nginx src]# tar xf v0.3.1rc1.tar.gz
[root@Nginx src]# tar xf LuaJIT-2.0.5.tar.gz
安装 Lua 即时编译器 luajit
[root@Nginx src]# cd LuaJIT-2.0.5/
[root@Nginx LuaJIT-2.0.5]# make && make install
编译安装 Nginx
## 返回原来的目录
[root@Nginx LuaJIT-2.0.5]# cd /soft/src
## 下载Nginx源码包
[root@Nginx src]# wget http://nginx.org/download/nginx-1.16.0.tar.gz
## 解压并进入源码包
[root@Nginx src]# tar xf nginx-1.16.0.tar.gz
[root@Nginx src]# cd nginx-1.16.0/
## 安装源码包
[root@Nginx nginx-1.16.0]# ./configure --prefix=/etc/nginx
 --with-http_ssl_module --with-http_stub_status_module --with-http_dav_module
--add-module=../ngx_devel_kit-0.3.1rc1/ --add-module=../lua-nginx-module-0.10.15
[root@Nginx nginx-1.16.0]# make && make install
## 建立软链接
[root@Nginx nginx-1.16.0]# ln -s /usr/local/lib/libluajit-5.1.so.2 /lib64/libluajit-5.1.so.2
## 内核加入lua库
[root@Nginx nginx-1.16.0]# echo "/usr/local/LuaJIT/lib" >> /etc/ld.so.conf
Nginx 调用 Lua 模块的语法和变量
- 语法:
- set_by_lua --- 设置 Nginx 变量
- set_by_lua_file --- 指定设置 Nginx 变量的文件
- access_by_lua --- 请求访问阶段的处理,可以设置访问控制
- access_by_lua_file --- 指定访问控制文件
- content_by_lua --- 返回的内容
- content_by_lua_file --- 指定返回内容文件
- 变量
- ngx.var --- Nginx 变量
- ngx.req.get_headers --- 获取请求头
- ngx.req.get_url_args --- 获取url请求参数
- ngx.redirect --- 重定向
- ngx.print --- 输出响应内容
- ngx.say --- 输出响应内容,最后加个换行
- ngx.header --- 输出响应头
测试 Nginx 和 Lua 是否连接成功
[root@Nginx ~]# vim /etc/nginx/conf/nginx.conf
## 在配置文件server标签里下面内容
        location /test {
                default_type text/html;
                content_by_lua_block {
                        ngx.say("Hello World")
                }

## 启动Nginx
[root@Nginx ~]# /etc/nginx/sbin/nginx
浏览器访问 IP地址/test 是否为 Hello World (注意关闭selinux和firewalld)
Nginx+Lua实现灰度发布
Nginx+Lua实现灰度发布原理:
当用户请求访问前端代理 Nginx 时,内嵌Lua模块会解析 Nginx 配置文件中 Lua 脚本,Lua 脚本会获取客户端IP地址,查看 Memcached 缓存中是否存在该键值,如果存在则会反向代理到新版本的upstream池,不存在则会反向代理到老版本的upstream池。
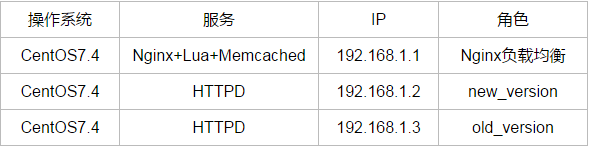
这只主要是灰度发布,另外两个节点是什么web容器不重要,可以正常访问就行
新老版本服务器配置
## 关闭防火墙和selinux
[root@node ~]# setenforce 0
[root@node ~]# systemctl stop firewalld
## 安装启动httpd
[root@node ~]# yum install httpd -y
[root@node ~]# systemctl start httpd
## 新版本配置
[root@node ~]# echo "这是新版本" > /var/www/html/index.html
## 老版本配置
[root@node ~]# echo "这是老版本" > /var/www/html/index.html
以上就是两个节点配置IP可以正常访问就不用动它们了
配置 Memcached
## 安装Memcached
[root@Nginx src]# yum install memcached -y
## 下载Lua和memcached连接库,让Lua可以连接Memcached
[root@Nginx src]# cd /soft/src
[root@Nginx src]# wget https://github.com/openresty/lua-resty-memcached/archive/v0.14.tar.gz
[root@Nginx src]# tar xf v0.14.tar.gz
[root@Nginx src]# mkdir /etc/nginx/conf/lua
[root@Nginx src]# cp -r lua-resty-memcached-0.14/lib/resty/memcached.lua /etc/nginx/conf/lua/
## 启动Memcached
[root@Nginx src]# systemctl start memcached
[root@Nginx src]# systemctl enable memcached
配置 Nginx 负载均衡
## 把Nginx配置文件server标签和server标签内容都删了换成下面引用其他配置文件
    include conf.d/*.conf
## 创建引用目录
[root@Nginx ~]# mkdir /etc/nginx/conf/conf.d
## 编写Nginx配置文件
[root@Nginx ~]# vim /etc/nginx/conf/conf.d/lua.conf
## 调用刚刚复制的memcached.lua文件
lua_package_path "/etc/nginx/conf/lua/memcached.lua";
upstream new_version {
    server 192.168.1.2:80;
}
upstream old_version {
    server 192.168.1.3:80;
}
server {
    listen 80;
    server_name 192.168.1.1;
    location / {
        default_type 'text/plain';
        content_by_lua_file /etc/nginx/conf/lua/index.lua;   ## 访问网站交给这个lua脚本
    }
    location @new_version {
        proxy_pass http://new_version;
        proxy_set_header Host $http_host;
    }
    location @old_version {
        proxy_pass http://old_version;
        proxy_set_header Host $http_host;
    }
}
编写 Lua 脚本
[root@Nginx ~]# vim /etc/nginx/conf/lua/index.lua
-- 获取客户端头部信息的 x-real-ip
clientIP = ngx.req.get_headers()["X-Real-IP"]
-- 如果clientIP没有获取到客户端IP就获取 x_forwarded_for
if clientIP == nil then
clientIP = ngx.req.get_headers()["x_forwarded_for"]
end
-- 如果clientIP还是没有获取到客户端IP就获取 remote_addr
if clientIP == nil then
clientIP = ngx.var.remote_addr
end
-- 本地加载 memcached
local memcached = require "resty.memcached"
-- 实例化对象
local memc, err = memcached:new()
-- 判断连接是否存在错误
if not memc then
ngx.say("failed to instantiate memc: "..err)
return
 end
-- 建立 memcache 连接
local ok, err = memc:connect("127.0.0.1", 11211)
-- 无法连接往前端抛出错误信息
if not ok then
ngx.say("failed to connect: "..err)
return
end
-- 获取对象中的 ip 存在值赋给 res
local res, flags, err = memc:get(clientIP)
if err then
ngx.say("failed to get clientIP "..err)
return
end
-- 如果 res 值为 1 则调用 local-@new_version
if res == "1" then
ngx.exec("@new_version")
return
end
-- 否则调用 local-@old_version
ngx.exec("@old_version")
return
启动 Nginx 后可以上浏览器测试一下啦
[root@Nginx ~]# /etc/nginx/sbin/nginx把IP加入 Memcached 让其访问新版本
## 安装telnet(没有Memcached客户端用telnet暂时代替一下)
[root@Nginx ~]# yum install telnet -y
## 连接Memcached
[root@Nginx ~]# telnet 127.0.0.1 11211
## set 客户端访问的IP(后面的分别是flags、exptime、bytes对应的值,不用管,这不重要)
set 192.168.1.254 0 0 1
## 填写IP键的值(出现STORED就可以了)
1