环境准备
我使用的是vmware workstation,首先安装ubuntu 12.04,安装完成后通过vmware的clone,clone出两个虚机,设置的IP分别是:
192.168.74.130 master
192.168.74.132 node1
192.168.74.133 node2
然后修改各个主机的/etc/hosts中的内容。
使用vi或者gedit,将上边的内容编缉进去。
创建用户
先创建hadoop用户组:
sudo addgroup hadoop
然后创建用户hadoop:
sudo adduser -ingroup hadoop hadoop
注:在centos 和 redhat下直接创建用户就行,会自动生成相关的用户组和相关文件,而ubuntu下直接创建用户,创建的用户没有根目录。
给hadoop用户添加权限,打开/etc/sudoers文件;
sudo gedit /etc/sudoers
按回车键后就会打开/etc/sudoers文件了,给hadoop用户赋予root用户同样的权限。
在root ALL=(ALL:ALL) ALL下添加hadoop ALL=(ALL:ALL) ALL,
hadoop ALL=(ALL:ALL) ALL
为本机(master)和子节点(node..)安装JDK环境。
其实网上挺多的,参考http://blog.csdn.net/klov001/article/details/8075237,这里不详细描述了。
修改本机(master)和子节点(node..)机器名
打开/etc/hostname文件;
sudo gedit /etc/hostname
分别改为master、node1和node2。
本机(master)和子节点(son..)安装ssh服务
主要为ubuntu安装,cents和redhat系统自带。
ubuntu下:
sudo apt-get install ssh openssh-server
建立ssh无密码登录环境
做这一步之前首先建议所有的机子全部转换为hadoop用户,以防出现权限问题的干扰。
ssh生成密钥有rsa和dsa两种生成方式,默认情况下采用rsa方式。
创建ssh-key,这里我们采用rsa方式;
ssh-keygen -t rsa -P ""
(注:回车后会在~/.ssh/下生成两个文件:id_rsa和id_rsa.pub这两个文件是成对出现的)
进入~/.ssh/目录下,将id_rsa.pub追加到authorized_keys授权文件中,开始是没有authorized_keys文件的;
cd ~/.ssh
cat id_rsa.pub >> authorized_keys
可以使用ssh 主机名测试一下是否成功。
为mater安装hadoop
在hadoop用户下建立hadoop文件夹,然后将hadoop-1.2.0.tar.gz上传到这个目录下。
tar -zxvf hadoop-1.2.0.tar.gz
解压缩。然后到hadoop目录下conf下找到hadoop-env.sh
配置JAVA_HOME为你上面配置的JAVA_HOME。
找到core-site.xml,配置信息如下:
<configuration>
   <property>
     <name>hadoop.tmp.dir</name>
     <value>/home/hadoop/tmp/hadoop-${user.name}</value>
     <description>A base for other temporarydirectories.</description>
   </property>

   <property>
     <name>fs.default.name</name>
     <value>hdfs://master:9000</value>
     <description>The name of the default file system.  A URI whose
     scheme and authority determine the FileSystem implementation.  The
     uri's scheme determines the config property (fs.SCHEME.impl) naming
     the FileSystem implementation class.  The uri's authority is used to
     determine the host, port, etc. for a filesystem.
     </description>
   </property>
</configuration>
修改hdfs-site.xml:
<?xml version="1.0"?>
<?xml-stylesheet type="text/xsl" href="configuration.xsl"?>

<!-- Put site-specific property overrides in this file. -->

<configuration>
   <property>
     <name>dfs.replication</name>
     <value>2</value>
     <description>Default block replication.
     The actual number of replications can be specified when the file iscreated.
     The default is used if replication is not specified in create time.
     </description>
   </property>
</configuration>
修改mapred-site.xml:
<?xml version="1.0"?>
<?xml-stylesheet type="text/xsl" href="configuration.xsl"?>

<!-- Put site-specific property overrides in this file. -->

<configuration>
    <property>
     <name>mapred.job.tracker</name>
     <value>master:9001</value>
     <description>The host and port that the MapReduce job trackerruns
     at.  If "local", then jobs are run in-process as a singlemap
     and reduce task.
     </description>
   </property>
</configuration>
修改masters:
master
修改slaves:
node1
node2
启动hadoop
在master主机上的hadoop安装目录下的bin目录下,执行格式化
./hadoop namenode -format
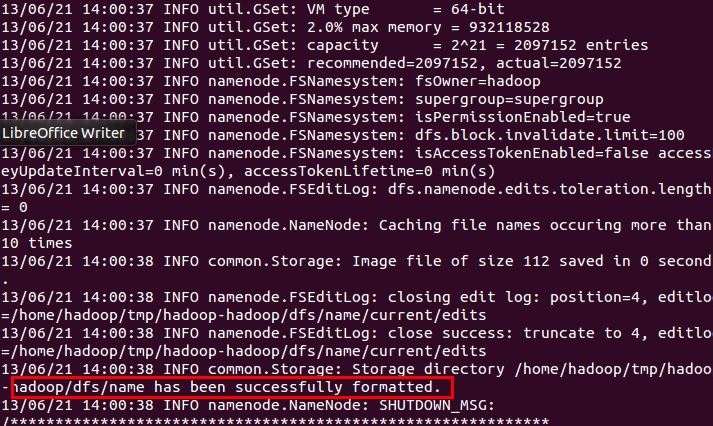
正常情况下会出现如下提示:

说明格式化成功。
启动所有结点:
./start-all.sh

会按先后顺序启动,启动完成后,分别到主机和两个node上使用jps查看。
master上显示如下:

node1和node2上显示:

在操作的过程中遇到了DataNode不能启动的问题,经过查看node1的hadoop的日志,发现提示错误信息:
org.apache.hadoop.hdfs.server.datanode.DataNode: All directories in dfs.data.dir are invalid.
经过查找是因为权限的问题,于是
sudo chmod 755 “你配置的data目录”
问题解决。
运行示例
在根目录下新建文件a,并且向a中随意添加字符串信息。
然后在hdfs上创建目录:
./hadoop dfs -mkdir test1
把刚才创建的文件a上传到test1下:
./hadoop dfs -put ~/a test1
然后查看文件中的内容:
./hadoop dfs -cat test1/a
显示结果如下:
