-
1.安装
pip install drf-haystack # django的开源 搜索框架(python语音写的,搜索框架可以使用其他 语音的搜索引擎)
pip install whoosh # 搜索引擎(python语音写的)
pip install jieba # 中文分词Jieba,由于Whoosh自带的是英文分词,对中文的分词支持 不是太好
2. syl/settings.py 全文检索配置
'''1.注册app '''
INSTALLED_APPS = [

    'haystack', # haystack要放在应用的上面
]


'''2.模板路径 '''
TEMPLATES = [
    { 'DIRS': [os.path.join(BASE_DIR,'templates')],
    },
 ]

'''3.全文检索配置'''
HAYSTACK_SEARCH_RESULTS_PER_PAGE = 15 # 搜索出多条数据时需要分页
HAYSTACK_CONNECTIONS = {
    'default': {
    # 'ENGINE': 'haystack.backends.whoosh_backend.WhooshEngine',
    'ENGINE': 'course.whoosh_cn_backend.MyWhooshEngine',
    'PATH': os.path.join(BASE_DIR, 'whoosh_index'), # 指定倒排索引 存放位置
    },
}
# # ES引擎
# HAYSTACK_CONNECTIONS = {
# 'default': {
# 'ENGINE': 'haystack.backends.elasticsearch_backend.ElasticsearchSearchEngine',
# 'URL': 'http://10.211.55.15:9200/', # Elasticsearch服务器ip地址,端口号固 定为9200
# 'INDEX_NAME': 'syl', # Elasticsearch建立的反向索引库的名称
# },
# }
# # 添加此项,当数据库改变时,会自动更新索引,非常方便
# HAYSTACK_SIGNAL_PROCESSOR = 'haystack.signals.RealtimeSignalProcessor'
2.2 在子应用下创建索引文件
- apps/course/search_indexes.py
# apps/course/search_indexes.py
# 文件名必须是 search_indexes.py

from haystack import indexes
from .models import Course
# 修改此处,类名为模型类的名称+Index,比如模型类为GoodsInfo,
# 则这里类名为GoodsInfoIndex(其 实可以随便写)
#
class CourseIndex(indexes.SearchIndex, indexes.Indexable):
    """ Course索引类 """
    # text为索引字段
    # document = True,这代表haystack和搜索引擎将使用此字段的内容作为索引进行检索
    # use_template=True 指定根据表中的那些字段建立索引文件的说明放在一个文件中
    text = indexes.CharField(document=True, use_template=True)
    # 对那张表进行查询
    def get_model(self): # 重载get_model方法,必须要有
        """返回建立索引的模型类"""
        return Course # 返回这个model
    # 建立索引的数据
    def index_queryset(self, using=None):
            """返回要建立索引的数据查询集"""
            # 这个方法返回什么内容,最终就会对那些方法建立索引,这里是对所有字段建立索引
            return self.get_model().objects.all()
2.3 指定索引模板文件
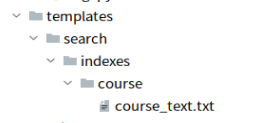
- syl/templates/search/indexes/course/course_text.txt
- # 创建文件路径命名必须这个规范:templates/search/indexes/应用名称/模型类名称
_text.txt

{{object.id}}
{{object.title}}
{{object.desc}}
2.4 修改为jieba分词中的中文分析器
- apps/course/whoosh_cn_backend.py
# 更换 text 字段的 分析方式, 变为jieba分词中的中文分析器
from haystack.backends.whoosh_backend import WhooshEngine, WhooshSearchBackend
from whoosh.fields import TEXT
from jieba.analyse import ChineseAnalyzer
class MyWhooshSearchBackend(WhooshSearchBackend):
    def build_schema(self, fields):
        (content_field_name, schema) = super().build_schema(fields)
        # 指定whoosh使用jieba进行分词
        schema._fields['text'] = TEXT(stored=True,
                                      analyzer=ChineseAnalyzer(),
                                      field_boost=fields.get('text').boost,
                                      sortable=True)
        return (content_field_name, schema)

class MyWhooshEngine(WhooshEngine):
    backend = MyWhooshSearchBackend
2.5 课程全文检索接口视图函数
- course/views.py
# 课程全文检索接口视图函数
from syl import settings
from django.core.paginator import InvalidPage, Paginator
from haystack.forms import ModelSearchForm
from django.http import JsonResponse
# 如果settings.py中配置就是用settings中配置的,否则就每页 15 条
RESULTS_PER_PAGE = getattr(settings, 'HAYSTACK_SEARCH_RESULTS_PER_PAGE', 15 )
def course_index_search(request):
    #1.获取前端传过来的关键字(查询数据)
    query = request.GET.get('q', None)
    page = int(request.GET.get('page', 1 )) # 第几页
    page_size = int(request.GET.get('page_size', RESULTS_PER_PAGE))  #每页多少条
    #2.获取查询条件,进行查询
    if query:
        form = ModelSearchForm(request.GET, load_all=True)  # 将查询条件传递给查询对象
        if form.is_valid():
            results = form.search() # 查询出来的最终数据
        else:
            results = []
    else:
        return JsonResponse({"code": 404 , "msg": 'No file found!', "data": []})
    #3.对结果集进行分页
    paginator = Paginator(results, page_size)
    try:
        page = paginator.page(page) # 从分好的页中拿第几页
    except InvalidPage: # 如果分页出错
        return JsonResponse({"code": 404 , "msg": 'No file found!', "data": []})
    #4.把查询的分页结果集对象转换成json格式
    jsondata = []
    for result in page.object_list: # 分页后的课程查询结果
        data = {
            'id': result.object.id,
            'title': result.object.title,
            'desc': result.object.desc,
            'img':
                request.scheme + '://' + request.META['HTTP_HOST'] + result.object.img.url,
            # 'follower': result.object.follower,
            'learner': result.object.learner,
            'status': result.object.status,
            'course_type': result.object.course_type.id
        }
        jsondata.append(data)
        result = {
            "code": 200,
            "msg": 'Search successfully!',
            "data": {"count": page.paginator.count, "results": jsondata}
        }
        return JsonResponse(result)
2.6 syl/urls.py 添加路由
urlpatterns = [
    path('search/', course_index_search),

 ]
2.7 命令构建倒排索引
python manage.py rebuild_index
3.测试课程全文检索
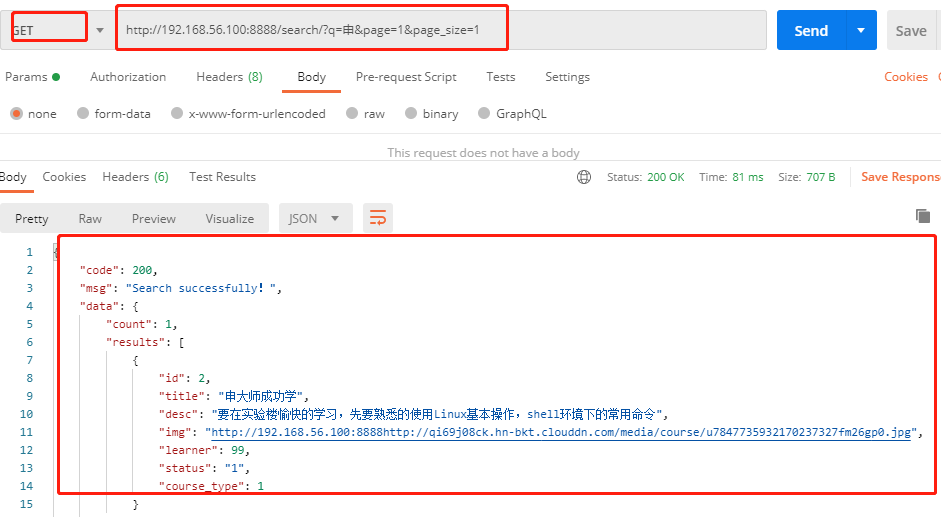
- 测试接口
-
http://192.168.56.100:8888/search/?q=申&page=1&page_size=1
- 测试结果
