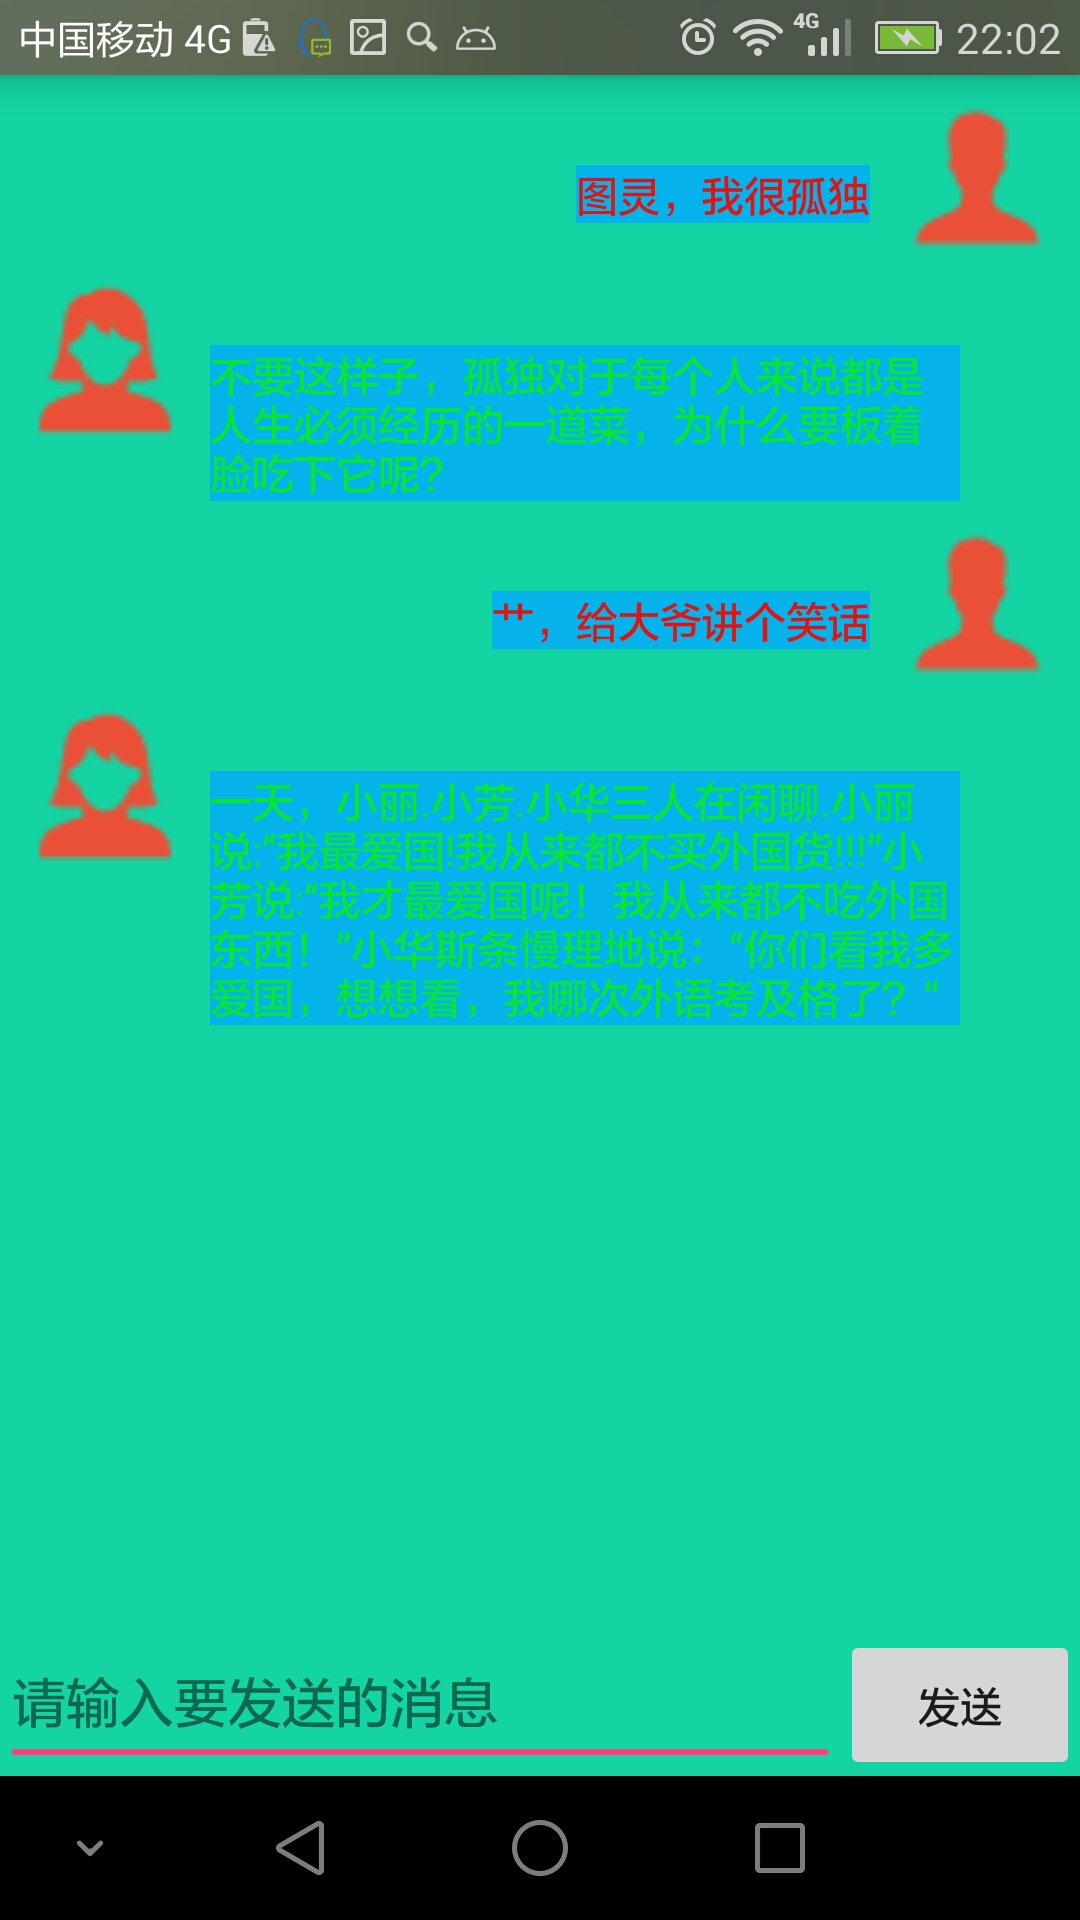
先来张图,看看我们要做成什么样的效果。很简单的一个发送消息接收消息的界面,那怎么实现的呢,毫无疑问,是ListView的多布局了,右边显示我们发送消息的条目,左边显示要接收消息的条目。下面是一个EditText+Button。代码如下(多加一句,ListView多布局type一定是从0开始,不是从0开始的要转换成从0开始)
receive_message_item.xml-----接收消息布局
<?xml version="1.0" encoding="utf-8"?>
<RelativeLayout xmlns:android="http://schemas.android.com/apk/res/android"
    android:layout_width="match_parent"
    android:layout_height="match_parent">
    <ImageView
        android:id="@+id/iv_receive_message"
        android:src="@mipmap/meinv"
        android:layout_width="50dp"
        android:layout_height="50dp" />
    <TextView
        android:id="@+id/tv_receive_message"
        android:text="send message"
        android:textColor="#08e735"
        android:layout_marginLeft="10dp"
        android:background="#07b3ec"
        android:layout_marginRight="30dp"
        android:gravity="center_vertical"
        android:layout_marginTop="20dp"
        android:layout_toRightOf="@+id/iv_receive_message"
        android:layout_width="wrap_content"
        android:layout_height="wrap_content" />

</RelativeLayout>
send_message_item.xml---发送消息布局
<?xml version="1.0" encoding="utf-8"?>
<RelativeLayout xmlns:android="http://schemas.android.com/apk/res/android"
    android:layout_width="match_parent"
    android:layout_height="match_parent">
    <TextView
        android:id="@+id/tv_send_message"
        android:text="send message"
        android:background="#07b3ec"
        android:layout_marginLeft="30dp"
        android:textColor="#df1515"
        android:gravity="center_vertical"
        android:layout_toLeftOf="@+id/iv_send_message"
        android:layout_width="wrap_content"
        android:layout_marginRight="10dp"
        android:layout_marginTop="20dp"
        android:layout_height="wrap_content" />
    <ImageView
        android:id="@+id/iv_send_message"
        android:src="@mipmap/man"
        android:layout_alignParentRight="true"
        android:layout_width="50dp"
        android:layout_height="50dp" />
</RelativeLayout>
activity_main.xml----LietView布局
<?xml version="1.0" encoding="utf-8"?>
<LinearLayout xmlns:android="http://schemas.android.com/apk/res/android"
    xmlns:tools="http://schemas.android.com/tools"
    android:layout_width="match_parent"
    android:layout_height="match_parent"
    android:orientation="vertical"
     android:background="#16d4a5"
    tools:context="com.zcl.tuling.MainActivity">

    <ListView
        android:id="@+id/lv_message"
        android:layout_margin="10dp"
        android:layout_width="match_parent"
        android:layout_height="0dp"
        android:dividerHeight="10dp"
        android:divider="@null"
        android:layout_weight="1" />

    <FrameLayout
        android:layout_width="match_parent"
        android:layout_height="wrap_content">

        <LinearLayout
            android:layout_width="match_parent"
            android:layout_height="50dp"
            android:orientation="horizontal">
            <EditText
                android:id="@+id/edt_send_message"
                android:layout_width="0dp"
                android:layout_height="match_parent"
                android:layout_weight="1"
                android:hint="请输入要发送的消息" />
            <Button
                android:id="@+id/btn_send"
                android:layout_width="80dp"
                android:layout_height="50dp"
                android:text="发送" />

        </LinearLayout>
    </FrameLayout>
</LinearLayout>
实体类:
public class TuLingBean {
    private int code;
    private String text;

    public int getCode() {
        return code;
    }

    public void setCode(int code) {
        this.code = code;
    }

    public String getText() {
        return text;
    }

    public void setText(String text) {
        this.text = text;
    }
}
MainActivity.java-----说明一下,这里网络请求数据我为了节省时间我用的是自己封装的一个库,之后有时间会改过来的。
public class MainActivity extends AppCompatActivity implements View.OnClickListener {
    public static final String URL_PATH="http://www.tuling123.com/openapi/api?key=dae83a55d5c542d4946958ad613b8d7c&info=";
    private static final String TAG = MainActivity.class.getSimpleName();
    private ListView mListView;
    private EditText mEditText;
    private Button mButton;
    private MessageAdapter adapter;
    private String text;
private List<TuLingBean> mList;
    @Override
    protected void onCreate(Bundle savedInstanceState) {
        super.onCreate(savedInstanceState);
        setContentView(R.layout.activity_main);
        initView();
    }
    private void initView() {
        mList=new ArrayList<>();
        mListView = (ListView) findViewById(R.id.lv_message);
        mEditText = (EditText) findViewById(R.id.edt_send_message);
        mButton = (Button) findViewById(R.id.btn_send);
        mButton.setOnClickListener(this);
         adapter = new MessageAdapter(this, mList);
        mListView.setAdapter(adapter);
    }
    private void setData() {
        HttpUtil.getStringAsync(URL_PATH + text, new HttpUtil.RequestCallBack() {
            @Override
            public void onFailure() {
                Log.i(TAG, "onFailure: ");
            }
            @Override
            public void onSuccess(String result) {
                Log.i(TAG, "onSuccess: ");
                Gson gson = new Gson();
                TuLingBean fromJson = gson.fromJson(result, TuLingBean.class);
                mList.add(fromJson);
                adapter.notifyDataSetChanged();
                mEditText.setText("");
            }
            @Override
            public void onFinish() {
                Log.i(TAG, "onFinish: ");

            }
        });
        mListView.setSelection(mList.size());
    }

    @Override
    public void onClick(View v) {
         text=mEditText.getText().toString().trim();
        TuLingBean bean=new TuLingBean();
        bean.setText(text);
        bean.setCode(1);
        mList.add(bean);
        adapter.notifyDataSetChanged();
        setData();
    }
}
适配器
public class MessageAdapter extends BaseAdapter {
    private List<TuLingBean> data;
    private LayoutInflater inflater;

    public MessageAdapter(Context context, List<TuLingBean> data) {
        this.data = data;
        inflater = LayoutInflater.from(context);
    }

    @Override
    public int getCount() {
        return data != null ? data.size() : 0;
    }

    @Override
    public TuLingBean getItem(int position) {
        return data.get(position);
    }

    @Override
    public long getItemId(int position) {
        return position;
    }

    @Override
    public int getItemViewType(int position) {
        int type=0;
        if (data.get(position).getCode()==100000){
            return type;
        }
        return data.get(position).getCode();
    }

    @Override
    public int getViewTypeCount() {
        return 2;
    }

    @Override
    public View getView(int position, View convertView, ViewGroup parent) {
        int type = getItemViewType(position);
        ViewHolder holder = null;
        ViewHolderLeft holderLeft = null;
        if (convertView == null) {
            switch (type) {
                case 0:
                    holderLeft = new ViewHolderLeft();
                    convertView = inflater.inflate(R.layout.receive_message_item, parent, false);
                    holderLeft.receiveMessage = (TextView) convertView.findViewById(R.id.tv_receive_message);
                    holderLeft.receiveMessage.setText(data.get(position).getText());
                    convertView.setTag(holderLeft);
                    break;

                case 1:
                    holder = new ViewHolder();
                    convertView = inflater.inflate(R.layout.send_message_item, parent, false);
                    holder.sendMessage = (TextView) convertView.findViewById(R.id.tv_send_message);
                    holder.sendMessage.setText(data.get(position).getText());
                    convertView.setTag(holder);
                    break;
            }
        } else {
            switch (type) {
                case 0:
                    holderLeft = (ViewHolderLeft) convertView.getTag();
                    holderLeft.receiveMessage.setText(data.get(position).getText());
                    break;
                case 1:
                    holder = (ViewHolder) convertView.getTag();
                    holder.sendMessage.setText(data.get(position).getText());
                    break;
            }
        }
        return convertView;
    }
    public class ViewHolder {
        TextView sendMessage;
    }
    public class ViewHolderLeft {
        TextView receiveMessage;
    }

}