模板语法
两种书写格式:
- 变量相关 {{ }}
- 逻辑相关 {% %}
模板传值
给html页面传值的两种方式
第一种方式
def test(request):
    n = 1
    f = 1.21
    s = 'hellow world'
    lt = [11, 22, 33, 44, 55, 66]
    tu = (111, 222, 333)
    dic = {'username': 'neo', 'password': '123'}
    se = {1, 3, 5, 7, 9}
    bo = True

    return render(request, 'test.html', 'n': n, 'dic': dic)
弊端就是:当要传的变量名很多的时候,就很麻烦
第二种 locals()
locals() 会将当前所在的名称空间中所有的名字全部传递给html页面
传值 基本数据类型
def test(request):
    n = 1
    f = 1.21
    s = 'hellow world'
    lt = [11, 22, 33, 44, 55, 66]
    tu = (111, 222, 333)
    dic = {'username': 'neo', 'password': '123'}
    se = {1, 3, 5, 7, 9}
    bo = True

    return render(request, 'test.html', locals())
前端接收:
<p>{{ n }}</p>
<p>{{ f }}</p>
<p>{{ lt }}</p>
<p>{{ tu }}</p>
<p>{{ s }}</p>
<p>{{ se }}</p>
<p>{{ bo }}</p>
<p>{{ dic }}</p>
传函数名
def test(request):
	def func1():
    	pass

    return render(request, 'test.html', locals())
前端
<p>传函数名 {{ func1 }}</p>
显示效果:传函数名 None
注意:
-
给HTML页面传递函数名的时候,模板语法会自动加括号调用该函数,并且将函数的返回值显示在浏览器页面上。
-
但是模板语法不支持函数传参,意味着给html页面传的函数只能是不需要传参数调用的函数。
传类名和对象
    def func1():
        pass


    class MyClass(object):
        def get_self(self):
            return 'get_self'

        @classmethod
        def get_cls(cls):
            return 'get_cls'

        @staticmethod
        def get_func():
            return 'get_func'

    obj = MyClass()
前端:
<p>传类名:{{ MyClass }}</p>
<p>传对象名: {{ obj }}</p>

<p>{{ obj.get_cls }}</p>
<p>{{ obj.get_self }}</p>
<p>{{ obj.get_func }}</p>
总结:只要是能够加括号调用的 传递到html页面上都会自动加括号调用
过滤器
语法结构
用|来使用, 会自动将 | 左边的数据当作过滤器的第一个参数传入, :右边的当作第二个参数
<p>统计长度:{{ s|length }}</p>
常用的方法
- 统计长度:
<p>统计长度:{{ s|length }}</p>, 如果无法统计长度会默认返回0 - 加法运算:
{{ n|add:666 }}, 内部异常捕获 支持数字相加 字符串拼接 都不符合返回空 - 切片操作:
{{ lt|slice:'0:5:2' }}, 顾头不顾尾 也支持步长 - 自动转成文件大小格式:
{{ file_size|filesizeformat }} - 截取文本内容:
s|truncatechars:5(按字符计算)截取五个字符,三个点也算 - 截取文本内容:
{{ s1|truncatewords:5 }}, (按照空格计算) 截取五个单词 三个点不算 - 判断是否有值:
{{ is_value|default:'is_value变量名指向的值为空' }}, 有值展示值本身 没值展示默认值 - 展示带有标签的文本:
{{ sss }}- 默认情况下 是不会自动转换成前端html标签,防止恶意攻击
前后端取消转义
前端:<p>{{ sss|safe}}</p> 这样就可以自动转换成前端html标签
后端:
from django.utils.safestring import mark_safe

def test(request):
    sss2 = "<h2>h2标签</h2>"
    res = mark_safe(sss2)

    return render(request, 'test.html', locals())


# 前端传res就行了
也就意味着 html代码可以不在html文件内写,可以在后端写完了传给前端
标签
逻辑相关的语法
for循环:
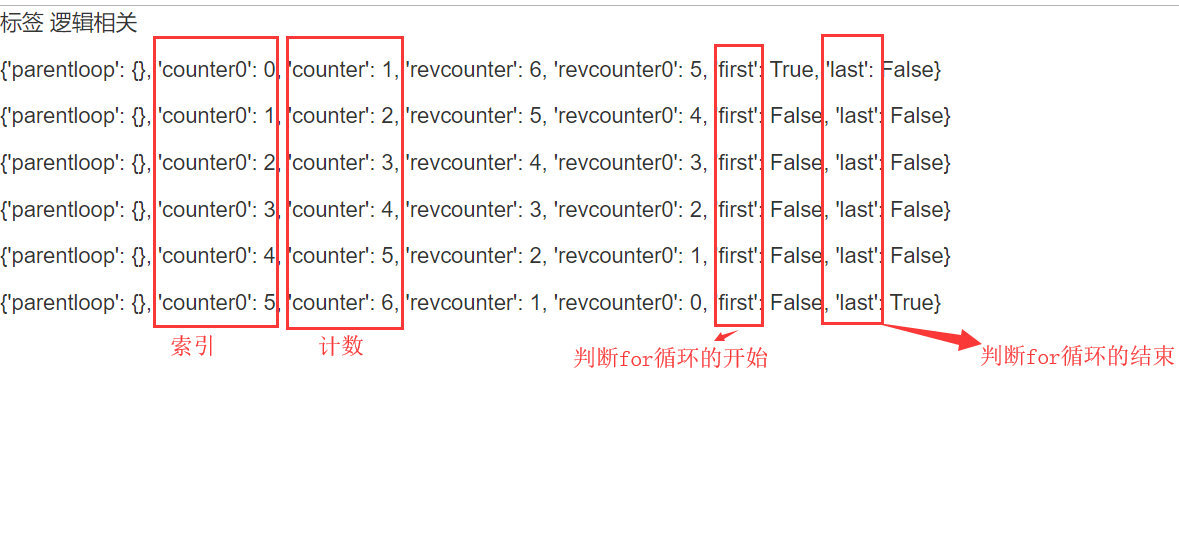
<p>标签  逻辑相关</p>
{% for foo in lt %}
	<p>{{ forloop }}</p>
    <p>{{ foo }}</p>
{% endfor %}
forloop 内置的对象:
{'parentloop': {}, 'counter0': 0, 'counter': 1, 'revcounter': 6, 'revcounter0': 5, 'first': True, 'last': False}
if判断
{% if s %}
<p>s有值</p>
    {% else %}
    <p>s没有值</p>
{% endif %}
for循环和if判断联合使用
{% for foo in lt %}
    {% if forloop.first %}
        <p>第一次</p>
    {% elif forloop.last %}
        <p>最后一次</p>
    {% else %}
        <p>{{ foo }}有点意思</p>

    {% endif %}
{% endfor %}
{% empty %}
<p>当for循环的对象是空的时候会走 </p>
with起别名
后端有个大字典,传到前端:
comp_dic = {'username':'123', 'hobby':['study', 'run', ['rap', {'age':20}]]}
前端: <p>{{ comp_dic.hobby.2.1.age }}</p>
注意:模板语法的取值 只有一种方式 统一采用句点符
<p>当你的数据是通过多个句点符获取到的,后续又需要经常使用,可以给该数据起别名,但别名只能在with内部使用</p>
{% with comp_dic.hobby.2.1.age as age %}
    <p>{{ age }}</p>

{% endwith %}
自定义过滤器和标签
django支持用户自定义过滤器和标签
有三个步骤:
-
在应用名下新建一个名字必须叫做templatetags的文件夹
-
在该文件夹内,新建一个任意名称的py文件
-
在该py文件中,必须先写下面两句代码
from django.template import Library

register = Library()
之后就可以用register自定义过滤器和标签了
自定义过滤器
和默认的过滤器一样 最多只能接受两个参数
from django.template import Library

register = Library()

# 自定义过滤器
@register.filter(name='neo')
def index(a, b):
    return a + b    # 两个数的和
需要先在html页面上 加载
{% load mytag %}
{{ 1|neo:2 }}
自定义的过滤器可以在逻辑语句中使用,而自定义的标签不可以
{% load mytag %}
{% if 1|neo:2 %}
    <p>有值</p>
    {% else %}
    <p>没有值</p>

{% endif %}
自定义标签
可以接收任意多个参数,参数与参数之间必须空格隔开
from django.template import Library

register = Library()

@register.simple_tag(name='mytag')
def mytag(a,b,c,d):
    return '%s*%s*%s*%s' % (a,b,c,d)   # 接收四个参数用*拼接
自定义inclusion_tag
是一个函数,能够接收外界传入的参数,然后传递给一个页面,页面上获取数据,渲染完成之后,将渲染好的页面放到调用inclusion_tag的地方。
mytag.py
from django.template import Library

register = Library()
@register.inclusion_tag('mytag.html', name='xxx')
def func(n):
    lt = []
    for i in range(n):
        lt.append(f'第{i}项')

    return locals()   # 将lt直接传递给mytag页面
template文件夹下mytag.html
<ul>
    {% for foo in lt %}
        <li>{{ foo }}</li>
    {% endfor %}

</ul>
views.py返回的test.html页面
{% load  mytag %}
{% xxx 5 %}
注意: 当你需要使用一些页面组件的时候 并且该页面组件需要参数才能够正常渲染 你可以考虑使用inclusion_tag
模板的继承
继承模板extends
在子页面中在页面最上方使用下面的语法来继承母板
{% extends 'home.html' %}
块(block)
在父页面上利用block划定想要修改的区域,继承后就可以通过名字找到对应的名字找到该区域,并修改
- 模板上的block区域越多,页面的扩展性越强,推荐你一个模板页面至少有三块区域(css区域,html代码区域,js区域)
- 通过这三个区域,就能够实现每一个页面都有自己独立的css和js代码
- 可以在子页面上通过{{ block.super }}沿用父页面的内容
导入(include)
将html页面当做模块的直接导入使用:{% include 'form.html'%}
{% block content %}
    <p>我改成home1页面内容</p>
    {{block.super}}
    {% include 'form.html' %}
{% endblock %}

{% block css %}
    <style>
        p {
            color: green;
        }
    </style>
{% endblock %}

{% block js %}
    <script>
        alert('login')
    </script>
{% endblock %}