1、使用cropbox包来上传裁剪图片,可见介绍:https://www.jianshu.com/p/6c269f0b48c0I
ImgCrop包包括:css--style.css,js--cropbox.js、cropbox-min.js,jquery-1.11.1.min.js,index.html
把css和js文件分门别类的放置到django项目中的static目录下,为了区分把style.css更名为imagecrop.css。
2、在views.py中增加视图函数:
def my_image(request):
    if request.method=='POST':
        img=request.POST['img'] #从前端imagecrop.html通过ajax提交的img数据
        #保存到数据表中,代码略
        #dbinfo.save()
        return  HttpResponse("1")
    else:
        return render(request,'imagecrop.html')
3、前台页面imagecrop.html,从index.html修改而来。
{% load staticfiles %}
<link rel="stylesheet" href="{% static 'css/imagecop.css' %}">

<div class="container">
  <div class="imageBox">
    <div class="thumbBox"></div>
    <div class="spinner" style="display: none"></div>
  </div>
  <div class="action">
    <!-- <input type="file" id="file" style="  200px">-->
    <div class="new-contentarea tc"> <a href="javascript:void(0)" class="upload-img">
      <label for="upload-file">请先选择图片...</label>
      </a>
      <input type="file" class="" name="upload-file" id="upload-file" />
    </div>
    <input type="button" id="btnCrop" class="Btnsty_peyton" value="OK">
    <input type="button" id="btnZoomIn" class="Btnsty_peyton" value="+"  >
    <input type="button" id="btnZoomOut" class="Btnsty_peyton" value="-" >
  </div>
  <div class="cropped"></div>
</div>

<script src="{% static 'js/jquery-1.11.1.min.js' %}"></script>
<script type="text/javascript" src="{% static 'js/cropbox-min.js' %}"></script>
<script type="text/javascript" src="{% static 'js/csrf.js' %}"></script>

<script type="text/javascript">
$(window).load(function() {
    var options =
    {
        thumbBox: '.thumbBox',
        spinner: '.spinner',
        imgSrc: ''
    }
    var cropper = $('.imageBox').cropbox(options);
    var img="";
    $('#upload-file').on('change', function(){
        var reader = new FileReader();
        reader.onload = function(e) {
            options.imgSrc = e.target.result;
            cropper = $('.imageBox').cropbox(options);
            getImg();
        }
        reader.readAsDataURL(this.files[0]);
        this.files = [];
        //getImg();
    })
    $('#btnCrop').on('click', function(){
        //alert("图片上传");
        $.ajax({
            url:'{% url "account:my_image" %}',
            type:'POST',
            data:{"img":img},
            success:function (e) {
                if(e==1){
                    parent.location.reload(); }
                else {
                    alert("sorry,the picutre can't been uploaded.")
                }
            },
        });
    })

    function getImg(){
        img = cropper.getDataURL();
        $('.cropped').html('');
        $('.cropped').append('<img src="'+img+'" align="absmiddle" style="180px;border-radius:180px;margin-top:4px;box-shadow:0px 0px 12px #7E7E7E;"><p>180px*180px</p>');
        $('.cropped').append('<img src="'+img+'" align="absmiddle" style="128px;border-radius:1280px;margin-top:4px;box-shadow:0px 0px 12px #7E7E7E;"><p>128px*128px</p>');
        $('.cropped').append('<img src="'+img+'" align="absmiddle" style="64px;border-radius:64px;margin-top:4px;box-shadow:0px 0px 12px #7E7E7E;" ><p>64px*64px</p>');
        }

    $(".imageBox").on("mouseup",function(){
         getImg();
          });

    $('#btnZoomIn').on('click', function(){
        cropper.zoomIn();
    })
    $('#btnZoomOut').on('click', function(){
        cropper.zoomOut();
    })
});
</script>
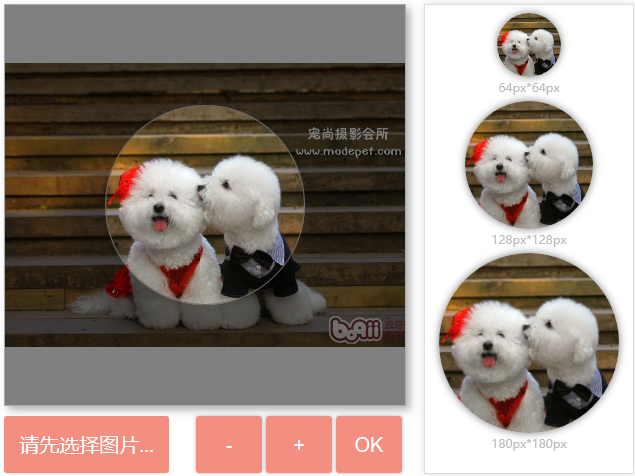
界面:

4、页面入口:设置一个按钮,用layer.js实现弹出imagecrop.html页面
<button class="btn btn-primary btn-lg" id="upload_image" onclick="upload_image_layer()">upload image </button>

    <script type="text/javascript" src="{% static 'js/jquery.js' %}"></script>
    <script type="text/javascript" src="{% static 'js/layer.js' %}"></script>
    <script type="text/javascript">
    function upload_image_layer() {
        //alert("函数执行了" );
        layer.open({
            area:['680px','600px'],
            title:"上传图像",
            type:2,
            content:"{% url 'my_image' %}",
        });
    }
    </script>
5、设置url
对应上面的{% url 'my_image' %},在urls.py中设置:url(r'^my-image/$',views.my_image,name="my_image"),
6、注意事项:
- 可在imagecrop.css中修改裁剪页面的样式,如把正方形框改为圆形框;
- 图片存在数据表中,也可修改存在文件中,则看另一篇关于上传文件的文章;