1、下载
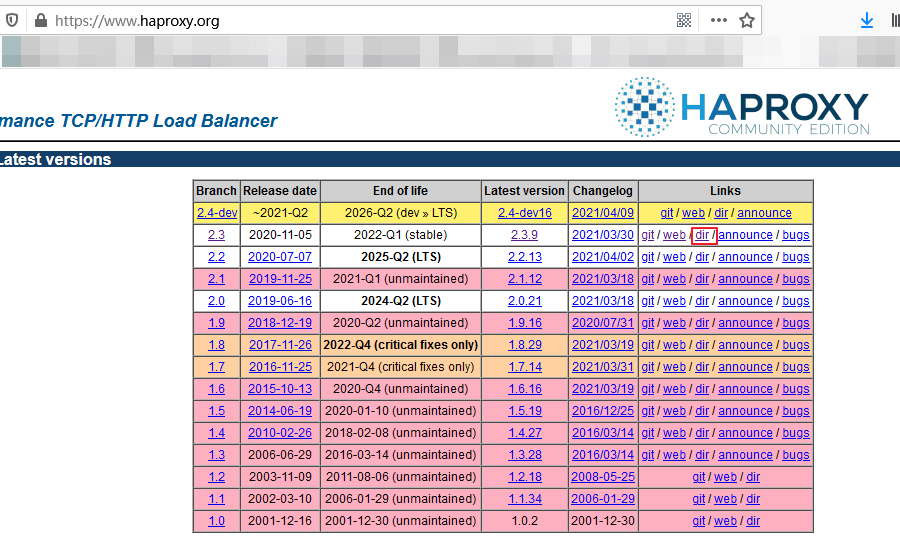
(1) 商业化官网地址:http://www.haproxy.com/

其中可以选择社区版的。这里案例中下载社区版的 2.3.9 版本。
(2) 社区版本地址:http://www.haproxy.org/

2、安装
三台服务器, 192.168.149.130 安装 haproxy,192.168.149.128 及 192.168.149.129 分别安装 上下文为 service1 的 web 服务 ,使用 haproxy 进行负载均衡这两个实例服务。
(1)部署前操作
将 下载下来的 gz 包上传到 Linux 服务上。
(2)部署
|
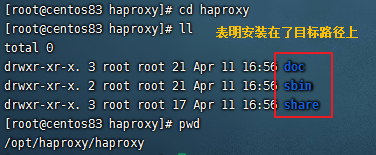
tar zxvf haproxy-2.3.9.tar.gz cd haproxy-2.3.9 uname -a //查看内核信息 make PREFIX=/opt/haproxy/haproxy TARGET=4180 CPU=x86_64 cd /opt/haproxy/haproxy mkdir conf touch conf/haproxy.cfg #创建配置文件 mkdir -p /etc/haproxy ln -s /opt/haproxy/haproxy/conf/haproxy.cfg /etc/haproxy/haproxy.cfg #将配置文件软链接到 /etc/haproxy目录中 cp -r /opt/haproxy/haproxy-2.3.9/examples/errorfiles /opt/haproxy/haproxy/errorfiles ln -s /opt/haproxy/haproxy/errorfiles /etc/haproxy/errorfiles #将安装目录下的错误页面文件软链接到 /etc/haproxy目录下 cp /opt/haproxy/haproxy-2.3.9/examples/haproxy.init /etc/rc.d/init.d/haproxy # 定义成系统服务 chmod +x /etc/rc.d/init.d/haproxy #授权 chkconfig haproxy on #设置开机启动 ln -s /opt/haproxy/haproxy/sbin/haproxy /usr/sbin/haproxy #添加链接 |
这里 为 haproxy.cfg errorfiles haproxy程序文件 创建软链接 是因为 haproxy 服务器 启动文件 haproxy.init 中 记录的配置文件路径、haproxy程序路径分别在 /etc/haproxy 及 /usr/sbin 路径下,haproxy.init 文件内容如下:
#!/bin/sh
#
# chkconfig: - 85 15
# description: HA-Proxy is a TCP/HTTP reverse proxy which is particularly suited
#              for high availability environments.
# processname: haproxy
# config: /etc/haproxy/haproxy.cfg
# pidfile: /var/run/haproxy.pid

# Script Author: Simon Matter <simon.matter@invoca.ch>
# Version: 2004060600

# Source function library.
if [ -f /etc/init.d/functions ]; then
  . /etc/init.d/functions
elif [ -f /etc/rc.d/init.d/functions ] ; then
  . /etc/rc.d/init.d/functions
else
  exit 0
fi

# Source networking configuration.
. /etc/sysconfig/network

# Check that networking is up.
[ ${NETWORKING} = "no" ] && exit 0

# This is our service name
BASENAME=`basename $0`
if [ -L $0 ]; then
  BASENAME=`find $0 -name $BASENAME -printf %l`
  BASENAME=`basename $BASENAME`
fi

BIN=/usr/sbin/$BASENAME

CFG=/etc/$BASENAME/$BASENAME.cfg
[ -f $CFG ] || exit 1

PIDFILE=/var/run/$BASENAME.pid
LOCKFILE=/var/lock/subsys/$BASENAME

RETVAL=0

start() {
  quiet_check
  if [ $? -ne 0 ]; then
    echo "Errors found in configuration file, check it with '$BASENAME check'."
    return 1
  fi

  echo -n "Starting $BASENAME: "
  daemon $BIN -D -f $CFG -p $PIDFILE
  RETVAL=$?
  echo
  [ $RETVAL -eq 0 ] && touch $LOCKFILE
  return $RETVAL
}

stop() {
  echo -n "Shutting down $BASENAME: "
  killproc $BASENAME -USR1
  RETVAL=$?
  echo
  [ $RETVAL -eq 0 ] && rm -f $LOCKFILE
  [ $RETVAL -eq 0 ] && rm -f $PIDFILE
  return $RETVAL
}

restart() {
  quiet_check
  if [ $? -ne 0 ]; then
    echo "Errors found in configuration file, check it with '$BASENAME check'."
    return 1
  fi
  stop
  start
}

reload() {
  if ! [ -s $PIDFILE ]; then
    return 0
  fi

  quiet_check
  if [ $? -ne 0 ]; then
    echo "Errors found in configuration file, check it with '$BASENAME check'."
    return 1
  fi
  $BIN -D -f $CFG -p $PIDFILE -sf $(cat $PIDFILE)
}

check() {
  $BIN -c -q -V -f $CFG
}

quiet_check() {
  $BIN -c -q -f $CFG
}

rhstatus() {
  status $BASENAME
}

condrestart() {
  [ -e $LOCKFILE ] && restart || :
}

# See how we were called.
case "$1" in
  start)
    start
    ;;
  stop)
    stop
    ;;
  restart)
    restart
    ;;
  reload)
    reload
    ;;
  condrestart)
    condrestart
    ;;
  status)
    rhstatus
    ;;
  check)
    check
    ;;
  *)
    echo $"Usage: $BASENAME {start|stop|restart|reload|condrestart|status|check}"
    exit 1
esac

exit $?
若是不想在 /etc 中创建 haproxy,/usr/sbin 中创建目录和建立软链接,可以直接 修改 haproxy.init 文件中的 路径信息,在移动到 /etc/rc.d/init.d 中。
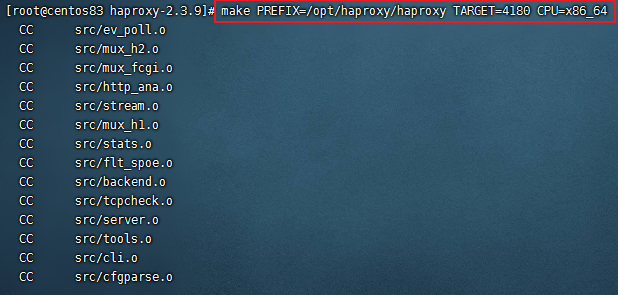
在编译的时候指定了内核信息(TARGETCPU),可以看:https://www.jb51.net/article/101996.htm 的说明

(3)配置
直接 打开 /opt/haproxy/haproxy/conf/haproxy.cfg 进行编辑
|
cd /opt/haproxy/haprxoy/conf vi haproxy.cfg systemctl start haproxy |
编辑 后的内容 如下 :
global
  chroot /opt/haproxy/haproxy
  pidfile /opt/haproxy/haproxy/haproxy.pid
  maxconn 1000
  daemon

defaults
  mode http
  option dontlognull
  option httpclose
  option httplog
  option forwardfor
  option redispatch
  timeout connect 10000
  timeout client 30000
  timeout server 30000
  maxconn 60000
  retries 3

listen stats   # haproxy 的统计数据页面
  bind 0.0.0.0:1080
  stats refresh 30s
  stats uri /stats
  stats realm Haproxy Manager
  stats auth admin:admin   # 登录统计页面的账号

frontend main    # 代理
  bind 0.0.0.0:80  default_backend dynamic

backend dynamic
  balance roundrobin
  server web1 192.168.149.128:8080
  server web2 192.168.149.129:8080

errorfile 403 /etc/haproxy/errorfiles/403.http
errorfile 500 /etc/haproxy/errorfiles/500.http
errorfile 502 /etc/haproxy/errorfiles/502.http
errorfile 503 /etc/haproxy/errorfiles/503.http
errorfile 504 /etc/haproxy/errorfiles/504.http
此时可以打开浏览器,输入 :192.168.149.130:1080/stats 看到 haproxy 的统计页面
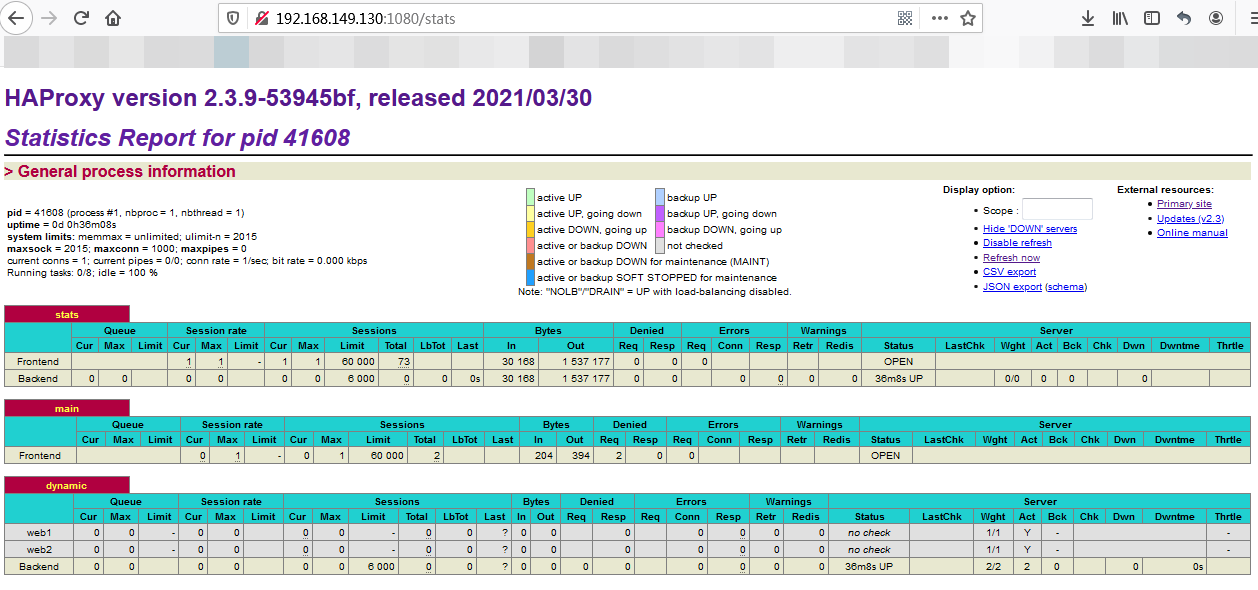
在浏览器中 输入 :192.168.149.130:80/service1/health 也可以看到 正确返回 信息 ,说明 该请求被转发到 了 128 服务器 或 129 服务器上。

(4)日志打印配置
通常我们看问题,需要通过日志获取一些信息,所以需要开启日志打印
|
# 关闭 selinux vi /etc/selinux/config #编辑文件 setenforce 0 #使配置立即生效 vi /etc/rsyslog.conf vi /opt/haproxy/haproxy/conf/haproxy.cfg # 创建日志文件 mkdir -p /opt/haproxy/haproxy/log touch /opt/haproxy/haproxy/log/haproxy.log systemctl restart rsyslog systemctl reload haproxy |
/etc/selinux/config 文件修改后内容如下:
# This file controls the state of SELinux on the system.
# SELINUX= can take one of these three values:
#     enforcing - SELinux security policy is enforced.
#     permissive - SELinux prints warnings instead of enforcing.
#     disabled - No SELinux policy is loaded.
#SELINUX=enforcing
SELINUX=disabled
# SELINUXTYPE= can take one of these three values:
#     targeted - Targeted processes are protected,
#     minimum - Modification of targeted policy. Only selected processes are protected.
#     mls - Multi Level Security protection.
#SELINUXTYPE=targeted
/etc/rsyslog.conf 文件修改后内容如下:
# rsyslog configuration file

# For more information see /usr/share/doc/rsyslog-*/rsyslog_conf.html
# or latest version online at http://www.rsyslog.com/doc/rsyslog_conf.html
# If you experience problems, see http://www.rsyslog.com/doc/troubleshoot.html

#### MODULES ####

module(load="imuxsock"    # provides support for local system logging (e.g. via logger command)
       SysSock.Use="off") # Turn off message reception via local log socket;
                          # local messages are retrieved through imjournal now.
module(load="imjournal"             # provides access to the systemd journal
       StateFile="imjournal.state") # File to store the position in the journal
#module(load="imklog") # reads kernel messages (the same are read from journald)
#module(load"immark") # provides --MARK-- message capability

# Provides UDP syslog reception
# for parameters see http://www.rsyslog.com/doc/imudp.html
#module(load="imudp") # needs to be done just once
#input(type="imudp" port="514")
$ModLoad imudp
$UDPServerRun 514
local2.*                                         /opt/haproxyhaproxy/log/haproxy.log

# Provides TCP syslog reception
# for parameters see http://www.rsyslog.com/doc/imtcp.html
#module(load="imtcp") # needs to be done just once
#input(type="imtcp" port="514")

#### GLOBAL DIRECTIVES ####

# Where to place auxiliary files
global(workDirectory="/var/lib/rsyslog")

# Use default timestamp format
module(load="builtin:omfile" Template="RSYSLOG_TraditionalFileFormat")

# Include all config files in /etc/rsyslog.d/
include(file="/etc/rsyslog.d/*.conf" mode="optional")

#### RULES ####

# Log all kernel messages to the console.
# Logging much else clutters up the screen.
#kern.*                                                 /dev/console

# Log anything (except mail) of level info or higher.
# Don't log private authentication messages!
*.info;mail.none;authpriv.none;cron.none                /var/log/messages

# The authpriv file has restricted access.
authpriv.*                                              /var/log/secure

# Log all the mail messages in one place.
mail.*                                                  -/var/log/maillog


# Log cron stuff
cron.*                                                  /var/log/cron

# Everybody gets emergency messages
*.emerg                                                 :omusrmsg:*

# Save news errors of level crit and higher in a special file.
uucp,news.crit                                          /var/log/spooler

# Save boot messages also to boot.log
local7.*                                                /var/log/boot.log


# ### sample forwarding rule ###
#action(type="omfwd"
# An on-disk queue is created for this action. If the remote host is
# down, messages are spooled to disk and sent when it is up again.
#queue.filename="fwdRule1"       # unique name prefix for spool files
#queue.maxdiskspace="1g"         # 1gb space limit (use as much as possible)
#queue.saveonshutdown="on"       # save messages to disk on shutdown
#queue.type="LinkedList"         # run asynchronously
#action.resumeRetryCount="-1"    # infinite retries if host is down
# Remote Logging (we use TCP for reliable delivery)
# remote_host is: name/ip, e.g. 192.168.0.1, port optional e.g. 10514
#Target="remote_host" Port="XXX" Protocol="tcp")
/opt/haproxy/haproxy/conf/haproxy.cfg 修改后文件内容如下:
global
  log 127.0.0.1 local2 debug
  chroot /opt/haproxy/haproxy
  pidfile /opt/haproxy/haproxy/haproxy.pid
  maxconn 1000
  daemon

defaults
  mode http
  log global
  option dontlognull
  option httpclose
  option httplog
  option forwardfor
  option redispatch
  timeout connect 10000
  timeout client 30000
  timeout server 30000
  maxconn 60000
  retries 3

listen stats
  bind 0.0.0.0:1080
  stats refresh 30s
  stats uri /stats
  stats realm Haproxy Manager
  stats auth admin:admin

frontend main
  bind 0.0.0.0:80
  default_backend dynamic

backend dynamic
  balance roundrobin
  server web1 192.168.149.128:8080
  server web2 192.168.149.129:8080

errorfile 403 /etc/haproxy/errorfiles/403.http
errorfile 500 /etc/haproxy/errorfiles/500.http
errorfile 502 /etc/haproxy/errorfiles/502.http
errorfile 503 /etc/haproxy/errorfiles/503.http
errorfile 504 /etc/haproxy/errorfiles/504.http
在浏览器 再次访问 192.168.149.130:1080/stats 和 192.168.149.130:80/service1/health
打开:/opt/haproxy/haproxy/log/haproxy.log 日志文件可以看到如下信息:
2021-04-11T18:54:49+08:00 localhost haproxy[20659]: 192.168.149.1:60320 [11/Apr/2021:18:54:49.395] stats stats/<STATS> 0/0/0/0/0 200 21124 - - LR-- 1/1/0/0/0 0/0 "GET /stats HTTP/1.1"
2021-04-11T18:55:19+08:00 localhost haproxy[20659]: 192.168.149.1:60326 [11/Apr/2021:18:55:19.459] stats stats/<STATS> 0/0/0/0/0 200 21244 - - LR-- 1/1/0/0/0 0/0 "GET /stats HTTP/1.1"
2021-04-11T18:55:49+08:00 localhost haproxy[20659]: 192.168.149.1:60330 [11/Apr/2021:18:55:49.531] stats stats/<STATS> 0/0/0/0/0 200 21248 - - LR-- 1/1/0/0/0 0/0 "GET /stats HTTP/1.1"
2021-04-11T18:55:54+08:00 localhost haproxy[20659]: 192.168.149.128:49404 [11/Apr/2021:18:55:54.294] main dynamic/web1 0/0/1/11/12 200 123 - - ---- 1/1/0/0/0 0/0 "GET /service1/health HTTP/1.1"
2021-04-11T18:56:19+08:00 localhost haproxy[20659]: 192.168.149.1:60338 [11/Apr/2021:18:56:19.579] stats stats/<STATS> 0/0/0/0/0 200 21330 - - LR-- 1/1/0/0/0 0/0 "GET /stats HTTP/1.1"
说明 haproxy 的日志信息已经输出到 该文件中。
PS:
这里修改了 haproxy.cfg 文件之后,没有 使用 systemctl restart haproxy 方式 而是 使用 systemctl reload haproxy 方式,说明其支持 修改配置文件之后的热加载方式。
若是日志文件中没有内容输出,可以看下 /var/log/messages 文件中对 haproxy 记录的内容,若下:

说明 selinux 没有成功关闭。
3、部署过程中遇到的问题
4、参考
https://www.jb51.net/article/101996.htm
https://blog.51cto.com/u_11886307/2406609 开启日志
(2) 部署
3、安装过程中遇到的问题