除了流量管理、可观测性之外,Istio 服务网格中还可以对网格进行安全管控。Istio 的安全功能主要分为三个部分的实现:
- 双向 TLS 支持
- 基于黑白名单的访问控制
- 基于角色的访问控制
- JWT 认证支持
安全网关
Istio 的身份和证书管理是通过 SDS(安全发现服务)来实现的,如下图所示:
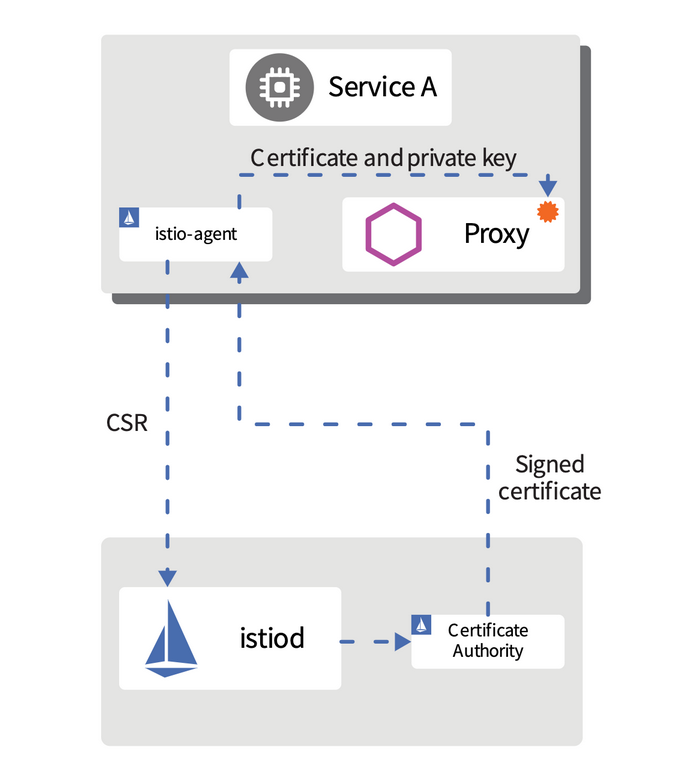
其执行的流程如下所示:
- 首先 Istio 提供一个 gRPC 服务来接受证书签名请求(CSRs)
- Envoy 通过 SDS API 发送证书和密钥请求
- 在收到 SDS 请求后,istio-agent 创建私钥和 CSR,然后将 CSR 及其凭据发送到 Istiod 中的 CA 服务进行签名
- CA 验证 CSR 中携带的凭据并签署 CSR 以生成证书
- istio-agent 通过 Envoy SDS API 将私钥与从 Istio CA 收到的证书发送给 Envoy
- 上述 CSR 过程会周期性地重复,以处理证书和密钥轮换
这的 istio-agent 并不是指的单独的一个容器,而是指 sidecar 容器中的 pilot-agent 进程。
接下来我们可以通过 SDS 来为 Istio Ingress Gateway 配置 TLS 安全认证,配置 TLS Ingress Gateway,让它从 Ingress Gateway 代理通过 SDS 获取凭据。Ingress Gateway 代理和 Ingress Gateway 在同一个 Pod 中运行,监听 Ingress Gateway 所在命名空间中新建的 Secret。在 Ingress Gateway 中启用 SDS 具有如下好处:
- Ingress Gateway 无需重启,就可以动态的新增、删除或者更新密钥/证书对以及根证书。
- 无需挂载 Secret 卷,创建了 kubernetes Secret 之后,这个 Secret 就会被 Gateway 代理捕获,并以密钥/证书对和根证书的形式发送给 Ingress Gateway。
- Gateway 代理能够监视多个密钥/证书对,只需要为每个主机名创建 Secret 并更新 Gateway 定义就可以了
下面我们通过一个简单的示例来说明如何启用 Istio Ingress Gateway 的 TLS 认证。
单一主机
首先使用 OpenSSL 生成证书和密钥,使用如下命令创建根证书和私钥来为你的服务签名证书:
$ openssl req -x509 -sha256 -nodes -days 365 -newkey rsa:2048 -subj '/O=example Inc./CN=example.com' -keyout example.com.key -out example.com.crt
然后使用上面的根证书和私钥为 httpbin.example.com 域名进行签名,首先生成证书签名请求:
$ openssl req -out httpbin.example.com.csr -newkey rsa:2048 -nodes -keyout httpbin.example.com.key -subj "/CN=httpbin.example.com/O=some organization"
然后使用上面的证书签名请求来请求签发证书:
$ openssl x509 -req -days 365 -CA example.com.crt -CAkey example.com.key -set_serial 0 -in httpbin.example.com.csr -out httpbin.example.com.crt
Signature ok
subject=CN = httpbin.example.com, O = some organization
Getting CA Private Key
签名成功后会得到如下所示的几个证书和密钥:
$ ls -la
total 56
drwxr-xr-x  9 ych  staff   288 Jul 25 15:51 .
drwxr-xr-x  7 ych  staff   224 Jul 25 15:18 ..
-rw-r--r--  1 ych  staff  1180 Jul 25 15:50 example.com.crt
-rw-------  1 ych  staff  1708 Jul 25 15:50 example.com.key
-rw-r--r--  1 ych  staff  1050 Jul 25 15:51 httpbin.example.com.crt
-rw-r--r--  1 ych  staff   944 Jul 25 15:50 httpbin.example.com.csr
-rw-------  1 ych  staff  1704 Jul 25 15:50 httpbin.example.com.key
由于 Ingress Gateway 是通过监听同一命名空间下面的 Secret 对象来进行安全服务发现的,所以我们需要将上面生成的证书创建在 istio-system 命名空间之下:
$ kubectl create secret tls httpbin-tls --cert=httpbin.example.com.crt --key=httpbin.example.com.key -n istio-system
secret/httpbin-tls created
然后创建 httpbin 示例应用,应用资源清单文件如下所示:
# httpbin.yaml
apiVersion: v1
kind: Service
metadata:
  name: httpbin
  labels:
    app: httpbin
spec:
  ports:
  - name: http
    port: 8000
  selector:
    app: httpbin
---
apiVersion: apps/v1
kind: Deployment
metadata:
  name: httpbin
spec:
  replicas: 1
  selector:
    matchLabels:
      app: httpbin
      version: v1
  template:
    metadata:
      labels:
        app: httpbin
        version: v1
    spec:
      containers:
      - image: docker.io/citizenstig/httpbin
        imagePullPolicy: IfNotPresent
        name: httpbin
        ports:
        - containerPort: 8000
使用如下所示命令直接安装即可:
$ kubectl apply -f <(istioctl kube-inject -f httpbin.yaml)
service/httpbin created
deployment.apps/httpbin created
$ kubectl get pods -l app=httpbin
NAME                       READY   STATUS            RESTARTS   AGE
httpbin-56db79f4f5-b2vp9   2/2     Running           0          8m35s
$ kubectl get svc -l app=httpbin
NAME      TYPE        CLUSTER-IP     EXTERNAL-IP   PORT(S)    AGE
httpbin   ClusterIP   10.106.18.14   <none>        8000/TCP   8m47s
然后接下来创建一个 Gateway,其 servers 字段的端口为 443,设置 credentialName 的值为上面创建的 Secret 对象 httpbin-tls,并将 TLS 模式设置为 SIMPLE。
$ cat <<EOF | kubectl apply -f -
apiVersion: networking.istio.io/v1beta1
kind: Gateway
metadata:
  name: mygateway
spec:
  selector:
    istio: ingressgateway # 使用默认的 ingress gatewaygateway
  servers:
  - port:
      number: 443
      name: https
      protocol: HTTPS
    tls:
      mode: SIMPLE
      credentialName: "httpbin-tls" # 必须使用上面创建的同名的Secret对象
    hosts:
    - "httpbin.example.com"
EOF
这样就成功创建了一个 TLS 的安全网关,接下来为 httpbin 应用配置路由规则,创建一个 VirtualService 对象,如下所示:
$ cat <<EOF | kubectl apply -f -
apiVersion: networking.istio.io/v1beta1
kind: VirtualService
metadata:
  name: httpbin
spec:
  hosts:
  - "httpbin.example.com"
  gateways:
  - mygateway
  http:
  - match:
    - uri:
        prefix: /status
    - uri:
        prefix: /delay
    route:
    - destination:
        port:
          number: 8000
        host: httpbin
EOF
这样我们就可以通过 HTTPS 协议安全的访问 httpbin 应用了,由于我们这里的 Istio Ingressgateway 是通过 NodePort 暴露的服务,所以我们在测试的时候应该使用 443 端口对应的 nodePort 端口:
$ kubectl get svc -n istio-system -l istio=ingressgateway
NAME                   TYPE       CLUSTER-IP       EXTERNAL-IP   PORT(S)                                                                      AGE
istio-ingressgateway   NodePort   10.102.120.128   <none>        15020:31093/TCP,80:32193/TCP,443:30951/TCP,31400:31871/TCP,15443:31367/TCP   46d
从上面可以看出我们的网关安全访问端口是 30951,网关地址是任意的一个节点 IP,我们这里使用 master 节点的地址 k8s.qikqiak.com,当然还要记得将域名 httpbin.example.com 也要解析到网关的节点上,我们可以执行如下所示的命令:
$ curl -v -HHost:httpbin.example.com --cacert example.com.crt https://httpbin.example.com:30951/status/418
*   Trying 123.59.188.12...
* TCP_NODELAY set
* Connected to httpbin.example.com (123.59.188.12) port 30951 (#0)
* ALPN, offering h2
* ALPN, offering http/1.1
* successfully set certificate verify locations:
*   CAfile: example.com.crt
  CApath: none
* TLSv1.2 (OUT), TLS handshake, Client hello (1):
* TLSv1.2 (IN), TLS handshake, Server hello (2):
* TLSv1.2 (IN), TLS handshake, Certificate (11):
* TLSv1.2 (IN), TLS handshake, Server key exchange (12):
* TLSv1.2 (IN), TLS handshake, Server finished (14):
* TLSv1.2 (OUT), TLS handshake, Client key exchange (16):
* TLSv1.2 (OUT), TLS change cipher, Change cipher spec (1):
* TLSv1.2 (OUT), TLS handshake, Finished (20):
* TLSv1.2 (IN), TLS change cipher, Change cipher spec (1):
* TLSv1.2 (IN), TLS handshake, Finished (20):
* SSL connection using TLSv1.2 / ECDHE-RSA-CHACHA20-POLY1305
* ALPN, server accepted to use h2
* Server certificate:
*  subject: CN=httpbin.example.com; O=some organization
*  start date: Jul 25 07:51:14 2020 GMT
*  expire date: Jul 25 07:51:14 2021 GMT
*  common name: httpbin.example.com (matched)
*  issuer: O=example Inc.; CN=example.com
*  SSL certificate verify ok.
* Using HTTP2, server supports multi-use
* Connection state changed (HTTP/2 confirmed)
* Copying HTTP/2 data in stream buffer to connection buffer after upgrade: len=0
* Using Stream ID: 1 (easy handle 0x7feb00008a00)
> GET /status/418 HTTP/2
> Host:httpbin.example.com
> User-Agent: curl/7.64.1
> Accept: */*
>
* Connection state changed (MAX_CONCURRENT_STREAMS == 2147483647)!
< HTTP/2 418
< server: istio-envoy
< date: Sat, 25 Jul 2020 08:46:02 GMT
< access-control-allow-credentials: true
< access-control-allow-origin: *
< x-more-info: http://tools.ietf.org/html/rfc2324
< content-length: 135
< x-envoy-upstream-service-time: 10
<

    -=[ teapot ]=-

       _...._
     .'  _ _ `.
    | ."` ^ `". _,
    \_;`"---"`|//
      |       ;/
      \_     _/
        `"""`
* Connection #0 to host httpbin.example.com left intact
* Closing connection 0
通过上面的信息可以看到输出了正确的结果,通过 -v 参数还可以看到 TLS 握手建立连接的完整过程。
多个主机
上面是将单个主机配置到一个 Ingress Gateway 中,同样我们还可以把多个主机名配置到同一个 Ingress Gateway 上,例如 httpbin.example.com 和 hello.example.com 两个主机名配置到同一个网关上,Ingress Gateway 会为每个 credentialName 获取一个唯一的凭据。
同样先部署 helloworld 示例应用,对应的资源清单文件如下所示:
# helloworld-v1.yaml
apiVersion: v1
kind: Service
metadata:
  name: helloworld-v1
  labels:
    app: helloworld-v1
spec:
  ports:
  - name: http
    port: 5000
  selector:
    app: helloworld-v1
---
apiVersion: apps/v1
kind: Deployment
metadata:
  name: helloworld-v1
spec:
  replicas: 1
  selector:
    matchLabels:
      app: helloworld-v1
      version: v1
  template:
    metadata:
      labels:
        app: helloworld-v1
        version: v1
    spec:
      containers:
      - name: helloworld
        image: istio/examples-helloworld-v1
        resources:
          requests:
            cpu: "100m"
        imagePullPolicy: IfNotPresent #Always
        ports:
        - containerPort: 5000
使用如下所示命令直接安装即可:
$ kubectl apply -f <(istioctl kube-inject -f helloworld-v1.yaml)
service/helloworld-v1 created
deployment.apps/helloworld-v1 created
$ kubectl get pods -l app=helloworld-v1
NAME                       READY   STATUS            RESTARTS   AGE
httpbin-56db79f4f5-b2vp9   2/2     Running           0          8m35s
$ kubectl get svc -l app=helloworld-v1
NAME            TYPE        CLUSTER-IP    EXTERNAL-IP   PORT(S)    AGE
helloworld-v1   ClusterIP   10.104.3.71   <none>        5000/TCP   30s
然后同样使用上面我们创建的根证书来对域名 hello.example.com 进行签名,首先生成证书签名请求:
$ openssl req -out hello.example.com.csr -newkey rsa:2048 -nodes -keyout hello.example.com.key -subj "/CN=hello.example.com/O=some organization"
然后使用上面的证书签名请求来请求签发证书:
$ openssl x509 -req -days 365 -CA example.com.crt -CAkey example.com.key -set_serial 0 -in hello.example.com.csr -out hello.example.com.crt
Signature ok
subject=CN = hello.example.com, O = some organization
Getting CA Private Key
同样使用上面生成的证书和密钥在 istio-system 命名空间下面为 Ingress Gateway 新建一个 Secret 对象:
$ kubectl create secret tls hello-tls --cert=hello.example.com.crt --key=hello.example.com.key -n istio-system
secret/hello-tls created
然后重新定义上面的 Gateway 网关,其中包含了两个 server,都开放了 443 端口。两个 credentialName 字段分别赋值为 httpbin-tls 和 hello-tls,设置 TLS 的 mode 为 SIMPLE 。
$ cat <<EOF | kubectl apply -f -
apiVersion: networking.istio.io/v1beta1
kind: Gateway
metadata:
  name: mygateway
spec:
  selector:
    istio: ingressgateway # 使用 istio 默认的 ingress gateway
  servers:
  - port:
      number: 443
      name: https-httpbin
      protocol: HTTPS
    tls:
      mode: SIMPLE
      credentialName: "httpbin-tls"
    hosts:
    - "httpbin.example.com"
  - port:
      number: 443
      name: https-hello
      protocol: HTTPS
    tls:
      mode: SIMPLE
      credentialName: "hello-tls"
    hosts:
    - "hello.example.com"
EOF
由于上面我们已经为 httpbin 应用配置了路由规则,所以接下来只需要为 helloworld 应用配置流量路由即可:
$ cat <<EOF | kubectl apply -f -
apiVersion: networking.istio.io/v1beta1
kind: VirtualService
metadata:
  name: hello
spec:
  hosts:
  - "hello.example.com"
  gateways:
  - mygateway
  http:
  - match:
    - uri:
        exact: /hello
    route:
    - destination:
        host: helloworld-v1
        port:
          number: 5000
EOF
创建完成后将域名 hello.example.com 解析到网关的地址,然后对其发送 HTTPS 请求:
$ curl -v -HHost:hello.example.com --cacert example.com.crt https://hello.example.com:30951/hello
......
< HTTP/2 200
< content-type: text/html; charset=utf-8
< content-length: 59
< server: istio-envoy
< date: Sat, 25 Jul 2020 08:49:42 GMT
< x-envoy-upstream-service-time: 313
<
......
同样发送 HTTPS 请求到 httpbin.example.com,还是会看到正确的结果:
$ curl -v -HHost:httpbin.example.com --cacert example.com.crt https://httpbin.example.com:30951/status/418
......
< HTTP/2 418
< server: istio-envoy
< date: Sat, 25 Jul 2020 08:50:53 GMT
< access-control-allow-credentials: true
< access-control-allow-origin: *
< x-more-info: http://tools.ietf.org/html/rfc2324
< content-length: 135
< x-envoy-upstream-service-time: 5
<

    -=[ teapot ]=-

       _...._
     .'  _ _ `.
    | ."` ^ `". _,
    \_;`"---"`|//
      |       ;/
      \_     _/
        `"""`
* Connection #0 to host httpbin.example.com left intact
* Closing connection 0
mTLS 认证
在 Istio 中主要有两种类型的认证:
- 对等认证(PeerAuthentication):用于服务到服务的认证,以验证进行连接的客户端,Istio 提供双向 TLS 作为传输认证的解决方案,无需更改服务代码就可以启用它。
- 请求认证(RequestAuthentication):用于最终用户认证,以验证附加到请求的凭据,Istio 使用 JSON Web Token(JWT)验证启用请求级认证。
Istio 中的认证策略范围主要包括如下三个方面:
- 网格
- 命名空间
- 特定服务
此外,Istio 的认证机制支持兼容模式(permissive mode),以帮助我们了解安全策略或者服务迁移。
接下来我们来为服务网格内部的服务开启自动 mTLS(双向TLS认证),实现客户端、服务端都验证双方身份。前面我们已经在 default 命名空间下面部署了 httpbin 应用:
$ kubectl get pods -l app=httpbin
NAME                       READY   STATUS    RESTARTS   AGE
httpbin-68dbf6ccd9-npn6w   2/2     Running   0          11d
$ kubectl get svc -l app=httpbin
NAME      TYPE        CLUSTER-IP     EXTERNAL-IP   PORT(S)    AGE
httpbin   ClusterIP   10.106.18.14   <none>        8000/TCP   11d
现在我们来测试下命名空间范围内的认证,部署 sleep 应用到 mtls 命名空间下面:
$ kubectl create ns mtls
namespace/mtls created
$ kubectl apply -f samples/sleep/sleep.yaml -n mtls
serviceaccount/sleep created
service/sleep created
deployment.apps/sleep created
$ kubectl get pods -n mtls
NAME                    READY   STATUS    RESTARTS   AGE
sleep-f8cbf5b76-kfqzv   1/1     Running   0          95s
当应用部署完成后,以 sleep 应用为客户端来访问 default 命名空间下面的 httpbin 应用,命令如下所示:
$ kubectl exec -it sleep-f8cbf5b76-kfqzv -n mtls -- curl http://httpbin.default:8000/ip
{
  "origin": "127.0.0.1"
}
可以看到能够正常访问,这是因为通信的双方没有任何的 TLS 认证方式,所以默认情况下是可以访问的。然后我们创建一个对等认证的策略:
# mtls-demo.yaml
apiVersion: security.istio.io/v1beta1
kind: PeerAuthentication
metadata:
  name: mtls-demo
  namespace: default  # 去掉namespace就是全局的,加上就是命名空间级别的
spec:
  selector:  # 如果配置了selector,则只会对下面匹配的服务生效(针对特定的服务),如果您没有为 selector 字段提供值,则 Istio 会将策略与策略存储范围内的所有工作负载进行匹配
    matchLabels:
      app: httpbin
  mtls:
    mode: PERMISSIVE  # 兼容模式:可以同时使用明文和加密的方式访问
    # mode: STRICT   # 严格模式:双方必须使用 mTLS 去访问
    # DISABLE:禁用双向 TLS,从安全角度来看,除非您提供自己的安全解决方案,否则请勿使用此模式
里我们创建了一个基于 default 这个命名空间的对等认证策略,通过配置 mode: PERMISSIVE 指定使用兼容模式进行认证,该模式下面可以同时使用明文和加密的方式访问服务,此外还可以通过 labelSelector 去针对特定的服务生效。直接创建上面的资源对象即可:
$ kubectl apply -f mtls-demo.yaml
peerauthentication.security.istio.io/mtls-demo created
这个时候我们重新访问 httpbin 应用可以看到仍然可以访问,因为我们配置的是兼容的宽松模式:
$ kubectl exec -it sleep-f8cbf5b76-kfqzv -n mtls -- curl http://httpbin.default:8000/ip
{
  "origin": "127.0.0.1"
}
接下来我们将上面的 mode 改成严格模式 STRICT,重新更新后,再次访问 httpbin 应用:
$ kubectl exec -it sleep-f8cbf5b76-kfqzv -n mtls -- curl http://httpbin.default:8000/ip
curl: (56) Recv failure: Connection reset by peer
command terminated with exit code 56
可以看到请求失败了,证明我们配置的严格模式生效了。那么正确访问 httpbin 服务的方式是怎样的呢?其实也非常简单,只需要将我们的客户端 sleep 应用加入到网格中来即可:
$ kubectl apply -f <(istioctl kube-inject -f samples/sleep/sleep.yaml) -n mtls
serviceaccount/sleep unchanged
service/sleep unchanged
deployment.apps/sleep configured
$ kubectl get pods -n mtls
NAME                     READY   STATUS     RESTARTS   AGE
sleep-776fd7c979-jvpbt   2/2     Running    0          15s
$ kubectl exec -it sleep-776fd7c979-jvpbt -c sleep -n mtls -- curl http://httpbin.default:8000/ip
{
  "origin": "127.0.0.1"
}
我们只是在网格中创建了一个对等认证策略的资源对象,就完成了 mTLS 认证,这是因为 Istio 已经实现了自动的 mTLS,会帮我们自动完成证书和密钥的管理,直接注入即可。
基于 JWT 的认证和授权
JWT(JSON Web Token)是一种多方传递可信 JSON 数据的方案,一个 JWT token 由.分隔的三部分组成:{Header}.{Payload}.{Signature},其中 Header 是 Base64 编码的 JSON 数据,包含令牌类型、签名算法以及秘钥 ID 等信息;Payload 是需要传递的 claims 数据,也是 Base64 编码的 JSON 数据,其中有些字段是 JWT 标准已有的字段如:exp、iat、iss、sub 等,也可以根据需求添加自定义字段;Signature 是对前两部分的签名,防止数据被篡改,以此确保 token 信息是可信的。

Istio 中验签所需公钥由 RequestAuthentication 请求认证资源的 jwks 配置提供。JWT 授权则是对终端用户的访问控制,比如某个内部服务需要管理员才能够访问,这时候就需要验证终端用户的角色是否为管理员,可以在 JWT claims 中带有管理员角色信息,然后在授权策略中对该角色进行授权。
要使用 JWT 授权的当然就需要有效的 JWT 终端身份认证,所以在使用 JWT 授权前首先要为服务添加终端身份认证即 RequestAuthentication。
Request 认证策略指定验证 JWT 所需的值,这些值包括:
- token 在请求中的位置
- 请求的 issuer
- 公共 JSON Web Key Set(JWKS)
Istio 会根据 request 认证策略中的规则检查提供的令牌(如果已提供),并拒绝令牌无效的请求。当请求不带有令牌时,默认情况下将接受它们。要拒绝没有令牌的请求,请提供授权规则。
现在我们来验证基于 JWT 的认证功能,同样使用 sleep 和 httpbin 应用为例,将 sleep 部署到名为 jwtest 的命名空间:
$ kubectl create ns jwtest
namespace/jwtest created
$ kubectl apply -f <(istioctl kube-inject -f samples/sleep/sleep.yaml) -n jwtest
serviceaccount/sleep created
service/sleep created
deployment.apps/sleep created
$ kubectl get pods -n jwtest
NAME                     READY   STATUS    RESTARTS   AGE
sleep-776fd7c979-7jrv2   2/2     Running   0          76s
现在默认情况下我们是可以正常访问 httpbin 应用的:
$ kubectl exec -it sleep-776fd7c979-7jrv2 -c sleep -n jwtest -- curl http://httpbin.default:8000/ip
{
  "origin": "127.0.0.1"
}
然后我们创建一个如下所示的请求认证对象:
# jwt-demo.yaml
apiVersion: security.istio.io/v1beta1
kind: RequestAuthentication  # 请求认证
metadata:
  name: jwt-demo
  namespace: default
spec:
  selector:  # 针对特定的服务
    matchLabels:
      app: httpbin
  jwtRules:
  - issuer: "testing@secure.istio.io"
    jwksUri: "https://raw.githubusercontent.com/istio/istio/release-1.6/security/tools/jwt/samples/jwks.json"
    # jwks
    # fromHeaders
    # fromParams
其中最重要的就是 jwtRules 属性下面的配置,我们这里通过 jwksUri 来指定所需的认证信息,直接创建:
$ kubectl apply -f jwt-demo.yaml
requestauthentication.security.istio.io/jwt-demo created
这个请求认证策略使得 httpbin 应用接收 Issuer 为 testing@secure.istio.io 的 JWT 令牌。比如我们通过一个无效的 Token 来访问应用:
$ kubectl exec -it sleep-776fd7c979-7jrv2 -c sleep -n jwtest -- curl http://httpbin.default:8000/headers -s -o /dev/null -H "Authorization: Bearer invalidToken" -w "%{http_code}\n"
401
因为我们指定了 Token,所以就需要使用我们配置的 JWT Token 来进行认证。如果我们不带上 Token,则可以正常访问,这是因为我们并没有配置任何授权策略:
$ kubectl exec -it sleep-776fd7c979-7jrv2 -c sleep -n jwtest -- curl http://httpbin.default:8000/headers -s -o /dev/null -w "%{http_code}\n"
200
接下来我们针对 httpbin 应用配置一个授权策略,要求所有发往 httpbin 应用的请求都要包含一个将 requestPrincipal 设置为 testing@secure.istio.io/testing@secure.istio.io 的有效 JWT。
apiVersion: security.istio.io/v1beta1
kind: AuthorizationPolicy  # 授权策略
metadata:
  name: auth-policy-demo
  namespace: default
spec:
  selector:
    matchLabels:
      app: httpbin
  action: ALLOW  # ALLOW、DENY
  rules:
  - from:
    - source:
        requestPrincipals: ["testing@secure.istio.io/testing@secure.istio.io"]
Istio 会使用 / 连接 JWT 的 iss 和 sub 来组成 requestPrincipal 字段,比如我这里的 iss 和 sub 都为 testing@secure.istio.io,这样 Istio 生成的 requestPrincipal 属性值为 testing@secure.istio.io/testing@secure.istio.io,我们可以通过如下命令获取测试的 Token 以及 JSON 信息:
$ JWT_JSON=$(curl https://raw.githubusercontent.com/istio/istio/release-1.6/security/tools/jwt/samples/demo.jwt -s) && echo $JWT_JSON | cut -d '.' -f2 - | base64 --decode -
{"exp":4685989700,"foo":"bar","iat":1532389700,"iss":"testing@secure.istio.io","sub":"testing@secure.istio.io"}
$ TOKEN=$(curl https://raw.githubusercontent.com/istio/istio/release-1.6/security/tools/jwt/samples/demo.jwt -s)
直接创建上面的认证策略:
$ kubectl apply -f auth-policy-demo.yaml
authorizationpolicy.security.istio.io/auth-policy-demo created
创建完成后我们使用上面的有效的 TOKEN 来访问 httpbin 应用:
$ kubectl exec -it sleep-776fd7c979-7jrv2 -c sleep -n jwtest -- curl "http://httpbin.default:8000/headers" -s -o /dev/null -H "Authorization: Bearer $TOKEN" -w "%{http_code}\n"
200
可以看到可以正常访问,我们重新使用没有 JWT Token 的 Header 来请求 httpbin 应用:
istio-1.6.1]# kubectl exec -it sleep-776fd7c979-7jrv2 -c sleep -n jwtest -- curl "http://httpbin.default:8000/headers" -s -o /dev/null -w "%{http_code}\n"
403
可以看到是 403 错误,这是因为当前的请求不符合上面我们配置的授权策略。关于安全相关的更多信息或者资源对象属性字段可以查看官方文档:https://istio.io/latest/zh/docs/concepts/security/。