本文流程
1.Texturing基础
2.装载Texturing和mipmapping
3.纹理过滤和包装
4.Texture level-of-detail, swizzles, and depth comparison
3D 图像渲染最基础的操作是使用纹理,它经典应用是坐标系应用在图像的表面,
2D Textures
一个2D纹理是在OpenGL ES 应用中最基础和普遍的。它的坐标系是作(s, t),有时也写作(u,v),纹理的左下角在st坐标系中定义为(0.0,0.0).右上角定义为(1.0,1.0).超过[0.0, 1.0]的坐标也是允许的,

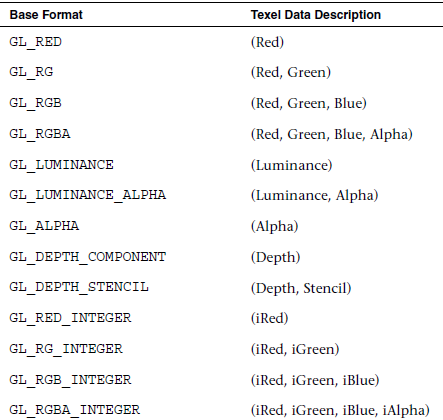
纹理的基本格式见下图
3D Textures
可以被认为是多个2DTexture

纹理对象和加载纹理
纹理应用第一步是创建一个纹理对象。纹理对象是一个包含着图片数据、过滤模型、包装模型等用于渲染的数据的容器。纹理对象是一个无符号整型(GLuint)的句柄。使用void glGenTextures(GLsizei n, GLuint *textures)来创建


第二步将一个纹理对象绑定为当前纹理对象。

第三步装载图像数据


// Texture object handle
GLuint textureId;
// 2 x 2 Image, 3 bytes per pixel (R, G, B)
GLubyte pixels[4 * 3] =
{
  255, 0, 0, // Red
  0, 255, 0, // Green
  0, 0, 255, // Blue
  255, 255, 0 // Yellow
};
// Use tightly packed data
glPixelStorei(GL_UNPACK_ALIGNMENT, 1);
// Generate a texture object
glGenTextures(1, &textureId);
// Bind the texture object
glBindTexture(GL_TEXTURE_2D, textureId);
// Load the texture
glTexImage2D(GL_TEXTURE_2D, 0, GL_RGB, 2, 2, 0, GL_RGB,
        GL_UNSIGNED_BYTE, pixels);
// Set the filtering mode
glTexParameteri(GL_TEXTURE_2D, GL_TEXTURE_MIN_FILTER,
          GL_NEAREST);
glTexParameteri(GL_TEXTURE_2D, GL_TEXTURE_MAG_FILTER,
          GL_NEAREST);
