SpringBoot理念就是零配置编程,但是如果绝对需要使用XML的配置,我们建议您仍旧从一个@Configuration类开始,你可以使用@ImportResouce注解加载XML配置文件,我拿一个例子来进行讲解:
这个例子的大体步骤如下:
(1)新建一个工程;
(2)在App.Java类编写HelloService2;
(3)在App.java类无法扫描的包下编写HelloService;
(4)编写application-bean.xml注入HelloService;
(5)编写ConfigClass注入配置文件application-bean.xml;
(6)编写App.java启动类进行测试;
(7)其它说明
(1)新建一个工程;
参照我前面的例子
(2)在App.java类包路径下编写TestService;
首先我们这里有几个包:me.shijunjie,com.test,我们这里打算把App.java启动类放到me.shijunjie中,根据Spring Boot扫描(根包到子包的原则),我们把TestService写在Spring Boot可以扫描的位置, TestService2写在Spring Boot无法扫描到的位置,那么我们使用配置文件bean的方式进行引入,具体代码如下:
package me.shijunjie.service;

import org.springframework.stereotype.Service;

@Service
public class TestService {

    public TestService() {
        System.out.println("me.shijunjie.service");
        System.out.println("TestService");
    }

}
(3)在App.java类无法扫描的包下编写TestService2;
注意这个类是写在Spring Boot无法自动扫描的位置,正常启动之后,如果引入TestService2的话肯定会报异常的,因为它根本没有被注入成功,具体代码如下:
package com.test.service;

import org.springframework.stereotype.Service;

@Service
public class TestService2 {

    public TestService2() {
        System.out.println("com.test.service");
        System.out.println("TestService2");
    }

}
(4)编写application-bean.xml注入TestService2;
在src/main/resouces下编写配置文件application-bean.xml文件:
<?xml version="1.0" encoding="UTF-8"?>
<beans xmlns="http://www.springframework.org/schema/beans"
    xmlns:xsi="http://www.w3.org/2001/XMLSchema-instance" xmlns:mvc="http://www.springframework.org/schema/mvc"
    xmlns:p="http://www.springframework.org/schema/p" xmlns:context="http://www.springframework.org/schema/context"
    xmlns:aop="http://www.springframework.org/schema/aop" xmlns:tx="http://www.springframework.org/schema/tx"
    xsi:schemaLocation="http://www.springframework.org/schema/beans
            http://www.springframework.org/schema/beans/spring-beans-3.0.xsd
            http://www.springframework.org/schema/context
            http://www.springframework.org/schema/context/spring-context-3.0.xsd
            http://www.springframework.org/schema/aop
            http://www.springframework.org/schema/aop/spring-aop-3.0.xsd
            http://www.springframework.org/schema/tx
            http://www.springframework.org/schema/tx/spring-tx-3.0.xsd
            http://www.springframework.org/schema/mvc
            http://www.springframework.org/schema/mvc/spring-mvc-3.0.xsd
            http://www.springframework.org/schema/context
            http://www.springframework.org/schema/context/spring-context-3.0.xsd">

       <bean id="testService2" class="com.test.service.TestService2"></bean>
</beans>
(5)编写ConfigClass注入配置文件application-bean.xml;
在me.shijunjie.config包下编写类ConfigClass,这个确保能被Spring Boot可以扫描到,不然一切都付之东流了,具体代码如下:
package me.shijunjie.config;

import org.springframework.context.annotation.Configuration;
import org.springframework.context.annotation.ImportResource;

@Configuration
@ImportResource(locations={"classpath:application-bean.xml"})
public class ConfigClass {

}
(6)编写App.java启动类进行测试;
这个类Spring Boot正常的启动代码:
package me.shijunjie;

import org.springframework.boot.SpringApplication;
import org.springframework.boot.autoconfigure.SpringBootApplication;

@SpringBootApplication
public class App
{
    public static void main( String[] args )
    {
       SpringApplication.run(App.class, args);
    }
}
在App.java 右键 Run As Java Application观察控制台输出可以看到:
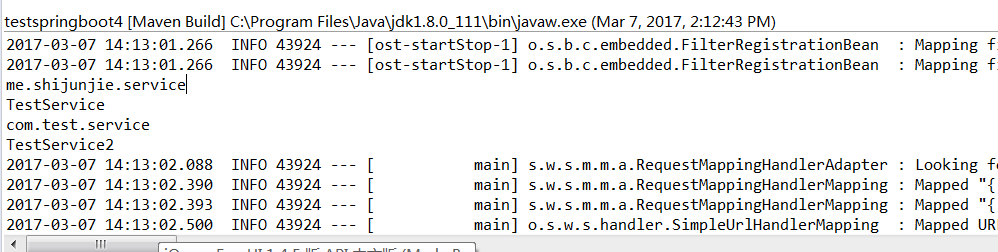
(7)其它说明
ImportResouce有两种常用的引入方式:classpath和file,具体查看如下的例子:
classpath路径:locations={"classpath:application-bean1.xml","classpath:application-bean2.xml"}
file路径:locations= {"file:d:/test/application-bean1.xml"};