1.1.1 摘要
在博文《Ember.js实现单页面应用程序》中,我们介绍了使用Ember JS实现一个单页应用程序 (SPA),这使我想起了几年前写过一个任务管理程序,通过选择日期,然后编辑时间来增加任务信息。
当时,我们是使用ASP.NET和jQuery实现了任务管理程序的,通过ajax调用ASP.NET的Webservice方法来访问数据库。
今天,我们将通过任务管理程序的实现,来介绍使用ASP.NET Web API和Knockout JS的结合使用,想必许多人都有使用过任务管理程序,其中我觉得Google日历是一个不错的任务管理器
图1 Google日历
目录
1.1.2 正文
通过图1Google日历,我们发现它使用一个Date Picker,让用户选择编辑的日期、还有一个24小时的表格,当用户点击表上的一个时间区域就显示一个弹出式窗口,让用户编辑任务的内容,现在大概了解了基本的界面设计了,接下来我们将通过ASP.NET Web API作为服务端,开放API让Knockout JS调用接口获取数据。
创建ASP.NET MVC 项目
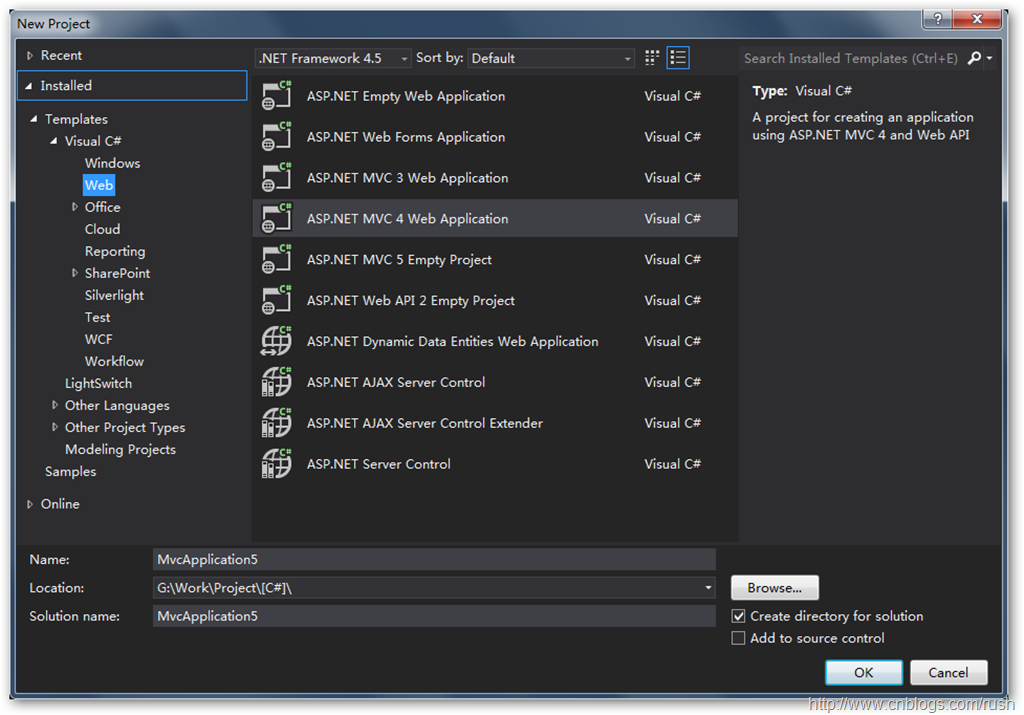
首先,我们在VS2012中创建一个ASP.NET MVC 4 Web项目。
然后,我们打开Package Manager Console,添加Package引用,要使用的库如下:
- PM> install-package jQuery
- PM> install-package KnockoutJS
- PM> install-package Microsoft.AspNet.Web.Optimization
- PM> update-package Micrsoft.AspNet.WebApi
- PM> install-package EntityFramework
图2 ASP.NET MVC 4 Web Application
创建数据表
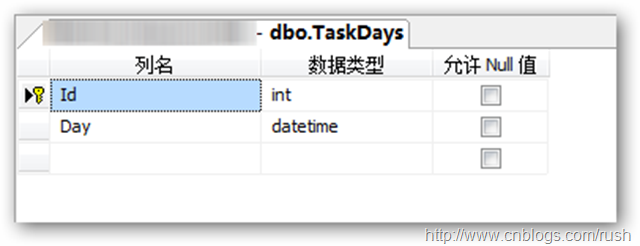
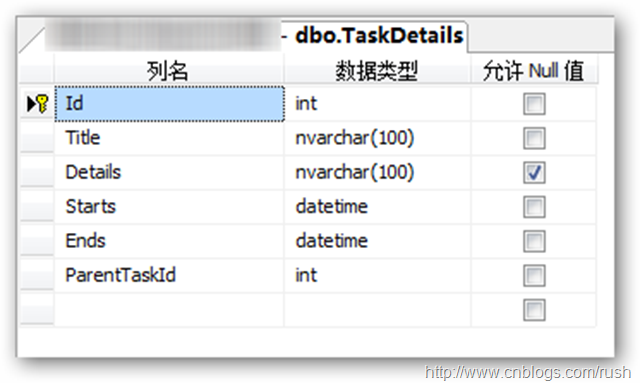
接着,我们在数据库中添加表TaskDays和TaskDetails,TaskDays保存所有任务的日期,那么一个日期只有一行记录保存该表中,它包含了Id(自增)和Day字段,TaskDetails保存不同时间短任务信息,它包含Id(自增)、Title、Details、Starts、Ends和ParentTaskId等字段,其中ParentTaskId保存任务的日期的Id值。
图3 表TaskDays和TaskDetails
数据传输对象
前面,我们已经定义了数据表TaskDays和TaskDetails并且通过ParentTaskId建立了表之间的关系,接下来,我们将根表定义数据传输对象,具体定义如下:
    /// <summary>
    /// Defines a DTO TaskCalendar.
    /// </summary>
    public class TaskDay
    {
        public TaskDay()
        {
            Tasks = new List<TaskDetail>();
        }
        public int Id { get; set; }
        public DateTime Day { get; set; }
        public List<TaskDetail> Tasks { get; set; }
    }


    /// <summary>
    /// Defines a DTO TaskDetail.
    /// </summary>
    public class TaskDetail
    {
        public int Id { get; set; }
        public string Title { get; set; }
        public string Details { get; set; }
        public DateTime Starts { get; set; }
        public DateTime Ends { get; set; }

        [ForeignKey("ParentTaskId")]
        [ScriptIgnore]
        public TaskDay ParentTask { get; set; }
        public int ParentTaskId { get; set; }
    }
上面,我们定义了数据传输对象TaskDays和TaskDetails,在TaskDays类中,我们定义了一个List<TaskDetail>类型的字段并且在构造函数中实例化该字段,通过保持TaskDetail类型的强对象引用,从而建立起TaskDays和TaskDetails之间的聚合关系,也就是TaskDay和TaskDetails是一对多的关系。
创建控制器
这里我们的ASP.NET MVC程序作为服务端向客户端开放API接口,所以我们创建控制器CalendarController并且提供数据库操作方法,具体实现如下:
    /// <summary>
    /// The server api controller.
    /// </summary>
    public class CalendarController : ApiController
    {

        /// <summary>
        /// Gets the task details.
        /// </summary>
        /// <param name="id">The identifier.</param>
        /// <returns>A list of task detail.</returns>
        /// /api/Calendar/GetTaskDetails?id
        [HttpGet]
        public List<TaskDetail> GetTaskDetails(DateTime id)
        {

        }

        /// <summary>
        /// Saves the task.
        /// </summary>
        /// <param name="taskDetail">The task detail.</param>
        /// <returns></returns>
        /// /api/Calendar/SaveTask?taskDetail
        [HttpPost]
        public bool SaveTask(TaskDetail taskDetail)
        {
        }

        /// <summary>
        /// Deletes the task.
        /// </summary>
        /// <param name="id">The identifier.</param>
        /// <returns></returns>
        /// /api/Calendar/DeleteTask?id
        [HttpDelete]
        public bool DeleteTask(int id)
        {

        }
    }
在控制器CalendarController中我们定义了三个方法分别是SaveTask()、DeleteTask()和GetTaskDetails(),想必大家一看都知道这三个方法的作用,没错就是传统的增删查API,但我们这里并没有给出具体数据库操作代码,因为我们将使用Entity Framework替代传统ADO.NET操作。
Entity Framework数据库操作
接下来,我们定义类TaskDayRepository和TaskDetailRepository,它们使用Entity Framework对数据库进行操作,具体定义如下:
    /// <summary>
    /// Task day repository
    /// </summary>
    public class TaskDayRepository : ITaskDayRepository
    {
        readonly TaskCalendarContext _context = new TaskCalendarContext();

        /// <summary>
        /// Gets all tasks.
        /// </summary>
        public IQueryable<TaskDay> All
        {
            get { return _context.TaskDays.Include("Tasks"); }
        }

        /// <summary>
        /// Alls the including tasks.
        /// </summary>
        /// <param name="includeProperties">The include properties.</param>
        /// <returns></returns>
        public IQueryable<TaskDay> AllIncluding(params Expression<Func<TaskDay, object>>[] includeProperties)
        {
            IQueryable<TaskDay> query = _context.TaskDays;
            foreach (var includeProperty in includeProperties)
            {
                query = query.Include(includeProperty);
            }
            return query;
        }

        /// <summary>
        /// Finds the specified identifier.
        /// </summary>
        /// <param name="id">The identifier.</param>
        /// <returns></returns>
        public TaskDay Find(int id)
        {
            return _context.TaskDays.Find(id);
        }

        /// <summary>
        /// Inserts the or update.
        /// </summary>
        /// <param name="taskday">The taskday.</param>
        public void InsertOrUpdate(TaskDay taskday)
        {
            if (taskday.Id == default(int))
            {
                _context.TaskDays.Add(taskday);
            }
            else
            {
                _context.Entry(taskday).State = EntityState.Modified;
            }
        }

        /// <summary>
        /// Saves this instance.
        /// </summary>
        public void Save()
        {
            _context.SaveChanges();
        }

        /// <summary>
        /// Deletes the specified identifier.
        /// </summary>
        /// <param name="id">The identifier.</param>
        public void Delete(int id)
        {
            var taskDay = _context.TaskDays.Find(id);
            _context.TaskDays.Remove(taskDay);
        }

        public void Dispose()
        {
            _context.Dispose();
        }
    }

    public interface ITaskDayRepository : IDisposable
    {
        IQueryable<TaskDay> All { get; }
        IQueryable<TaskDay> AllIncluding(params Expression<Func<TaskDay, object>>[] includeProperties);
        TaskDay Find(int id);
        void InsertOrUpdate(TaskDay taskday);
        void Delete(int id);
        void Save();
    }
上面,我们定义类TaskDayRepository,它包含具体的数据库操作方法:Save()、Delete()和Find(),TaskDetailRepository的实现和TaskDayRepository基本相似,所以我们很快就可以使用TaskDetailRepository,具体定义如下:
/// <summary>
/// Task detail repository
/// </summary>
public class TaskDetailRepository : ITaskDetailRepository
{
    readonly TaskCalendarContext _context = new TaskCalendarContext();

    /// <summary>
    /// Gets all.
    /// </summary>
    public IQueryable<TaskDetail> All
    {
        get { return _context.TaskDetails; }
    }

    /// <summary>
    /// Alls the including task details.
    /// </summary>
    /// <param name="includeProperties">The include properties.</param>
    /// <returns></returns>
    public IQueryable<TaskDetail> AllIncluding(params Expression<Func<TaskDetail, object>>[] includeProperties)
    {
        IQueryable<TaskDetail> query = _context.TaskDetails;
        foreach (var includeProperty in includeProperties)
        {
            query = query.Include(includeProperty);
        }
        return query;
    }

    /// <summary>
    /// Finds the specified identifier.
    /// </summary>
    /// <param name="id">The identifier.</param>
    /// <returns></returns>
    public TaskDetail Find(int id)
    {
        return _context.TaskDetails.Find(id);
    }

    /// <summary>
    /// Saves this instance.
    /// </summary>
    public void Save()
    {
        _context.SaveChanges();
    }

    /// <summary>
    /// Inserts the or update.
    /// </summary>
    /// <param name="taskdetail">The taskdetail.</param>
    public void InsertOrUpdate(TaskDetail taskdetail)
    {
        if (default(int) == taskdetail.Id)
        {
            _context.TaskDetails.Add(taskdetail);
        }
        else
        {
            _context.Entry(taskdetail).State = EntityState.Modified;
        }
    }

    /// <summary>
    /// Deletes the specified identifier.
    /// </summary>
    /// <param name="id">The identifier.</param>
    public void Delete(int id)
    {
        var taskDetail = _context.TaskDetails.Find(id);
        _context.TaskDetails.Remove(taskDetail);
    }

    public void Dispose()
    {
        _context.Dispose();
    }
}

public interface ITaskDetailRepository : IDisposable
{
    IQueryable<TaskDetail> All { get; }
    IQueryable<TaskDetail> AllIncluding(params Expression<Func<TaskDetail, object>>[] includeProperties);
    TaskDetail Find(int id);
    void InsertOrUpdate(TaskDetail taskdetail);
    void Delete(int id);
    void Save();
}
上面我们通过Entity Framework实现了数据的操作,接下来,让我们控制器CalendarController的API的方法吧!
    /// <summary>
    /// The server api controller.
    /// </summary>
    public class CalendarController : ApiController
    {
        readonly ITaskDayRepository _taskDayRepository = new TaskDayRepository();
        readonly TaskDetailRepository _taskDetailRepository = new TaskDetailRepository();

        /// <summary>
        /// Gets the task details.
        /// </summary>
        /// <param name="id">The identifier.</param>
        /// <returns>A list of task detail.</returns>
        /// /api/Calendar/GetTaskDetails?id
        [HttpGet]
        public List<TaskDetail> GetTaskDetails(DateTime id)
        {
            var taskDay = _taskDayRepository.All.FirstOrDefault<TaskDay>(_ => _.Day == id);
            return taskDay != null ? taskDay.Tasks : new List<TaskDetail>();
        }

        /// <summary>
        /// Saves the task.
        /// </summary>
        /// <param name="taskDetail">The task detail.</param>
        /// <returns></returns>
        /// /api/Calendar/SaveTask?taskDetail
        [HttpPost]
        public bool SaveTask(TaskDetail taskDetail)
        {
            var targetDay = new DateTime(
                taskDetail.Starts.Year,
                taskDetail.Starts.Month,
                taskDetail.Starts.Day);

            // Check new task or not.
            var day = _taskDayRepository.All.FirstOrDefault<TaskDay>(_ => _.Day == targetDay);

            if (null == day)
            {
                day = new TaskDay
                    {
                        Day = targetDay,
                        Tasks = new List<TaskDetail>()
                    };
                _taskDayRepository.InsertOrUpdate(day);
                _taskDayRepository.Save();
                taskDetail.ParentTaskId = day.Id;
            }
            else
            {
                taskDetail.ParentTaskId = day.Id;
                taskDetail.ParentTask = null;
            }
            _taskDetailRepository.InsertOrUpdate(taskDetail);
            _taskDetailRepository.Save();
            return true;
        }

        /// <summary>
        /// Deletes the task.
        /// </summary>
        /// <param name="id">The identifier.</param>
        /// <returns></returns>
        /// /api/Calendar/DeleteTask?id
        [HttpDelete]
        public bool DeleteTask(int id)
        {
            try
            {
                _taskDetailRepository.Delete(id);
                _taskDetailRepository.Save();
                return true;
            }
            catch (Exception)
            {
                return false;
            }

        }
    }
Knockout JS
上面,我们通过APS.NET MVC实现了服务端,接下来,我们通过Knockout JS实现客户端访问服务端,首先,我们在Script文件中创建day-calendar.js和day-calendar.knockout.bindinghandlers.js文件。
// The viem model type.
var ViewModel = function () {
    var $this = this,
        d = new Date();

    // Defines observable object, when the selectedDate value changed, will
    // change data bind in the view.
    $this.selectedDate = ko.observable(new Date(d.getFullYear(), d.getMonth(), d.getDate()));
    $this.selectedTaskDetails = ko.observable(new TaskDetails(d));

    // A serial of observable object observableArray.
    $this.dateDetails = ko.observableArray();
    $this.appointments = ko.observableArray();


    // Init date details list.
    $this.initializeDateDetails = function () {
        $this.dateDetails.removeAll();
        for (var i = 0; i < 24; i++) {
            var dt = $this.selectedDate();
            $this.dateDetails.push({
                count: i,
                TaskDetails: new GetTaskHolder(i, dt)
            });
        }
    };

    // Call api to get task details.
    $this.getTaskDetails = function (date) {
        var dt = new Date(date.getFullYear(), date.getMonth(), date.getDate()),
            uri = "/api/Calendar/GetTaskDetails";

        // Deprecation Notice: The jqXHR.success(), jqXHR.error(), and jqXHR.complete() callbacks are deprecated as of jQuery 1.8.
        // To prepare your code for their eventual removal, use jqXHR.done(), jqXHR.fail(), and jqXHR.always() instead.
        // Reference: https://api.jquery.com/jQuery.ajax/
        $.get(uri, 'id=' + dt.getFullYear() + '-' + (dt.getMonth() + 1) + '-' + dt.getDate()
        ).done(function(data) {
            $this.appointments.removeAll();
            $(data).each(function(i, item) {
                $this.appointments.push(new Appointment(item, i));
            });
        }).error(function(data) {
            alert("Failed to retrieve tasks from server.");
        });
    };
};
上面,我们定义了ViewModel类型,并且在其中定义了一系列的方法。
- selectedDate:获取用户在日历控件中选择的日期。
- selectedTaskDetails:获取用户选择中TaskDetail对象。
- dateDetails:定义监控数组,它保存了24个时间对象。
- appointments:定义监控数组保存每个TaskDetail对象。
接下来,需要获取用户点击日历控件的操作,我们通过方法ko.bindingHandlers()自定义事件处理方法,具体定义如下:
// Binding event handler with date picker.
ko.bindingHandlers.datepicker = {
    init: function (element, valueAccessor, allBindingsAccessor) {

        // initialize datepicker with some optional options
        var options = allBindingsAccessor().datepickerOptions || {};
        $(element).datepicker(options);

        // when a user changes the date, update the view model
        ko.utils.registerEventHandler(element, "changeDate", function (event) {
            var value = valueAccessor();

            // Determine if an object property is ko.observable
            if (ko.isObservable(value)) {
                value(event.date);
            }
        });
    },
    update: function (element, valueAccessor) {
        var widget = $(element).data("datepicker");
        //when the view model is updated, update the widget
        if (widget) {
            widget.date = ko.utils.unwrapObservable(valueAccessor());
            widget.setValue();
        }
    }

};
上面,我们定义了日历控件的事件处理方法,当用户选择日历中的日期时,我们获取当前选择的日期绑定到界面上,具体定义如下:
<!-- Selected time control -->
<input id="selectStartDate" data-bind="datepicker: Starts" type="text" class="span12" />
上面,我们在Html元素中绑定了datepicker事件处理方法并且把Starts值显示到input元素中。
图4 日历控件
接下来,我们定义Time picker事件处理方法,当用户时间时获取当前选择的时间绑定到界面上,具体定义如下:
// Binding event handler with time picker.
ko.bindingHandlers.timepicker = {
    init: function (element, valueAccessor, allBindingsAccessor) {
        //initialize timepicker
        var options = $(element).timepicker();

        //when a user changes the date, update the view model
        ko.utils.registerEventHandler(element, "changeTime.timepicker", function (event) {
            var value = valueAccessor();
            if (ko.isObservable(value)) {
                value(event.time.value);
            }
        });
    },
    update: function (element, valueAccessor) {
        var widget = $(element).data("timepicker");
        //when the view model is updated, update the widget
        if (widget) {
            var time = ko.utils.unwrapObservable(valueAccessor());
            widget.setTime(time);
        }
    }
};
同样,我们把时间值绑定页面元素中,具体定义如下:
<!-- Time picker value-->
<input id="selectStartTime" data-bind="timepicker: StartTime" class="span8" type="text" />
现在,我们已经实现获取用户的输入,接下来需要把用户输入的任务信息数据保存到数据库中,那么我们将通过$.ajax()方法调用API接口,首先我们在day-calendar.js文件中定义类型TaskDetails,具体定义如下:
// TaskDetails type.
var TaskDetails = function (date) {
    var $this = this;
    $this.Id = ko.observable();
    $this.ParentTask = ko.observable();
    $this.Title = ko.observable("New Task");
    $this.Details = ko.observable();
    $this.Starts = ko.observable(new Date(new Date(date).setMinutes(0)));
    $this.Ends = ko.observable(new Date(new Date(date).setMinutes(59)));

    // Gets start time when starts changed.
    $this.StartTime = ko.computed({
        read: function () {
            return $this.Starts().toLocaleTimeString("en-US");
        },
        write: function (value) {
            if (value) {
                var dt = new Date($this.Starts().toDateString() + " " + value);
                $this.Starts(new Date($this.Starts().getFullYear(), $this.Starts().getMonth(), $this.Starts().getDate(), dt.getHours(), dt.getMinutes()));
            }
        }
    });

    // Gets end time when ends changed.
    $this.EndTime = ko.computed({
        read: function () {
            return $this.Ends().toLocaleTimeString("en-US");
        },
        write: function (value) {
            if (value) {
                var dt = new Date($this.Ends().toDateString() + " " + value);
                $this.Ends(new Date($this.Ends().getFullYear(), $this.Ends().getMonth(), $this.Ends().getDate(), dt.getHours(), dt.getMinutes()));
            }
        }
    });

    $this.btnVisibility = ko.computed(function () {
        if ($this.Id() > 0) {
            return "visible";
        }
        else {
            return "hidden";
        }
    });

    $this.Save = function (data) {

        // http://knockoutjs.com/documentation/plugins-mapping.html
        var taskDetails = ko.mapping.toJS(data);
        taskDetails.Starts = taskDetails.Starts.toDateString();
        taskDetails.Ends = taskDetails.Ends.toDateString();
        $.ajax({
            url: "/api/Calendar/SaveTask",
            type: "POST",
            contentType: "text/json",
            data: JSON.stringify(taskDetails)

        }).done(function () {
            $("#currentTaskModal").modal("toggle");
            vm.getTaskDetails(vm.selectedDate());
        }).error(function () {
            alert("Failed to Save Task");
        });
    };

    $this.Delete = function (data) {
        $.ajax({
            url: "/api/Calendar/" + data.Id(),
            type: "DELETE",

        }).done(function () {
            $("#currentTaskModal").modal("toggle");
            vm.getTaskDetails(vm.selectedDate());
        }).error(function () {
            alert("Failed to Delete Task");
        });
    };

    $this.Cancel = function (data) {
        $("#currentTaskModal").modal("toggle");
    };
};
我们在TaskDetails类型中定义方法Save()和Delete(),我们看到Save()方法通过$.ajax()调用接口“/api/Calendar/SaveTask” 保存数据,这里要注意的是我们把TaskDetails对象序列化成JSON格式数据,然后调用SaveTask()保存数据。
现在,我们已经实现了页面绑定用户的输入,然后由Knockout JS访问Web API接口,对数据库进行操作;接着需要对程序界面进行调整,我们在项目中添加bootstrap-responsive.css和bootstrap.css文件引用,接下来,我们在的BundleConfig中指定需要加载的Javascript和CSS文件,具体定义如下:
    /// <summary>
    /// Compress JS and CSS file.
    /// </summary>
    public class BundleConfig
    {
        /// <summary>
        /// Registers the bundles.
        /// </summary>
        /// <param name="bundles">The bundles.</param>
        public static void RegisterBundles(BundleCollection bundles)
        {
            bundles.Add(new ScriptBundle("~/bundles/jquery").Include(
            "~/Scripts/jquery-{version}.js"));

            bundles.Add(new ScriptBundle("~/bundles/bootstrap").Include(
                        "~/Scripts/bootstrap.js",
                        "~/Scripts/html5shiv.js"));

            bundles.Add(new ScriptBundle("~/bundles/jqueryval").Include(
                        "~/Scripts/jquery.unobtrusive*",
                        "~/Scripts/jquery.validate*"));

            bundles.Add(new ScriptBundle("~/bundles/knockout").Include(
                        "~/Scripts/knockout-{version}.js"));

            bundles.Add(new StyleBundle("~/Styles/bootstrap/css").Include(
                "~/Content/bootstrap-responsive.css",
                "~/Content/bootstrap.css"));

            bundles.Add(new ScriptBundle("~/bundles/jquerydate").Include(
                        "~/Scripts/datepicker/bootstrap-datepicker.js",
                        //"~/Scripts/datepicker/locales/bootstrap-datepicker.zh-CN.js",
                        "~/Scripts/timepicker/bootstrap-timepicker.min.js",
                        "~/Scripts/moment.js"));

            bundles.Add(new ScriptBundle("~/bundles/app").Include(
                       "~/Scripts/app/day-calendar*"));

            bundles.Add(new StyleBundle("~/Styles/jquerydate").Include(
                "~/Content/datepicker/datepicker.css",
                "~/Content/timepicker/bootstrap-timepicker.css"));
        }
    }
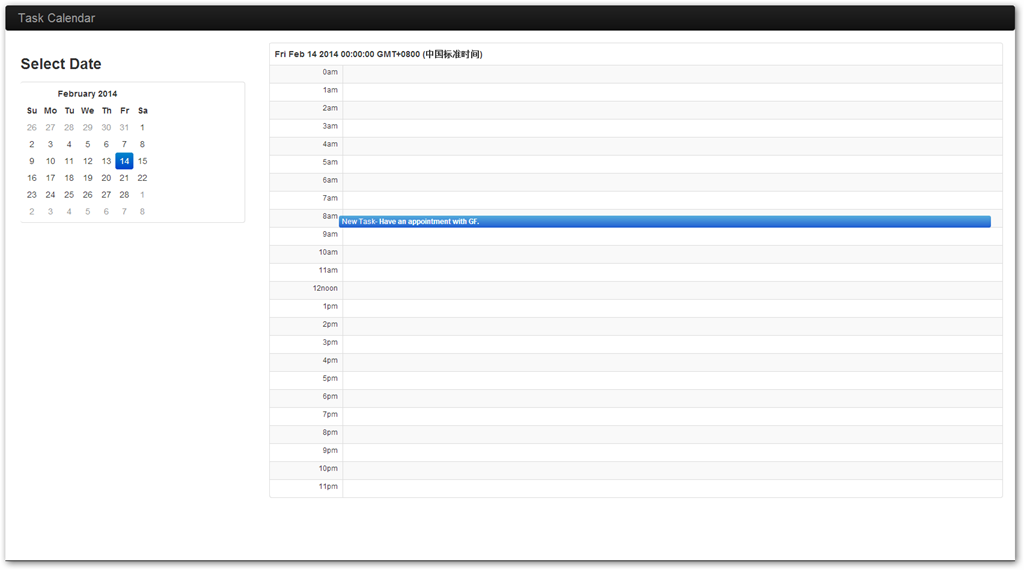
图5 任务管理器Demo
1.1.3 总结
我们通过一个任务管理程序的实现介绍了Knockout JS和Web API的结合使用,服务端我们通过Entity Framework对数据进行操作,然后使用API控制器开放接口让客户端访问,然后我们使用Knockout JS的数据绑定和事件处理方法实现了动态的页面显示,最后,我们使用了BootStrap CSS美化了一下程序界面。
本文仅仅是介绍了Knockout JS和Web API的结合使用,如果大家想进一步学习,参考如下链接。
参考
- https://github.com/dotnetcurry/ko-calendar-dncmag-08
- http://blogs.msdn.com/b/webdev/archive/2013/11/18/announcing-release-of-asp-net-and-web-tools-2013-1-for-visual-studio-2012.aspx
- http://code.tutsplus.com/tutorials/into-the-ring-with-knockout-js--net-21239
- http://code.tutsplus.com/series/into-the-ring-with-knockoutjs--net-22038
- http://www.asp.net/web-api/overview/creating-web-apis/using-web-api-with-entity-framework/using-web-api-with-entity-framework,-part-5


