全网备份数据同步方案
备份网站内部人员信息 不能解决外部(人员)上传数据的备份
定时任务最短执行的周期为一分钟,采用定时任务方式,有时可能造成一分钟内的数据丢失
因此对于重要数据需要采用实时同步的方案
#数据同时同步方法
##什么是实时同步:如何实现实时同步数据备份
###1 利用监控服务 监控同步数据目录信息的变化
###2 发现目录中数据产生变化 就利用rsync服务推送数据到备份服务器上

##实时同步工作原理概念
1)进行数据信息的监控
2)将变化的数据进行推送备份--利用Rsync
##实现实时同步的技术手段:
1-->inotify+rsync
2-->sersync
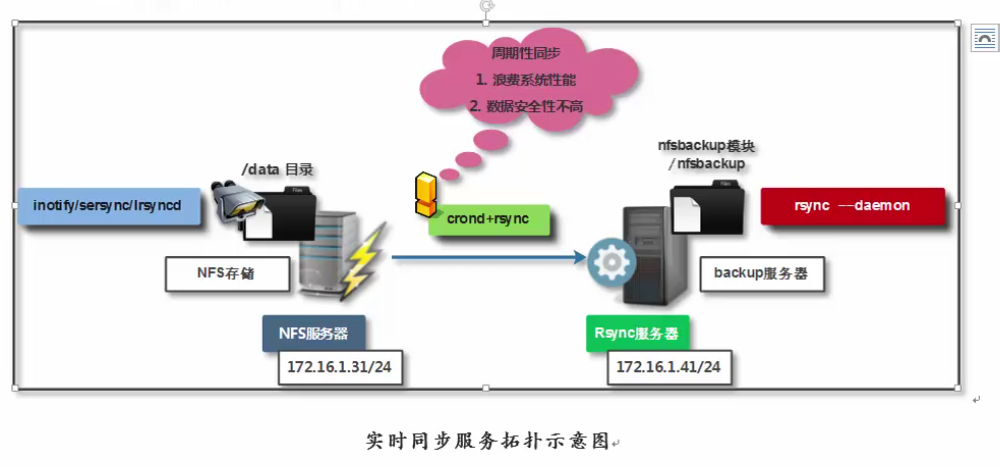
实时同步服务拓扑示意图

服务架构
软件名称:inotify-tools
intify主要是监控 rsync是传输

TIP:异步就是将所有请求先放入内存当中
修改1个文件名称是什么行为

inotify只是监控软件(事件驱动机制) 同步是rsync做的
事件驱动机制:
中小型比较适合前2款
####实现实时同步的方法
01 intofy 对同步数据目录信息的监控
02 rsync 完成对数据信息的实时同步
intify+rsync 利用脚本进行结合
第一个里程碑:部署rsync服务
客户端
服务端
第二个里程碑:部署inotify软件
部署数据监控服务(inotify)
1)安装inotify软件(检查是否安装)
yum install inotify-tools -y --- 基于epel源(/etc/yum.repos.d/ 源文件保存目录)
备注:安装在NFS上
centos系统安装软件方式
1)yum安装软件方式
和rpm -ivh安装软件命令对比
yum安装软件可以解决软件之间依赖关系
rpm安装软件只能安装指定的软件,不会安装依赖包
使用yum安装软件:
01 具有yum仓库:存储所有软件的仓库
02 具有yum源文件:利用yum源文件 决定使用哪个yum仓库 进行软件下载
/etc/yum.d/ 放置源文件
yum repolist --显示本台主机的所有可用yum源信息
2)编译安装软件
3)利用二进制包方式安装软件
安装采用绿色版本软件,进行安装
rpm -ql inotify-tools
[root@nfs01 ~]# rpm -ql inotify-tools
/usr/bin/inotifywait
/usr/bin/inotifywatch
/usr/lib64/libinotifytools.so.0
/usr/lib64/libinotifytools.so.0.4.1
/usr/share/doc/inotify-tools-3.14
/usr/share/doc/inotify-tools-3.14/AUTHORS
/usr/share/doc/inotify-tools-3.14/COPYING
/usr/share/doc/inotify-tools-3.14/ChangeLog
/usr/share/doc/inotify-tools-3.14/NEWS
/usr/share/doc/inotify-tools-3.14/README
/usr/share/man/man1/inotifywait.1.gz
/usr/share/man/man1/inotifywatch.1.gz
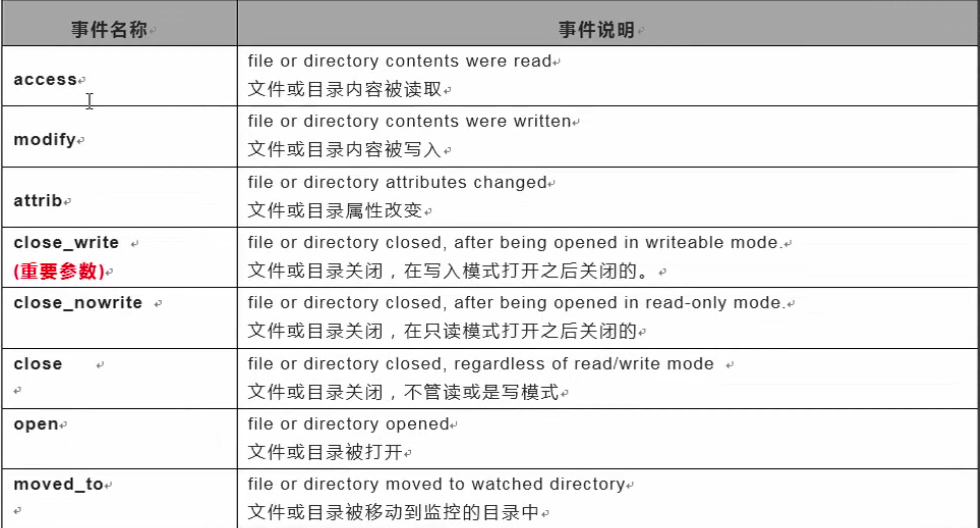
inotifywait 在被监控的文件或目录上等待特定文件系统事件(open close delete 等)发生 ,执行后处于阻塞状态,使用shell脚本中使用,通过此命令。实现对目录或文件的监控
inotifywatch 收集被监控的文件系统使用的统计数据,指文件系统时间发生的次数统计、统计文件数据信息变化的数量
[root@nfs01 ~]# ll /proc/sys/fs/inotify/
total 0
-rw-r--r-- 1 root root 0 May 20 10:36 max_queued_events
-rw-r--r-- 1 root root 0 May 20 10:36 max_user_instances
-rw-r--r-- 1 root root 0 May 20 10:36 max_user_watches
max_user_watches: 设置inotifywait或inotifywatch命令可以监视的文件数量(单进程)
8192
max_user_instances:设置每个用户可以运行的inotifywait或inotifywatch命令的进程数
128
max_queued_events: 设置inotify实例事件(event)队列可容纳的事件数量
16384
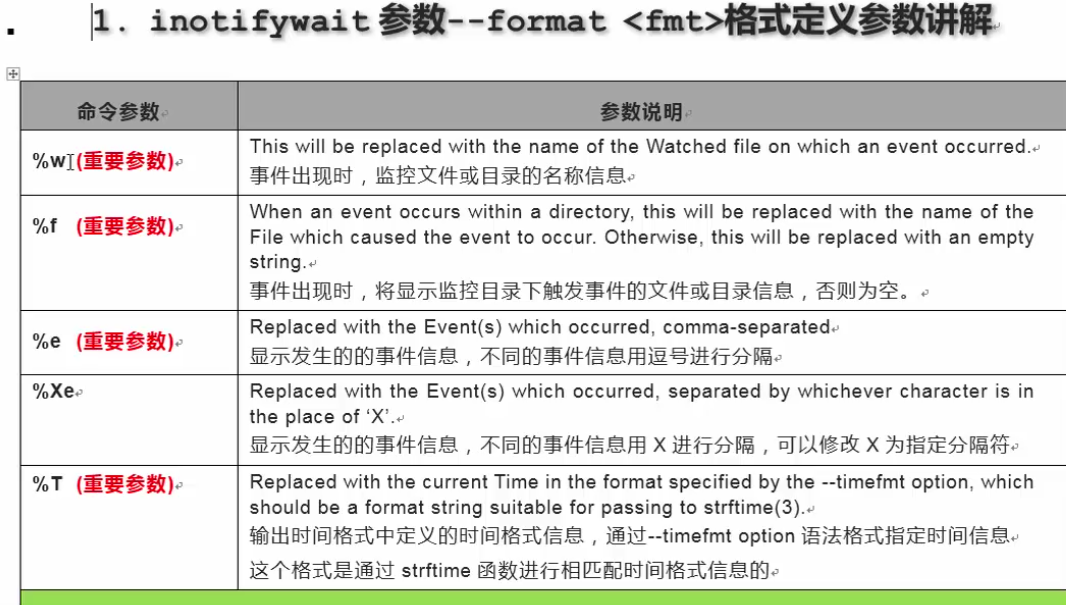
参数说明:
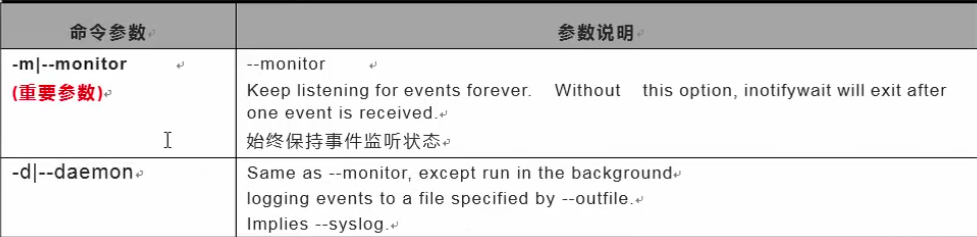


-m 表示始终保持事件的监听状态
-r 递归监控目录数据信息变化
-q 输出信息少(只打印事件信息)
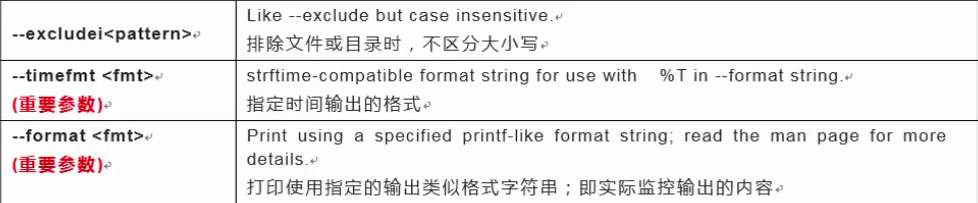
-timefmt 指定时间输出格式
-format 打印使用指定的输出类似格式字符串:即实际监控输出的内容
-e 指定监听的指定的文件,如果省略,表示所有事件都进行监听
-m|--monitor --- 始终保持监视状态,默认对目录只监视一次
-r --- 表示进行递归监控(目录1/目录2/目录3/file)
-q|--quiet --- 将没有信息不要输出在屏幕上显示 &>/dev/null
--timefmt <fmt> --- 时间格式信息(date)
--format --- 输出内容的格式信息
-e --- 指定监控的事件信息(如果不指定此参数,表示所有事件都监控)
指定的事件:

创建1个文件的逻辑
[root@nfs01 ~]# inotifywait -m /data ### -m表示一直显示
Setting up watches.
Watches established.
/data/ CREATE 0603-1.txt
/data/ OPEN 0603-1.txt
/data/ ATTRIB 0603-1.txt
/data/ CLOSE_WRITE,CLOSE 0603-1.txt
删除1个文件的逻辑
/data/ OPEN,ISDIR
/data/ CLOSE_NOWRITE,CLOSE,ISDIR
/data/ DELETE 0603-1.txt
修改1个文件的逻辑
/data/ OPEN 0603.txt
/data/ MODIFY 0603.txt
/data/ CLOSE_WRITE,CLOSE 0603.txt
重命名一个文件,会触发什么事件?
2018-05-09 /data/file01 事件信息:MOVED_FROM
2018-05-09 /data/file10 事件信息:MOVED_TO
sed命令替换文件信息原理过程
2018-05-09 /data/file10 事件信息:OPEN
2018-05-09 /data/sedRSK9Gs 事件信息:CREATE
2018-05-09 /data/sedRSK9Gs 事件信息:OPEN
2018-05-09 /data/file10 事件信息:ACCESS
2018-05-09 /data/sedRSK9Gs 事件信息:MODIFY
2018-05-09 /data/sedRSK9Gs 事件信息:ATTRIB
2018-05-09 /data/sedRSK9Gs 事件信息:ATTRIB
2018-05-09 /data/file10 事件信息:CLOSE_NOWRITE,CLOSE
2018-05-09 /data/sedRSK9Gs 事件信息:CLOSE_WRITE,CLOSE
2018-05-09 /data/sedRSK9Gs 事件信息:MOVED_FROM
2018-05-09 /data/file10 事件信息:MOVED_TO
创建目录
/data/ CREATE,ISDIR 01
基本用法:用-mrq 参数
[root@nfs01 ~]# inotifywait -mrq /data
/data/ OPEN,ISDIR
/data/ CLOSE_NOWRITE,CLOSE,ISDIR
/data/01/ CREATE ceshi.txt
/data/01/ OPEN ceshi.txt
/data/01/ ATTRIB ceshi.txt
/data/01/ CLOSE_WRITE,CLOSE ceshi.txt
inotifywait -mrq /data/ --- 实现数据监控最重要的三个参数
inotifywait -mrq --timefmt "%F" --format "%T %w%f 事件信息:%e" /data/ ---详细监控命令
-e create -e参数指定监控的事件 监控的目录

实时同步命令参数示意图

常用的时间参数参照表

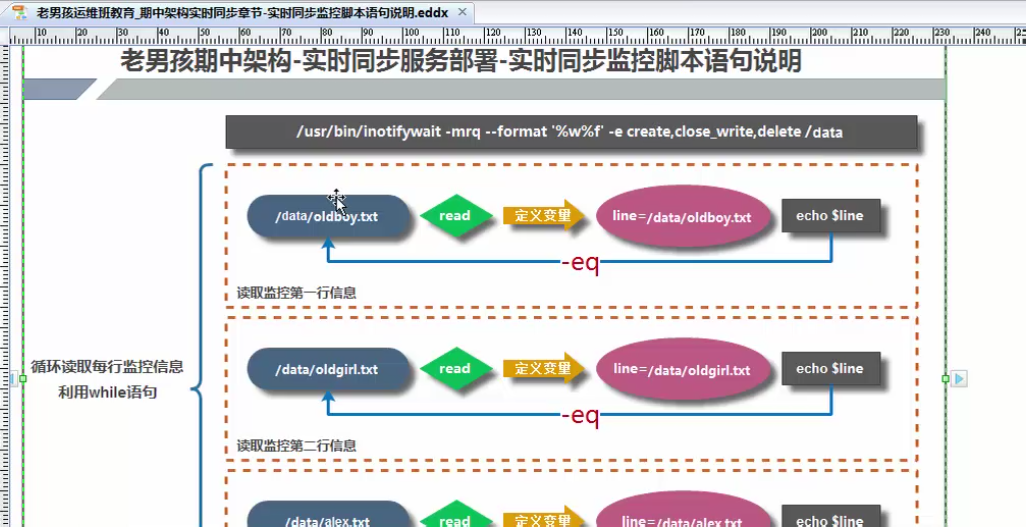
第三个里程碑:编写inotify+rsync脚本
01 inotify使用方法
inotifywait -mrq --format "%w%f" -e create,close_write,delete,moved_to /data/
02 rsync 使用方法
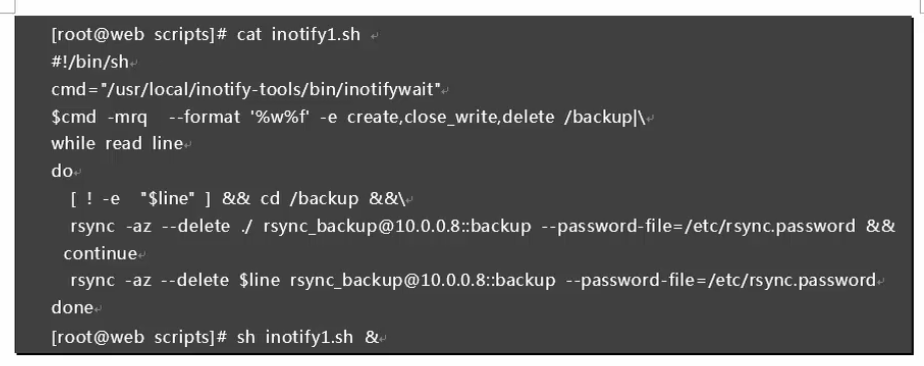
初步完善后脚本:
#!/bin/bash

inotifywait -mrq --format "%w%f" -e create,close_write,delete,moved_to /data/|
while read line
do
rsync -az --delete /data/ rsync_backup@172.16.1.41::backup --password-file=/etc/rsync.password
done

快捷命令
ctrl+z 暂停运行的进程
pkill -f "sh -x inotify.sh"
杀手说明:杀手三人组只能杀死运行中的进程,不能杀死暂停的进程
jobs 检查放入后台运行的进程信息
bg 后台运行进程放入前台
fg 前台运行进程放入后台
sh inotify.sh & 脚本运行在后台
ps -ef | grep sh
让脚本程序在后台运行的方法
1 sh inotify.sh &
2 nohup sh inotify.sh &
思考 screen 实现脚本后台运行
<<inotify.sh>>
#!/bin/bash inotifywait -mrq --format "%w%f" -e create,close_write,delete,moved_to /data/| while read line do rsync -az --delete /data/ rsync_backup@172.16.1.41::backup --password-file=/etc/rsync.password done
[root@nfs01 scripts]# sz inotify.sh 将指定文件发送到桌面
优化配置实践


sersync部分
2)sersync
第一个里程碑:安装sersync软件
https://github.com/wsgzao/sersync
cd /server/tools 工具放在这个目录
01 上传软件
<<sersync_installdir_64bit.zip>>
02 解压软件包
[root@nfs01 tools]# unzip sersync_installdir_64bit.zip
Archive: sersync_installdir_64bit.zip
creating: sersync_installdir_64bit/
creating: sersync_installdir_64bit/sersync/
creating: sersync_installdir_64bit/sersync/bin/
inflating: sersync_installdir_64bit/sersync/bin/sersync
creating: sersync_installdir_64bit/sersync/conf/
inflating: sersync_installdir_64bit/sersync/conf/confxml.xml
creating: sersync_installdir_64bit/sersync/logs/
[root@nfs01 tools]# cd sersync_installdir_64bit
[root@nfs01 sersync_installdir_64bit]# ll
total 4
drwxr-xr-x 5 root root 4096 Dec 23 2012 sersync
[root@nfs01 sersync_installdir_64bit]# tree --软件组成
.
└── sersync
├── bin
│ └── sersync
├── conf
│ └── confxml.xml
└── logs
4 directories, 2 files
03 将软件包移动到指定目录中
[root@nfs01 sersync_installdir_64bit]# mv sersync/ /usr/local/

第二个里程碑:编写软件配置文件(难点)
配置文件位置:
[root@nfs01 conf]# ll
total 4
-rw-r--r-- 1 root root 2214 Oct 26 2011 confxml.xml
[root@nfs01 conf]# pwd
/usr/local/sersync/conf
#01 编写配置文件前先进行备份
[root@nfs01 conf]# cp confxml.xml{,.bak}
[root@nfs01 conf]# ll
total 8
-rw-r--r-- 1 root root 2214 Oct 26 2011 confxml.xml
-rw-r--r-- 1 root root 2214 Jun 3 18:27 confxml.xml.bak
#02 编写配置文件
<filter start="false">
7 <exclude expression="(.*).svn"></exclude>
8 <exclude expression="(.*).gz"></exclude>
9 <exclude expression="^info/*"></exclude>
10 <exclude expression="^static/*"></exclude>
11 </filter>
说明:表示排除同步数据
<inotify>
13 <delete start="true"/>
14 <createFolder start="true"/>
15 <createFile start="false"/>
16 <closeWrite start="true"/>
17 <moveFrom start="true"/>
18 <moveTo start="true"/>
19 <attrib start="false"/>
20 <modify start="false"/>
21 </inotify>
说明:指定监控的事件信息
23 <sersync>
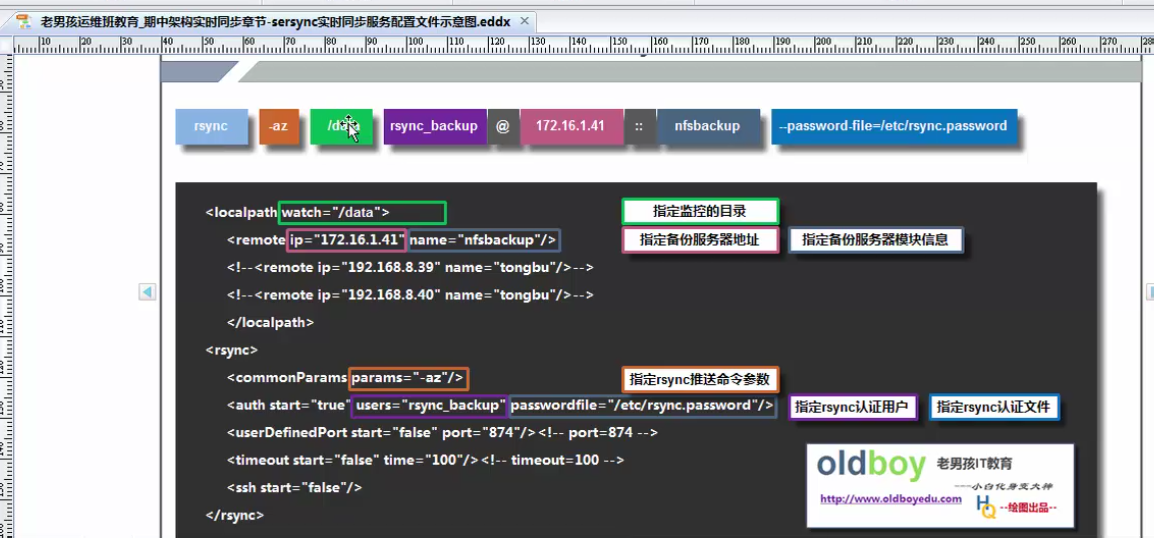
24 <localpath watch="/opt/tongbu"> --监控的目录
25 <remote ip="127.0.0.1" name="tongbu1"/> --推送的远程主机和目录
26 <!--<remote ip="192.168.8.39" name="tongbu"/>--> --注释信息
27 <!--<remote ip="192.168.8.40" name="tongbu"/>-->
28 </localpath>

说明:定义监控的目录信息 指定推送的备份服务器IP地址与目录信息
<rsync>
30 <commonParams params="-artuz"/>
31 <auth start="false" users="root" passwordfile="/etc/rsync.pas"/>
32 <userDefinedPort start="false" port="874"/><!-- port=874 -->
33 <timeout start="false" time="100"/><!-- timeout=100 -->
34 <ssh start="false"/>
35 </rsync>

说明rsync部分:定义rsync数据推送时的参数信息
第三个里程碑:启动sersync软件服务
01 先给与执行权限:
[root@nfs01 bin]# pwd
/usr/local/sersync/bin
[root@nfs01 bin]# chmod +x sersync
[root@nfs01 bin]# ll
total 1768
-rwxr-xr-x 1 root root 1810128 Oct 26 2011 sersync
02 查看帮助信息:
[root@nfs01 bin]# ./sersync -h
set the system param
execute:echo 50000000 > /proc/sys/fs/inotify/max_user_watches
execute:echo 327679 > /proc/sys/fs/inotify/max_queued_events
parse the command param
_______________________________________________________
参数-d:启用守护进程模式
参数-r:在监控前,将监控目录与远程主机用rsync命令推送一遍
c参数-n: 指定开启守护线程的数量,默认为10个
参数-o:指定配置文件,默认使用confxml.xml文件
参数-m:单独启用其他模块,使用 -m refreshCDN 开启刷新CDN模块
参数-m:单独启用其他模块,使用 -m socket 开启socket模块
参数-m:单独启用其他模块,使用 -m http 开启http模块
不加-m参数,则默认执行同步程序
________________________________________________________________
03 正式启动
[root@nfs01 bin]# ./sersync -dro /usr/local/sersync/conf/confxml.xml
set the system param
execute:echo 50000000 > /proc/sys/fs/inotify/max_user_watches
execute:echo 327679 > /proc/sys/fs/inotify/max_queued_events
parse the command param
option: -d run as a daemon
option: -r rsync all the local files to the remote servers before the sersync work
option: -o config xml name: /usr/local/sersync/conf/confxml.xml
daemon thread num: 10
parse xml config file
host ip : localhost host port: 8008
daemon start,sersync run behind the console
use rsync password-file :
user is rsync_backup
passwordfile is /etc/rsync.password
config xml parse success
please set /etc/rsyncd.conf max connections=0 Manually
sersync working thread 12 = 1(primary thread) + 1(fail retry thread) + 10(daemon sub threads)
Max threads numbers is: 22 = 12(Thread pool nums) + 10(Sub threads)
please according your cpu ,use -n param to adjust the cpu rate
------------------------------------------
rsync the directory recursivly to the remote servers once
working please wait...
execute command: cd /data && rsync -az -R --delete ./ rsync_backup@172.16.1.41::backup --password-file=/etc/rsync.password >/dev/null 2>&1
run the sersync:
watch path is: /data
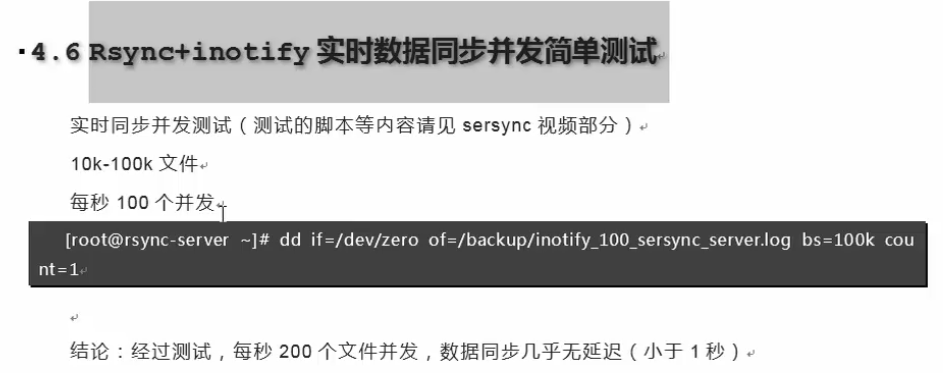
至此可以进行测试