插件:https://pub.flutter-io.cn/packages/amap_base
参考签名keystore:https://blog.csdn.net/weixin_44567104/article/details/90377912
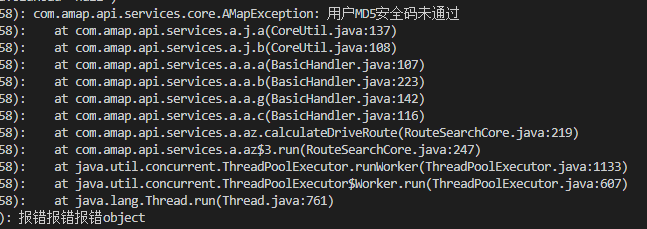
参考解决用户key不正确或过期,md5不正确问题:https://blog.csdn.net/m00123456789/article/details/71404282?tdsourcetag=s_pctim_aiomsg
amap_base算是评分比较高的,但作者比较忙一直没更新问题也比较多
1、生成keystore文件,放到根目录下。参考https://blog.csdn.net/weixin_44567104/article/details/90377912
2、生成keystore.properties文件,加入配置
storePassword=xxx
keyPassword=xxx
keyAlias=xxx
#这里是app下的build.gradle加载,android.keystore在上级目录,就是根目录
storeFile=../android.keystore
3、app下的build.gradle加入配置
// load keystore签名配置,地图、支付等服务都要用到
def keystorePropertiesFile = rootProject.file("keystore.properties")
def keystoreProperties = new Properties()
keystoreProperties.load(new FileInputStream(keystorePropertiesFile))

android {

    ...

    //签名配置
    signingConfigs {
        debug {
            keyAlias keystoreProperties['keyAlias']
            keyPassword keystoreProperties['keyPassword']
            storeFile file(keystoreProperties['storeFile'])
            storePassword keystoreProperties['storePassword']
        }
        release {
            keyAlias keystoreProperties['keyAlias']
            keyPassword keystoreProperties['keyPassword']
            storeFile file(keystoreProperties['storeFile'])
            storePassword keystoreProperties['storePassword']
        }
    }

    buildTypes {
        profile {
            initWith debug
        }
        debug {
            signingConfig signingConfigs.debug
        }
        release {
            // TODO: Add your own signing config for the release build.
            // Signing with the debug keys for now, so `flutter run --release` works.
            signingConfig signingConfigs.release
        }
    }

}
4、修改AndroidManifest.xml
<?xml version="1.0" encoding="utf-8"?>
<!--包名必须和build.gradle里的applicationId一致-->
<manifest xmlns:android="http://schemas.android.com/apk/res/android"
          package="xxx">

    <!-- The INTERNET permission is required for development. Specifically,
         flutter needs it to communicate with the running application
         to allow setting breakpoints, to provide hot reload, etc.
    -->
    <uses-permission android:name="android.permission.INTERNET"/>
    <uses-permission android:name="android.permission.WRITE_EXTERNAL_STORAGE" />
    <uses-permission android:name="android.permission.READ_EXTERNAL_STORAGE" />
    <uses-permission android:name="android.permission.CAMERA" />

    <!-- io.flutter.app.FlutterApplication is an android.app.Application that
         calls FlutterMain.startInitialization(this); in its onCreate method.
         In most cases you can leave this as-is, but you if you want to provide
         additional functionality it is fine to subclass or reimplement
         FlutterApplication and put your custom class here. -->
    <application
        android:name="io.flutter.app.FlutterApplication"
        android:label="flutter_module"
        android:icon="@mipmap/ic_launcher">
        <!--android配置amap key,ios在初始化的时候传入AMap.init('ioskey')-->
        <meta-data
            android:name="com.amap.api.v2.apikey"
            android:value="key" />
        <!--改包名后这里默认.MainActivity会找不到-->
        <activity
            android:name="com.example.flutter_module.host.MainActivity"
            android:launchMode="singleTop"
            android:theme="@style/LaunchTheme"
            android:configChanges="orientation|keyboardHidden|keyboard|screenSize|locale|layoutDirection|fontScale|screenLayout|density|uiMode"
            android:hardwareAccelerated="true"
            android:windowSoftInputMode="adjustResize">
            <!-- This keeps the window background of the activity showing
                 until Flutter renders its first frame. It can be removed if
                 there is no splash screen (such as the default splash screen
                 defined in @style/LaunchTheme). -->
            <meta-data
                android:name="io.flutter.app.android.SplashScreenUntilFirstFrame"
                android:value="true" />
            <intent-filter>
                <action android:name="android.intent.action.MAIN"/>
                <category android:name="android.intent.category.LAUNCHER"/>
            </intent-filter>
        </activity>
    </application>
</manifest>
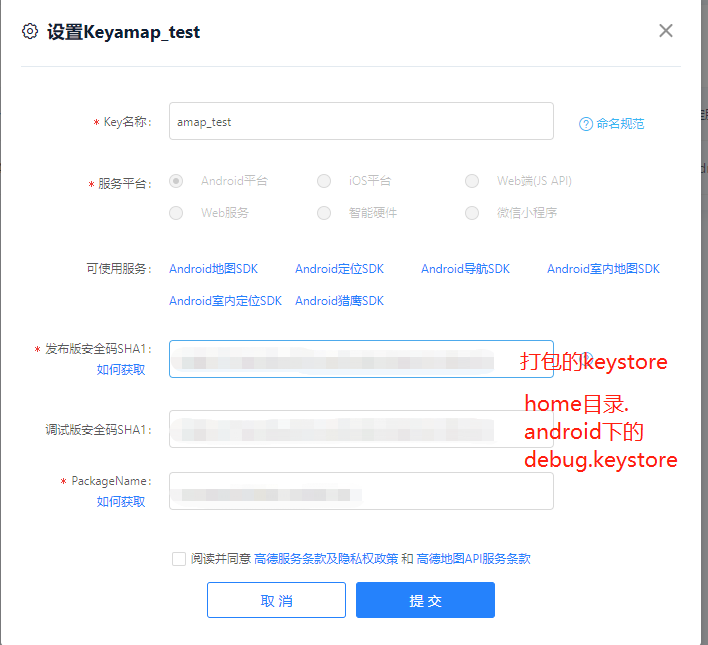
5、一些问题,基本都是验签没过,sha1和packagename一定要对应上,android工程配置也要一致。用户key不正确一般加上keystore验签就行了,md5不正确应该是包名不匹配