核心
利用HibernateTools,从POJO类。Mapping映射文件。数据库表有当中的一项,就能生成其它两项。
概述
在使用Hibernate开发系统持久层时,依照一般开发流程
1、分析业务
2、获得系统实体类
3、写Hibernate的mapping映射文件
4、依据映射文件,生成数据库表
以上这几步是Hibernate开发的起始。依据开发习惯的不同。有些项目组可能会先写POJO类,有的项目可能会先设计数据库,有的项目组可能先写映射文件。事实上完毕当中的一项时。类结构或者表结构就能够确定了。
既然已经能确定结构了,全然能够使用工具来取代手工完毕剩余的工作。
前提
安装Eclipse插件HibernateTools。eclipse插件安装百度下教程非常多,建议採用copy安装或者link安装,再有就是HibernateTools的版本号相应着特定的Eclipse版本号,所以安装前请先检查自己的eclipse版本号。
然后建立项目,本文建立的是Dynamic Web Project。採用了mysql数据库,建立项目后,引入mysql的驱动jar,引入Hibernate(本文用了4.3.5版本号)的包,即lib下required目录中全部jar
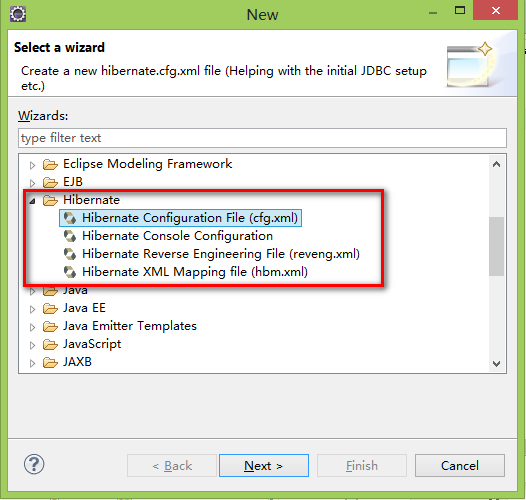
安装完了插件,首先利用tool生成Hibernate配置文件,项目右键-->new,安装完HibernateTools后,多了4种类型的文件。选择第一种:
依据使用的数据库,填入必须的属性:
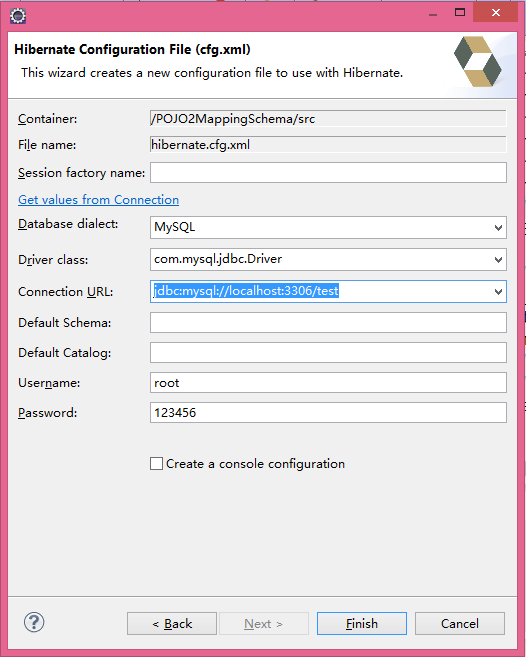
生成hibernate.cfg.xml的代码:
<span style="font-family:KaiTi_GB2312;font-size:18px;"><?xml version="1.0" encoding="utf-8"?>
<!DOCTYPE hibernate-configuration PUBLIC
"-//Hibernate/Hibernate Configuration DTD 3.0//EN"
"http://www.hibernate.org/dtd/hibernate-configuration-3.0.dtd">
<hibernate-configuration>
    <session-factory>
        <property name="hibernate.bytecode.use_reflection_optimizer">false</property>
        <property name="hibernate.connection.driver_class">com.mysql.jdbc.Driver</property>
        <property name="hibernate.connection.password">123456</property>
        <property name="hibernate.connection.url">jdbc:mysql://localhost:3306/test</property>
        <property name="hibernate.connection.username">root</property>
        <property name="hibernate.dialect">org.hibernate.dialect.MySQLDialect</property>
        <property name="hibernate.search.autoregister_listeners">false</property>


    </session-factory>
</hibernate-configuration></span>
相互转换
接下能够进入正题了,本文分别从三项中的每一项入手,生成其它两项。
思路一:由POJO类生成mapping映射文件和DDL
POJO类的代码写起来非常方便。因此首先介绍这样的方法,个人觉得这样的方法效率最高。
首先建立两个POJO类
package org.hibernate.test;


public class Student implements java.io.Serializable {

	private int id;
	private String name;

	public Student() {
	}

	public Student(int id) {
		this.id = id;
	}

	public Student(int id, String name) {
		this.id = id;
		this.name = name;
	}

	public int getId() {
		return this.id;
	}

	public void setId(int id) {
		this.id = id;
	}

	public String getName() {
		return this.name;
	}

	public void setName(String name) {
		this.name = name;
	}

}
package org.hibernate.test;
import java.util.ArrayList;
import java.util.List;
public class Class implements java.io.Serializable {
private int id;
private String name;
private List students = new ArrayList(0);
public Class() {
}
public Class(int id) {
this.id = id;
}
public Class(int id, String name, List students) {
this.id = id;
this.name = name;
this.students = students;
}
public int getId() {
return this.id;
}
public void setId(int id) {
this.id = id;
}
public String getName() {
return this.name;
}
public void setName(String name) {
this.name = name;
}
public List getStudents() {
return this.students;
}
public void setStudents(List students) {
this.students = students;
}
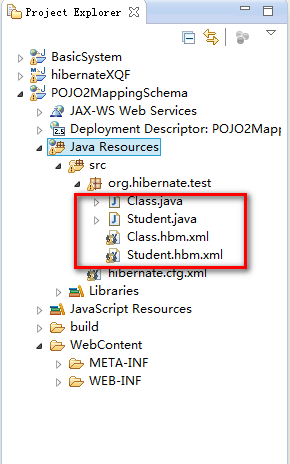
}接下来一步一步生成另外两项,首先项目右键-->new,选择Hibernate以下的第四项,建立mapping映射文件,依据已存在的POJO类,生成Mapping文件
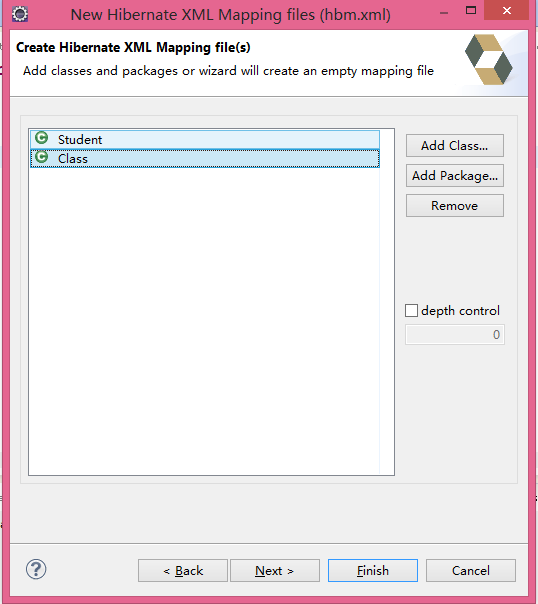
下一步,能够预先查看生成的hbm.xml文件,有特殊要求的能够再生成的文件基础上稍作改动。
生成代码:
<span style="font-family:KaiTi_GB2312;font-size:18px;"><?xml version="1.0"?>
<!DOCTYPE hibernate-mapping PUBLIC "-//Hibernate/Hibernate Mapping DTD 3.0//EN"
"http://www.hibernate.org/dtd/hibernate-mapping-3.0.dtd">
<!-- Generated 2014-5-30 21:29:20 by Hibernate Tools 4.0.0 -->
<hibernate-mapping>
    <class name="org.hibernate.test.Student" table="STUDENT">
        <id name="id" type="int">
            <column name="ID" />
            <generator class="assigned"></generator>
        </id>
        <property name="name" type="java.lang.String">
            <column name="NAME" />
        </property>
    </class>
</hibernate-mapping></span>
<span style="font-family:KaiTi_GB2312;font-size:18px;"><?xml version="1.0"?
> <!DOCTYPE hibernate-mapping PUBLIC "-//Hibernate/Hibernate Mapping DTD 3.0//EN" "http://www.hibernate.org/dtd/hibernate-mapping-3.0.dtd"> <!-- Generated 2014-5-30 21:29:20 by Hibernate Tools 4.0.0 --> <hibernate-mapping> <class name="org.hibernate.test.Class" table="CLASS"> <id name="id" type="int"> <column name="ID" /> <generator class="assigned"></generator> </id> <property name="name" type="java.lang.String"> <column name="NAME" /> </property> <list name="students" inverse="false" table="STUDENT" lazy="true"> <key> <column name="ID" /> </key> <list-index> <column name="idx" /> </list-index> <one-to-many class="org.hibernate.test.Student" /> </list> </class> </hibernate-mapping></span>
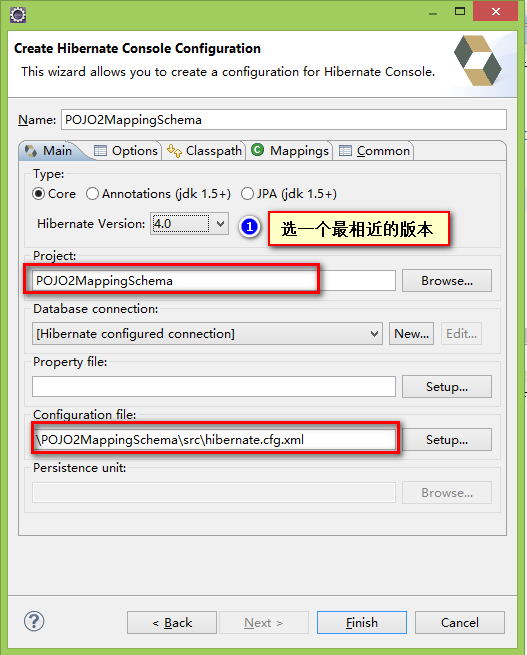
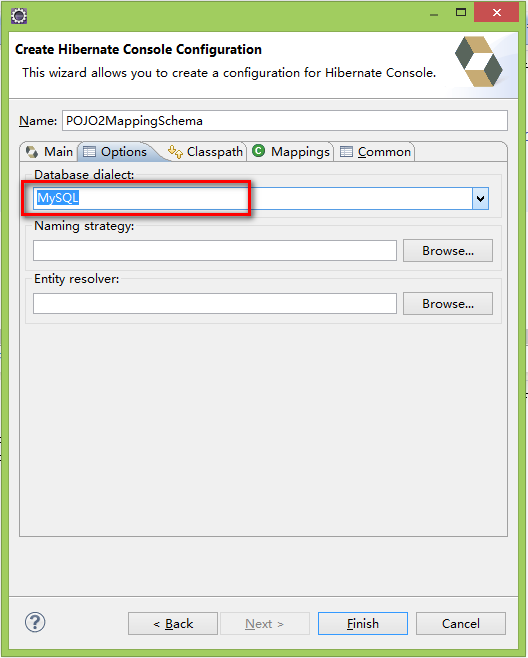
mapping映射文件生成了。接下来生成ddl,项目右键-->new。选择Hibernate Console Configuration
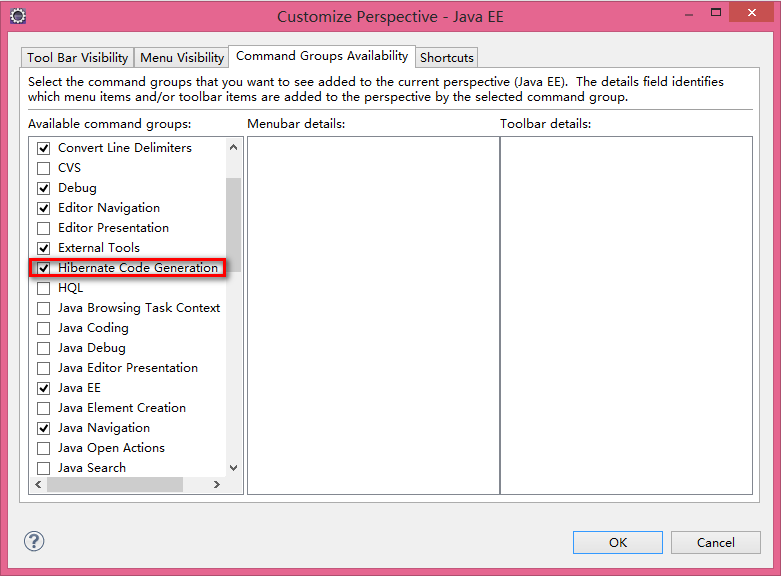
选择好相应的项后。finish,然后须要在工具栏加入Hibernate code Generation。Windows-->Customer Perspective
然后工具栏多了一个非常像执行button的图标,单击下拉button。选第二项

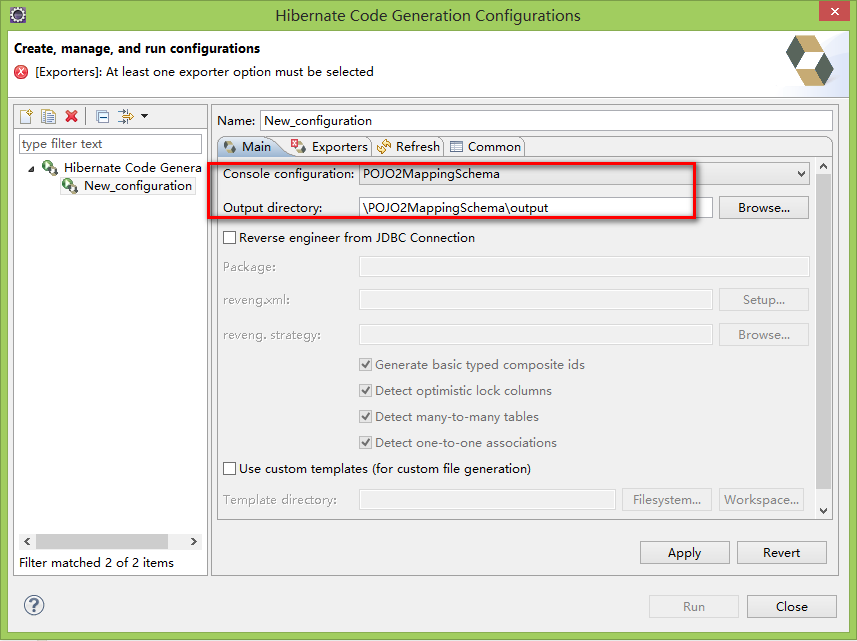
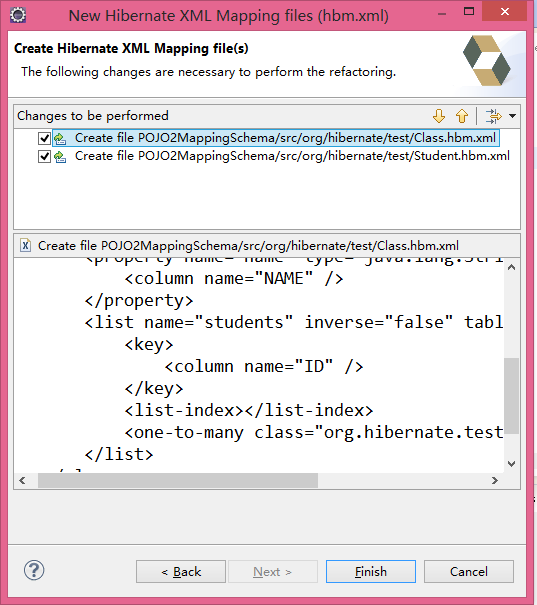
单击Exporters选项卡。能够看到HibernateTools工具能导出和生成的项非常多,能够依据配置有针对性的选择自己想要的项,这里我们勾选Schema Export,然后单击图标1以下的Properties的Add。后出现图标2所看到的的窗口
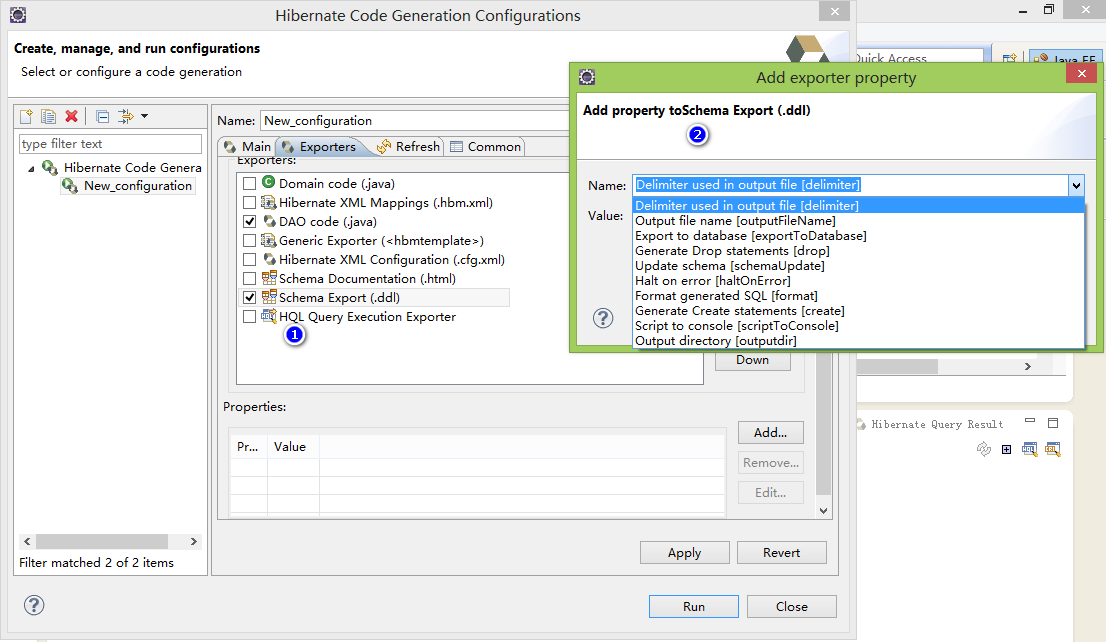
选择第二项,这就是要生成我们想要的ddl,如图。当然上图还勾选了DAO Code,生成了操作试题的DAO代码(HibernateTools确实非常贴心)

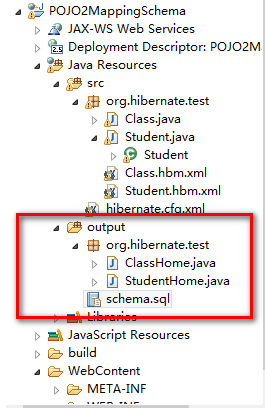
这是生成后的图片
ddl的建表语句:
<span style="font-family:KaiTi_GB2312;font-size:18px;">create table CLASS (ID integer not null, NAME varchar(255), primary key (ID));
create table STUDENT (ID integer not null, NAME varchar(255), idx integer, primary key (ID));
alter table STUDENT add index FKBACA0E1BE081A5FD (ID), add constraint FKBACA0E1BE081A5FD foreign key (ID) references CLASS (ID);
</span>
DAO代码例如以下:
<span style="font-family:KaiTi_GB2312;font-size:18px;">package org.hibernate.test;

// Generated 2014-5-30 23:18:05 by Hibernate Tools 4.0.0

import java.util.List;
import javax.naming.InitialContext;
import org.apache.commons.logging.Log;
import org.apache.commons.logging.LogFactory;
import org.hibernate.LockMode;
import org.hibernate.SessionFactory;
import org.hibernate.criterion.Example;

/**
 * Home object for domain model class Class.
 * @see org.hibernate.test.Class
 * @author Hibernate Tools
 */
public class ClassHome {

	private static final Log log = LogFactory.getLog(ClassHome.class);

	private final SessionFactory sessionFactory = getSessionFactory();

	protected SessionFactory getSessionFactory() {
		try {
			return (SessionFactory) new InitialContext()
					.lookup("SessionFactory");
		} catch (Exception e) {
			log.error("Could not locate SessionFactory in JNDI", e);
			throw new IllegalStateException(
					"Could not locate SessionFactory in JNDI");
		}
	}

	public void persist(Class transientInstance) {
		log.debug("persisting Class instance");
		try {
			sessionFactory.getCurrentSession().persist(transientInstance);
			log.debug("persist successful");
		} catch (RuntimeException re) {
			log.error("persist failed", re);
			throw re;
		}
	}

	public void attachDirty(Class instance) {
		log.debug("attaching dirty Class instance");
		try {
			sessionFactory.getCurrentSession().saveOrUpdate(instance);
			log.debug("attach successful");
		} catch (RuntimeException re) {
			log.error("attach failed", re);
			throw re;
		}
	}

	public void attachClean(Class instance) {
		log.debug("attaching clean Class instance");
		try {
			sessionFactory.getCurrentSession().lock(instance, LockMode.NONE);
			log.debug("attach successful");
		} catch (RuntimeException re) {
			log.error("attach failed", re);
			throw re;
		}
	}

	public void delete(Class persistentInstance) {
		log.debug("deleting Class instance");
		try {
			sessionFactory.getCurrentSession().delete(persistentInstance);
			log.debug("delete successful");
		} catch (RuntimeException re) {
			log.error("delete failed", re);
			throw re;
		}
	}

	public Class merge(Class detachedInstance) {
		log.debug("merging Class instance");
		try {
			Class result = (Class) sessionFactory.getCurrentSession().merge(
					detachedInstance);
			log.debug("merge successful");
			return result;
		} catch (RuntimeException re) {
			log.error("merge failed", re);
			throw re;
		}
	}

	public Class findById(int id) {
		log.debug("getting Class instance with id: " + id);
		try {
			Class instance = (Class) sessionFactory.getCurrentSession().get(
					"org.hibernate.test.Class", id);
			if (instance == null) {
				log.debug("get successful, no instance found");
			} else {
				log.debug("get successful, instance found");
			}
			return instance;
		} catch (RuntimeException re) {
			log.error("get failed", re);
			throw re;
		}
	}

	public List findByExample(Class instance) {
		log.debug("finding Class instance by example");
		try {
			List results = sessionFactory.getCurrentSession()
					.createCriteria("org.hibernate.test.Class")
					.add(Example.create(instance)).list();
			log.debug("find by example successful, result size: "
					+ results.size());
			return results;
		} catch (RuntimeException re) {
			log.error("find by example failed", re);
			throw re;
		}
	}
}</span>
到此。我们就由POJO类。生成了hbm.xml文件和DDL
思路二:由hbm.xml生成POJO类和DDL
...
思路三:由数据库表(或DDL)生成POJO类和hbm.xml
...
思路二三请见下一博客。
邮件地址:350676076@qq.com,转载请注明出处。