解读代码(非作者源码):https://github.com/pudae/tensorflow-densenet
技术解读
本代码是使用Tensorflow框架中的slim轻量级模块编写的,其中包含的技术手段(使用了很多):
1 @slim.add_arg_scope # 装饰器
之前分析了TF-slim的基本使用,详见:https://www.cnblogs.com/monologuesmw/p/12627697.html。也介绍了一种应对相对简单网络结构的TF-slim的编写模板,详见:https://www.cnblogs.com/monologuesmw/p/12631901.html。DenseNet代码中使用了一种应对相对复杂网络结构的编写方式,一起来看一看吧!
TF-slim是tensorflow的轻量级模块,能够对使用Tensorflow编写的代码进行"代码瘦身",减少代码量。其中核心的内容是使用
1 with slim.arg_scope([slim.conv2d, slim.fully_connected, ...], ... )
进行方法中相关默认参数的设置。
在slim.arg_scope([ ])中,可以使用slim自带的一些网络结构函数,并对其设置相应的参数。但如果要使用的网络为自定义的网络结构,如何使用slim.arg_scope进行代码瘦身,并结合slim自带的函数呢?本篇将结合DenseNet的实现进行介绍。
这里面会涉及到装饰器的知识,先来回顾一下装饰器。
装饰器
装饰器本质上是函数,用于装饰其他函数,为其他函数添加附加功能。并且是在不改变被装饰函数源代码和调用方式的条件下,添加附加功能。
其中,包含三个方面的Python知识:
- 函数即"变量";
- 高阶函数:一个函数可以接受另一个函数作为参数;
- 嵌套函数
下面先建立一个装饰器,功能是为函数添加运行时间的功能。不使用装饰器实现上述功能的方式:
 1 import time
 2
 3
 4 def timer(func):
 5
 6     def bar():
 7         start_time = time.time()
 8         func()
 9         stop_time = time.time()
10         print("the run time of func is %s" %(stop_time-start_time))
11     return bar
12
13
14 def test():
15     time.sleep(3)
16     print("in the test!")
17
18 if __name__ == '__main__':
19     test = timer(test)
20     test()
执行并返回的内容:
1 in the test!
2 the run time of func is 3.0000534057617188
这实际上改变了函数的调用方式。
使用装饰器:
 1 import time
 2
 3
 4 def timer(func):
 5
 6     def bar():
 7         start_time = time.time()
 8         func()
 9         stop_time = time.time()
10         print("the run time of func is %s" %(stop_time-start_time))
11     return bar
12
13
14 @timer   # 新增
15 def test():
16     time.sleep(3)
17     print("in the test!")
18
19 if __name__ == '__main__':
20     # test = timer(test)   # 删除
21     test()
将timer作为装饰器添加到函数test上,然后便可以直接调用test,不改变被装饰函数的调用方式,添加附加功能。
1 in the test!
2 the run time of func is 3.000742197036743
相当于使用@timer代替了test=timer(test)。
但实际上现在还会存在一个问题,在代码结尾添加print(test.__name__),打印出的结果不是test,而是bar,如下所示。
 1 import time
 2
 3
 4 def timer(func):
 5
 6     def bar():
 7         start_time = time.time()
 8         func()
 9         stop_time = time.time()
10         print("the run time of func is %s" %(stop_time-start_time))
11     return bar
12
13
14 @timer
15 def test():
16     time.sleep(3)
17     print("in the test!")
18
19 if __name__ == '__main__':
20     # test = timer(test)
21     test()
22     print(test.__name__)
此时输出的结果:
1 in the test!
2 the run time of func is 3.0001981258392334
3 bar
为了避免这一隐患,需要在嵌套函数bar上添加@wraps(func)。【wraps来源于functools中】
如下述代码:
 1 import time
 2 from functools import wraps   # 新增
 3
 4 def timer(func):
 5     @wraps(func)    # 新增
 6     def bar():
 7         start_time = time.time()
 8         func()
 9         stop_time = time.time()
10         print("the run time of func is %s" %(stop_time-start_time))
11     return bar
12
13
14 @timer
15 def test():
16     time.sleep(3)
17     print("in the test!")
18
19 if __name__ == '__main__':
20     # test = timer(test)
21     test()
22     print(test.__name__)
此时打印的结果:
in the test!
the run time of func is 3.000368356704712
test
@slim.add_arg_scope
了解了装饰器后,@slim.add_arg_scope也就比较容易理解了。其功能就像底层中描述的一样,slim.add_arg_scope是一个函数的装饰器,函数被装饰后可以在arg_scope中使用。

slim.utils.collect_named_outputs(collections, alias, outputs)
代码中在自定义网络结构中,广泛使用了这一函数。该函数的作用是为output的tensor添加别名,并将tensor添加到collections的列表中。
源码解读
本节主要针对代码中densenet.py和nets_factory.py中的内容进行解读与记录。
网络结构
本部分内容均体现在densenet.py中。
先来回顾一下DenseNet的网络结构,其中包含: 【详见:https://www.cnblogs.com/monologuesmw/p/12916844.html】
- Dense Block
- DenseBlock中互联的建立
- Transition Laye
- global average pool
- 由BN-ReLU-Conv组成的BottleNeck Layer结构
都需要通过手写建立,这些结构建立后,为了后续搭建整体结构使用slim框架的arg_scope,此处建立的这些网络结构需要添加到arg_scope中,便会使用到之前谈到的装饰器@slim.add_arg_ scope。
· global average pool
在tensorflow中全局平均池化操作可以使用tf.reduce_mean处理,在以图像构成的张量中,需要知道图像张量存储的格式,即"NHWC" or "NCHW",也就是tf.reduce_mean中维度axis的设置。

全局平均池化针对的是每个通道的所有元素,即作用于H和W维度上。因此,很容易理解,如果张量以NHWC保存,则axis=[1, 2],若张量以NCHW保存,则axis=[2, 3]。 代码实现如下:
1 @slim.add_arg_scope  # 将全局平均池化添加到arg_scope中, 以供后续使用
2 def _global_avg_pool2d(inputs, data_format='NHWC', scope=None, outputs_collections=None):
3   with tf.variable_scope(scope, 'xx', [inputs]) as sc:  # 变量作用域的设置,可以设置该变量作用域需要的参数
4     axis = [1, 2] if data_format == 'NHWC' else [2, 3]
5     net = tf.reduce_mean(inputs, axis=axis, keep_dims=True)
6     net = slim.utils.collect_named_outputs(outputs_collections, sc.name, net)
7     return net
· 由BN-ReLU-Conv组成的BottleNeck Layer结构
在YOLOv3中使用的是ResNet v1版中的DBL结构,DenseNet中使用的是ResNet v2版的BN-ReLU-Conv结构(此处没有使用Leaky ReLU,但简称为BLD结构)。在BLD后选择性的添加有dropout结构。代码实现如下:
 1 @slim.add_arg_scope
 2 def _conv(inputs, num_filters, kernel_size, stride=1, dropout_rate=None,
 3           scope=None, outputs_collections=None):
 4   with tf.variable_scope(scope, 'xx', [inputs]) as sc:  # 同样是xx作用域
 5     net = slim.batch_norm(inputs)  # BN
 6     net = tf.nn.relu(net)  # relu
 7     net = slim.conv2d(net, num_filters, kernel_size)  # conv
 8
 9     if dropout_rate:   # 添加dropout
10       net = tf.nn.dropout(net)
11
12     net = slim.utils.collect_named_outputs(outputs_collections, sc.name, net)
13
14   return net
· Dense Block 中节点互联之间的建立
互联关系的建立首先只是局部,建立在三层之间。即顺序连接外,再添加一条支路。使用tf.concat()进行三层中第一层与第三层的融合,即也需要知道特征张量的存储形式 。也就是结构图中1*1与3*3卷积的节点互联。
 1 @slim.add_arg_scope
 2 def _conv_block(inputs, num_filters, data_format='NHWC', scope=None, outputs_collections=None):
 3   with tf.variable_scope(scope, 'conv_blockx', [inputs]) as sc:  # 此时变量作用于不再是xx
 4     net = inputs
 5     net = _conv(net, num_filters*4, 1, scope='x1')
 6     net = _conv(net, num_filters, 3, scope='x2')
 7     if data_format == 'NHWC':
 8       net = tf.concat([inputs, net], axis=3)
 9     else: # "NCHW"
10       net = tf.concat([inputs, net], axis=1)
11
12     net = slim.utils.collect_named_outputs(outputs_collections, sc.name, net)
13
14   return net
· Dense Block
当形成1*1与3*3的节点互联的模块后,便可以循环构建1*1与3*3的Dense Block。num_filters用于控制tf.concat()后通道数量的改变。
 1 @slim.add_arg_scope
 2 def _dense_block(inputs, num_layers, num_filters, growth_rate,
 3                  grow_num_filters=True, scope=None, outputs_collections=None):
 4
 5   with tf.variable_scope(scope, 'dense_blockx', [inputs]) as sc:
 6     net = inputs
 7     for i in range(num_layers):
 8       branch = i + 1
 9       net = _conv_block(net, growth_rate, scope='conv_block'+str(branch))
10
11       if grow_num_filters:
12         num_filters += growth_rate
13
14     net = slim.utils.collect_named_outputs(outputs_collections, sc.name, net)
15
16   return net, num_filters
· Transition Layer
Transition Layer由1*1BLD和2*2平均池化构成:
 1 @slim.add_arg_scope
 2 def _transition_block(inputs, num_filters, compression=1.0,
 3                       scope=None, outputs_collections=None):
 4
 5   num_filters = int(num_filters * compression)
 6   with tf.variable_scope(scope, 'transition_blockx', [inputs]) as sc:
 7     net = inputs
 8     net = _conv(net, num_filters, 1, scope='blk')
 9     net = slim.avg_pool2d(net, 2)
10     net = slim.utils.collect_named_outputs(outputs_collections, sc.name, net)
11   return net, num_filters
上述各层均为自定义网络结构,均使用装饰器@slim.add_arg_scope。
DenseNet
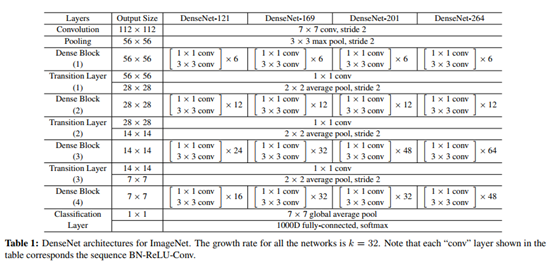
为了可以通过传入参数实现不同深度的DenseNet,如DenseNet-121,DenseNet-169等。将通过对DenseNet网络结构中,各区块组成的数量以参数的形式进行设置。包含初始部分、DenseBlock与Transition Layer组合部分以及最终部分。
 1 def densenet(inputs,
 2              num_classes=1000,
 3              reduction=None,
 4              growth_rate=None,
 5              num_filters=None,
 6              num_layers=None,
 7              dropout_rate=None,
 8              data_format='NHWC',
 9              is_training=True,
10              reuse=None,
11              scope=None):
12   assert reduction is not None
13   assert growth_rate is not None
14   assert num_filters is not None
15   assert num_layers is not None
16
17   compression = 1.0 - reduction
18   num_dense_blocks = len(num_layers)
19
20   if data_format == 'NCHW':
21     inputs = tf.transpose(inputs, [0, 3, 1, 2])
22
23   with tf.variable_scope(scope, 'densenetxxx', [inputs, num_classes],
24                          reuse=reuse) as sc:
25     end_points_collection = sc.name + '_end_points'
26     with slim.arg_scope([slim.batch_norm, slim.dropout],
27                          is_training=is_training),
28          slim.arg_scope([slim.conv2d, _conv, _conv_block,
29                          _dense_block, _transition_block],
30                          outputs_collections=end_points_collection),
31          slim.arg_scope([_conv], dropout_rate=dropout_rate):
32       net = inputs
33
34       # initial convolution   通用的
35       net = slim.conv2d(net, num_filters, 7, stride=2, scope='conv1')
36       net = slim.batch_norm(net)
37       net = tf.nn.relu(net)
38       net = slim.max_pool2d(net, 3, stride=2, padding='SAME')
39
40       # blocks
41       for i in range(num_dense_blocks - 1):
42         # dense blocks
43         net, num_filters = _dense_block(net, num_layers[i], num_filters,
44                                         growth_rate,
45                                         scope='dense_block' + str(i+1))
46
47         # Add transition_block
48         net, num_filters = _transition_block(net, num_filters,
49                                              compression=compression,
50                                              scope='transition_block' + str(i+1))
51
52       net, num_filters = _dense_block(
53               net, num_layers[-1], num_filters,
54               growth_rate,
55               scope='dense_block' + str(num_dense_blocks))
56
57       # final blocks
58       with tf.variable_scope('final_block', [inputs]):
59         net = slim.batch_norm(net)
60         net = tf.nn.relu(net)
61         net = _global_avg_pool2d(net, scope='global_avg_pool')
62
63       net = slim.conv2d(net, num_classes, 1,
64                         biases_initializer=tf.zeros_initializer(),
65                         scope='logits')
66
67       end_points = slim.utils.convert_collection_to_dict(
68           end_points_collection)
69
70       if num_classes is not None:
71         end_points['predictions'] = slim.softmax(net, scope='predictions')
72
73       return net, end_points
至此,可以通过num_filters、num_layers 等参数的设置实现不同深度的DenseNet。如DenseNet-121:
 1 def densenet121(inputs, num_classes=1000, data_format='NHWC', is_training=True, reuse=None):
 2   return densenet(inputs,
 3                   num_classes=num_classes,
 4                   reduction=0.5,
 5                   growth_rate=32,
 6                   num_filters=64,
 7                   num_layers=[6,12,24,16],
 8                   data_format=data_format,
 9                   is_training=is_training,
10                   reuse=reuse,
11                   scope='densenet121')
12 densenet121.default_image_size = 224
nets_factory.py主要是对构建的模块和模型进行调用,不再赘述。