述
Silverlight 2 Beta 1版本发布了,无论从Runtime还是Tools都给我们带来了很多的惊喜,如支持框架语言Visual Basic, Visual C#, IronRuby, Ironpython,对JSON、Web Service、WCF以及Sockets的支持等一系列新的特性。《一步一步学Silverlight 2系列》文章带您快速进入Silverlight 2开发。
本文为系列文章第五篇,利用前面讲过的鼠标事件处理实现简单的拖放功能。
准备XAML
在实现拖放功能中,分为三个步骤:
1.按下鼠标,触发MouseLeftButtonDown事件,选择要拖动的对象。
2.移动鼠标,触发MouseMove事件,移动选择的对象。
3.放开鼠标,触发MouseLeftButtonUp事件,停止捕捉事件。
做一个简单的界面,用一个按钮来显示拖放,如下XAML声明:
<Canvas Background="#46461F">
    <Button
       MouseLeftButtonDown="OnMouseDown"
       MouseMove="OnMouseMove"
       MouseLeftButtonUp="OnMouseUp"
       Canvas.Left="50" Canvas.Top="50" Background="Red"
       FontSize="18"
       Width="160" Height="80">
        <Button.Content>
            <StackPanel Orientation="Horizontal" HorizontalAlignment="Center"
                        VerticalAlignment="Center">
                <Image Source="smile_6.png"></Image>
                <TextBlock Text="拖动我" VerticalAlignment="Center" Margin="10"></TextBlock>
            </StackPanel>
        </Button.Content>
    </Button>
</Canvas>
这里为了界面显示效果,使用了控件模板,后续会专门讲到。
开始拖放操作
开始拖放操作,实现MouseLeftButtonDown事件处理程序,用两个全局变量来记录当前鼠标的位置和鼠标是否保持移动。
bool trackingMouseMove = false;
Point mousePosition;

void OnMouseDown(object sender, MouseButtonEventArgs e)
{
    FrameworkElement element = sender as FrameworkElement;
    mousePosition = e.GetPosition(null);
    trackingMouseMove = true;
    if (null != element)
    {
        element.CaptureMouse();
        element.Cursor = Cursors.Hand;
    }
}
移动对象
移动对象,实现MouseMove事件处理程序,计算元素的位置并更新,同时更新鼠标的位置。
void OnMouseMove(object sender, MouseEventArgs e)
{
    FrameworkElement element = sender as FrameworkElement;
    if (trackingMouseMove)
    {
        double deltaV = e.GetPosition(null).Y - mousePosition.Y;
        double deltaH = e.GetPosition(null).X - mousePosition.X;
        double newTop = deltaV + (double)element.GetValue(Canvas.TopProperty);
        double newLeft = deltaH + (double)element.GetValue(Canvas.LeftProperty);

        element.SetValue(Canvas.TopProperty, newTop);
        element.SetValue(Canvas.LeftProperty, newLeft);

        mousePosition = e.GetPosition(null);
    }
}
完成拖放操作
完成拖放操作,实现MouseLeftButtonUp事件处理程序。
void OnMouseUp(object sender, MouseButtonEventArgs e)
{
    FrameworkElement element = sender as FrameworkElement;
    trackingMouseMove = false;
    element.ReleaseMouseCapture();

    mousePosition.X = mousePosition.Y = 0;
    element.Cursor = null;
}
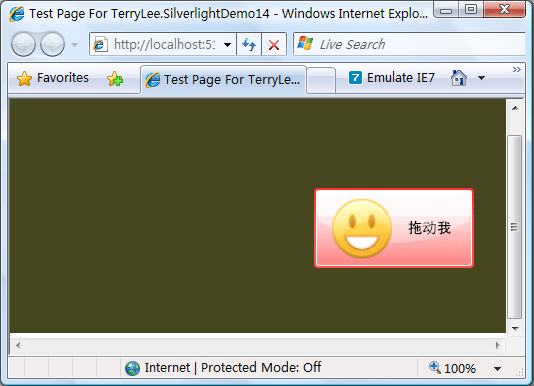
效果显示
最终,完成后的效果如下
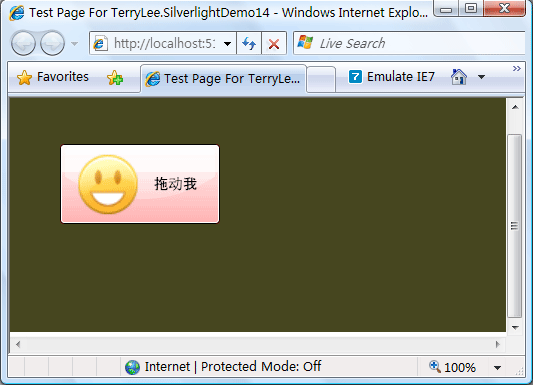
拖动按钮
结束语
本文实现了一个简单的拖放功能(示例来自于Silverlight 2 SDK),点击下载文本示例代码。
作者:TerryLee
出处:http://terrylee.cnblogs.com
本文版权归作者和博客园共有,欢迎转载,但未经作者同意必须保留此段声明,且在文章页面明显位置给出原文连接,否则保留追究法律责任的权利。
出处:http://terrylee.cnblogs.com
本文版权归作者和博客园共有,欢迎转载,但未经作者同意必须保留此段声明,且在文章页面明显位置给出原文连接,否则保留追究法律责任的权利。