本节内容是如何获取Android系统中应用程序的信息,主要包括packagename、label、icon、占用大小等。具体分为两个
部分,计划如下:
第一部分: 获取应用程序的packagename、label、icon等 ;
第二部分: 获取应用程序的占用大小,包括:缓存大小(cachsize)、数据大小(datasize)。
每部分都为您准备了简单丰富的实例,您一定不会错过。
Android系统为我们提供了很多服务管理的类,包括ActivityManager、PowerManager(电源管理)、AudioManager(音频管理)
等。除此之外,还提供了一个PackageManger管理类,它的主要职责是管理应用程序包。 通过它,我们就可以获取应用程序信息。
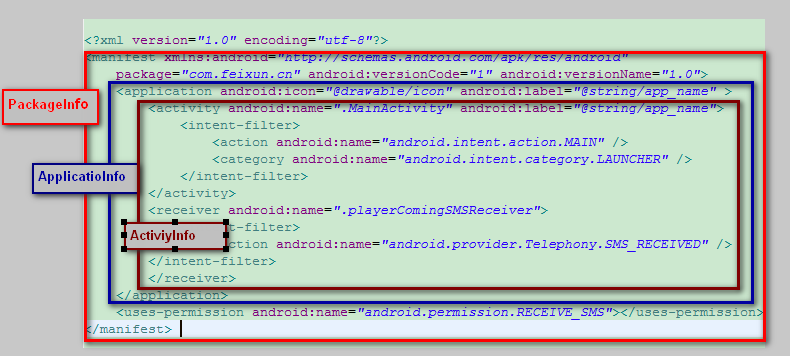
引入: AnroidManifest.xml文件节点说明:

一、相关类的介绍
PackageItemInfo类
说明: AndroidManifest.xml文件中所有节点的基类,提供了这些节点的基本信息:a label、icon、 meta-data。它并不
直接使用,而是由子类继承然后调用相应方法。
常用字段:
public int icon 获得该资源图片在R文件中的值 (对应于android:icon属性)
public int labelRes 获得该label在R文件中的值(对应于android:label属性)
public String name 获得该节点的name值 (对应于android:name属性)
public String packagename 获得该应用程序的包名 (对应于android:packagename属性)
常用方法:
Drawable loadIcon(PackageManager pm) 获得当前应用程序的图像
CharSequence loadLabel(PackageManager pm) 获得当前应用程序的label
ActivityInfo类 继承自 PackageItemInfo
说明: 获得应用程序中<activity/>或者 <receiver />节点的信息 。我们可以通过它来获取我们设置的任何属性,包括
theme 、launchMode、launchmode等
常用方法继承至PackageItemInfo类中的loadIcon()和loadLabel()
ServiceInfo 类
说明: 同ActivityInfo类似 ,同样继承自 PackageItemInfo,只不过它表示的是<service>节点信息。
ApplicationInfo类 继承自 PackageItemInfo
说明:获取一个特定引用程序中<application>节点的信息。
字段说明:
flags字段: FLAG_SYSTEM 系统应用程序
FLAG_EXTERNAL_STORAGE 表示该应用安装在sdcard中
常用方法继承至PackageItemInfo类中的loadIcon()和loadLabel()
ResolveInfo类
说明:根据<intent>节点来获取其上一层目录的信息,通常是<activity>、<receiver>、<service>节点信息。
常用字段:
public ActivityInfo activityInfo 获取 ActivityInfo对象,即<activity>或<receiver >节点信息
public ServiceInfo serviceInfo 获取 ServiceInfo对象,即<service>节点信息
常用方法:
Drawable loadIcon(PackageManager pm) 获得当前应用程序的图像
CharSequence loadLabel(PackageManager pm) 获得当前应用程序的label
PackageInfo类
说明:手动获取AndroidManifest.xml文件的信息 。
常用字段:
public String packageName 包名
public ActivityInfo[] activities 所有<activity>节点信息
public ApplicationInfo applicationInfo <application>节点信息,只有一个
public ActivityInfo[] receivers 所有<receiver>节点信息,多个
public ServiceInfo[] services 所有<service>节点信息 ,多个
PackageManger 类
说明: 获得已安装的应用程序信息 。可以通过getPackageManager()方法获得。
常用方法:
public abstract PackageManager getPackageManager()
功能:获得一个PackageManger对象
public abstrac tDrawable getApplicationIcon(StringpackageName)
参数: packageName 包名
功能:返回给定包名的图标,否则返回null
public abstract ApplicationInfo getApplicationInfo(String packageName, int flags)
参数:packagename 包名
flags 该ApplicationInfo是此flags标记,通常可以直接赋予常数0即可
功能:返回该ApplicationInfo对象
public abstract List<ApplicationInfo> getInstalledApplications(int flags)
参数:flag为一般为GET_UNINSTALLED_PACKAGES,那么此时会返回所有ApplicationInfo。我们可以对ApplicationInfo
的flags过滤,得到我们需要的。
功能:返回给定条件的所有PackageInfo
public abstract List<PackageInfo> getInstalledPackages(int flags)
参数如上
功能:返回给定条件的所有PackageInfo
public abstractResolveInfo resolveActivity(Intent intent, int flags)
参数: intent 查寻条件,Activity所配置的action和category
flags: MATCH_DEFAULT_ONLY :Category必须带有CATEGORY_DEFAULT的Activity,才匹配
GET_INTENT_FILTERS :匹配Intent条件即可
GET_RESOLVED_FILTER :匹配Intent条件即可
功能 :返回给定条件的ResolveInfo对象(本质上是Activity)
public abstract List<ResolveInfo> queryIntentActivities(Intent intent, int flags)
参数同上
功能 :返回给定条件的所有ResolveInfo对象(本质上是Activity),集合对象
public abstract ResolveInfo resolveService(Intent intent, int flags)
参数同上
功能 :返回给定条件的ResolveInfo对象(本质上是Service)
public abstract List<ResolveInfo> queryIntentServices(Intent intent, int flags)
参数同上
功能 :返回给定条件的所有ResolveInfo对象(本质上是Service),集合对象
二、DEMO讲解
通过前面的介绍,相信您一定很了解了,本质上来讲,这些XXXInfo类不过是我们在AndroidManifest.XML文件中定义的信息,
知道到这点了,理解起来就不是很难了。
下面我透过两个简答的DEMO,来学以致用。
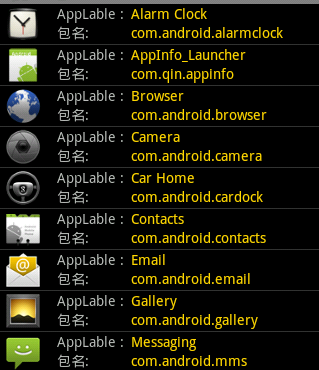
Demo 1: 通过queryIntentActivities()方法,查询Android系统的所有具备ACTION_MAIN和CATEGORY_LAUNCHER
的Intent的应用程序,点击后,能启动该应用,说白了就是做一个类似Home程序的简易Launcher 。
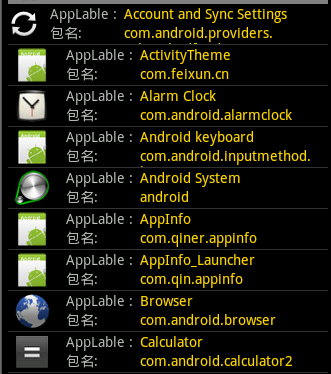
Demo 2 :通过getInstalledApplications()方法获取应用,然后对其过滤,查找出我们需要的第三方应用,系统应用,安装在sdcard的应用。
Demo1 :
图:

1 、布局文件: 主要有两个:带listview的browse_app_list.xml文件 ;listview的项browse_app_item.xml
browse_app_list.xml
- <?xml version="1.0" encoding="utf-8"?>
- <LinearLayout xmlns:android="http://schemas.android.com/apk/res/android"
- android:orientation="vertical" android:layout_width="fill_parent"
- android:layout_height="fill_parent">>
- <ListView android:id="@+id/listviewApp" android:layout_width="fill_parent"
- android:layout_height="fill_parent" ></ListView>
- </LinearLayout>
<?xml version="1.0" encoding="utf-8"?>
<LinearLayout xmlns:android="http://schemas.android.com/apk/res/android"
	android:orientation="vertical" android:layout_width="fill_parent"
	android:layout_height="fill_parent">>
	<ListView android:id="@+id/listviewApp" android:layout_width="fill_parent"
		android:layout_height="fill_parent" ></ListView>
</LinearLayout>
browse_app_item.xmlbrowse_app_item.xml
- <?xml version="1.0" encoding="utf-8"?>
- <LinearLayout xmlns:android="http://schemas.android.com/apk/res/android"
- android:layout_width="fill_parent" android:layout_height="50dip">
- <ImageView android:id="@+id/imgApp" android:layout_width="wrap_content"
- android:layout_height="fill_parent" ></ImageView>
- <RelativeLayout android:layout_width="fill_parent" android:layout_marginLeft="10dip"
- android:layout_height="40dip">
- <TextView android:id="@+id/tvLabel" android:layout_width="wrap_content"
- android:layout_height="wrap_content" android:text="AppLable : "></TextView>
- <TextView android:id="@+id/tvAppLabel" android:layout_width="wrap_content"
- android:layout_toRightOf="@id/tvLabel" android:layout_height="wrap_content"
- android:layout_marginLeft="3dip" android:text="Label" android:textColor="#FFD700"></TextView>
- <TextView android:id="@+id/tvName" android:layout_width="wrap_content"
- android:layout_height="wrap_content" android:layout_below="@id/tvLabel"
- android:text="包名:"></TextView>
- <TextView android:id="@+id/tvPkgName" android:layout_width="wrap_content"
- android:layout_height="wrap_content" android:layout_below="@id/tvAppLabel"
- android:layout_alignLeft="@id/tvAppLabel" android:textColor="#FFD700"></TextView>
- </RelativeLayout>
- </LinearLayout>
<?xml version="1.0" encoding="utf-8"?>
<LinearLayout xmlns:android="http://schemas.android.com/apk/res/android"
	android:layout_width="fill_parent" android:layout_height="50dip">

	<ImageView android:id="@+id/imgApp" android:layout_width="wrap_content"
		android:layout_height="fill_parent" ></ImageView>
	<RelativeLayout android:layout_width="fill_parent"  android:layout_marginLeft="10dip"
		android:layout_height="40dip">
		<TextView android:id="@+id/tvLabel" android:layout_width="wrap_content"
			android:layout_height="wrap_content" android:text="AppLable : "></TextView>
		<TextView android:id="@+id/tvAppLabel" android:layout_width="wrap_content"
			android:layout_toRightOf="@id/tvLabel" android:layout_height="wrap_content"
			android:layout_marginLeft="3dip" android:text="Label" android:textColor="#FFD700"></TextView>
		<TextView android:id="@+id/tvName" android:layout_width="wrap_content"
			android:layout_height="wrap_content" android:layout_below="@id/tvLabel"
			android:text="包名:"></TextView>
		<TextView android:id="@+id/tvPkgName" android:layout_width="wrap_content"
		    android:layout_height="wrap_content" android:layout_below="@id/tvAppLabel"
		    android:layout_alignLeft="@id/tvAppLabel" android:textColor="#FFD700"></TextView>
	</RelativeLayout>
</LinearLayout>
2 、AppInfo.java : 保存应用程序信息的Model类
- /Model类 ,用来存储应用程序信息
- public class AppInfo {
- private String appLabel; //应用程序标签
- private Drawable appIcon ; //应用程序图像
- private Intent intent ; //启动应用程序的Intent ,一般是Action为Main和Category为Lancher的Activity
- private String pkgName ; //应用程序所对应的包名
- public AppInfo(){}
- public String getAppLabel() {
- return appLabel;
- }
- public void setAppLabel(String appName) {
- this.appLabel = appName;
- }
- public Drawable getAppIcon() {
- return appIcon;
- }
- public void setAppIcon(Drawable appIcon) {
- this.appIcon = appIcon;
- }
- public Intent getIntent() {
- return intent;
- }
- public void setIntent(Intent intent) {
- this.intent = intent;
- }
- public String getPkgName(){
- return pkgName ;
- }
- public void setPkgName(String pkgName){
- this.pkgName=pkgName ;
- }
- }
/Model类 ,用来存储应用程序信息
public class AppInfo {

	private String appLabel;    //应用程序标签
	private Drawable appIcon ;  //应用程序图像
	private Intent intent ;     //启动应用程序的Intent ,一般是Action为Main和Category为Lancher的Activity
	private String pkgName ;    //应用程序所对应的包名

	public AppInfo(){}

	public String getAppLabel() {
		return appLabel;
	}
	public void setAppLabel(String appName) {
		this.appLabel = appName;
	}
	public Drawable getAppIcon() {
		return appIcon;
	}
	public void setAppIcon(Drawable appIcon) {
		this.appIcon = appIcon;
	}
	public Intent getIntent() {
		return intent;
	}
	public void setIntent(Intent intent) {
		this.intent = intent;
	}
	public String getPkgName(){
		return pkgName ;
	}
	public void setPkgName(String pkgName){
		this.pkgName=pkgName ;
	}
}
3、 BrowseApplicationInfoAdapter.java : 自定义适配器类,为ListView提供视图
- //自定义适配器类,提供给listView的自定义view
- public class BrowseApplicationInfoAdapter extends BaseAdapter {
- private List<AppInfo> mlistAppInfo = null;
- LayoutInflater infater = null;
- public BrowseApplicationInfoAdapter(Context context, List<AppInfo> apps) {
- infater = (LayoutInflater) context.getSystemService(Context.LAYOUT_INFLATER_SERVICE);
- mlistAppInfo = apps ;
- }
- @Override
- public int getCount() {
- // TODO Auto-generated method stub
- System.out.println("size" + mlistAppInfo.size());
- return mlistAppInfo.size();
- }
- @Override
- public Object getItem(int position) {
- // TODO Auto-generated method stub
- return mlistAppInfo.get(position);
- }
- @Override
- public long getItemId(int position) {
- // TODO Auto-generated method stub
- return 0;
- }
- @Override
- public View getView(int position, View convertview, ViewGroup arg2) {
- System.out.println("getView at " + position);
- View view = null;
- ViewHolder holder = null;
- if (convertview == null || convertview.getTag() == null) {
- view = infater.inflate(R.layout.browse_app_item, null);
- holder = new ViewHolder(view);
- view.setTag(holder);
- }
- else{
- view = convertview ;
- holder = (ViewHolder) convertview.getTag() ;
- }
- AppInfo appInfo = (AppInfo) getItem(position);
- holder.appIcon.setImageDrawable(appInfo.getAppIcon());
- holder.tvAppLabel.setText(appInfo.getAppLabel());
- holder.tvPkgName.setText(appInfo.getPkgName());
- return view;
- }
- class ViewHolder {
- ImageView appIcon;
- TextView tvAppLabel;
- TextView tvPkgName;
- public ViewHolder(View view) {
- this.appIcon = (ImageView) view.findViewById(R.id.imgApp);
- this.tvAppLabel = (TextView) view.findViewById(R.id.tvAppLabel);
- this.tvPkgName = (TextView) view.findViewById(R.id.tvPkgName);
- }
- }
- }
//自定义适配器类,提供给listView的自定义view
public class BrowseApplicationInfoAdapter extends BaseAdapter {

	private List<AppInfo> mlistAppInfo = null;

	LayoutInflater infater = null;

	public BrowseApplicationInfoAdapter(Context context,  List<AppInfo> apps) {
		infater = (LayoutInflater) context.getSystemService(Context.LAYOUT_INFLATER_SERVICE);
		mlistAppInfo = apps ;
	}
	@Override
	public int getCount() {
		// TODO Auto-generated method stub
		System.out.println("size" + mlistAppInfo.size());
		return mlistAppInfo.size();
	}
	@Override
	public Object getItem(int position) {
		// TODO Auto-generated method stub
		return mlistAppInfo.get(position);
	}
	@Override
	public long getItemId(int position) {
		// TODO Auto-generated method stub
		return 0;
	}
	@Override
	public View getView(int position, View convertview, ViewGroup arg2) {
		System.out.println("getView at " + position);
		View view = null;
		ViewHolder holder = null;
		if (convertview == null || convertview.getTag() == null) {
			view = infater.inflate(R.layout.browse_app_item, null);
			holder = new ViewHolder(view);
			view.setTag(holder);
		}
		else{
			view = convertview ;
			holder = (ViewHolder) convertview.getTag() ;
		}
		AppInfo appInfo = (AppInfo) getItem(position);
		holder.appIcon.setImageDrawable(appInfo.getAppIcon());
		holder.tvAppLabel.setText(appInfo.getAppLabel());
		holder.tvPkgName.setText(appInfo.getPkgName());
		return view;
	}

	class ViewHolder {
		ImageView appIcon;
		TextView tvAppLabel;
		TextView tvPkgName;

		public ViewHolder(View view) {
			this.appIcon = (ImageView) view.findViewById(R.id.imgApp);
			this.tvAppLabel = (TextView) view.findViewById(R.id.tvAppLabel);
			this.tvPkgName = (TextView) view.findViewById(R.id.tvPkgName);
		}
	}
}
4 、MainActivity.java 主工程逻辑
请仔细体会queryIntentActivities()方法,并且注意到排序,它很重要。
- <span style="font-size: 13px;">public class MainActivity extends Activity implements OnItemClickListener {
- private ListView listview = null;
- private List<AppInfo> mlistAppInfo = null;
- @Override
- public void onCreate(Bundle savedInstanceState) {
- super.onCreate(savedInstanceState);
- setContentView(R.layout.browse_app_list);
- listview = (ListView) findViewById(R.id.listviewApp);
- mlistAppInfo = new ArrayList<AppInfo>();
- queryAppInfo(); // 查询所有应用程序信息
- BrowseApplicationInfoAdapter browseAppAdapter = new BrowseApplicationInfoAdapter(
- this, mlistAppInfo);
- listview.setAdapter(browseAppAdapter);
- listview.setOnItemClickListener(this);
- }
- // 点击跳转至该应用程序
- public void onItemClick(AdapterView<?> arg0, View view, int position,
- long arg3) {
- // TODO Auto-generated method stub
- Intent intent = mlistAppInfo.get(position).getIntent();
- startActivity(intent);
- }
- // 获得所有启动Activity的信息,类似于Launch界面
- public void queryAppInfo() {
- PackageManager pm = this.getPackageManager(); // 获得PackageManager对象
- Intent mainIntent = new Intent(Intent.ACTION_MAIN, null);
- mainIntent.addCategory(Intent.CATEGORY_LAUNCHER);
- // 通过查询,获得所有ResolveInfo对象.
- List<ResolveInfo> resolveInfos = pm
- .queryIntentActivities(mainIntent, PackageManager.MATCH_DEFAULT_ONLY);
- // 调用系统排序 , 根据name排序
- // 该排序很重要,否则只能显示系统应用,而不能列出第三方应用程序
- Collections.sort(resolveInfos,new ResolveInfo.DisplayNameComparator(pm));
- if (mlistAppInfo != null) {
- mlistAppInfo.clear();
- for (ResolveInfo reInfo : resolveInfos) {
- String activityName = reInfo.activityInfo.name; // 获得该应用程序的启动Activity的name
- String pkgName = reInfo.activityInfo.packageName; // 获得应用程序的包名
- String appLabel = (String) reInfo.loadLabel(pm); // 获得应用程序的Label
- Drawable icon = reInfo.loadIcon(pm); // 获得应用程序图标
- // 为应用程序的启动Activity 准备Intent
- Intent launchIntent = new Intent();
- launchIntent.setComponent(new ComponentName(pkgName,
- activityName));
- // 创建一个AppInfo对象,并赋值
- AppInfo appInfo = new AppInfo();
- appInfo.setAppLabel(appLabel);
- appInfo.setPkgName(pkgName);
- appInfo.setAppIcon(icon);
- appInfo.setIntent(launchIntent);
- mlistAppInfo.add(appInfo); // 添加至列表中
- System.out.println(appLabel + " activityName---" + activityName
- + " pkgName---" + pkgName);
- }
- }
- }
- }</span>
public class MainActivity extends Activity implements OnItemClickListener {

	private ListView listview = null;

	private List<AppInfo> mlistAppInfo = null;

	@Override
	public void onCreate(Bundle savedInstanceState) {
		super.onCreate(savedInstanceState);
		setContentView(R.layout.browse_app_list);

		listview = (ListView) findViewById(R.id.listviewApp);
		mlistAppInfo = new ArrayList<AppInfo>();
		queryAppInfo(); // 查询所有应用程序信息
		BrowseApplicationInfoAdapter browseAppAdapter = new BrowseApplicationInfoAdapter(
				this, mlistAppInfo);
		listview.setAdapter(browseAppAdapter);
		listview.setOnItemClickListener(this);
	}
	// 点击跳转至该应用程序
	public void onItemClick(AdapterView<?> arg0, View view, int position,
			long arg3) {
		// TODO Auto-generated method stub
		Intent intent = mlistAppInfo.get(position).getIntent();
		startActivity(intent);
	}
	// 获得所有启动Activity的信息,类似于Launch界面
	public void queryAppInfo() {
		PackageManager pm = this.getPackageManager(); // 获得PackageManager对象
		Intent mainIntent = new Intent(Intent.ACTION_MAIN, null);
		mainIntent.addCategory(Intent.CATEGORY_LAUNCHER);
		// 通过查询,获得所有ResolveInfo对象.
		List<ResolveInfo> resolveInfos = pm
				.queryIntentActivities(mainIntent, PackageManager.MATCH_DEFAULT_ONLY);
		// 调用系统排序 , 根据name排序
		// 该排序很重要,否则只能显示系统应用,而不能列出第三方应用程序
		Collections.sort(resolveInfos,new ResolveInfo.DisplayNameComparator(pm));
		if (mlistAppInfo != null) {
			mlistAppInfo.clear();
			for (ResolveInfo reInfo : resolveInfos) {
				String activityName = reInfo.activityInfo.name; // 获得该应用程序的启动Activity的name
				String pkgName = reInfo.activityInfo.packageName; // 获得应用程序的包名
				String appLabel = (String) reInfo.loadLabel(pm); // 获得应用程序的Label
				Drawable icon = reInfo.loadIcon(pm); // 获得应用程序图标
				// 为应用程序的启动Activity 准备Intent
				Intent launchIntent = new Intent();
				launchIntent.setComponent(new ComponentName(pkgName,
						activityName));
				// 创建一个AppInfo对象,并赋值
				AppInfo appInfo = new AppInfo();
				appInfo.setAppLabel(appLabel);
				appInfo.setPkgName(pkgName);
				appInfo.setAppIcon(icon);
				appInfo.setIntent(launchIntent);
				mlistAppInfo.add(appInfo); // 添加至列表中
				System.out.println(appLabel + " activityName---" + activityName
						+ " pkgName---" + pkgName);
			}
		}
	}
}
好了,第一个Demo完成 。。
Demo 2:
demo2在布局、适配器方面和Demo1一样。只是利用了getInstalledApplications()方法,继而通过ApplicationInfo.flags来挑选
我们希望的ApplicationInfo对象。
图:


过滤应用程序如下:
- package com.qiner.appinfo;
- import java.util.ArrayList;
- import java.util.Collections;
- import java.util.List;
- import com.qiner.appinfo.R;
- import android.app.Activity;
- import android.app.Application;
- import android.content.pm.ApplicationInfo;
- import android.content.pm.PackageManager;
- import android.os.Bundle;
- import android.view.View;
- import android.view.View.OnClickListener;
- import android.widget.Button;
- import android.widget.ListView;
- public class MainActivity extends Activity {
- public static final int FILTER_ALL_APP = 0; // 所有应用程序
- public static final int FILTER_SYSTEM_APP = 1; // 系统程序
- public static final int FILTER_THIRD_APP = 2; // 第三方应用程序
- public static final int FILTER_SDCARD_APP = 3; // 安装在SDCard的应用程序
- private ListView listview = null;
- private PackageManager pm;
- private int filter = FILTER_ALL_APP;
- private List<AppInfo> mlistAppInfo ;
- private BrowseApplicationInfoAdapter browseAppAdapter = null ;
- /** Called when the activity is first created. */
- @Override
- public void onCreate(Bundle savedInstanceState) {
- super.onCreate(savedInstanceState);
- setContentView(R.layout.browse_app_list);
- listview = (ListView) findViewById(R.id.listviewApp);
- if(getIntent()!=null){
- filter = getIntent().getIntExtra("filter", 0) ;
- }
- mlistAppInfo = queryFilterAppInfo(filter); // 查询所有应用程序信息
- // 构建适配器,并且注册到listView
- browseAppAdapter = new BrowseApplicationInfoAdapter(this, mlistAppInfo);
- listview.setAdapter(browseAppAdapter);
- }
- // 根据查询条件,查询特定的ApplicationInfo
- private List<AppInfo> queryFilterAppInfo(int filter) {
- pm = this.getPackageManager();
- // 查询所有已经安装的应用程序
- List<ApplicationInfo> listAppcations = pm
- .getInstalledApplications(PackageManager.GET_UNINSTALLED_PACKAGES);
- Collections.sort(listAppcations,
- new ApplicationInfo.DisplayNameComparator(pm));// 排序
- List<AppInfo> appInfos = new ArrayList<AppInfo>(); // 保存过滤查到的AppInfo
- // 根据条件来过滤
- switch (filter) {
- case FILTER_ALL_APP: // 所有应用程序
- appInfos.clear();
- for (ApplicationInfo app : listAppcations) {
- appInfos.add(getAppInfo(app));
- }
- return appInfos;
- case FILTER_SYSTEM_APP: // 系统程序
- appInfos.clear();
- for (ApplicationInfo app : listAppcations) {
- if ((app.flags & ApplicationInfo.FLAG_SYSTEM) != 0) {
- appInfos.add(getAppInfo(app));
- }
- }
- return appInfos;
- case FILTER_THIRD_APP: // 第三方应用程序
- appInfos.clear();
- for (ApplicationInfo app : listAppcations) {
- //非系统程序
- if ((app.flags & ApplicationInfo.FLAG_SYSTEM) <= 0) {
- appInfos.add(getAppInfo(app));
- }
- //本来是系统程序,被用户手动更新后,该系统程序也成为第三方应用程序了
- else if ((app.flags & ApplicationInfo.FLAG_UPDATED_SYSTEM_APP) != 0){
- appInfos.add(getAppInfo(app));
- }
- }
- break;
- case FILTER_SDCARD_APP: // 安装在SDCard的应用程序
- appInfos.clear();
- for (ApplicationInfo app : listAppcations) {
- if ((app.flags & ApplicationInfo.FLAG_EXTERNAL_STORAGE) != 0) {
- appInfos.add(getAppInfo(app));
- }
- }
- return appInfos;
- default:
- return null;
- }
- return appInfos;
- }
- // 构造一个AppInfo对象 ,并赋值
- private AppInfo getAppInfo(ApplicationInfo app) {
- AppInfo appInfo = new AppInfo();
- appInfo.setAppLabel((String) app.loadLabel(pm));
- appInfo.setAppIcon(app.loadIcon(pm));
- appInfo.setPkgName(app.packageName);
- return appInfo;
- }
- }
package com.qiner.appinfo;

import java.util.ArrayList;
import java.util.Collections;
import java.util.List;

import com.qiner.appinfo.R;

import android.app.Activity;
import android.app.Application;
import android.content.pm.ApplicationInfo;
import android.content.pm.PackageManager;
import android.os.Bundle;
import android.view.View;
import android.view.View.OnClickListener;
import android.widget.Button;
import android.widget.ListView;

public class MainActivity extends Activity  {

	public static final int FILTER_ALL_APP = 0; // 所有应用程序
	public static final int FILTER_SYSTEM_APP = 1; // 系统程序
	public static final int FILTER_THIRD_APP = 2; // 第三方应用程序
	public static final int FILTER_SDCARD_APP = 3; // 安装在SDCard的应用程序

	private ListView listview = null;

	private PackageManager pm;
	private int filter = FILTER_ALL_APP;
	private List<AppInfo> mlistAppInfo ;
	private BrowseApplicationInfoAdapter browseAppAdapter = null ;
	/** Called when the activity is first created. */
	@Override
	public void onCreate(Bundle savedInstanceState) {
		super.onCreate(savedInstanceState);
		setContentView(R.layout.browse_app_list);
		listview = (ListView) findViewById(R.id.listviewApp);
		if(getIntent()!=null){
			filter = getIntent().getIntExtra("filter", 0) ;
		}
		mlistAppInfo = queryFilterAppInfo(filter); // 查询所有应用程序信息
		// 构建适配器,并且注册到listView
		browseAppAdapter = new BrowseApplicationInfoAdapter(this, mlistAppInfo);
		listview.setAdapter(browseAppAdapter);
	}
	// 根据查询条件,查询特定的ApplicationInfo
	private List<AppInfo> queryFilterAppInfo(int filter) {
		pm = this.getPackageManager();
		// 查询所有已经安装的应用程序
		List<ApplicationInfo> listAppcations = pm
				.getInstalledApplications(PackageManager.GET_UNINSTALLED_PACKAGES);
		Collections.sort(listAppcations,
				new ApplicationInfo.DisplayNameComparator(pm));// 排序
		List<AppInfo> appInfos = new ArrayList<AppInfo>(); // 保存过滤查到的AppInfo
		// 根据条件来过滤
		switch (filter) {
		case FILTER_ALL_APP: // 所有应用程序
			appInfos.clear();
			for (ApplicationInfo app : listAppcations) {
				appInfos.add(getAppInfo(app));
			}
			return appInfos;
		case FILTER_SYSTEM_APP: // 系统程序
			appInfos.clear();
			for (ApplicationInfo app : listAppcations) {
				if ((app.flags & ApplicationInfo.FLAG_SYSTEM) != 0) {
					appInfos.add(getAppInfo(app));
				}
			}
			return appInfos;
		case FILTER_THIRD_APP: // 第三方应用程序
			appInfos.clear();
			for (ApplicationInfo app : listAppcations) {
				//非系统程序
				if ((app.flags & ApplicationInfo.FLAG_SYSTEM) <= 0) {
					appInfos.add(getAppInfo(app));
				}
				//本来是系统程序,被用户手动更新后,该系统程序也成为第三方应用程序了
				else if ((app.flags & ApplicationInfo.FLAG_UPDATED_SYSTEM_APP) != 0){
					appInfos.add(getAppInfo(app));
				}
			}
			break;
		case FILTER_SDCARD_APP: // 安装在SDCard的应用程序
			appInfos.clear();
			for (ApplicationInfo app : listAppcations) {
				if ((app.flags & ApplicationInfo.FLAG_EXTERNAL_STORAGE) != 0) {
					appInfos.add(getAppInfo(app));
				}
			}
			return appInfos;
		default:
			return null;
		}
		return appInfos;
	}
	// 构造一个AppInfo对象 ,并赋值
	private AppInfo getAppInfo(ApplicationInfo app) {
		AppInfo appInfo = new AppInfo();
		appInfo.setAppLabel((String) app.loadLabel(pm));
		appInfo.setAppIcon(app.loadIcon(pm));
		appInfo.setPkgName(app.packageName);
		return appInfo;
	}
}
你可以在此基础上,构建更多丰富的应用。比说说Settings模块中的卸载安装应用程序等。
本节的源代码已上传,下载地址:http://download.csdn.net/detail/qinjuning/3775869