到目前为止,我们学会了单独使用CodeSmith实现代码生成。但其实你完全可以把CodeSmith结合在一起将生成的代码直接导入到Visual Studio里面。Visual Studio可以通过用户自定义工具来运行CodeSmtih,并在无论任何时候你对模板做修改时自动地调用其XML文件,这个特性允许你在Visual Studio里存储模板以及你需要地数据,并且在Visual Studio里利用CodeSmith实时地生成代码。
2.理解自定义工具
如果你在Visual Studio的项目方案浏览器里选择了一个文件后,你就可以配置自定义工具来作为其一个属性。 自定义工具其实是能够通过IVsSingleFileGenerator COM接口运行特定VB或者C#代码的组件。无论什么时候当你利用自定义工具修改或者保存文件时,Visual Studio都会通过自定义工具处理你的源文件并将其作为一个新的项目文件存储在自定义工具输出里。有些Visual Studio自带的工具就使用了这个功能,比如Visual Studio通过自定义工具建立一个强类型的DataSets的XSD文件。
CodeSmith实现了通过特定格式的XML文件使自己作为一个自定义工具集成在了Visual Studio里。因此,如果你添加正确的XML文件到Visual Studio里并在自定义工具里把CodeSmith 挂出来,那么你现在就可以在Visual Studio里直接使用CodeSmith创建代码了。
3.添加一个模板到你的项目
在开始在Visual Studio里生成代码之前,你需要添加CodeSmith 模板到你的Visual Studio项目。有两种方法可以办到:
(1)直接从Windows浏览窗口里把已有的模板文件直接拖到Visual Studio项目浏览器里。那么该项目文件将直接在当前位置使用CodeSmith 源模板
(2)在Windows浏览窗口新建一个文件夹,然后把你需要的模板都拷贝进去,并将文件夹放在你的项目解决方案目录下,然后在Visual Studio里刷新项目目录,你就会看到装有模板的文件夹了。
接下来,我们举个实际的例子,我们需要创建的vb类库代码如下。包含两个类:
1 Namespace CodeSmithSamples
2 Public Class Book
3 Private m_strTitle As String
4 Public Property Title() As String
5 Get
6 Return m_strTitle
7 End Get
8 Set(ByVal Value As String)
9 m_strTitle = Value
10 End Set
11 End Property
12 Private m_objAuthor As Author
13 Public Property Author() As Author
14 Get
15 Return m_objAuthor
16 End Get
17 Set(ByVal Value As Author)
18 m_objAuthor = Value
19 End Set
20 End Property
21 End Class
22 Public Class Author
23 Private m_strName As String
24 Public Property Name() As String
25 Get
26 Return m_strName
27 End Get
28 Set(ByVal Value As String)
29 m_strName = Value
30 End Set
31 End Property
32 End Class
33 End Namespace
我们将使用CodeSmith创建一个Books 和 Authors的排序列表。我们复制VBSortedList.cst模板(在实例模板里面)到当前项目中,紧接着我们删除以下三行:
Option Strict On
Imports System
Imports System.Collections
4.创建XML文件
要使用CodeSmith 结合Visual Studio作为自定义工具生成代码最关键的是创建XML文件。XML文件包含了模板属性,下面就是我们要创建的SortedList.xml:
1 <?xml version="1.0" encoding="utf-8" ?>
2 <codeSmith>
3 <!-- template that will be used to generate code -->
4 <template path="VBSortedList.cst" />
5
6 <!-- namespace for the generated code -->
7 <namespace>CodeSmithSamples</namespace>
8
9 <!-- namespaces that should be imported -->
10 <imports>
11 <import namespace="System" />
12 <import namespace="System.Collections" />
13 </imports>
14
15 <!-- any properties can be setup here as defaults and can be overridden in each property set -->
16 <defaultProperties>
17 <property name="Accessibility">Public</property>
18 </defaultProperties>
19
20 <!-- list of property sets which each get loaded into the template and executed -->
21 <propertySets>
22 <propertySet>
23 <property name="ClassName">AuthorSortedList</property>
24 <property name="ItemType">Author</property>
25 <property name="KeyType">String</property>
26 </propertySet>
27 <propertySet>
28 <property name="ClassName">BookSortedList</property>
29 <property name="ItemType">Book</property>
30 <property name="KeyType">String</property>
31 </propertySet>
32 </propertySets>
33 </codeSmith>
XML文件包含了VBSortedList.cst模板所需要的属性信息。XML文件也包含了生成代码所需要的命名空间,同时你要注意模板实际执行了两次,因为XML文件包含了两个不同的属性集。输出结果会将两个不同属性集成员整合到生成的文件里。
5.定义自定义工具属性
现在你就需要把这两部分连接起来。在资源管理器中选择SortedList.xml文件设置它的自定义工具属性为CodeSmithGenerator。现在输出文件将会成为SortedList.xml 的一个子项:
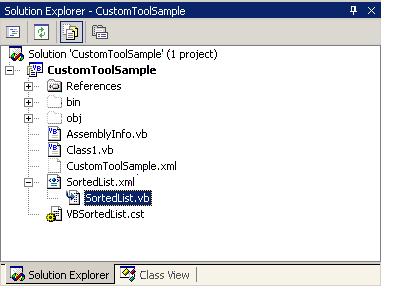
注意生成的结果,不管又几个属性集最终都输出到了一个文件里。