Android逆向之Java常用类
包装类
byte > Byte
int > Integer
short > Short
long > Long
float > Float
double > Double
boolean > Boolean
char > Character
public static void test0(){
int n =123456;
// 整型转字符串
String num=Integer.toString(n);
System.out.println(num);
// 从字符串中获取字符 ,获取了第0位上的数值。即123456的1.
char ch =num.charAt(0);
// 用字符类,将字符转为整型
int m=Character.digit(ch,10);
System.out.println(m);
// 用整型类,将字符串解析为整型
int m1=Integer.parseInt(num);
System.out.println(m1);
}字符串类
String类
toString equals
StringBuffer类与StringBuilder类
equals
public class Main {
public static void test1(){
Scanner scanner=new Scanner(System.in);
String str =scanner.next();
String string="hello";
if (string.equals(str)){
System.out.println("yes");
}else {
System.out.println("NO");
}
}append
 StringBuffer buffer = new StringBuffer();
        buffer.append(name);// 连接字符串
        buffer.append("hello");
        buffer.append(" world ");
        buffer.append(" good! ");
        System.out.println(buffer);
        StringBuilder builder = new StringBuilder();
        builder.append(name);
        builder.append("hello");
        builder.append("world");
        builder.append(" good! ");
        System.out.println(builder);
        System.out.println(name.toString());
        System.out.println(buffer.toString());
        System.out.println(builder.toString());
文件操作类
创建文件
public static File CreateFile(String filePath){
    // 创建文件对象
    File file = new File(filePath);
    // 判断文件是否存在
    if( !file.exists()) {
        // 创建文件,因为createNewFile函数本身抛出了异常,需要try
        try {
            file.createNewFile();
        } catch (IOException e) {
            e.printStackTrace();
            return null;
        }
    }
    // 返回文件对象
    return file;
}
读取文件
public static String ReadFile(File file){
    try {
        //  1. 创建文件输入流对象
        FileInputStream inputStream = new FileInputStream(file);
        //  2. 创建字节输出流对象
        ByteArrayOutputStream byteArrayOutputStream = new
ByteArrayOutputStream();
        // 3. 创建字节数组
        byte bytes[] = new byte[1024];
        int nReadLen = 0;
        //  4. 使用文件输入流对象读取文件内容
        while ( (nReadLen =  inputStream.read(bytes,0,1024))
!=‐1){
            //  5. 将读取的内容写入到字节对象
            byteArrayOutputStream.write(bytes,0,nReadLen);
        }
        // 以字符串方式返回字节对象
        return new String(byteArrayOutputStream.toByteArray());
    } catch (Exception e) {
        e.printStackTrace();
    }
    return null;
}
写入文件
public static String WriteFile(File file, String content){
    try {
        //  1. 创建文件输出流对象
        FileOutputStream  outputStream = new
FileOutputStream(file);
        // 2. 创建字节数组
        byte bytes[] = content.getBytes();
        int nReadLen = 0;
        //  3. 使用文件输出流对象写入文件内容
        outputStream.write(bytes);
    } catch (Exception e) {
        e.printStackTrace();
    }
    return null;
}
删除文件
public static String DeleteFile(File file){
    if (file.exists()){
        // 删除文件
        if (file.isFile()){
            file.delete();
        }
        // 删除目录
        else if (file.isDirectory()){
            // 删除目录下的每一个文件
            File[] files = file.listFiles();
            for (int i = 0; i < files.length; i++) {
                // 递归删除
                DeleteFile(files[i]);
            }
            // 删除目录
            file.delete();
        }
    }
    return null;
}
public static void DeleteDir(String destDir) {
    File file = new File(destDir);
    DeleteFile(file);
}
调用
public static void test2(){
File file = FileUtils.CreateFile("hello.txt");
FileUtils.WriteFile(file, "hello123456");
String content = FileUtils.ReadFile(file);
System.out.println(content);
FileUtils.DeleteDir("hello");
}操作命令行程序
操作cmd
import java.io.BufferedReader;
import java.io.File;
import java.io.InputStream;
import java.io.InputStreamReader;
public class CmdUtils {
public static void runCMD(String command){
try {
String cmd = "cmd.exe /c " +command;
// Runtime.getRuntime().exec
// 1. 执行命令,获取Process对象
Process process = Runtime.getRuntime().exec(cmd);
// 2. 获取cmd输出信息
// 2.1 获取输入流对象
InputStream inputStream = process.getInputStream();
// 2.2 封装流读取对象
InputStreamReader reader = new InputStreamReader(inputStream);
// 2.3 封装缓冲流读取对象
BufferedReader br = new BufferedReader(reader);
// 2.4 循环读取
String string = null;
while ( (string = br.readLine()) != null){
System.out.println(string);
}
br.close();
// 2.5 等待读取完毕
process.waitFor();
} catch (Exception e) {
e.printStackTrace();
}
}
}
带设置目录的操作cmd
public static void runCMD(String command, String dir){
        try {
            String cmd = "cmd.exe /c " +command;
            // 1. 执行命令,获取Process对象
            Process process = Runtime.getRuntime().exec(cmd, null, new File(dir));
            // 2. 获取cmd输出信息
            // 2.1 获取输入流对象
            InputStream inputStream = process.getInputStream();
            // 2.2 封装流读取对象
            InputStreamReader reader = new InputStreamReader(inputStream);
            // 2.3 封装缓冲流读取对象
            BufferedReader br = new BufferedReader(reader);
            String string = null;
            // 2.4 循环读取
            while ( (string = br.readLine()) != null){
                System.out.println(string);
           }
            br.close();
            // 2.5 等待读取完毕
            process.waitFor();
       } catch (Exception e) {
            e.printStackTrace();
       }
   }
调用方法
public static void main(String[] args) {
    // write your code here
        // 反编译APK
        CmdUtils.runCMD("java -jar apktool.jar d 1.apk");
        // 重新打包APK,但是相比之前会少了个签名了的文件。
        CmdUtils.runCMD("java -jar apktool.jar b 1 -o 2.apk");
        // 用这个以默认身份重新签名。
        CmdUtils.runCMD("java -jar signapk.jar testkey.x509.pem testkey.pk8 ../2.apk ../2_signed.apk", "sign");
   }
泛型编程
public static void test4(){
// ArrayList<String> strings1 = new ArrayList<>();
// 接口,实现接口的类,存在类似c++中的多态关系
// c++中模板,在java中称为泛型编程
List<String> strings = new ArrayList<>();
strings.add("hello");
strings.add("hello123");
strings.add("hello123456");
strings.add("hello123456789");
System.out.println(strings);
for (int i = 0; i < strings.size(); i++) {
System.out.println(strings.get(i));
}
}文件格式
dom4jXML解析库
导入dom4j库
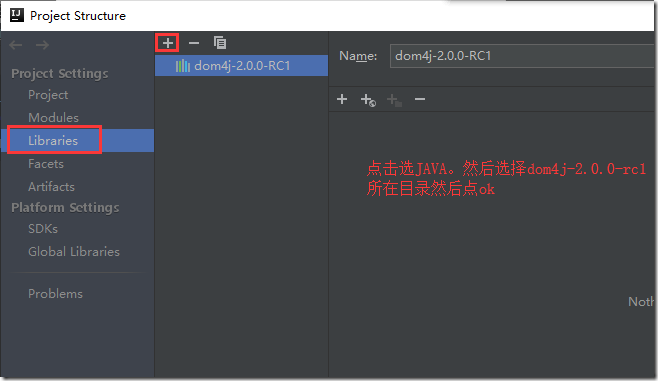
① 在项目中新建一个目录libs ② 将xml库文件复制到libs目录 ③ 在idea中导入xml库
菜单左上角file-project structure
XmlUtils
import org.dom4j.Attribute;
import org.dom4j.Document;
import org.dom4j.DocumentException;
import org.dom4j.Element;
import org.dom4j.io.SAXReader;
import java.io.FileInputStream;
import java.io.FileNotFoundException;
import java.io.InputStream;
import java.util.List;
public class XmlUtils {
// 获取Document对象,一个xml文件就是一个文档对象
public static Document getDocument(String xml) {
try {
SAXReader saxReader = new SAXReader();
InputStream inputStream = new FileInputStream(xml);
Document doc = saxReader.read(inputStream);
return doc;
} catch (DocumentException e) {
e.printStackTrace();
} catch (FileNotFoundException e) {
e.printStackTrace();
}
return null;
}
// 获取元素
public static Element getElement(Document doc, String name) {
// 获取根节点
Element root = doc.getRootElement();
// 返回子节点的元素列表
List<Element> child = root.elements();
for (int i = 0; i < child.size(); i++) {
Element element = child.get(i);
//System.out.println("元素:" + element.getName());
if (element.getName().equals(name))
{
return element;
}
}
return null;
}
// 获取属性
public static Attribute getAttr(Element app, String name) {
List<Attribute> atts = app.attributes();
for (Attribute att: atts) {
//System.out.println("属性:" + att.getName());
if (att.getName().equals(name)){
return att;
}
}
return null;
}
}
调用,记得根目录得有xml.xml文件
public static void test2()
{
Document doc = XmlUtils.getDocument("xml.xml");
Element element = XmlUtils.getElement(doc,"标签4");
System.out.println(element.getName());
Attribute attribute = XmlUtils.getAttr(element,"属性2");
System.out.println(attribute.getName() + " : "+attribute.getValue());
}
线程类
// 创建线程,指定回调函数
        Thread thread = new Thread(){
            @Override
            public void run() {
                super.run();
                System.out.println("thread 1");
            }
        };
        // 启动线程
        thread.start();
        // 方法2
        // 创建 匿名对象
        Runnable runnable = new Runnable() {
            @Override
            public void run() {
                System.out.println("thread 2");
            }
        };
        // 创建线程,指定回调
        Thread thread1 = new Thread(runnable);
        // 启动线程
        thread1.start();
        // 简写
        new Thread(){
            @Override
            public void run() {
                super.run();
                System.out.println("thread 3");
            }
        }.start();
网络编程
public static void test3(){
String urlpath = "http://www.baidu.com";
try {
// 1. 创建一个URL对象
URL url = new URL(urlpath);
// 2. 创建一个连接
HttpURLConnection httpURLConnection = (HttpURLConnection) url.openConnection();
httpURLConnection.setConnectTimeout(5000);
// 3. 获取返回数据
// 3.1 获取返回码
int ret = httpURLConnection.getResponseCode();
if(ret == 200){// 200 ok
InputStream inputStream = httpURLConnection.getInputStream();
ByteArrayOutputStream byteArrayOutputStream = new ByteArrayOutputStream();
byte bytes[] = new byte[1024];
int nReadLen = -1;
while (true){
// 从输入流中读取数据,写入到字节数组中,写入到的数组偏移是0,最大1024
nReadLen = inputStream.read(bytes,0,1024);
if(nReadLen == -1) break;
byteArrayOutputStream.write(bytes,0,nReadLen);
}
byte bytes1[] = byteArrayOutputStream.toByteArray();
String s = new String(bytes1);
System.out.println(s);
}
} catch (MalformedURLException e) {
e.printStackTrace();
} catch (IOException e) {
e.printStackTrace();
}
}
