前言:以下内容基于React全家桶+AntD实战课程的学习实践过程记录。最终成果github地址:https://github.com/66Web/react-antd-manager,欢迎star。
一、Redux基础介绍
- 单向数据流:从父组件留向子组件,兄弟组件无法共享数据
- Redux核心概念
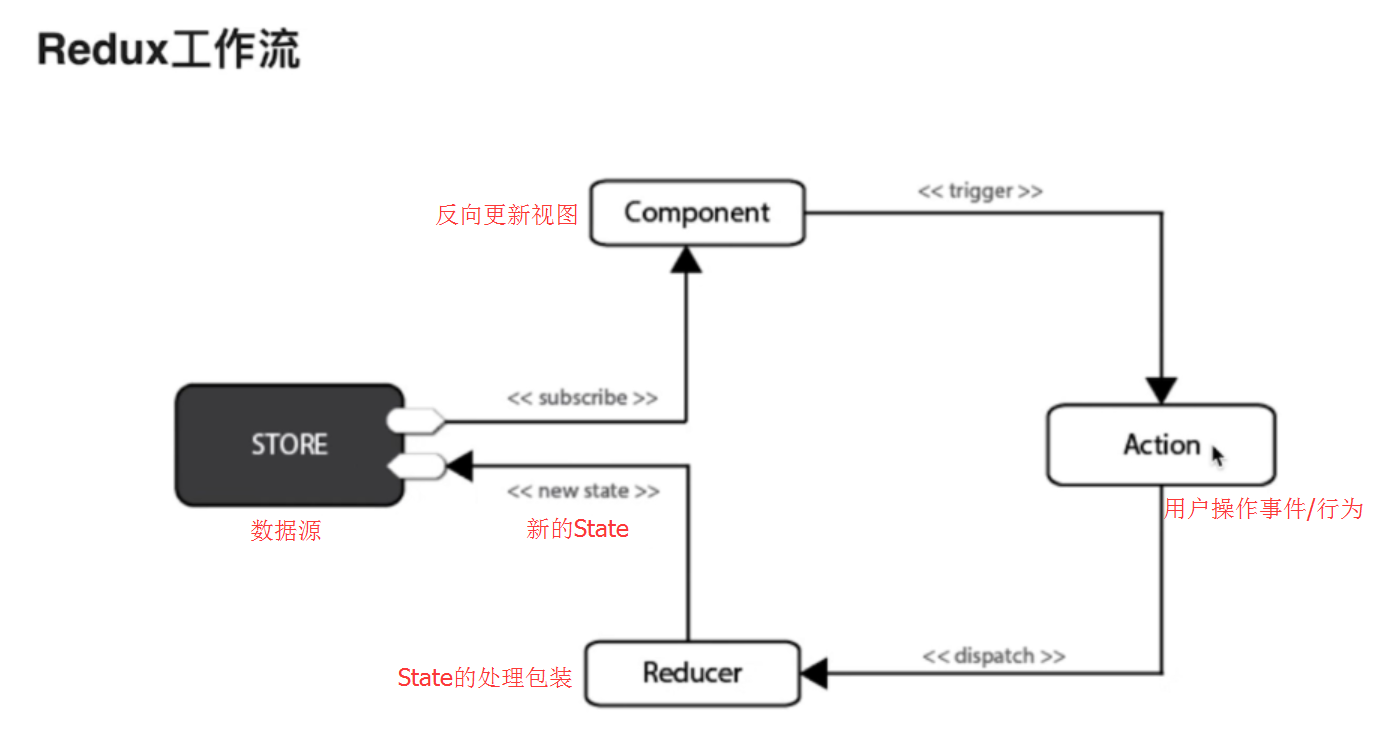
- State:React中的状态,是只读对象,不可直接修改
- Reducer:基本函数,用于对State的业务处理
- Action:普通对象,用于描述事件行为,改变State
- Redux工作流
-
Redux安装
yarn add redux --save

yarn add react-redux --save
-
Redux集成
-
创建Action模块
-
创建Reducer模块
-
创建Store模块
-
通过connect方法将React组件和Redux连接起来
-
添加<Provider />作为项目的根组件,用于数据的存储
-
Redux调试工具安装
-
在火狐中安装Redux Devtools扩展:【安装地址】
-
项目中安装redux-devtools-extension调试插件
yarn add redux-devtools-extension --save
-
Redux适用场景
-
项目需求角度考虑:
- 用户的使用方式复杂
- 不同身份的用户有不同的使用方式(比如普通用户和管理员)
- 多个用户之间可以协作
- 与服务器大量交互,或者使用了WebSocket
- View要从多个来源获取数据
- 组件角度考虑:
- 某个组件的状态,需要共享
- 某个状态需要在任何地方都可以拿到
- 一个组件需要改变全局状态
- 一个组件需要改变另一个组件的状态
- 不适用的场景:
- 用户的使用方式非常简单
- 用户之间没有协作
- 不需要与服务器大量交互,也没有使用 WebSocket
- 视图层(View)只从单一来源获取数据
二、Redux集成
- src->redux目录下:创建action->index.js操作事件模块
/** * Action 类型:用户事件操作 */ export const type = { SWITCH_MENU : 'SWITCH_MENU' } // 菜单点击切换,修改面包屑名称 export function switchMenu(menuName) { return { type:type.SWITCH_MENU, menuName } } - src->redux目录下:创建reducer->index.js数据处理模块
/** * Reducer: 数据处理 */ import {type} from './../action' const initialState = { menuName: '首页' } const ebikeData = (state = initialState, action) => { switch (action.type) { case type.SWITCH_MENU: return { ...state, //旧值 menuName: action.menuName //新值 } break; default: return { ...state }; } } export default ebikeData; - src->redux目录下:创建store->configureStore.js数据源模块
/** * 引入createStore保存数据源 */ import {createStore} from 'redux' import reducer from './../reducer' //调试工具插件方法 -- redux降级到3.7可使用 // import { composeWithDevTools } from 'redux-devtools-extension' export default () => createStore(reducer) -
src->index.js项目入口文件中:添加<Provider />项目根组件,存储store数据源
import { Provider } from 'react-redux'
import configureStore from './redux/store/configureStore'

const store = configureStore();
ReactDOM.render(
    <Provider store={store}>
        <Router />
    </Provider>,
    document.getElementById('root'));
三、面包屑标题切换
- pages->components->NevLeft(index.js)中:菜单(Menu)点击切换改变store中的面包屑名称(MenuName)
- 通过connect方法将react组件与Redux连接
export default connect()(NavLeft)
- 获取this.props.dispatch方法派发事件:通过action事件自动调用reducer存入到store中
import {connect} from 'react-redux'  //连接器
import { switchMenu } from './../../redux/action' //事件行为

class NavLeft extends React.Component {
    state = {
        currentKey: ''
    }
    handleClick = ({item, key}) => {
        if (key === this.state.currentKey) {
            return false;
        }
        // 事件派发,自动调用reducer,通过reducer保存到store对象中
        const { dispatch } = this.props;
        dispatch(switchMenu(item.props.title))
        // console.log(item)
        this.setState({
            currentKey: key
        })
    }
    homeHandleClick = () => {
        const { dispatch } = this.props;
        dispatch(switchMenu('首页'));
        this.setState({
            currentKey: ""
        });
    };

    //其它代码
    <Menu
          onClick={this.handleClick}
          selectedKeys={[this.state.currentKey]}
          theme="dark"
     >
          {this.state.MenuTreeNode}
    </Menu>

}
- pages->components->Header(index.js)中:获取并填入store中的面包屑名称(MenuName)
- 通过connect方法将react组件与Redux连接
- 利用mapStateToProps函数建立state与store的映射关系:将state.menuName 绑定到 props 的menuName
- 面包屑标题处:获取this.props.menuName填入
import {connect} from 'react-redux'  //连接器
……

//将state.menuName 绑定到 props 的menuName
const mapStateToProps = state => {
    return {
        menuName: state.menuName
    }
}
export default connect(mapStateToProps)(Header)
关于mapStateToProps
——参考博客 |
注:项目来自慕课网