开发机环境
操作系统:ubuntu 10.10
交叉编译环境:arm-linux-gcc 4.3.2 ,安装位置 /usr/local/arm/4.3.2/
6410板子内核源码路径:/forlinx/linux-3.0.1/
目标板环境:OK6410-A linux3.0.1
一、hello驱动程序
1.首先先建好交叉编译环境,交叉编译器是必须的,输入以下验证是否安装成功;
#arm-linux-gcc –v
如果显示一堆介绍并且显示版本信息,那你的编译器安装好了,否则,可能是没有添加路径,需要将arm-linux-gcc所在的路径加入到PATH中,按如下操作:
#vi /etc/profile //编辑/etc/profile文件添加把编译器路径到环境变量PATH中
在文件的最后添加一下内容:
PATH=/usr/local/arm/4.3.2/bin PATH
export PATH
输入以下命令使配置生效。
#source /etc/profile
2、编写模块源文件
#vim hello.c
1: #include<linux/init.h>
2:
3: #include<linux/module.h>
4:
5: #include<linux/kernel.h>static int hello_init(void)
6:
7: {
8:
9: printk("Hello,this is my first driver!\n");
10:
11: return 0;
12:
13: }
14:
15: static void hello_exit(void)
16:
17: {
18:
19: printk("Goodbye world!\n");
20:
21: }
22:
23: module_init(hello_init);
24:
25: module_exit(hello_exit);
26:
27: MODULE_LICENSE("Dual BSD/GPL");
28:
代码解释:
static int __init hello_init(void)
static void __exit hello_exit(void)
– static声明,因为这种函数在特定文件之外没有其它意义
– __init标记
表明该函数只在初始化期间使用。
模块装载后,将该函数占用的内存空间释放
– __exit标记
该代码仅用于模块卸载。
printk 内核函数,打印信息,类似于用户空间glibc库中的printf,注意在内核中不能使用glibc库中的函数。
module_init(hello_init);
module_exit(hello_exit);
–宏:module_init/module_exit
–声明模块初始化及清除函数所在的位置
–装载和卸载模块时,内核可以自动找到相应的函数
3、编写Makefile文件
#vim Makefile
1: obj-m := hello.o
2: KDIR := /forlinx/linux-3.0.1/
3: PWD := $(shell pwd)
4: default:
5: $(MAKE) -C $(KDIR) SUBDIRS=$(PWD) modules
6: clean:
7: $(MAKE) -C $(KDIR) SUBDIRS=$(PWD) clean
8: rm -rf *.order
注意:
•1、2、4行顶行写,3、5行使用tab缩进。
• KDIR为6410开发板的内核源码路径
•hello.o,因为我们的源文件为hello.c,所以这里要写test.o
•Makefile文件与hello.c文件放在同一个目录下,比如/forlinx/test/
4、编译模块
在/forlinx/test/目录下输入make命令。
#make
成功后会生成 hello.ko文件。这个就是我们需要的模块文件,其他的都是中间的临时文件。
查看一下hello.ko文件信息,可以看出是基于ARM平台的目标文件。
#file hello.ko
注意:由于编译模块时需要使用内核中的一些依赖文件,因此需要确保在内核源码中那些文件存在。
如果上面的编译有错误,我们需要在内核源码根目录下(/forlinx/linux-3.0.1/
)执行以下命令
#make oldconfig && make prepare &&make scripts
5、测试模块
将前面生成的模块文件(hello.ko)下载到开发板的 /tmp/ 目录下(如果没有此目录,则需要手动创建)。
在开发板上进行模块的装载与卸载操作。
(1)装载模块
# insmod hello.ko
(2)查看模块列表
#lsmod
(3)卸载模块
#rmmod hello
在终端上我们可以看到输出信息:
Hello,this is my first driver!
Goodbye world!
二、虚拟字符设备驱动程序
在linux系统中,我们经常听到说“一切都是文件”。我们对设备操作就转换为对文件的操作。那么我们在用户空间对文件的操作包括open、read、write、close等。那么在驱动程序中如何响应用户发出来的文件操作请求呢?
1、编写驱动程序
#vim char_drv.c
1: #include<linux/module.h>
2: #include <linux/kernel.h>
3: #include <linux/fs.h>
4: #include <asm/uaccess.h> /* copy_to_user,copy_from_user */
5:
6: #define MY_MAJOR 240
7:
8: int my_open (struct inode *inode,struct file *filp)
9: {
10: printk("#########open######\n");
11: return 0;
12: }
13:
14: ssize_t my_read (struct file *filp, char __user *buf, size_t count,loff_t *f_pos)
15: {
16: printk("#########read######\n");
17: return count;
18: }
19:
20: ssize_t my_write (struct file *filp, const char __user *buf, size_t
21:
22: count,loff_t *f_pos)
23: {
24: printk("#########write######\n");
25: return count;
26: }
27:
28: int my_release (struct inode *inode, struct file *filp)
29: {
30: printk("#########release######\n");
31: return 0;
32: }
33:
34: struct file_operations my_fops ={
35: .owner = THIS_MODULE,
36: .open = my_open,
37: .read = my_read,
38: .write = my_write,
39: .release = my_release,
40: };
41:
42: int__init my_init (void)
43: {
44: int rc;
45: printk ("Test char dev\n");
46: rc =register_chrdev(MY_MAJOR,"my",&my_fops);
47: if (rc <0)
48: {
49: printk ("register%s char dev error\n","my");
50: return -1;
51: }
52: printk ("ok!\n");
53: return 0;
54: }
55:
56: void __exit my_exit (void)
57: {
58: unregister_chrdev(MY_MAJOR,"my");
59: printk ("module exit\n");
60: }
61:
62: module_init(my_init);
63: module_exit(my_exit);
64:
65: MODULE_LICENSE("GPL");
Makefile文件
1: obj-m := char_drv.o
2: KDIR := /forlinx/linux-2.6.36.2-v1.05/
3: PWD := $(shell pwd)
4:
5: default:
6: $(MAKE) -C $(KDIR) SUBDIRS=$(PWD) modules
7: clean:
8: $(MAKE) -C $(KDIR) SUBDIRS=$(PWD) clean
9: rm -rf *.order
10:
11:
2、编写测试程序
#vim char_app.c
1: #include <stdio.h>
2: #include <sys/types.h>
3: #include <sys/stat.h>
4: #include <fcntl.h>
5: int main (void)
6: {
7: int fd;
8: char buf[10]={0,1};
9: char buf2[10];
10: fd = open("/dev/my_char",O_RDWR);
11: if (fd < 0)
12: {
13: printf ("Open /dev/my_char");
14: return -1;
15: }
16: write(fd,buf,2);
17: read(fd,buf2,2);
18: close (fd);
19: return 0;
20: }
3、编译驱动程序与测试程序
编译驱动程序
#make
编译测试程序
#arm-linux-gcc char_app.c -o char_app
4、将程序(char_drv.ko,char_app)下载到开发板
5、测试
加载驱动 #insmod char_drv.ko
创建设备文件 #mknod /dev/my_char c 240 0
测试 ./char_app
[root@FORLINX6410]# ./char_app
#########open######
#########write######
#########read######
#########release######
卸载驱动 #rmmod char_drv
二、LED驱动程序
控制LED是最简单的一件事情,我们学习LED驱动程序,就相当于学习其他编程语言是的“helloworld”程序一样,是一个入门的程序。
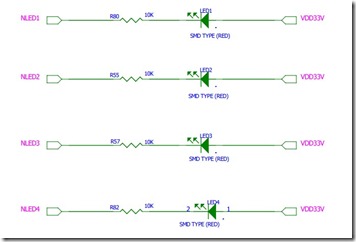
学习驱动程序,必须要对硬件有所了解,大家可以参照开发板原理图,下图是开发板LED原理图: 

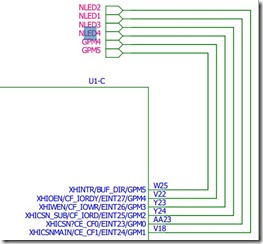
从原理图可以得知,LED与CPU引脚的连接方法如下,低电平点亮。
LED1 -GPM0
LED2-GPM1
LED3 -GPM2
LED4 –GPM3
从数据手册可以找到相应的控制方法。这里我们以LED1为例,介绍一下LED1的操作方法,其他的类似,请大家自行分析。
1.需要先将GPM0设置为输出方式。将相应的寄存器进行配置。
2.将GPMDAT寄存器的第0位置0灯亮,置1灯灭。
1.编写驱动程序
#vim led_drv.c
1: #include <linux/miscdevice.h>
2: #include <linux/delay.h>
3: #include <asm/irq.h>
4: #include <mach/hardware.h>
5: #include <linux/kernel.h>
6: #include <linux/module.h>
7: #include <linux/init.h>
8: #include <linux/mm.h>
9: #include <linux/fs.h>
10: #include <linux/types.h>
11: #include <linux/delay.h>
12: #include <linux/moduleparam.h>
13: #include <linux/slab.h>
14: #include <linux/errno.h>
15: #include <linux/ioctl.h>
16: #include <linux/cdev.h>
17: #include <linux/string.h>
18: #include <linux/list.h>
19: #include <linux/pci.h>
20: #include <asm/uaccess.h>
21: #include <asm/atomic.h>
22: #include <asm/unistd.h>
23: #include <mach/map.h>
24: #include <mach/regs-clock.h>
25: #include <mach/regs-gpio.h>
26: #include <plat/gpio-cfg.h>
27: #include <mach/gpio-bank-e.h>
28: #include <mach/gpio-bank-m.h>
29:
30: #define LED_MAJOR 241 //主设备号
31:
32: int led_open (struct inode *inode,struct file *filp)
33: {
34: unsigned int tmp;
35: tmp = __raw_readl(S3C64XX_GPMPUD);
36: tmp &= (~0xFF);
37: tmp |= 0xaa;
38: __raw_writel(tmp,S3C64XX_GPMPUD);
39:
40: //gpm0-3 output mode
41: tmp = __raw_readl(S3C64XX_GPMCON);
42: tmp &= (~0xFFFF);
43: tmp |= 0x1111;
44: __raw_writel(tmp,S3C64XX_GPMCON);
45:
46: //gpm0-3 output 0
47: tmp = __raw_readl(S3C64XX_GPMDAT);
48: tmp |= 0x10;
49: __raw_writel(tmp,S3C64XX_GPMDAT);
50: printk("#########open######\n");
51: return 0;
52: }
53:
54: ssize_t led_read (struct file *filp, char __user *buf, size_t count,
55: loff_t *f_pos)
56: {
57: printk("#########read######\n");
58: return count;
59: }
60:
61: ssize_t led_write (struct file *filp, const char __user *buf, size_t count
62: ,loff_t *f_pos)
63: {
64: int val;
65: unsigned tmp;
66: printk("#########write######\n");
67: copy_from_user(&val,buf,count);
68: switch(val)
69: {
70: case 0: //off
71: tmp = readl(S3C64XX_GPMDAT);
72: tmp |= (0x0f);
73: writel(tmp, S3C64XX_GPMDAT);
74: break;
75: case 1: //on
76: tmp = readl(S3C64XX_GPMDAT);
77: tmp &= ~(0x0f);
78: writel(tmp, S3C64XX_GPMDAT);
79: break;
80: default :
81: break;
82: }
83: return count;
84: }
85:
86: int led_release (struct inode *inode, struct file *filp)
87: {
88: printk("#########release######\n");
89: return 0;
90: }
91:
92: struct file_operations led_fops ={
93: .owner = THIS_MODULE,
94: .open = led_open,
95: .read = led_read,
96: .write = led_write,
97: .release = led_release,
98: };
99:
100: int __init led_init (void)
101: {
102: int rc;
103: printk ("Test led dev\n");
104: rc = register_chrdev(LED_MAJOR,"my_led",&led_fops); //注册设备
105: if (rc <0)
106: {
107: printk ("register %s char dev error\n","led");
108: return -1;
109: }
110: printk ("ok!\n");
111: return 0;
112: }
113:
114: void __exit led_exit (void)
115: {
116: unregister_chrdev(LED_MAJOR,"leds");
117: printk ("module exit\n");
118: return ;
119: }
120:
121: module_init(led_init);
122: module_exit(led_exit);
123: MODULE_LICENSE("GPL");
习惯写所有驱动将平时经常用的头文件加入代码中
Makefile文件
1: obj-m := led_drv.o
2: KDIR := /forlinx/linux-3.0.1/
3: PWD := $(shell pwd)
4:
5: default:
6: $(MAKE) -C $(KDIR) SUBDIRS=$(PWD) modules
7: clean:
8: $(MAKE) -C $(KDIR) SUBDIRS=$(PWD) clean
9: rm -rf *.order
2.编写测试程序
#vim led_app.c
#include <stdio.h>
#include<string.h>
#include <sys/types.h>
#include <sys/stat.h>
#include <fcntl.h>
/*led_app on
led_app off
*/
int main (int argc,char **argv)
{
int fd;
int val =1;
fd = open("/dev/my_led",O_RDWR);
if (fd < 0)
{
printf ("Open /dev/leds file error\n");
return -1;
}
if(argc != 2)
{
printf("Usage :\n");
printf("%s <on|off>\n",argv[0]);
return 0;
}
if(strcmp(argv[1],"on") == 0)
val =1;
else
val = 0;
write(fd,&val,4);
close (fd);
}
3.编译驱动程序与测试程序
编译驱动程序
#make
编译测试程序
#arm-linux-gcc led_app.c -o led_app
4.将程序下载到开发板
将前面生成的模块文件(led_drv.ko,led_app)下载到开发板的 /tmp/ 目录下(如果没有此目录,则需要手动创建)。
5.测试
加载驱动 #insmod led_drv.ko
创建设备文件 #mknod /dev/my_led c 241 0
测试 ./led_app
[root@FORLINX6410]# ./led_app 此时可以看到OK6410板子上的LED0在闪烁。
卸载驱动 #rmmod led_drv
三、蜂鸣器驱动
S3C6410包含5个32位的定时器,定时器1和定时器1包含PWM功能,能够驱动一个外部的I/O信号。所以我们可用它来产生PWM波来使蜂鸣器发出声音
在开始我们可以参看一下开发手册的关于定时器单元的寄存器的介绍,TCTG0寄存器,TCFG1寄存器,TCON寄存器的说明,按照手册上写代码就可以了。
蜂鸣器的原理图如下所示:

1、驱动程序的编写
#vim bell_drv.c
1: #include <linux/miscdevice.h>
2: #include <linux/delay.h>
3: #include <asm/irq.h>
4: #include <mach/hardware.h>
5: #include <linux/kernel.h>
6: #include <linux/module.h>
7: #include <linux/init.h>
8: #include <linux/mm.h>
9: #include <linux/fs.h>
10: #include <linux/types.h>
11: #include <linux/delay.h>
12: #include <linux/moduleparam.h>
13: #include <linux/slab.h>
14: #include <linux/errno.h>
15: #include <linux/ioctl.h>
16: #include <linux/cdev.h>
17: #include <linux/string.h>
18: #include <linux/list.h>
19: #include <linux/pci.h>
20: #include <asm/uaccess.h>
21: #include <asm/atomic.h>
22: #include <asm/unistd.h>
23: #include <mach/map.h>
24: #include <mach/regs-clock.h>
25: #include <mach/regs-gpio.h>
26: #include <plat/gpio-cfg.h>
27: #include <mach/gpio.h>
28: #include <mach/gpio-bank-e.h>
29: #include <mach/gpio-bank-f.h>
30: #include <mach/gpio-bank-m.h>
31: #include <plat/regs-timer.h>
32:
33: #define PWM_TIMER1_AUTO_RELOAD (1 << 11)
34: #define PWM_TIMER1_MANUAL_UPDATE (1 << 9)
35: #define PWM_TIMER1_START (1 << 8)
36:
37: #define DEVICE_NAME "bell"
38: #define DEVICE_MAJOR 240
39:
40: static void startbell()
41: {
42: unsigned long tcon,tcon1,tcon2,tcmp,tcnt,pwm_PCLK;
43: s3c_gpio_cfgpin(S3C64XX_GPF(15), S3C64XX_GPF15_PWM_TOUT1);
44: tcon = __raw_readl(S3C2410_TCON);
45: tcon |= PWM_TIMER1_MANUAL_UPDATE | PWM_TIMER1_AUTO_RELOAD;
46: __raw_writel(tcon, S3C2410_TCON);
47:
48: tcon1 = __raw_readl(S3C2410_TCFG0);
49: tcon1 |= 0x0f;
50:
51: tcon2 = __raw_readl(S3C2410_TCFG1);
52: tcon2 |= 0xf0;
53:
54: pwm_PCLK = 66500000/(tcon1 * tcon2);
55: tcnt = pwm_PCLK/2000;
56: tcmp = tcnt/3;
57: __raw_writel(tcnt,S3C2410_TCNTB(1));
58: __raw_writel(tcmp,S3C2410_TCMPB(1));
59: //reload
60: tcon = __raw_readl(S3C2410_TCON);
61: tcon |= PWM_TIMER1_AUTO_RELOAD | PWM_TIMER1_START;
62: __raw_writel(tcon, S3C2410_TCON);
63: }
64:
65: static void stopbell()
66: {
67: unsigned long tcon;
68: tcon = __raw_readl(S3C2410_TCON);
69: tcon &= ~(PWM_TIMER1_AUTO_RELOAD);
70: tcon &= ~(PWM_TIMER1_START);
71: __raw_writel(tcon, S3C2410_TCON);
72: s3c_gpio_cfgpin(S3C64XX_GPF(15),0);
73: }
74:
75: int bell_open(struct inode *inode,struct file *filp)
76: {
77: printk("****open**** \n");
78: return 0;
79: }
80:
81: static long bell_ioctl(struct file *filp, unsigned int cmd, unsigned long arg)
82: {
83: switch(cmd)
84: {
85: case 1:
86: startbell(); break;
87: case 0:
88: stopbell(); break;
89: default:
90: break;
91: }
92: return 1;
93: }
94:
95: static int bell_release(struct inode *inode,struct file *filp)
96: {
97: printk("*********release********\n");
98: return 0;
99: }
100:
101: struct file_operations bell_fops =
102: {
103: .owner = THIS_MODULE,
104: .open = bell_open,
105: .unlocked_ioctl = bell_ioctl,
106: .release = bell_release,
107: };
108:
109: int bell_init(void)
110: {
111: int rc;
112: printk("Test dev \n");
113: rc=register_chrdev(DEVICE_MAJOR,DEVICE_NAME,&bell_fops);
114: if(rc < 0)
115: {
116: printk("register %s char dev error \n",DEVICE_NAME);
117: return -1;
118: }
119: printk("OK!\n");
120: return 0;
121: }
122:
123: void bell_exit(void)
124: {
125: unregister_chrdev(DEVICE_MAJOR,DEVICE_NAME);
126: printk("module exit\n");
127: }
128:
129: module_init(bell_init);
130: module_exit(bell_exit);
131: MODULE_LICENSE("GPL");
Makefile文件
1: obj-m := bell_drv.o
2: KDIR := /forlinx/linux-3.0.1/
3: PWD := $(shell pwd)
4:
5: default:
6: $(MAKE) -C $(KDIR) SUBDIRS=$(PWD) modules
7: clean:
8: $(MAKE) -C $(KDIR) SUBDIRS=$(PWD) clean
9: rm -rf *.order
这个程序是我自己改动的,前提是在加载前面写好的led_drv.ko驱动
2、编写测试程序
#vi bell_app.c
1: #include <stdio.h>
2: #include<string.h>
3: #include <sys/types.h>
4: #include <sys/stat.h>
5: #include <fcntl.h>
6:
7: int main (void)
8: {
9: int fd1,fd2,i=0,val =1;
10: fd1 = open("/dev/bell",O_RDWR);
11: if (fd1 < 0)
12: {
13: printf ("Open /dev/bell file error\n");
14: return -1;
15: }
16:
17: fd2 = open("/dev/my_led",O_RDWR);
18: if (fd2 < 0)
19: {
20: printf ("Open /dev/leds file error\n");
21: return -1;
22: }
23: for(i=0; i<3; i++)
24: {
25: ioctl(fd1, 1, 0, 0);
26: val =1;
27: write(fd2,&val,4);
28: sleep(1);
29: ioctl(fd1,0, 0, 0);
30: val = 0;
31: write(fd2,&val,4);
32: sleep(1);
33: }
34: close (fd1);
35: close (fd2);
36: }
3.编译驱动程序与测试程序
编译驱动程序
#make
编译测试程序
#arm-linux-gcc bell_app.c –o bell_app
4.将程序下载到开发板
将前面生成的模块文件(bell_drv.ko,bell_app)下载到开发板的 /tmp/ 目录下(如果没有此目录,则需要手动创建)。
5.测试
加载驱动 #insmod bell_drv.ko
#insmod led_drv.ko
创建设备文件 #mknod /dev/my_led c 241 0
#mknod /dev/bell c 240 0
测试 ./bell_app
[root@FORLINX6410]# ./bell_app
此时可以听到OK6410板子上的蜂鸣器叫三下停止,同时LED0在闪烁。
卸载驱动 #rmmod bell_drv
#rmmod led_drv
四、独立扫描式按键驱动程序
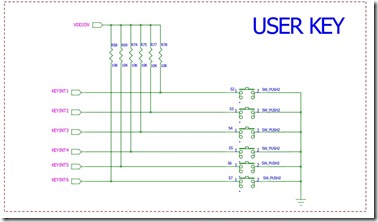
从单片机的学习中我们可知道按键可分为中断式和扫描式,从按键的学习中我们可以了解硬件结构等等,首先我们先参考开发板数据手册及原理图:
从上图我们可知道按键与端口对应关系如下:
KEY1——————GPN0
KEY2——————GPN1
KEY3——————GPN2
KEY4——————GPN3
KEY5——————GPN4
KEY6——————GPN5
我们只要参照GPN端口的控制方法就可以写按键驱动程序。
1、驱动程序的编写
#vim scan_button.c
1: #include <linux/miscdevice.h>
2: #include <linux/delay.h>
3: #include <asm/irq.h>
4: #include <mach/hardware.h>
5: #include <linux/kernel.h>
6: #include <linux/module.h>
7: #include <linux/init.h>
8: #include <linux/mm.h>
9: #include <linux/fs.h>
10: #include <linux/types.h>
11: #include <linux/delay.h>
12: #include <linux/moduleparam.h>
13: #include <linux/slab.h>
14: #include <linux/errno.h>
15: #include <linux/ioctl.h>
16: #include <linux/cdev.h>
17: #include <linux/string.h>
18: #include <linux/list.h>
19: #include <linux/pci.h>
20: #include <asm/uaccess.h>
21: #include <asm/atomic.h>
22: #include <asm/unistd.h>
23: #include <mach/map.h>
24: #include <mach/regs-clock.h>
25: #include <mach/regs-gpio.h>
26: #include <plat/gpio-cfg.h>
27: #include <mach/gpio.h>
28: #include <mach/gpio-bank-e.h>
29: #include <mach/gpio-bank-n.h>
30:
31: #define DEVICE_NAME "button"
32: #define DEVICE_MAJOR 242
33:
34: int button_open(struct inode *inode,struct file *filp)
35: {
36: printk("****open**** \n");
37: s3c_gpio_cfgpin(S3C64XX_GPN(0),0);
38: s3c_gpio_cfgpin(S3C64XX_GPN(1),0);
39: s3c_gpio_cfgpin(S3C64XX_GPN(2),0);
40: s3c_gpio_cfgpin(S3C64XX_GPN(3),0);
41: s3c_gpio_cfgpin(S3C64XX_GPN(4),0);
42: s3c_gpio_cfgpin(S3C64XX_GPN(5),0);
43: return 0;
44: }
45:
46: ssize_t button_read(struct file *filp,char *buf,size_t count,loff_t *f_pos)
47: {
48: int sum = 1;
49: struct button_dev *dev = filp->private_data;
50: int value = __raw_readl(S3C64XX_GPNDAT);
51: value &= 0x3f;
52: if(copy_to_user(buf,&value,sizeof(int)))
53: {
54: sum = -EFAULT;
55: }
56: return sum;
57: }
58:
59:
60: int button_release(struct inode *inode,struct file *filp)
61: {
62: return 0;
63: }
64:
65: struct file_operations button_fops =
66: {
67: .owner = THIS_MODULE,
68: .open = button_open,
69: .read = button_read,
70: .release = button_release,
71: };
72:
73: int button_init(void)
74: {
75: int rc;
76: printk("Test dev \n");
77: rc=register_chrdev(DEVICE_MAJOR,DEVICE_NAME,&button_fops);
78: if(rc < 0)
79: {
80: printk("register %s char dev error \n",DEVICE_NAME);
81: return -1;
82: }
83: printk("OK!\n");
84: return 0;
85: }
86:
87: void button_exit(void)
88: {
89: unregister_chrdev(DEVICE_MAJOR,DEVICE_NAME);
90: printk("module exit\n");
91: }
92:
93: module_init(button_init);
94: module_exit(button_exit);
95: MODULE_LICENSE("GPL");
Makefile文件
1: obj-m := scan_button.o
2: KDIR := /forlinx/linux-3.0.1/
3: PWD := $(shell pwd)
4:
5: default:
6: $(MAKE) -C $(KDIR) SUBDIRS=$(PWD) modules
7: clean:
8: $(MAKE) -C $(KDIR) SUBDIRS=$(PWD) clean
9: rm -rf *.order
2、编写测试程序
#vi button_app.c
1: #include <stdio.h>
2: #include<string.h>
3: #include <sys/types.h>
4: #include <sys/stat.h>
5: #include <fcntl.h>
6:
7: int offset[] = {0x3e,0x3d,0x3b,0x37,0x2f,0x1f};
8: int main()
9: {
10: int fd,i,j,m,retval = 0,oldval = 0;
11: fd = open("/dev/button",O_RDWR);
12: if (fd < 0)
13: {
14: printf ("Open /dev/button file error\n");
15: return -1;
16: }
17:
18: int scan_key(void)
19: {
20: j = read(fd,&retval,4);
21: if(j > 0)
22: {
23: if(retval != oldval)
24: {
25: for(i=0; i<6; i++)
26: {
27: if(offset[i] == retval)
28: {
29: printf("key %d pressed \n",++i);
30: }
31: }
32: }
33: oldval = retval;
34: }
35: return i;
36: }
37: while(1)
38: {
39: m=scan_key();
40:
41: usleep(10);
42: }
43: close(fd);
44: }
3.编译驱动程序与测试程序
编译驱动程序
#make
编译测试程序
#arm-linux-gcc button_app.c –o button_app
4.将程序下载到开发板
将前面生成的模块文件(scan_button.ko,button_app)下载到开发板的 /tmp/ 目录下(如果没有此目录,则需要手动创建)。
5.测试
加载驱动 #insmod scan_button.ko
创建设备文件 #mknod /dev/button c 242 0
测试 ./button_app
[root@FORLINX6410]# ./button_app
当我们按下六个键中的一个,在终端上会显示你按下的键号,以后在进一步写中断按键驱动,那时就可以用按键作为人机交互界面输入了。
卸载驱动 #rmmod led_drv
<待续>

