import numpy as np
from keras.datasets import mnist
from keras.utils import np_utils
from keras.models import Sequential
from keras.layers import Dense
from keras.optimizers import SGD
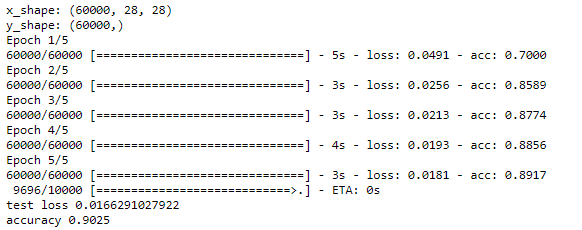
 1 # 载入数据
 2 (x_train,y_train),(x_test,y_test) = mnist.load_data()
 3 # (60000,28,28)
 4 print('x_shape:',x_train.shape)
 5 # (60000)
 6 print('y_shape:',y_train.shape)
 7 # (60000,28,28)->(60000,784)
 8 x_train = x_train.reshape(x_train.shape[0],-1)/255.0
 9 x_test = x_test.reshape(x_test.shape[0],-1)/255.0
10 # 换one hot格式
11 y_train = np_utils.to_categorical(y_train,num_classes=10)
12 y_test = np_utils.to_categorical(y_test,num_classes=10)
13
14 # 创建模型,输入784个神经元,输出10个神经元
15 model = Sequential([
16         Dense(units=10,input_dim=784,bias_initializer='one',activation='softmax')
17     ])
18
19 # 定义优化器
20 sgd = SGD(lr=0.2)
21
22 # 定义优化器,loss function,训练过程中计算准确率
23 model.compile(
24     optimizer = sgd,
25     loss = 'mse',
26     metrics=['accuracy'],
27 )
28
29 # 训练模型
30 model.fit(x_train,y_train,batch_size=64,epochs=5)
31
32 # 评估模型
33 loss,accuracy = model.evaluate(x_test,y_test)
34
35 print('
test loss',loss)
36 print('accuracy',accuracy)
37
38 # 保存模型
39 model.save('model.h5')   # HDF5文件,pip install h5py