
如上,是项目的目录结构。
common: 获取阿里云的yum源
mysql: 二进制安装mysql
nginx: 编译安装nginx
php-fpm:编译安装php-fpm
wordpress: 获取wordpress源码,更改部分值。
1,首先查看入口文件。
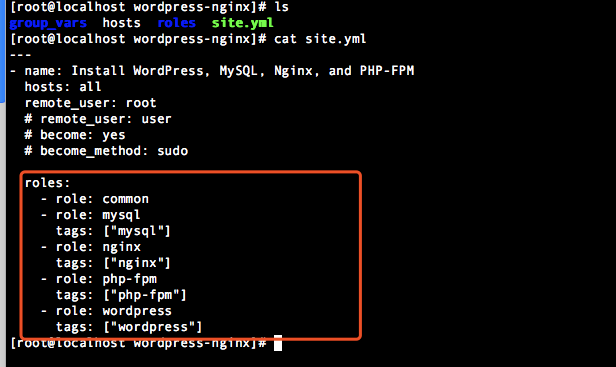
---
- name: Install WordPress, MySQL, Nginx, and PHP-FPM
  hosts: all
  remote_user: root
  # remote_user: user
  # become: yes
  # become_method: sudo

  roles:
    - role: common
    - role: mysql
      tags: ["mysql"]
    - role: nginx
      tags: ["nginx"]
    - role: php-fpm
      tags: ["php-fpm"]
    - role: wordpress
      tags: ["wordpress"]
2,查看hosts

[wordpress]
192.168.1.137
3, 查看group_vars下的变量
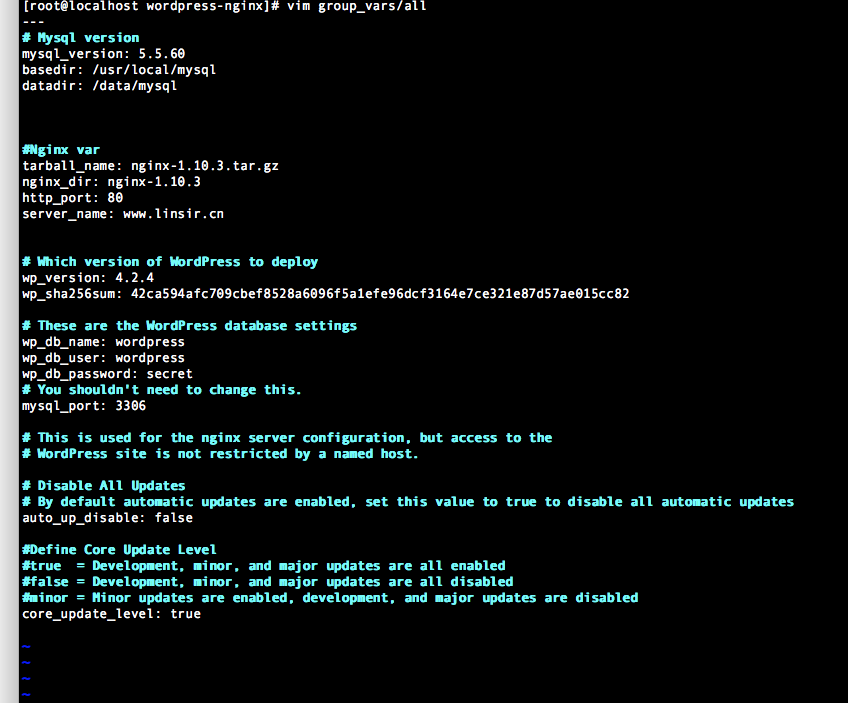
---
# Mysql version
mysql_version: 5.5.60
basedir: /usr/local/mysql
datadir: /data/mysql


#Nginx var
tarball_name: nginx-1.10.3.tar.gz
nginx_dir: nginx-1.10.3
http_port: 80
server_name: www.linsir.cn


# Which version of WordPress to deploy
wp_version: 4.2.4
wp_sha256sum: 42ca594afc709cbef8528a6096f5a1efe96dcf3164e7ce321e87d57ae015cc82

# These are the WordPress database settings
wp_db_name: wordpress
wp_db_user: wordpress
wp_db_password: secret
# You shouldn't need to change this.
mysql_port: 3306

# This is used for the nginx server configuration, but access to the
# WordPress site is not restricted by a named host.

# Disable All Updates
# By default automatic updates are enabled, set this value to true to disable all automatic updates
auto_up_disable: false

#Define Core Update Level
#true  = Development, minor, and major updates are all enabled
#false = Development, minor, and major updates are all disabled
#minor = Minor updates are enabled, development, and major updates are disabled
core_update_level: true
4,查看roles下的各个角色,根据site.yml文件中的顺序展开
1, common 主要是获取repo源用的
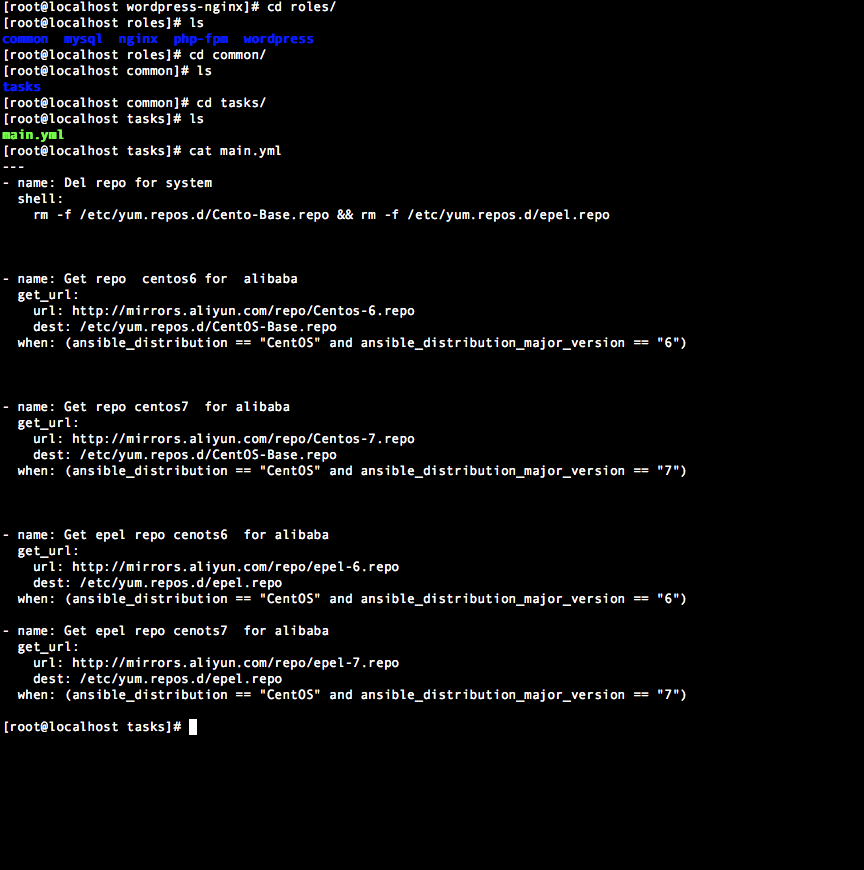
---
- name: Del repo for system
  shell:
    rm -f /etc/yum.repos.d/Cento-Base.repo && rm -f /etc/yum.repos.d/epel.repo


- name: Get repo  centos6 for  alibaba
  get_url:
    url: http://mirrors.aliyun.com/repo/Centos-6.repo
    dest: /etc/yum.repos.d/CentOS-Base.repo
  when: (ansible_distribution == "CentOS" and ansible_distribution_major_version == "6")


- name: Get repo centos7  for alibaba
  get_url:
    url: http://mirrors.aliyun.com/repo/Centos-7.repo
    dest: /etc/yum.repos.d/CentOS-Base.repo
  when: (ansible_distribution == "CentOS" and ansible_distribution_major_version == "7")


- name: Get epel repo cenots6  for alibaba
  get_url:
    url: http://mirrors.aliyun.com/repo/epel-6.repo
    dest: /etc/yum.repos.d/epel.repo
  when: (ansible_distribution == "CentOS" and ansible_distribution_major_version == "6")

- name: Get epel repo cenots7  for alibaba
  get_url:
    url: http://mirrors.aliyun.com/repo/epel-7.repo
    dest: /etc/yum.repos.d/epel.repo
  when: (ansible_distribution == "CentOS" and ansible_distribution_major_version == "7")
2,查看mysql角色
---

- name: Create mysql user
  user:
    name: mysql


- name: Download mysql
  get_url:
    url: http://mirrors.163.com/mysql/Downloads/MySQL-5.5/mysql-{{mysql_version}}-linux-glibc2.12-x86_64.tar.gz
    dest: /usr/local/src


- name: Unzip mysql
  unarchive:
    src: /usr/local/src/mysql-{{mysql_version}}-linux-glibc2.12-x86_64.tar.gz
    dest: /usr/local/src/
    copy: no

- name: Rename mysql
  shell:
    mv /usr/local/src/mysql-{{mysql_version}}-linux-glibc2.12-x86_64 /usr/local/mysql && chown -R mysql:mysql {{basedir}}


- name: Create data storage
  file:
    path: /data/mysql
    state: directory
    owner: mysql
    group: mysql


- name: Init mysql
  shell:
    ./scripts/mysql_install_db --user=mysql --basedir={{basedir}} --datadir={{datadir}}
  args:
    chdir: "{{basedir}}"

- name: Create mysql script for centos6
  shell:
    cp "{{basedir}}/support-files/mysql.server"  /etc/init.d/mysqld && chmod 755 /etc/init.d/mysqld
  when: (ansible_distribution == "CentOS" and ansible_distribution_major_version == "6")

- name: Create mysql script for centos7
  copy:
    src: mysqld.service
    dest: /usr/lib/systemd/system/mysqld.service
  when: (ansible_distribution == "CentOS" and ansible_distribution_major_version == "7")
  notify:
    - Reload service
- meta: flush_handlers


- name: Copy mysql config
  template:
    src: my.cnf.j2
    dest: /etc/my.cnf

- name: Restart mysqld
  service:
    name: mysqld
    state: restarted
  register: result

#根据服务器配置不同,mysql启动速度有所区别。
- name: sleep 10s
  shell:
    sleep 20

- name: Copy root password file
  shell:
    /usr/local/mysql/bin/mysqladmin -uroot password linlin