https://blog.csdn.net/u013498583/article/details/71404323
1原理
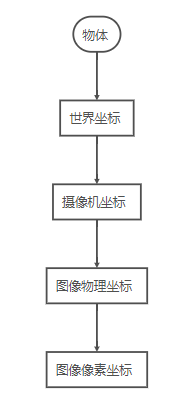
1-1成像过程
摄像机的成像过程主要是主要涉及到几个坐标系的变换(具体过程可以参考相机模型):
从摄像机成像畸变的产生于是其“天生”的,不可避免的,这主要是由于透镜成像原理导致的。其畸变的原理可以参考相机模型)。
1-2校正原理
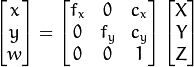
相机内参 像素的物理尺寸和焦距

相机的畸变矫正
图像像素坐标系
(uOv坐标系) 下的无畸变坐标 (U, V),经过 径向畸变 和 切向畸变 后落在了uOv坐标系 的 (Ud, Vd) 上。即就是说,真实图像 imgR 与 畸变图像 imgD 之间的关系为:
imgR(U, V) = imgD(Ud, Vd) 
最终公式

其中,[x′,y′]为畸变后的位置,[x,y]为畸变前的位置,[ki,pi]为畸变系数。当然,其实畸变系数远远不止这么四个,但通常情况下可以仅考虑这四个。
2标定过程
2-1 opencv自带的源码
2-2 使用matlab

最终获取标定文件
XML/YAML file
Camera_Matrix type_id="opencv-matrix">
<rows>3</rows>
<cols>3</cols>
<dt>d</dt>
<data>
 6.5746697944293521e+002 0. 3.1950000000000000e+002 0.
 6.5746697944293521e+002 2.3950000000000000e+002 0. 0. 1.</data></Camera_Matrix>
<Distortion_Coefficients type_id="opencv-matrix">
<rows>5</rows>
<cols>1</cols>
<dt>d</dt>
<data>
 -4.1802327176423804e-001 5.0715244063187526e-001 0. 0.
 -5.7843597214487474e-001</data></Distortion_Coefficients>
畸变矫正 Distortion_Coefficients 5个失真参数

内参矩阵 Camera_Matrix 新的变换矩阵
 联合
联合
6.校正
得到out_camera_data.xml文件后,我们可以直接使用该配置文件进行校正。
这个代码比较简单 没有中间变量
#include <opencv2/opencv.hpp>
#include <opencv2/calib3d/calib3d.hpp>
using namespace std;
using namespace cv;

/**
 * @主函数
 */
int main( int argc, char** argv )
{

	/// 读取一副图片,不改变图片本身的颜色类型(该读取方式为DOS运行模式)
		Mat src = imread( argv[1], 1 );
		Mat distortion = src.clone();
		Mat camera_matrix = Mat(3, 3, CV_32FC1);
		Mat distortion_coefficients;


		//导入相机内参和畸变系数矩阵
		FileStorage file_storage("out_camera_data.xml", FileStorage::READ);
		file_storage["Camera_Matrix"] >> camera_matrix;
		file_storage["Distortion_Coefficients"] >> distortion_coefficients;
		file_storage.release();

		//矫正
		undistort(src, distortion, camera_matrix, distortion_coefficients);

		imshow("img", src);
		imshow("undistort", distortion);
		imwrite("undistort.jpg", distortion);

		waitKey(0);
		return 0;
}
第二个代码样例
我已经成功获取了摄像机的内参矩阵,以及畸变矩阵。也已经成功畸变矫正。但是我还希望获取原图中心点undistort之后的对应点。
返回的map1,map2来直接获得undistort之后的对应点。
主要函数
initUndistortRectifyMap(cameraMatrix, distCoeffs, Mat(),
                            getOptimalNewCameraMatrix(cameraMatrix, distCoeffs, imageSize, 1, imageSize, 0),
                            imageSize, CV_16SC2, map1, map2);
网友调试过程
https://blog.csdn.net/qq_20289205/article/details/78632542
相对完整的例程
#include "opencv.hpp"

using namespace std;
using namespace cv;

void ReadIntrinsics(Mat &cameraMatrix, Mat &distCoeffs, Size &imageSize, char *IntrinsicsPath)
{
	bool FSflag = false;
	FileStorage readfs;

	FSflag = readfs.open(IntrinsicsPath, FileStorage::READ);
	if (FSflag == false) cout << "Cannot open the file" << endl;
	readfs["Camera_Matrix"] >> cameraMatrix;
	readfs["Distortion_Coefficients"] >> distCoeffs;
	readfs["image_Width"] >> imageSize.width;
	readfs["image_Height"] >> imageSize.height;

	cout << cameraMatrix << endl << distCoeffs << endl << imageSize << endl;

	readfs.release();
}

void Undistort_img(Mat map1, Mat map2, char *path)
{
	Mat img1, img2;
	img1 = imread(path);
	if (img1.empty()) cout << "Cannot open the image" << endl;
	remap(img1, img2, map1, map2, INTER_LINEAR);
// 	imwrite(path, img2);
	imshow("src img", img1);
	imshow("dst img", img2);
	waitKey();
}

void main()
{
	Mat	cameraMatrix, distCoeffs, map1, map2;
	Size imageSize;
	char * IntrinsicsPath = "Intrinsics.yml";
	ReadIntrinsics(cameraMatrix, distCoeffs, imageSize, IntrinsicsPath);

	// 去畸变并保留最大图
	initUndistortRectifyMap(cameraMatrix, distCoeffs, Mat(),
		getOptimalNewCameraMatrix(cameraMatrix, distCoeffs, imageSize, 1, imageSize, 0),
		imageSize, CV_16SC2, map1, map2);

	Undistort_img(map1, map2, "E:/VS13/undistort/undistort/1.bmp");

	// 去畸变至全图
	initUndistortRectifyMap(cameraMatrix, distCoeffs, Mat(), Mat(),
		imageSize, CV_16SC2, map1, map2);

    Undistort_img(map1, map2, "E:/VS13/undistort/undistort/1.bmp");
}