
在上两篇教程中,讲述了Silverlight的Out of Browser理论知识和基础实践。本节将讲述如何创建自定义的Out of Browser应用以及如何调试Silverlight的Out of Browser应用。
Silverlight Out of Browser的自定义化
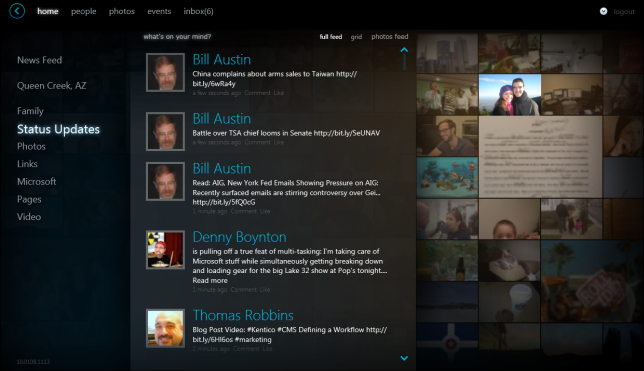
从Silverlight 4开始,OOB应用支持信任权限设置和窗口自定义,最典型的自定义窗口应用是Silverlight Facebook客户端。从下图可以看出,OOB应用其运行效果已经基本和Windows应用相似,其专业效果不逊于WinForm和WPF应用。
对于创建自定义窗口应用,微软提供了非常简单的方法,

首先选择“Require elevated trust when running outside the browser”, 在下面“Window Style”中可以选择不同的窗口模式,其中分别是:
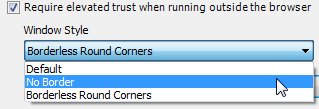
1. Default模式,默认模式是使用Windows默认窗口样式;
2. No Border,无边框模式;
3. Borderless Round Corners, 圆角无边框模式;
对比以上三种方模式,第一种默认模式最为简单,因为使用的是Windows默认窗口,其中最大化和最小化以及关闭控件都是继承自Windows窗口,其中窗口的拖拉事件默认的也是使用Windows API进行控制; 而第二种和第三种窗口模式,允许设计开发人员创建个性的OOB窗口应用,但是同时也需要创建自定义的最大化,最小化以及关闭控件。下面看一个简单的实例演示,
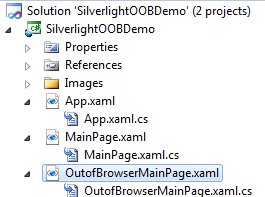
这里我们使用第三种窗口模式,圆角无边框窗口作为演示,首先打开上一讲中的例程项目SilverlightOOBDemo,为了演示的清晰明了,我们将重新创建一个OutofBrowserMainPage页面,承载新的自定义窗口页面。
该页面,我们模拟上面Facebook的黑色配色方案,简单实现自定义窗口。由于我们使用的是第三种窗口模式,圆角无边框,这里我们需要为OOB应用创建自定义最大化,最小化和关闭控件,以及拖拽响应事件。
首先创建自定义最大化,最小化和关闭控件,
创建一个新的控件WindowControls,将最大化,最小化和关闭控件归类放入该页面,
![]()
2 xmlns="http://schemas.microsoft.com/winfx/2006/xaml/presentation"
3 xmlns:x="http://schemas.microsoft.com/winfx/2006/xaml"
4 xmlns:d="http://schemas.microsoft.com/expression/blend/2008"
5 xmlns:mc="http://schemas.openxmlformats.org/markup-compatibility/2006"
6 mc:Ignorable="d"
7 d:DesignHeight="300" d:DesignWidth="400" Width="80" Height="24">
8
9 <StackPanel x:Name="LayoutRoot" Background="DarkGray" Orientation="Horizontal">
10 <Button x:Name="btMinimize" Height="20" Width="20" Margin="3" >
11 <Image Width="14" Height="14" VerticalAlignment="Center" HorizontalAlignment="Center" Source="/SilverlightOOBDemo;component/Images/min.png" Stretch="None"/>
12 </Button>
13 <Button x:Name="btMaximize" Height="20" Width="20" Margin="3" >
14 <Image Width="14" Height="14" VerticalAlignment="Center" HorizontalAlignment="Center" Source="/SilverlightOOBDemo;component/Images/max.png" Stretch="None"/>
15 </Button>
16 <Button x:Name="btClose" Height="20" Width="20" Margin="3" >
17 <Image Width="14" Height="14" VerticalAlignment="Center" HorizontalAlignment="Center" Source="/SilverlightOOBDemo;component/Images/close.png" Stretch="None"/>
18 </Button>
19 </StackPanel>
20 </UserControl>
21
然后创建简单的哦OutofBrowserMainPage页面样式,调用上面新创建的WindowControls控件。由于这里基本都是基础布局代码,这里不再赘述,如果对Silverlight项目布局不熟悉的,请看这套系列教程“Expression Blend实例中文教程系列文章汇总 ”。
2 xmlns="http://schemas.microsoft.com/winfx/2006/xaml/presentation"
3 xmlns:x="http://schemas.microsoft.com/winfx/2006/xaml"
4 xmlns:d="http://schemas.microsoft.com/expression/blend/2008"
5 xmlns:mc="http://schemas.openxmlformats.org/markup-compatibility/2006"
6 xmlns:local ="clr-namespace:SilverlightOOBDemo"
7 mc:Ignorable="d"
8 d:DesignHeight="600" d:DesignWidth="900">
9
10 <Border CornerRadius="3" BorderThickness="7" BorderBrush="Black" Background="Gray" x:Name="lytRoot">
11
12 <Border CornerRadius="4" BorderBrush="Black" BorderThickness="3" Background="DarkGray" Margin="1">
13 <Grid x:Name="LayoutRoot">
14 <Grid.ColumnDefinitions>
15 <ColumnDefinition Width="325*" />
16 <ColumnDefinition Width="57*" />
17 </Grid.ColumnDefinitions>
18 <Grid.RowDefinitions>
19 <RowDefinition Height="24" />
20 <RowDefinition Height="*" />
21 </Grid.RowDefinitions>
22
23 <local:WindowControls HorizontalAlignment="Right" VerticalAlignment="Top" Grid.Column="1" />
24
25 <StackPanel Orientation="Horizontal" IsHitTestVisible="True" Background="DarkGray" >
26 <TextBlock Text="Silverlight OOB Demo" HorizontalAlignment="Left" VerticalAlignment="Top" Margin="10,0,0,0" FontSize="15" Height="24" Width="195"/>
27 </StackPanel>
28
29 <Grid Grid.Row="1" Grid.ColumnSpan="2" >
30
31 <Grid.Background>
32 <LinearGradientBrush EndPoint="0.5,1" StartPoint="0.5,0">
33 <GradientStop Color="#FF000000" Offset="0"/>
34 <GradientStop Color="#FF585858" Offset="1"/>
35 </LinearGradientBrush>
36 </Grid.Background>
37
38 </Grid>
39 </Grid>
40 </Border>
41 </Border>
42 </UserControl>
43
这样一个自定义的OOB应用窗口已经创建完毕了。运行看看,这里会提示Security Warning,这是由于我们选择了权限信任设置,Silverlight客户端会自动提醒用户是否授权安装该应用。这里微软提供了XAP签名验证,可以优化Security Warning窗口,让用户更容易接受和安装,这将在后文介绍,这里我们直接点击安装即可。

这时会弹出以下自定义OOB应用窗口:
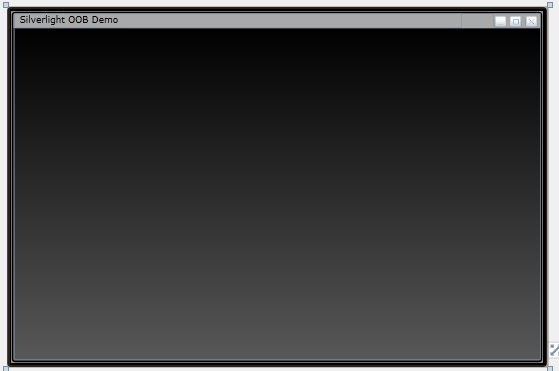
这样基本的Layout算是完成,而我们会发现,创建的自定义最大化,最小化和关闭控件都不能使用而且,窗口无法进行拖动。下面我们来添加一些代码来完善该自定义窗口。
最大化,最小化和关闭的功能实现
首先完善自定义最大化和最小化以及关闭控件的功能,进入WindowControl页面,添加简单代码即可实现上述功能,
2 {
3 bool maximized = false;
4
5 public WindowControls()
6 {
7 InitializeComponent();
8 }
9
10 /// <summary>
11 /// 窗口最大化控制
12 /// 欢迎访问我的博客:
13 /// http://jv9.cnblogs.com
14 /// </summary>
15 /// <param name="sender"></param>
16 /// <param name="e"></param>
17 private void btMaximize_Click(object sender, RoutedEventArgs e)
18 {
19 if (!maximized)
20 {
21 Application.Current.MainWindow.WindowState = WindowState.Maximized;
22 maximized = true;
23 }
24 else
25 {
26 maximized = false;
27 Application.Current.MainWindow.WindowState = WindowState.Normal;
28 }
29 }
30
31 /// <summary>
32 /// 窗口关闭控制
33 /// </summary>
34 /// <param name="sender"></param>
35 /// <param name="e"></param>
36 private void btClose_Click(object sender, RoutedEventArgs e)
37 {
38 Application.Current.MainWindow.Close();
39 }
40
41 /// <summary>
42 /// 窗口最小化控制
43 /// </summary>
44 /// <param name="sender"></param>
45 /// <param name="e"></param>
46 private void btMinimize_Click(object sender, RoutedEventArgs e)
47 {
48 Application.Current.MainWindow.WindowState = WindowState.Minimized;
49 }
50
51 }
主窗口位置拖拽功能实现
而对于OOB应用主窗口的拖拽,则需要在OutofBrowserMainPage中添加简单代码即可实现,代码如下:
首先声明实例获取当前主窗口
然后在窗口头部灰色区域创建鼠标响应事件,
![]()
2 <TextBlock Text="Silverlight OOB Demo" HorizontalAlignment="Left" VerticalAlignment="Top" Margin="10,0,0,0" FontSize="15" Height="24" Width="195"/>
3 </StackPanel>
在StackPanel_MouseLeftButtonDown事件中添加简单的控制代码即可实现OOB应用主窗口位置移动拖拽。
2 {
3 OOBWindow.DragMove();
4 }
主窗口尺寸修改实现
对于Windows窗口而言,修改窗口尺寸大小属于基本功能,在Silverlight的Out of Browser中,同样有相对应的API可以实现窗口尺寸修改,方法如下:
和上面相同,我们将创建一个独立的控件页面WindowResize,其中使用Path创建一个简单的拖拽图标![]() ,
,
2 xmlns="http://schemas.microsoft.com/winfx/2006/xaml/presentation"
3 xmlns:x="http://schemas.microsoft.com/winfx/2006/xaml"
4 xmlns:d="http://schemas.microsoft.com/expression/blend/2008"
5 xmlns:mc="http://schemas.openxmlformats.org/markup-compatibility/2006"
6 mc:Ignorable="d"
7 d:DesignHeight="300" d:DesignWidth="400" MouseEnter="UserControl_MouseEnter" MouseLeave="UserControl_MouseLeave">
8
9 <Border x:Name="LayoutRoot" BorderThickness="0" HorizontalAlignment="Right" VerticalAlignment="Bottom" Width="20" Height="20" Margin="0,0,-2,-2">
10 <Path x:Name="ptResize" Margin="6,6,0,0" Cursor="SizeNWSE" MouseLeftButtonDown="ptResize_MouseLeftButtonDown"
11 Data="M 8,0 L10,0 L10,2 L8,2 Z M 4,4 L6,4 L6,6 L4,6 Z M 8,4 L10,4 L10,6 L8,6 Z M0,8 L2,8 L2,10 L0,10 Z M4,8 L6,8 L6,10 L4,10 Z M8,8 L10,8 L10,10 L8,10 Z"Fill="Gray"/>
12 </Border>
13 </UserControl>
14
为了响应拖拽修改窗口尺寸,需要创建鼠标响应事件MouseLeftButtonDown,在事件中,调用Silverlight API,
2 {
3 public WindowResize()
4 {
5 InitializeComponent();
6 }
7
8 /// <summary>
9 /// 修改主窗口尺寸
10 /// </summary>
11 /// <param name="sender"></param>
12 /// <param name="e"></param>
13 private void ptResize_MouseLeftButtonDown(object sender, MouseButtonEventArgs e)
14 {
15 Application.Current.MainWindow.DragResize(WindowResizeEdge.BottomRight);
16 }
17
18 private void UserControl_MouseEnter(object sender, MouseEventArgs e)
19 {
20 this.Cursor = Cursors.SizeNWSE;
21 }
22
23 private void UserControl_MouseLeave(object sender, MouseEventArgs e)
24 {
25 this.Cursor = Cursors.Arrow;
26 }
27 }
这样该控件已经可以实现修改OOB应用主窗口尺寸大小,将该控件添加到OutofBrowserMainPage即可使用。
通过上面步骤的介绍,我们已经创建了一个完整的简单的Silverlight OOB自定义窗口应用。以上所有功能都是Silverlight 4的API提供。如果你在项目中需要更多的自定义功能,你可以通过继承Silverlight基类创建更为灵活和强大的自定义OOB控件。在微软官方提供了一套开源的创建自定义Out of Browser应用项目,如果感兴趣,大家可以下载该项目参考学习。
今天就写到这了,如果您在阅读中发现问题或者有好的建议,请您给我留言,在这里提前感谢您的支持和帮助。
欢迎大家加入"专注Silverlight" 技术讨论群: