购物车中的一项功能是持久化,就是我们关掉APP,下次进入后,还是可以显示出我们放入购物车的商品。
Flutter提供了三种持久化工具,数据库sqflite、shared_preferences、文件file。
但是这些商品不和后台进行数据交互,前台如果使用sqflite又显得太重,还要懂SQL知识。所以在购物车页面我们采用shared_preferences来进行持久化,它是简单的键-值的操作。
认识shared_preferences
shared_preferences是一个Flutter官方出的插件,它的主要作用就是可以key-value的形式来进行APP可客户端的持久化。
GitHub地址:https://github.com/flutter/plugins/tree/master/packages/shared_preferences
项目包依赖设置
既然是插件,使用前需要在pubspec.yaml里进行依赖设置,直接在dependencies里加入下面的代码:
shared_preferences: ^0.5.3+4
注意使用最新版本。
shared_preferences 增加方法
先来看看shared_preferences如何进行增加所存储的key-value值。删除购物车页面以前的代码,在这个页面进行新知识的学习。
先引入几个必要的包,使用shared_preferences前是要用import进行引入的。
import 'package:flutter/material.dart';
import 'package:shared_preferences/shared_preferences.dart';
然后用快速生成的方法stful,生成一个StatefulWidget类,起类名叫CartPage。在类里声明一个变量testList。
List<String> testList =[];
此时代码如下:
import 'package:flutter/material.dart';
import 'package:shared_preferences/shared_preferences.dart';


class CartPage extends StatefulWidget {
  @override
  _CartPageState createState() => _CartPageState();
}

class _CartPageState extends State<CartPage> {

  List<String> testList =[];
  @override
  Widget build(BuildContext context) {
    return Container(

    );
  }
}
编写增加方法
我们在类里声明一个内部方法add,代码如下:
void _add() async {
      SharedPreferences prefs = await SharedPreferences.getInstance(); //初始化

      String temp="my是最棒的!!!";
      testList.add(temp);
      prefs.setStringList('testInfo', testList);
      _show();
  }
编写显示方法
void _show() async{
    SharedPreferences prefs = await SharedPreferences.getInstance(); //初始化

    setState(() {
        if(prefs.getStringList('testInfo')!=null){
            testList=prefs.getStringList('testInfo');
        }

    });
  }
编写删除方法
void _clear() async{
    SharedPreferences prefs = await SharedPreferences.getInstance(); //初始化
    //prefs.clear(); //全部清空
    prefs.remove('testInfo'); //删除key键
    setState((){
      testList=[];
    });
  }
增加修改用set方法,查询用get, 删除是clear和remove方法。
build方法编写
有了这些方法,我们只要在build里加入一个ListView再加上两个按钮就可以了。
@override
  Widget build(BuildContext context) {
    _show();  //每次进入前进行显示
    return Container(

      child:Column(
        children: <Widget>[
          Container(
            height: 500.0,
            child: ListView.builder(
                itemCount:testList.length ,
                itemBuilder: (context,index){
                  return ListTile(
                    title: Text(testList[index]),
                  );
                },
              ) ,
          ),

          RaisedButton(
            onPressed: (){_add();},
            child: Text('增加'),
          ),
          RaisedButton(
            onPressed: (){_clear();},
            child: Text('清空'),
          ),
        ],
      )

    );
  }
这样就完成了所有代码的编写,通过简单的例子学会shared_preferences的增删改查操作。
完成代码如下:
import 'package:flutter/material.dart';
import 'package:shared_preferences/shared_preferences.dart';

class CartPage extends StatefulWidget {
  @override
  _CartPageState createState() => _CartPageState();
}

class _CartPageState extends State<CartPage> {
  List<String> testList = [];
  @override
  Widget build(BuildContext context) {
    _show();  //每次进入前进行显示
    return Container(
      child: Column(
        children: <Widget>[
          Container(
            height: 500.0,
            child: ListView.builder(
              itemCount: testList.length,
              itemBuilder: (context,index){
                return ListTile(
                  title: Text(testList[index]),
                );
              },
            ),
          ),

          RaisedButton(
            onPressed: (){_add();},
            child: Text('增加'),
          ),
          RaisedButton(
            onPressed: (){_clear();},
            child: Text('清空'),
          )
        ],
      ),
    );
  }

  //增加方法
  void _add() async{
    SharedPreferences prefs=await SharedPreferences.getInstance(); //初始化
    String temp = 'my是最棒哒!!!!!';
    testList.add(temp);
    prefs.setStringList('testInfo', testList);
    _show();
  }
  //查询显示
  void _show() async{
     SharedPreferences prefs=await SharedPreferences.getInstance(); //初始化
     if(prefs.getStringList('testInfo')!=null){ //查询get
       setState(() {
        testList = prefs.getStringList('testInfo');
       });
     }
  }
  //删除
  void _clear() async{
    SharedPreferences prefs=await SharedPreferences.getInstance(); //初始化
     //prefs.clear();//全部删除
    prefs.remove('testInfo'); //删除指定key键
    setState(() {
     testList = [];
    });
   }

}
运行后的结果:
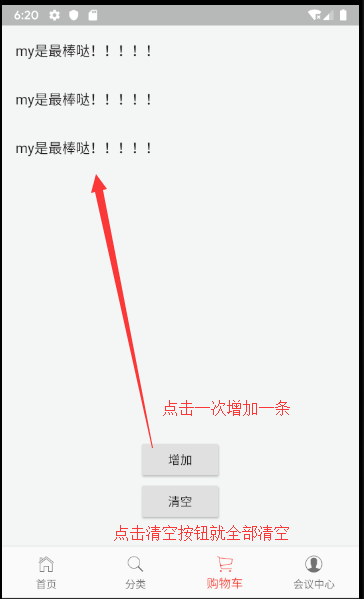
这时退出运行,页可以在终端内输入q就是退出了。
然后重新运行flutter run,发现刚才添加的三条数据还在,持久化成功。