Where are the logs?
Whatare needed to debug Bluetooth?
- Overview of bluetooth stacks architecture.
- You should know which layer has issue.
- Read Bluetooth specification careful if you need.
- Cross analyze logs, codes and spec.
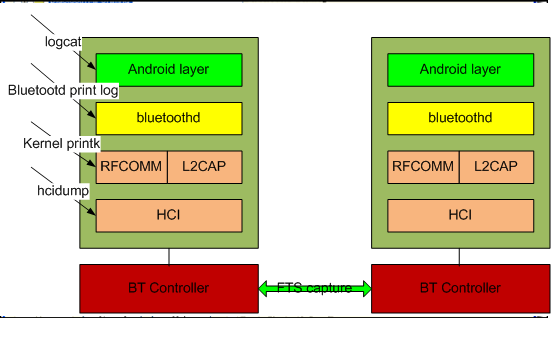
There are hcidump, air sniffer log, Bluetooth kernel stack log, bluetoothd print log and android logcat. In general case, they are needed to debug Bluetooth issues.
The figure like this:
How touse frontline to capture the Bluetooth air log?
Introduction
FTS4BT™ is a PC‐based, Bluetooth® protocol analyzer that displaysclassic Bluetooth data in Frontline's intuitive display, simplifying andaccelerating the debugging process.
1. Hardware.
Purchasethem from frontline companyJ
1. Software
DownloadFTS4BT from:
http://www.fte.com/support/CPAS-download.aspx?demo=FTS4BT&iid=16
2. Installthe FTS4BT.
1) Plug in the FTS dongle into computer.
2) Pls install the FTS4BT, it is very easy.
OPENING/SELECTING DATA CAPTURE METHOD
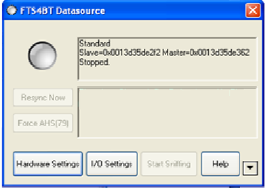
Nowthat the devices are on, the ComProbe positioned correctly, the next step is toopen FTS4BT and select the data capture method.
1. Open "Frontline FTS4BT"from the Start menu or from the Desktop folder.
Select"Frontline FTS4BT".
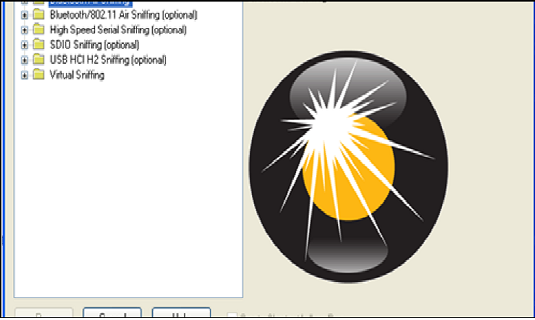
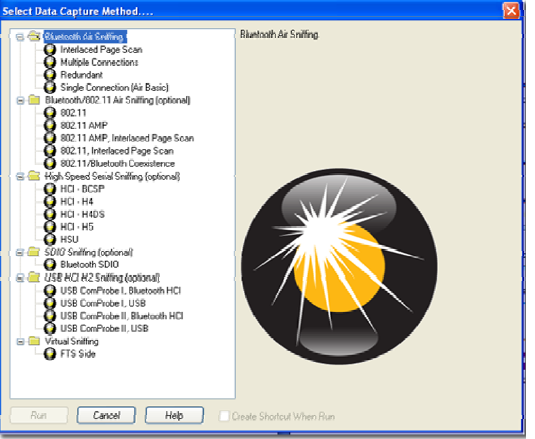
1. Select "Single Connection(Air Basic)".
Select"Run".
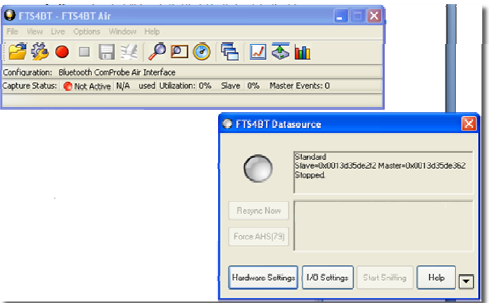
HARDWARE SETTINGS
Select"Hardware Settings"
Choose a Bluetooth® ComProbe® device.
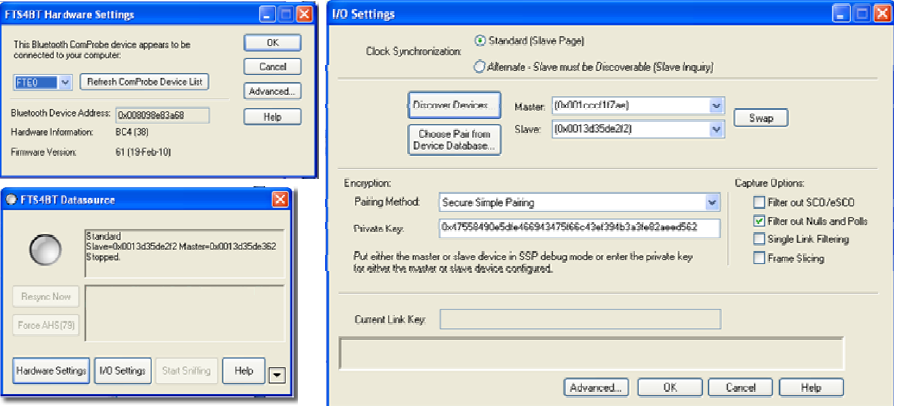
I/O SETTINGS
Turn on Devices
Beforeyou actually configure I/O Settings, you have to turn on the devices that youwant to test.
1. Make the device(s) discoverable.The process will be different for every device.
IMPORTANT NOTE: If youcan’t make your device discoverable, the BD_ADDR may be entered manually. Youwill have the chance to do that later in the process.
ClockSynchronization
TheBluetooth analyzer needs to know how to synchronize with the piconet.The analyzer supports two Synchronization Modes: Standard (Slave Page) andAlternate – Slave must be Discoverable (Slave Inquiry)
1. Select Standard (Slave Page)
This is thepreferred synchronization mode to use. This is how Frontline learns the clockof a device that is NOT discoverable. For example, after a phone and a headsethave paired, often the headset will not be discoverable. If the headset is aslave device and it is not discoverable, then FTS4BT will not be able tosynchronize to that device using Slave Inquiry mode. If we know the headset(slave) BD‐ADDR then by using SlavePage mode, FTS4BT will be able to page the device, (but will never complete theconnection during the page session). Once FTS4BT learns the clock informationduring the paging process, FTS4BT will discontinue the paging process and willnow be synchronized to the undiscoverable slave’s clock.
SlavePage is highly recommended, especially when the link is encrypted
SynchronizationDevice
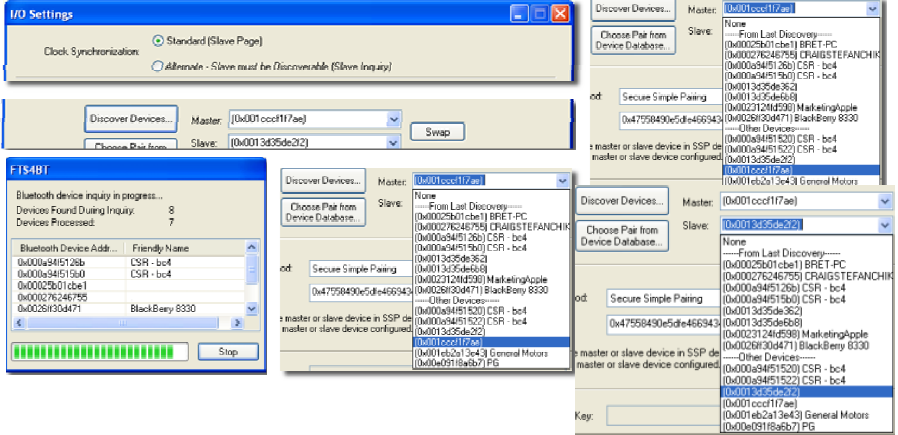
NowFTS4BT needs to know the Bluetooth Device Address (BD_ADDR) of thesynchronizing devices.
2. Select the "DiscoverDevices" button
FTS4BTwill go out and locate all the discoverable Bluetooth devices. The devices that you made discoverable a few moments ago should appear in the list
1. Click on the drop‐down arrow for Master and select the device address for the telephone
1. Click on the drop‐down arrow for Slave and select the device address for the ear piece
It'simportant to remember here that the Master is always the device which initiatesthe connection.
Click on the drop‐down arrow for Slave and select the deviceaddress for the ear piece
Encryption
Once you have identified the Master and Slave, the next step is tochoose encryption.
l None
l PINCode (ASCII)
l PINCode (Hex)
l LinkKey
l First,you can choose "None" as the encryption method when neither of thedevices has encryption enabled.
l Thesecond and third ways are to use a PIN Code to generate the Link Key. Thedevices generate link Keys during the Pairing Process based on a PIN Code. TheLink Key generated from this process is also based on a random number so thesecurity cannot be compromised. If the analyzer is given the PIN Code it candetermine the Link Key using the same algorithm. Since the analyzer also needsthe random number, the analyzer must catch the entire Pairing Process or elseit cannot generate the Link Key and decode the data.
l Fourth,if you know the Link Key in advance you may enter it directly. Select LinkKey in the Encryption list and then enter the Link Key in the edit box. Ifthe link key is already in the database, the Link Key is automatically enteredin the edit box after the Master and Slave have been selected. You can alsopick Choose Pair from Device Database to select a Master, Slave and LinkKey from the Device Database.
1. Select "PIN Code(ASCII)"
2. Enter the "ASCII PINCode"
3. Click OK to close I/OSettings
4. Start the pairing process betweenthe devices. The pairing process will vary from device to device
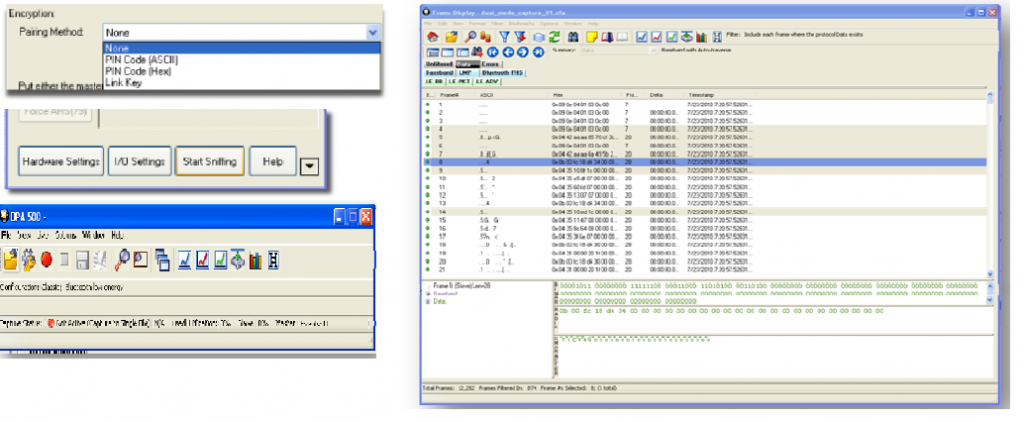
START SNIFFING
ANALYZING DATA
Control Window
FrameDisplay
Clickframe display icon,
How touse hcidump?
DESCRIPTION
hcidump reads raw HCI data coming from and going to aBluetooth device
(which canbe specified with the option -i, default is the first avail-
able one) and prints to screen commands,events and data in a human-
readableform. Optionally, the dump can be written to a file rather
than parsed,and the dump file can be parsed in a subsequent moment.
OPTIONS
Usage:hcidump [OPTION...] [filter]
-i, --device=hci_dev HCI device
-l, --snap-len=len Snap len (in bytes)
-p, --psm=psm Default PSM
-m, --manufacturer=compid Default manufacturer
-w, --save-dump=file Save dump to a file
-r, --read-dump=file Read dump from a file
-d, --wait-dump=host Wait on a host and send
-t, --ts Display time stamps
-a, --ascii Dump data in ascii
-x, --hex Dump data in hex
-X, --ext Dump data in hex and ascii
-R, --raw Dump raw data
-C, --cmtp=psm PSM for CMTP
-H, --hcrp=psm PSM for HCRP
-O, --obex=channel Channel for OBEX
-P, --ppp=channel Channel for PPP
-D, --pppdump=file Extract PPP traffic
-A, --audio=file Extract SCO audio data
-Y, --novendor No vendor commands or events
-4, --ipv4 Use IPv4 as transport
-6 --ipv6 Use IPv6 astransport
-h, --help Give this help list
-v, --version Give version information
--usage Give a short usage message
USEAGE STEPS
1. Install hcidump on debug board.AtPC develop directory:
~/workspace/dkbtd-gingerbread$ adb pushout/target/product/dkb/system/xbin/hcidump /system/xbin/
2. Enable BT on debug board
3. Run “hcidump –w hci.cfa” atdebug board’s sdcard directory
4. Do your test
5. On PC side, pull out the hcidumpdata: $ adb pull /sdcard/hci.cfa ./
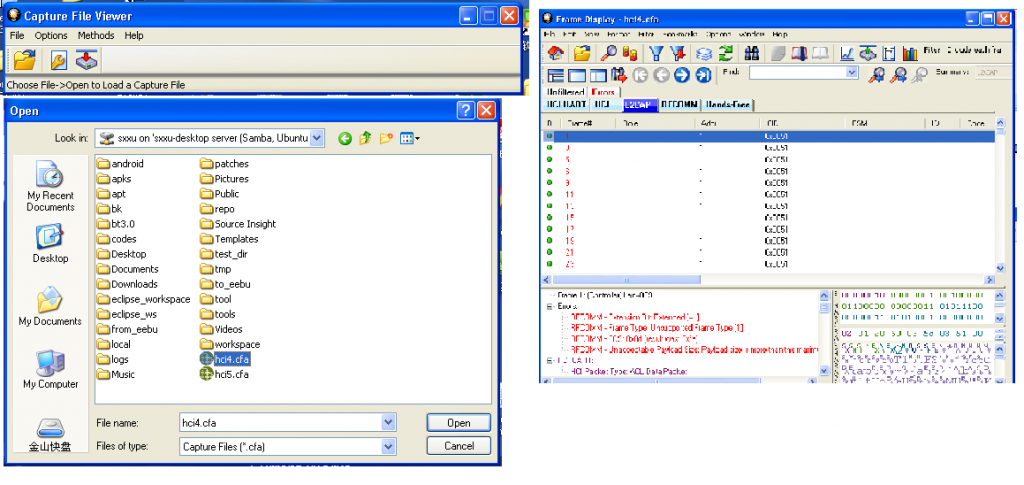
OpenFTS’s “Capture file viewer” from start menu ordesktop
1. Click open icon , choose your capture data file,like this:
Click show frame display icon ,
Showthe frames:
PS:
Ifyou don’t have FTS, you can check the hcidump data use “hcidump -r hci.cfa -tV”. There is a sample:
sxxu@sxxu-desktop:~/tmp$hcidump -r hci1.cfa -tV
HCIsniffer - Bluetooth packet analyzer ver 1.42
2000-01-0415:46:43.240234 < ACL data: handle 1 flags 0x00 dlen 12
2000-01-0415:46:43.240264 < HCI Command: Exit Sniff Mode (0x02|0x0004) plen 2
handle 1
2000-01-0415:46:43.247741 > HCI Event: Command Status (0x0f) plen 4
Exit Sniff Mode (0x02|0x0004) status 0x00ncmd 1
2000-01-0415:46:43.384490 > HCI Event: Number of Completed Packets (0x13) plen 5
handle 1 packets 1
2000-01-0415:46:43.388122 > ACL data: handle 1 flags 0x02 dlen 16
L2CAP(s): Connect rsp: dcid 0x005f scid0x0041 result 1 status 2
Connection pending - Authorizationpending
2000-01-0415:46:43.390136 > HCI Event: Mode Change (0x14) plen 6
status 0x00 handle 1 mode 0x00 interval 0
Mode: Active
2000-01-0415:46:43.398040 > ACL data: handle 1 flags 0x02 dlen 16
L2CAP(s): Connect rsp: dcid 0x005f scid 0x0041result 0 status 0
Connection successful
2000-01-0415:46:43.398101 < ACL data: handle 1 flags 0x00 dlen 16
2000-01-0415:46:43.400512 > HCI Event: Number of Completed Packets (0x13) plen 5
handle 1 packets 1
2000-01-0415:46:43.407409 > ACL data: handle 1 flags 0x02 dlen 14
L2CAP(s): Config rsp: scid 0x0041 flags0x00 result 0 clen 0
Success
2000-01-0415:46:43.407958 > ACL data: handle 1 flags 0x02 dlen 16
L2CAP(s): Config req: dcid 0x0041 flags0x00 clen 4
MTU 1013
How tocapture the bluez print log?
LogcatalsoJ
How toseparate the logs?