1. 安装MongoDB并启动服务,安装PyMongo
2. 连接MongoDB,并指定连接数据库、集合
import pymongo

client = pymongo.MongoClient(host='localhost', port=27017)
client = MongoClient('mongodb://localhost:27017/')

db = client.test
db = client['test']

collection = db.students
collection = db['students']
3. 插入
student = {
    'id': '20170101',
    'name': 'Jordan',
    'age': 20,
    'gender': 'male'
}
'''
result = collection.insert(student)
print(result) #5932a68615c2606814c91f3d
result = collection.insert([student, student])
print(result) #[ObjectId('5932a80115c2606a59e8a048'), ObjectId('5932a80115c2606a59e8a049')]
'''
#PyMongo 3.x版本中推荐使用 insert_one、insert_many
result = collection.insert_one(student)
print(result.inserted_id)
result = collection.insert_many([student, student])
print(result.inserted_ids)
4. 查询
result = collection.find_one({'name': 'Mike'})
print(type(result)) #<class 'dict'>
print(result)
from bson.objectid import ObjectId
result = collection.find_one({'_id': ObjectId('593278c115c2602667ec6bae')}) #查询指定id结果
print(result)
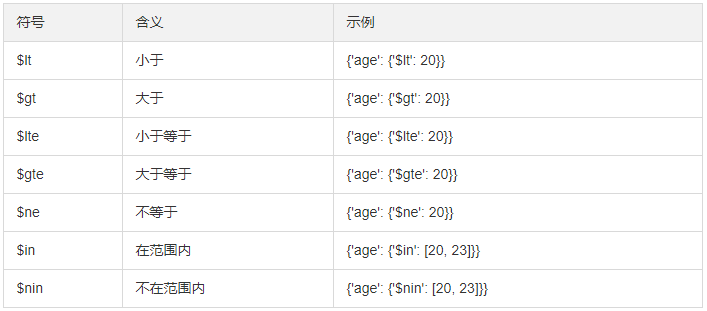
results = collection.find({'age': 20}) #等值查询
results = collection.find({'age': {'$gt': 20}}) #大于20
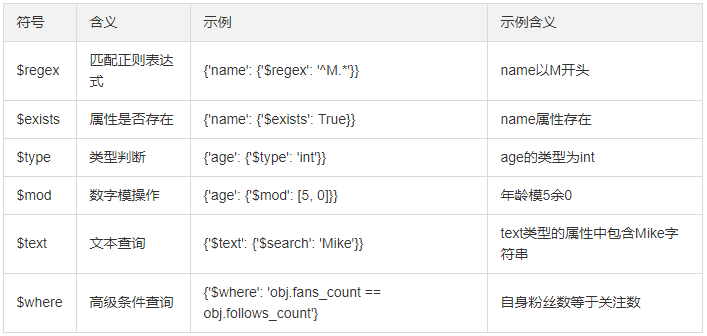
results = collection.find({'name': {'$regex': '^M.*'}}) #正则,M开头
print(results) #cursor对象,相当于生成器
for result in results:
print(result)
5. 计数
count = collection.find().count()
count = collection.find({'age': 20}).count()
print(count)
6. 排序
results = collection.find().sort('name', pymongo.ASCENDING)  #DESCENDING
print([result['name'] for result in results])
7. 偏移
''' 忽略前N个元素,取几条
注意:在数据库数量非常庞大的时候,如千万、亿级别,最好不要使用大的偏移量来查询数据,
因为这样很可能导致内存溢出。最好记录上次_id用条件查询
'''
results = collection.find().sort('name', pymongo.ASCENDING).skip(2)
results = collection.find().sort('name', pymongo.ASCENDING).skip(2).limit(2)
print([result['name'] for result in results])
8. 更新
'''
首先指定查询条件,然后将数据查询出来,修改年龄后调用update()方法将原条件和修改后的数据传入。
condition = {'name': 'Kevin'}
student = collection.find_one(condition)
student['age'] = 25
result = collection.update(condition, student)
print(result)  #{'ok': 1, 'nModified': 1, 'n': 1, 'updatedExisting': True}

这样可以只更新student字典内存在的字段。如果原先还有其他字段,则不会更新,也不会删除。
而如果不用$set的话,则会把之前的数据全部用student字典替换;如果原本存在其他字段,则会被删除。
result = collection.update(condition, {'$set': student})
'''

# 推荐使用
condition = {'name': 'Kevin'}
student = collection.find_one(condition)
student['age'] = 26
result = collection.update_one(condition, {'$set': student})

condition = {'age': {'$gt': 20}}
result = collection.update_one(condition, {'$inc': {'age': 1}})  #年龄+1
#result = collection.update_many(condition, {'$inc': {'age': 1}})
print(result)
print(result.matched_count, result.modified_count)
9. 删除
'''result = collection.remove({'name': 'Kevin'})  #符合条件的所有记录'''
#推荐使用
result = collection.delete_one({'name': 'Kevin'})
result = collection.delete_many({'age': {'$lt': 25}})
print(result)
print(result.deleted_count)
10. 其他组合方法
create_index、create_indexes、drop_index
find_one_and_delete、find_one_and_replace、find_one_and_update
参考链接: