新冠疫情已经持续好几个月了,目前,我国疫情已经基本控制住了,而欧美国家正处于爆发期,我们会看到很多网站都提供了多种疫情统计图,今天我们使用 Python 的 pyecharts 框架来绘制一些比较常见的统计图。
玫瑰图
首先,我们来绘制前段时间比较火的南丁格尔玫瑰图,数据来源我们通过接口 `https://lab.isaaclin.cn/nCoV/zh` 来获取,我们取疫情中死亡人数超过 2000 的国家的数据,实现代码如下:
url = 'https://lab.isaaclin.cn/nCoV/api/area'
data_json = requests.get(url).json()
country_list = []
count_list = []
ds = {}
for item in data_json['results']:
    if item['countryEnglishName']:
        if item['deadCount'] is not None and item['countryName'] is not None:
            if int(item['deadCount']) > 2000:
                d = {item['countryName']:item['deadCount']}
                ds.update(d)
ds = dict(sorted(ds.items(), key = lambda k: k[1]))
# 名称有重复的,把国家名作为 key 吧
country_list = ds.keys()
count_list = ds.values()
# 随机颜色生成
def randomcolor(kind):
    colors = []
    for i in range(kind):
        colArr = ['1', '2', '3', '4', '5', '6', '7', '8', '9', 'A', 'B', 'C', 'D', 'E', 'F']
        color = ""
        for i in range(6):
            color += colArr[random.randint(0, 14)]
        colors.append("#" + color)
    return colors
color_series = randomcolor(len(count_list))
# 创建饼图
pie = Pie(init_opts=opts.InitOpts(width='800px', height='900px'))
# 添加数据
pie.add("", [list(z) for z in zip(country_list, count_list)],
        radius=['20%', '100%'],
        center=['60%', '65%'],
        rosetype='area')
# 设置全局配置
# pie.set_global_opts(title_opts=opts.TitleOpts(title='南丁格尔玫瑰图'),
#                     legend_opts=opts.LegendOpts(is_show=False))
# 设置全局配置项
pie.set_global_opts(title_opts=opts.TitleOpts(title='全球新冠疫情',subtitle='死亡人数超过
2000 的国家',
                                               title_textstyle_opts=opts.TextStyleOpts(font_size=15,color= '#0085c3'),
                                               subtitle_textstyle_opts= opts.TextStyleOpts(font_size=15,color= '#003399'),
                                               pos_right= 'center',pos_left= '53%',pos_top= '62%',pos_bottom='center'
                                              ),
                     legend_opts=opts.LegendOpts(is_show=False))
# 设置系列配置和颜色
pie.set_series_opts(label_opts=opts.LabelOpts(is_show=True, position='inside', font_size=12,
                                              formatter='{b}:{c}', font_style='italic',
                                              font_family='Microsoft YaHei'))
pie.set_colors(color_series)
pie.render('南丁格尔玫瑰图.html')
看一下效果图:

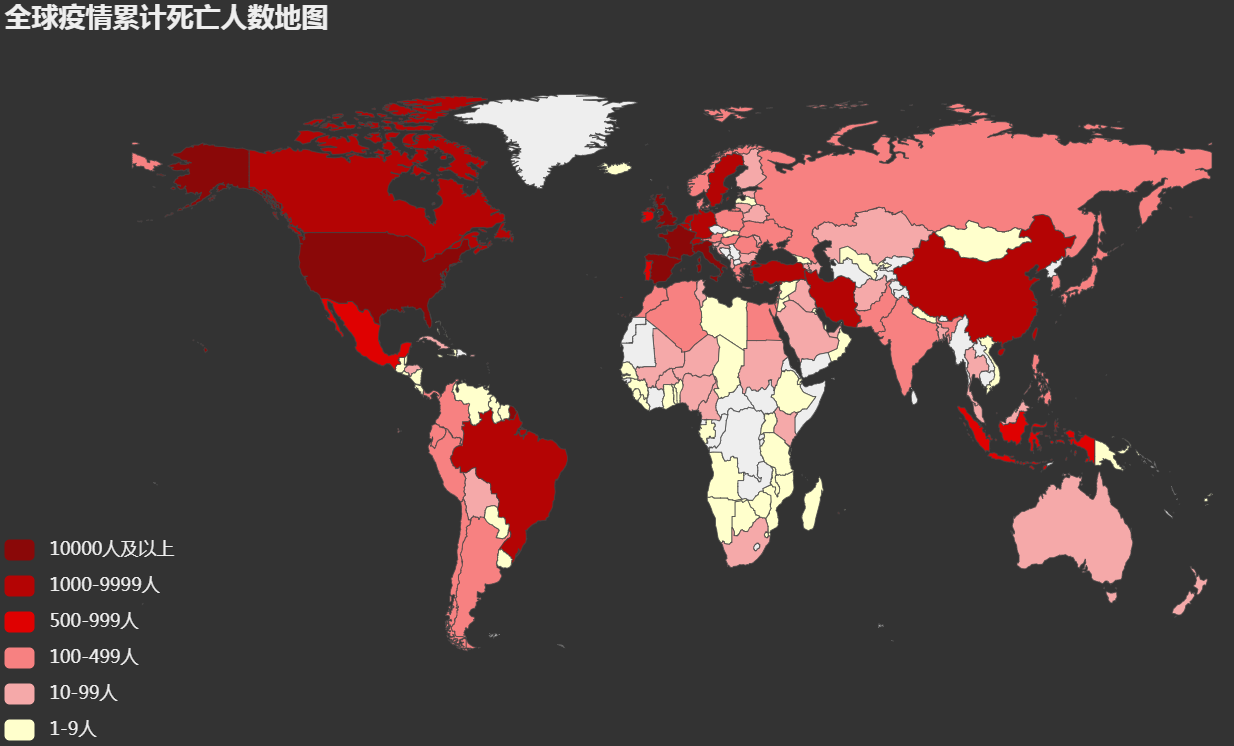
全球疫情地图
接着我们来绘制全球疫情地图,我们取各个国家的累计死亡人数的数据,代码实现如下所示:
url = 'https://lab.isaaclin.cn/nCoV/api/area'
data = requests.get(url).json()
oversea_confirm = []
for item in data['results']:
    if item['countryEnglishName']:
        oversea_confirm.append((item['countryEnglishName']
                                .replace('United States of America', 'United States')
                                .replace('United Kiongdom', 'United Kingdom'),
                                item['deadCount']))
world_map = (
        Map(init_opts=opts.InitOpts(theme='dark'))
        .add('累计死亡人数', oversea_confirm, 'world',is_map_symbol_show=False, is_roam=False)
        .set_series_opts(label_opts=opts.LabelOpts(is_show=False, color='#fff'))
        .set_global_opts(
            title_opts=opts.TitleOpts(title='全球疫情累计死亡人数地图'),
            legend_opts=opts.LegendOpts(is_show=False),
            visualmap_opts=opts.VisualMapOpts(max_=2700,
                                              is_piecewise=True,
                                              pieces=[
                                                {"max": 99999, "min": 10000, "label": "10000人及以上", "color": "#8A0808"},
                                                {"max": 9999, "min": 1000, "label": "1000-9999人", "color": "#B40404"},
                                                {"max": 999, "min": 500, "label": "500-999人", "color": "#DF0101"},
                                                {"max": 499, "min": 100, "label": "100-499人", "color": "#F78181"},
                                                {"max": 99, "min": 10, "label": "10-99人", "color": "#F5A9A9"},
                                                {"max": 9, "min": 0, "label": "1-9人", "color": "#FFFFCC"},
                                              ])
        )
    )
world_map.render(path='全球疫情地图.html')
看一下效果图:
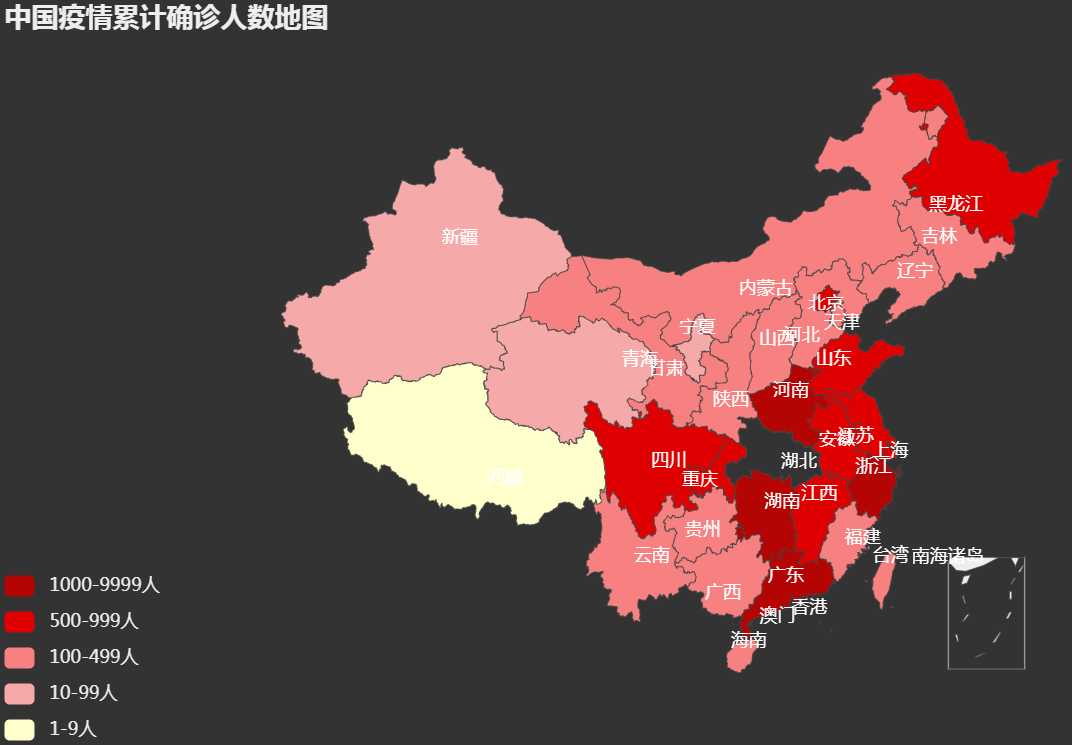
中国疫情地图
我们接着绘制我国的疫情地图,数据取各个省份累计确诊人数的数据,代码实现如下所示:
url = 'https://lab.isaaclin.cn/nCoV/api/area'
data = requests.get(url).json()
province_data = []
for item in data['results']:
    if item['countryName'] == '中国':
        province_data.append((item['provinceShortName'], item['confirmedCount']))
china_map = (
        Map(init_opts=opts.InitOpts(theme='dark'))
        .add('确诊人数', province_data, 'china',is_map_symbol_show=False,  is_roam=False)
        .set_series_opts(label_opts=opts.LabelOpts(is_show=True, color='#ffffff'))
        .set_global_opts(
            title_opts=opts.TitleOpts(title="中国疫情累计确诊人数地图"),
            legend_opts=opts.LegendOpts(is_show=False),
            visualmap_opts=opts.VisualMapOpts(max_=2000,
                                              is_piecewise=True,
                                              pieces=[
                                                  {"max": 9999, "min": 1000, "label": "1000-9999人", "color": "#B40404"},
                                                  {"max": 999, "min": 500, "label": "500-999人", "color": "#DF0101"},
                                                  {"max": 499, "min": 100, "label": "100-499人", "color": "#F78181"},
                                                  {"max": 99, "min": 10, "label": "10-99人", "color": "#F5A9A9"},
                                                  {"max": 9, "min": 0, "label": "1-9人", "color": "#FFFFCC"},
                                              ])
        )
)
china_map.render(path='中国疫情地图.html')
看一下效果图:
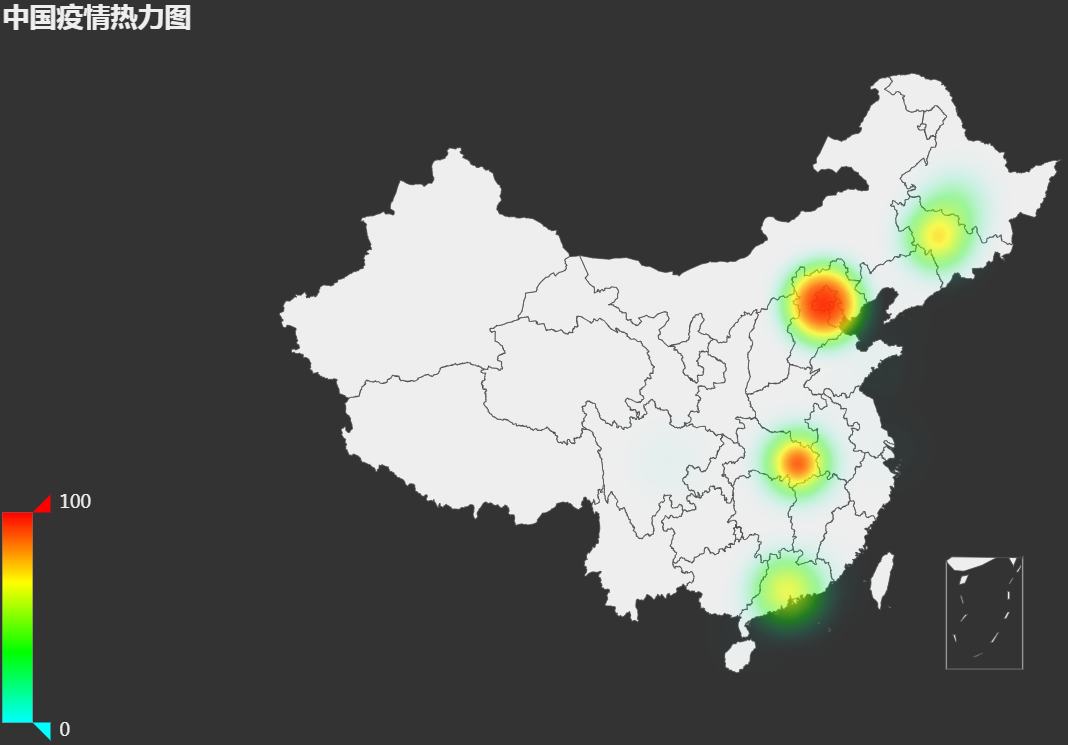
热力图
我们再接着来绘制热力图,我们还是取我国各个省份确诊的数据,实现代码如下所示:
url = 'https://lab.isaaclin.cn/nCoV/api/area'
data = requests.get(url).json()
cities_data = []
for item in data['results']:
    if item['countryName'] == '中国':
        if item['cities'] is not None:
            cities_data.extend(item['cities'])
hot_geo = (
        Geo(init_opts=opts.InitOpts(theme='dark'))
        .add_schema(maptype='china')
        .add('累计确诊人数',
             [(i['cityName'], i['currentConfirmedCount']) for i in cities_data
              if i['cityName'] in pyecharts.datasets.COORDINATES.keys()],
             type_='heatmap')
        .set_global_opts(
            title_opts=opts.TitleOpts(title='中国疫情热力图',
                                     pos_left='left'),
            legend_opts=opts.LegendOpts(is_show=False),
            visualmap_opts=opts.VisualMapOpts(is_show=True,
                                              is_piecewise=False,
                                              range_color=['#0ff', '#0f0', '#ff0', '#f00'])
        )
)
hot_geo.render(path='中国疫情热力图.html')
看一下效果图:
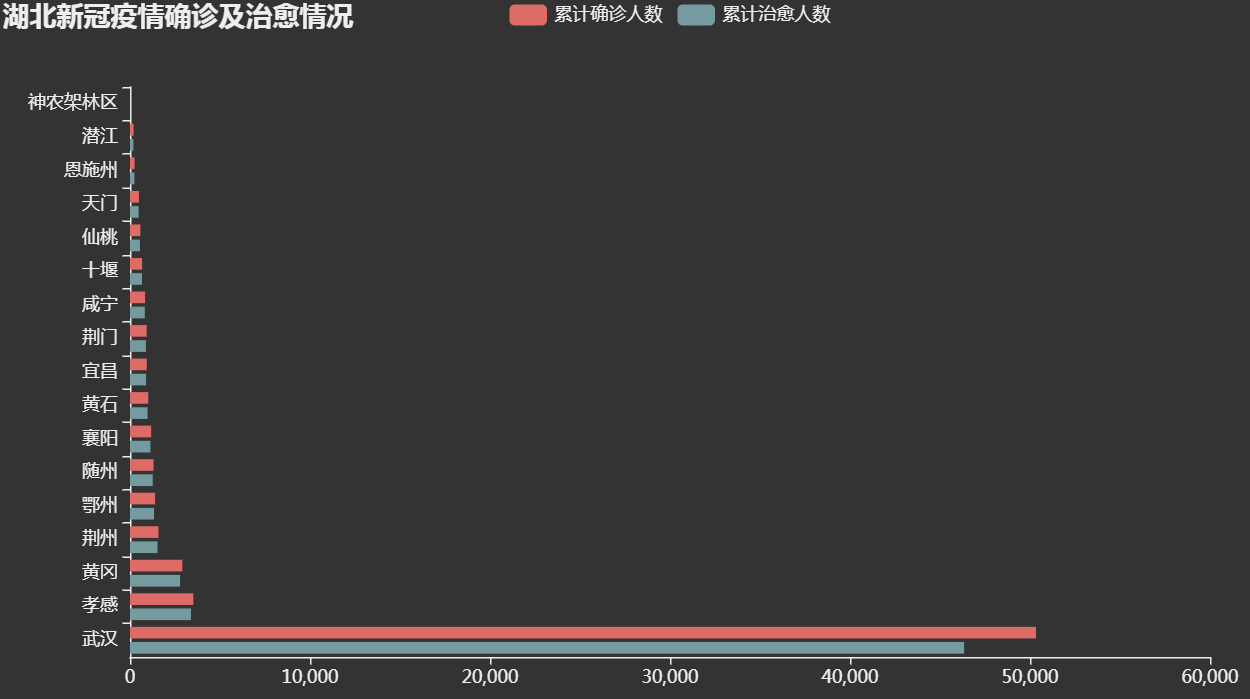
柱状图
我们接着来绘制柱状图,这次我们取一个省份的数据,因为湖北省确诊人数最多,我们就用这个省的数据吧,实现代码如下所示:
url = 'https://lab.isaaclin.cn/nCoV/api/area'
data = requests.get(url).json()
for item in data['results']:
    if item['provinceShortName'] == '湖北':
        hb_data = item['cities']
hb_bar = (
        Bar(init_opts=opts.InitOpts(theme='dark'))
        .add_xaxis([hd['cityName'] for hd in hb_data])
        .add_yaxis('累计确诊人数', [hd['confirmedCount'] for hd in hb_data])
        .add_yaxis('累计治愈人数', [hd['curedCount'] for hd in hb_data])
        .reversal_axis()
        .set_series_opts(label_opts=opts.LabelOpts(is_show=False))
        .set_global_opts(
            title_opts=opts.TitleOpts(title="湖北新冠疫情确诊及治愈情况"),
            legend_opts=opts.LegendOpts(is_show=True)
                )
        )
hb_bar.render(path='湖北新冠疫情图.html')
看一下效果图:
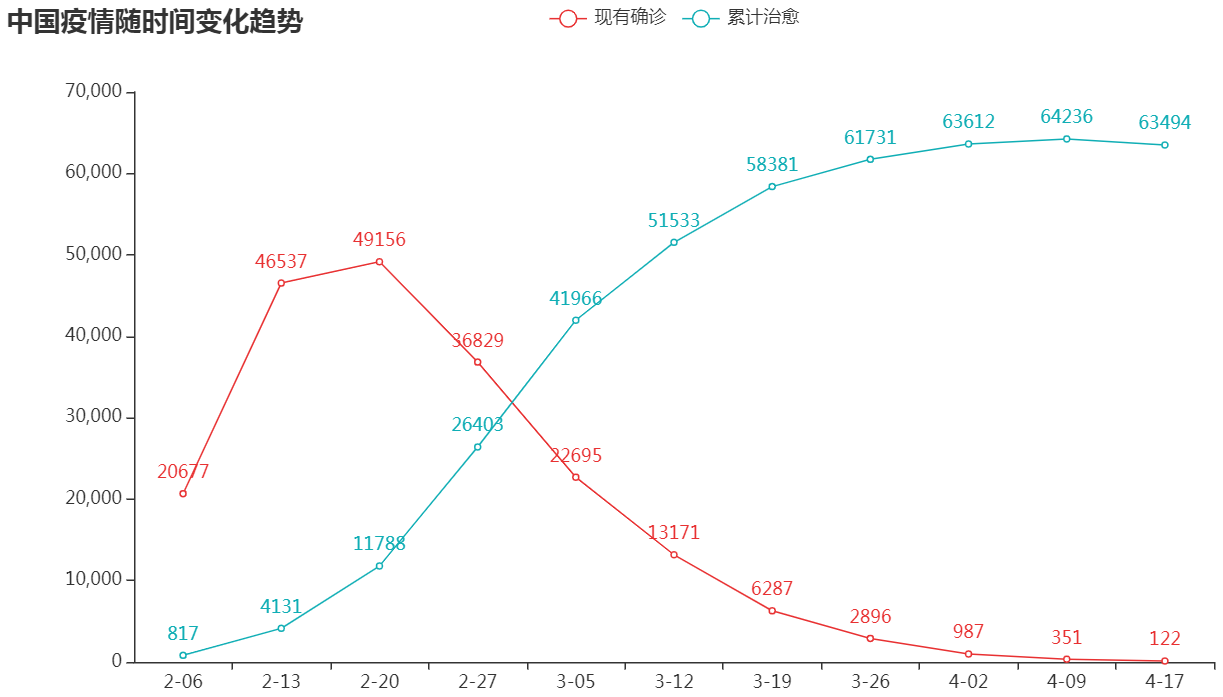
折线图
目前上面的接口已经不提供返回时间序列的数据了,但在 GitHub 上提供了数据仓库,有 JSON 和 CSV 两种格式,因 GitHub 网速太差,我尝试了几次也未能将数据下载下来,所以我们直接用微信上展示的数据吧,代码实现如下所示:
x_data = ['2-06', '2-13', '2-20', '2-27', '3-05', '3-12', '3-19', '3-26', '4-02', '4-09', '4-17']
# 现有确诊
y1_data = [20677, 46537, 49156, 36829, 22695, 13171, 6287, 2896, 987, 351, 122]
# 累计治愈
y2_data = [817, 4131, 11788, 26403, 41966, 51533, 58381, 61731, 63612, 64236, 63494]
line = (Line()
        .add_xaxis(x_data)
        .add_yaxis('现有确诊', y1_data, color='#10aeb5')
        .add_yaxis('累计治愈', y2_data, color='#e83132')
        .set_series_opts(label_opts=opts.LabelOpts(is_show=True))
        .set_global_opts(
            title_opts=opts.TitleOpts(title='中国疫情随时间变化趋势')
       ))

line.render(path='中国疫情折线图.html')
看一下效果图:
如果需要源码,可以扫描下面二维码,后台回复 200418 自行领取。